Using the Test Editor
When you create or open a test, test case, or shell test, it opens in the Test Editor. The Test Editor enables you to:
Record and edit test steps.
Add, copy, and delete test steps.
Create and edit test cases.
View both test and test case in a single view.
Debug tests.
This example shows the PTF Test Editor:
This example illustrates the PTF Test Editor. You can find definitions for the menus and controls later on in this section.
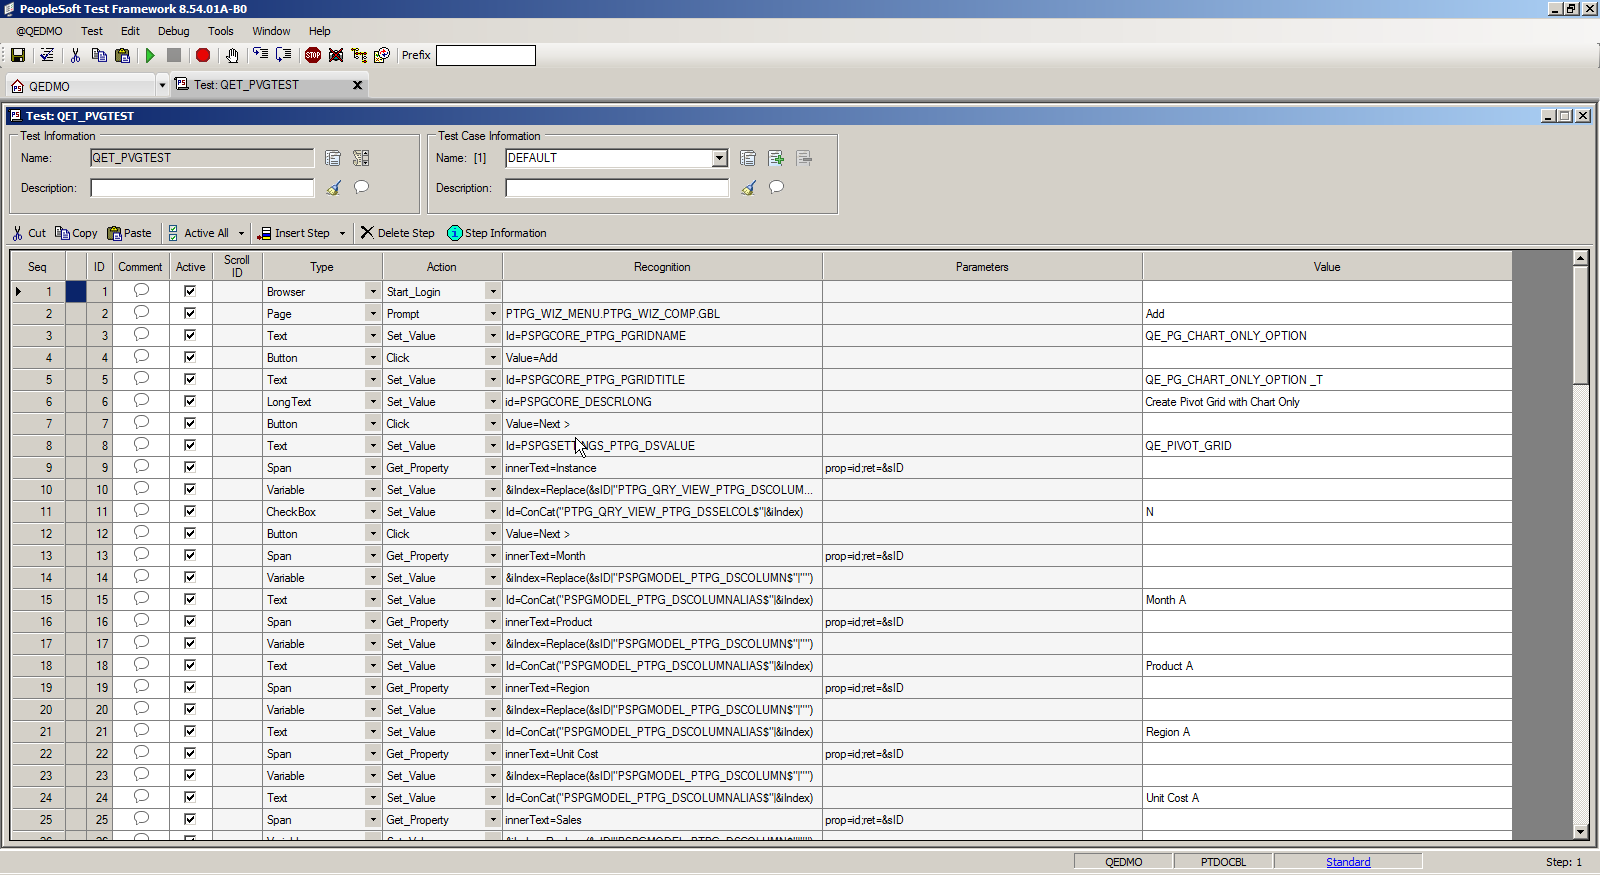
Note that many menu commands in the Test Editor are specific to the currently selected step.
Test Editor PTF Menu Commands
This table describes the Test Editor PTF menu commands:
|
PTF Menu Commands |
Usage |
|---|---|
|
Projects |
Opens the Projects dialog box. |
|
Local Options |
Open the Local Options dialog. |
|
Runtime Options |
Open the Runtime Options dialog. |
Test Editor Test Menu Commands
This table describes the Test Editor Test menu commands:
|
Test Menu Commands |
Usage |
|---|---|
|
Save |
Saves the current test. |
|
Save As |
Creates a copy of the current test with a new name. |
|
Test Case Save As |
Creates a test case as a copy of the current test case. |
|
Export |
Export test cases and test case values to a character-delimited text file, such as comma-separated values (csv) file. |
|
Import |
Import test cases and test case values from a character-delimited text file, such as comma-separated values (csv) file. |
|
Copy Link to Clipboard |
Copies a link to the test to the clipboard. You can send this information to another user, who can use the Window, Quick Open feature to open the test without having to navigate to it in PTF Explorer. |
|
Validate Test |
Validate the test against the application metadata to identify changes in the metadata since the test was last modified. As you modify a test based on the results of a test maintenance report, you can validate the test by running a test maintenance report. The report is generated for a single test, using analyses of compare reports generated in Step 2 of the Test Maintenance Wizard. |
|
Check Syntax |
Validates the parameter syntax and values. |
|
Run |
Runs the current test. |
|
Run from Step |
Runs the current test from the specified line number. |
|
Pause |
Pauses runtime of the test. |
|
End |
Stops runtime of the test. |
|
Open Test Recorder |
Launches the Test Recorder. |
Test Editor Edit Menu Commands
The Test Editor Edit menu contains standard Microsoft edit commands, such as Cut, Copy, Paste, and Delete, and the following PTF commands:
This table lists the additional PTF commands:
|
Edit Menu Command |
Usage |
|---|---|
|
Find |
Finds occurrences of a specific text string in the current test. Select the List all Matching Steps check box to create a list of matches. |
|
Again |
Searches for the Find string again. |
Test Editor Debug Menu Commands
This table describes Test Editor Debug menu commands:
|
Debug Menu Command |
Usage |
|---|---|
|
Step Into |
Runs the current step of the test and advances to the next step. |
|
Step Over |
Runs the current step of the test and advances to the next step, unless the next step calls another test. Steps over called tests. |
|
Toggle Break |
Sets a break point at the selected step or removes an existing breakpoint. |
|
Clear All Breaks |
Removes all break points. |
|
Stop on Error |
Stops runtime if the test encounters an error. Note: This option can be also be enabled through the command line. |
|
Disable Screen Shots |
By default, the recorder creates a screen shot with each error. Select this option to save space in the log by not creating screen shots. |
|
Highlight Errors |
Highlights errors in the log in yellow. |
|
Overwrite Log |
If a log window is open after the most recent runtime of a test, you can choose whether to append to the open log or overwrite the open log. Select this option to overwrite the open runtime log. |
|
Leave Browser Open |
Keeps the PTF-launched browser window open after running a test, to assist with debugging. Be aware that if many tests are run with this option enabled, performance may degrade as the webdrivers used by PTF consume memory. Use the Kill Leftover Drivers option if performance is impacted. Note: This option can be also be enabled through the command line. |
|
Terminate Existing Browsers |
Closes open Test Framework browser windows, to release the memory that is used by their associated web drivers. When the Leave Browser Open option is enabled, if performance issues arise, you can use Terminate Existing Browsers at any time to free up memory. |
Enabling Debug Options from the Command Line
You can enable the Stop on Error and Leave Browser Open debug options from the command line by using the -SOE and -LBO parameters respectively.
These parameters are used when you run a test from the command line using the PsTestFW command.
For Stop on Error (-SOE) parameter, you can specify True, False, or Not Set in the command line. The default value is Not Set.
The Stop on Error (-SOE) parameter is used as shown in the following example:
-CS=abc.us.oracle.com:443
-CUA=TRUE
-CO=VP1
-CP=VP1
-TST=TEST_KILL_1
-TC=DEFAULT
-PFX=
-RTO=LOCAL
-LOG=TEST_EXE.log
-SOE=TRUE
Note: Using Stop On Error (-SOE ) parameter in command line runtime will override the StopOnError runtime action in shell tests script.
The override works as follows:
If
-SOE=Truein command line andRuntime.StopOnError = Falsein shelltest, the command line runtime of the called test is stopped that encounters a Fail.If
-SOE=Falsein command line andRuntime.StopOnError = True or ALLin shelltest, the command line runtime of the called test will continue if it encounters a Fail.If
–SOEis not set, command line runtime of the called test will continue based on the setting ofRuntime.StopOnError.
For details on StopOnError runtime action, see Runtime.
For Leave Browser Open (-LBO) parameter, you can specify True or False in the command line. The default value is False.
All existing browsers will be terminated by default
before runtime when -LBO parameter
is set in command line parameters, unless the -TL parameter is used in command line
runtime.
The Leave Browser Open (-LBO) parameter is used as shown in the following example:
-CS=slc10ybf.us.oracle.com:443
-CUA=TRUE
-CO=VP1
-CP=VP1
-TST=TEST_KILL_1
-TC=DEFAULT
-PFX=
-RTO=LOCAL
-LOG=TEST_EXE.log
-LBO=TRUE
See Running Tests.
Test Editor Window Menu Commands
This table discusses the Test Editor Window menu commands:
|
Window Menu Command |
Usage |
|---|---|
|
Quick Open |
Using information from the Copy Link to Clipboard command, quickly opens a test without having to navigate to the log in PTF Explorer. You can also use this menu command to search for and open multiple tests, test cases, or text runtime logs. |
|
Close All |
Closes all windows. |
In addition to buttons for the standard Microsoft cut, copy, and paste commands, the test editor toolbar provides the following functions:
Field or Control |
Description |
|---|---|
|
Check Syntax |
|
Run test. |
|
End test. |
|
Show Test Recorder. |
|
Debug break. |
|
Step into. |
|
Step over. |
|
Stop on error. |
|
Disable screen shots. |
|
Highlight errors in the runtime log. |
|
Overwrite the open runtime log. |
|
Specify text that will be added to text fields when the test is run. The prefix text is substituted for the #PREFIX# reserved word in the Value field. Using a prefix can help prevent an error caused by a duplicate entry when the page is saved. |


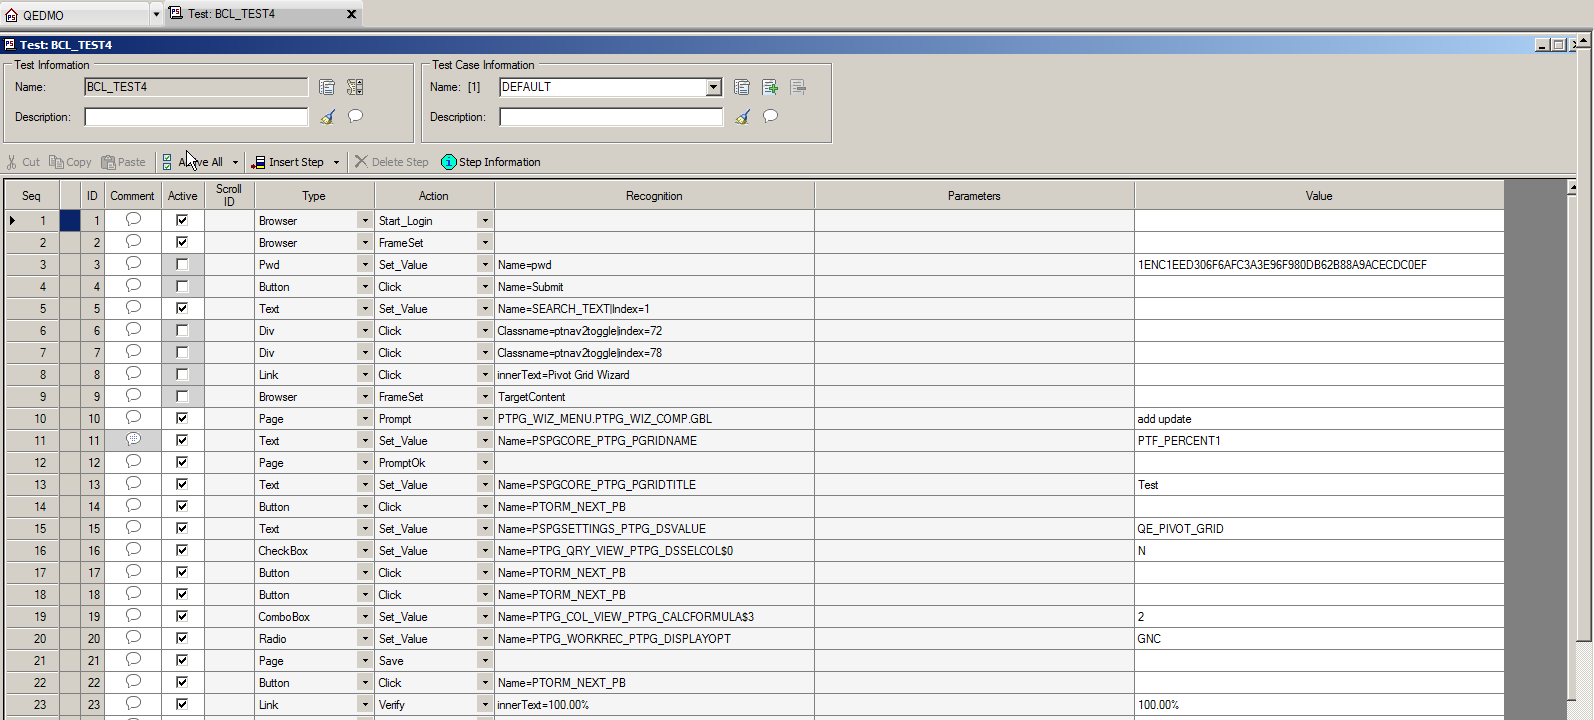
You can have multiple tests open in PTF. Each test has its own test window. This example shows a Test Editor test window:
This example illustrates the fields and controls on the Test Editor test window. You can find definitions for the fields and controls later on this page.
The following fields appear in the test window:
Test Information Fields
Field or Control |
Description |
|---|---|
Name |
Displays the test name. This field is display-only. |
Description |
Brief description of the test. You can enter a detailed description in the Comments. |
Test Information Functions
Field or Control |
Description |
|---|---|
|
Test Save As. |
|
Click to access the Message Recognition dialog box. Use the Message Recognition dialog box to define how PTF will respond to messages that are encountered during runtime of the test. The Message Recognition icon contains a check mark when the message recognition is enabled for the test. |
|
Open the Test Properties dialog. In the Language field, select the language for the PeopleSoft application. The default is English. Changing the value in the Language field only affects the language the test selects at sign in. It does not enable the test to run against a different language. PTF tests should be rund against the same language in which they were recorded. Select the Variable Action to use with this test. The variable action determines whether or not to use persistent variables. By default the action is set to None and persistent variables are not used. See Using Persistent Variables Select the Library Test check box to make the test a library test. See Using Library Tests. |
|
Open the Test Comments dialog to enter comments or to insert a timestamp. |


Using the Comments Editor
In the Comments dialog box, you can:
Enter a long description using rich text and images.
Insert a screen shot using the snapshot icon.
Insert timestamp.
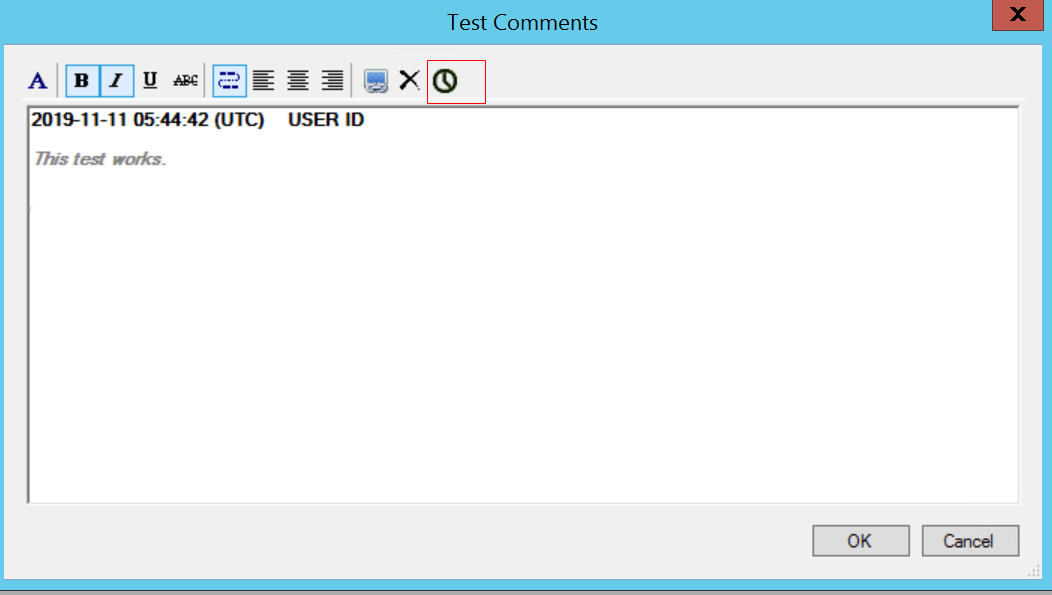
This example highlights the timestamp control on the Test Comments dialog box.
Field or Control |
Description |
|---|---|
|
Timestamp displays the current date, time, and user ID. Date and time follows ISO 8601 format, and uses UTC time zone. For example, 2018-12-10 14:30 (UTC) <User ID>. To insert timestamp, click the timestamp icon or press F5. |

Test Case Information Fields
Field or Control |
Description |
|---|---|
Name |
Displays the name of the current test case. You can select a different test case using the drop-down list. When you create a test, the system automatically associates it with a test case named DEFAULT. |
Description |
Brief description of the test case. You can enter a detailed description in the comments. |
Test Case Information Functions
Field or Control |
Description |
|---|---|
|
Test Case Save As. |
|
Create a new test case. |
|
Delete the selected test case. |
|
Open the Test Case Properties dialog. |
|
Open the Test Case Comments dialog. You can enter a long description of the test case using Rich Text and images. Apart from entering text, you can insert timestamp. See the preceding section, “Using the Comments Editor,” for details. |


In addition to buttons for the standard Microsoft cut, copy, and paste commands, the test window toolbar provides the following functions:
Field or Control |
Description |
|---|---|
|
Selects the Active check box for all steps. Click the drop-down arrow for additional step activation options, including:
|
|
Inserts a new, blank step below the current step. Click the drop-down arrow to insert the new step above the current step. |
|
Deletes the current step. |
|
Displays the Step Information dialog box showing the PeopleTools metadata associated with the object referenced in the step. See Using Step Information for more information. |


A PTF test consists of a series of steps. Each step in a test is composed of the following fields:
Field or Control |
Description |
|---|---|
Seq (sequence) |
A system-generated sequence number. Test steps run according to Seq order. When you move, add, or delete a step, Seq is refreshed. |
ID |
A system-generated unique identifier for each step in a test. This value does not change when you move, add, or delete a step. Test maintenance reports use the ID value. |
Comment |
When you click on the comment icon in the comment field a rich text editor opens that enables you to add detailed comments for each step. The comment field is gray when it contains a comment. |
Active |
Deselect this field to inactivate a step. PTF will skip inactive steps when the test runs. PTF syntax check is also skipped on inactive steps. Each step is active by default. This field is grayed for inactive steps. |
Scroll ID |
This field is only required for scroll handling. |
Type |
The step type. Often, the step type corresponds to the type of application object the step is to take an action on or to validate, such as Text, Check box, Browser, and so on. Other step types perform certain functions, such as running a test or query, setting a variable, or performing conditional processing. |
Action |
The action the test is to take . Each step type has a set of associated actions. The two most common actions used with a Text step type, for example, are Set and Verify. |
Recognition |
The means that PTF uses to identify the HTML object within the application. Often, this is the HTML ID property. |
Field Label |
Contains the label text of the page control referenced in the Recognition field. The value for the Show Field Label option in the Local Options dialog box determines whether this column appears:
For more information about setting local options, see Configuring Local Options. |
Parameters |
The conditions that apply to this specific step, if applicable. Note: This field was introduced in release 8.54; in previous releases, parameters were specified as part of the Recognition field. When you load and save a test from release 8.53 or lower, PTF automatically moves any parameters from the Recognition field to the Parameters field. |
Value |
In a typical recorded step, this is the value the tester entered for an object. In a step recorded in Verify mode, this would be the value that was present in the object when it was checked. Value is part of the test case, not the test itself. |