Using Connected Query Quick Start
The Connected Query Quick Start is a wizard that walks you through creating a simple connected query with a single parent query and a single child query linked using a set of related fields.
Note: The parent and child queries must exist and be visible in Query Manager before you can use them to create a connected query.
You cannot specify a child query in a connected query that is defined in a union.
Connected Query Quick Start is used only for creating new connected queries. You can edit existing connected queries using the Connected Query Manager page.
Connected query uses query security permissions for each of it member queries.
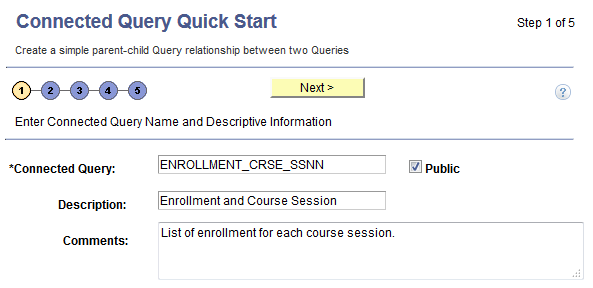
Use the Connected Query Quick Start - Step 1 (CQ_WZ_INFO) to enter a connected query name and descriptive information, and define ownership of the connected query.
Navigation:
This example illustrates the fields and controls on the Connected Query Quick Start - Step 1. Definitions for the fields and controls appear following the example.
Field or Control |
Description |
|---|---|
Connected Query |
This is a required field. Enter a name for the connected query. Note: The name of the connected query cannot be changed after you enter the name into the Select a Child Query page of a Connected Query Quick Start. Because Connected Query uses query name as an XML node, query names used in a Connected Query must follow these naming rules:
If a query name starts with an alpha or underscore [ _ ] character, the query node name in an XML file will be the same as the query name. Otherwise, the query node name will be the query name with the prefix PS_. For example:
|
Public |
Indicate the query ownership. If the Public check box is selected, this connected query will be public. If the Public check box is not selected, this connected query will be private. Note: The ownership of the connected query cannot be changed after you enter data into the Select a Child Query page of a Connected Query Quick Start. |
Description |
(Optional) Enter a description for the connected query. |
Comments |
(Optional) Enter comments for the connected query. |
Next |
Note: The Next button is available after you enter the name of the connected query in the Connected Query field and move to any other field. Click to advance the wizard to the next page. |
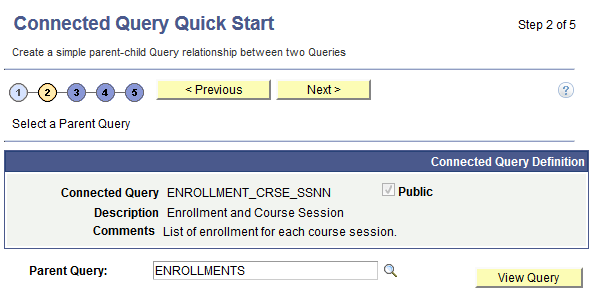
Use the Connected Query Quick Start - Step 2 (CQ_WZ_PARENT) to select an existing query to use as the parent query.
Navigation:
Select
Enter a connected query and descriptive information, and click the Next button.
This example illustrates the fields and controls on the Connected Query Quick Start - Step 2. Definitions for the fields and controls appear following the example.
Field or Control |
Description |
|---|---|
Parent Query |
Click the query Lookup icon to select a parent query from a list of queries for which you have been granted access. Note: You must use the query Lookup icon to select a parent query and be able to move to the next page. |
View Query |
Click to open Query Manager component in read-only mode to view the query. |
Next |
This button becomes active after you select a parent query. Click to advance the wizard to the next page. |
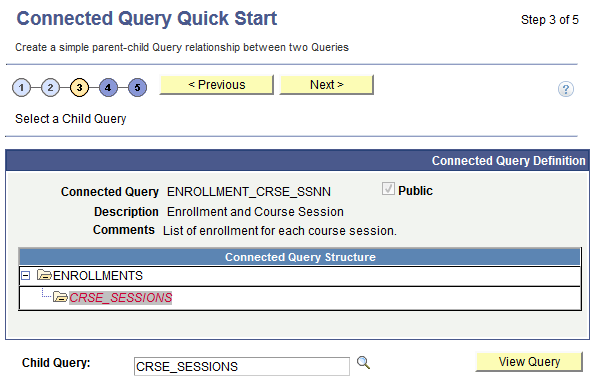
Use the Connected Query Quick Start - Step 3 (CQ_WZ_CHILDQRY) to select an existing query to use as the child query.
Navigation:
Select
Enter a connected query and descriptive information, and click the Next button.
Select an existing query to use as the parent query, and click the Next button.
This example illustrates the fields and controls on the Connected Query Quick Start - Step 3. Definitions for the fields and controls appear following the example.
Field or Control |
Description |
|---|---|
Child Query |
Click the query Lookup icon to select a child query from a list of queries for which you have been granted access. After you select a child query, its name appears in the Connected Query Structure section. |
View Query |
This button becomes active after you select a child query. Click to open Query Manager component in read-only mode to view the query. |
Next |
This button becomes active after you select a child query using the Lookup icon. Click to advance the wizard to the next page. |
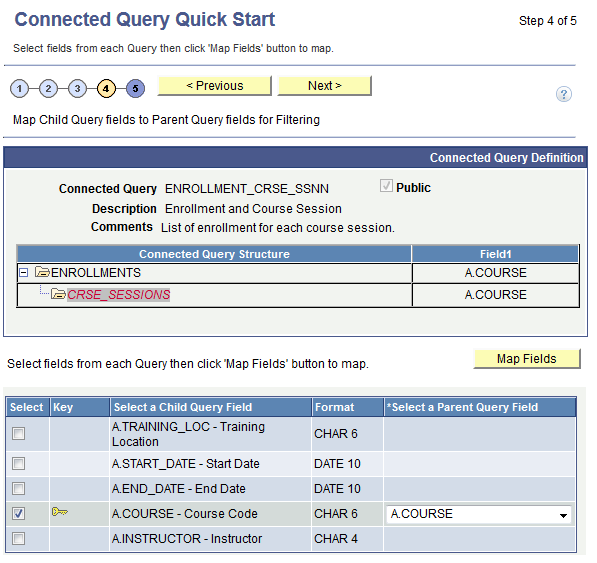
Use the Connected Query Quick Start - Step 4 (CQ_WZ_FLDMAP) to map query fields from a child query to corresponding fields from a parent query.
Navigation:
Select
Enter a connected query and descriptive information, and click the Next button.
Select an existing query to use as the parent query, and click the Next button.
Select an existing query to use as the child query, and click the Next button.
This example illustrates the fields and controls on the Connected Query Quick Start - Step 4. Definitions for the fields and controls appear following the example.
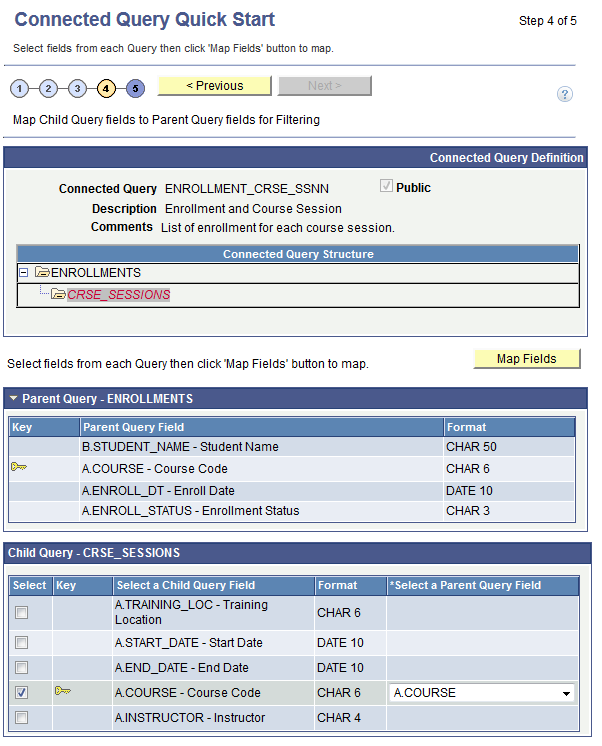
This page displays two sets of fields coming from parent and child queries:
The parent query section displays parent query fields and is for informational purposes only.
This section is collapsed by default and you have the option to expand it.
The child query section displays child query fields and enables the report developer to select one or more fields for mapping.
For each child query field selection, a drop-down list with possible parent query field lists appears. Those parent query field lists are filtered by compatible field data types. In some cases, Connected Query Manager uses smart thinking to map fields based on partial matching names but ultimate field matching is up to the user.
Field or Control |
Description |
|---|---|
Map Field |
Click to update the Connected Query structure. Note: The Fields column in the Connected Query Structure section displays the values that you just selected. |
Next |
This button becomes active after you select the fields for mapping and click the Map Fields button. Click to advance the wizard to the next page. |
This example illustrates the fields and controls on the Connected Query Quick Start - Step 4. Fields are mapped and Connected Query structure is updated.
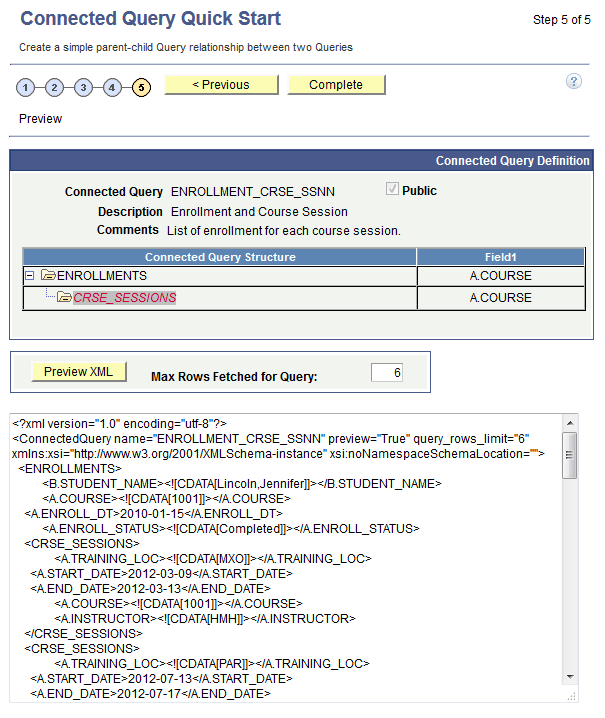
Report developers use the Connected Query Quick Start - Step 5 (CQ_WZ_PREVIEW) to review a new connected query and preview the results by running it in a preview mode with a limited number of rows returned from each query.
Navigation:
Select
Enter a connected query and descriptive information, and click the Next button.
Select an existing query to use as the parent query, and click the Next button.
Select an existing query to use as the child query, and click the Next button.
Map query fields from a child query to corresponding fields from a parent query, and click the Next button.
This example illustrates the fields and controls on the Connected Query Quick Start - Step 5. Definitions for the fields and controls appear following the example.
Field or Control |
Description |
|---|---|
Preview XML |
Click to display the formatted XML output for this connected query. XML output appears in a Preview mode, in the lower section of the Preview page. |
Max Rows Fetched For Query |
Enter the maximum number of rows to display in Preview mode by each member query. Note: You should limit the number of rows that are being fetched. The default value is 6. If you enter 0 or clear this text box, no row limits are imposed for a resulting XML, which can cause significant delay in getting results; and because the application runs in synchronized mode using the application server, you may get browser time-out or tuxedo time-out. |
Complete |
Click to transfer to Connected Query Manager page, where you can perform enhancements and save the connected query. Note: While working with a Connected Query Quick Start, you can modify your previous selections at any step by clicking the step number (in yellow or gray) icons. Changes in your selection could change a connection query structure. |
Note: In the Connected Query
Quick Start - Preview page, when XML that contains CDATA sections
is displayed at runtime, application users will see <![CDATA* and *]> in places
of <![CDATA[ and ]]>.