 Understanding Permission Lists
This chapter provides an overview of permission lists and discusses how to:
Manage permission lists.
Define permissions.
Understanding Permission Lists
Permission lists are the building blocks of user security authorizations. You typically create permission lists before you create user profiles and roles. When defining permission lists, however, consider the roles and user profiles with which you will use them. Recall that roles are intermediary objects between permission lists and users. You use roles to assign permissions to users dynamically.
Permission lists may contain any number of permissions, such as sign-in times, page permissions, web services permissions, and so on. Permission lists are more flexible and scalable when they contain fewer permissions.
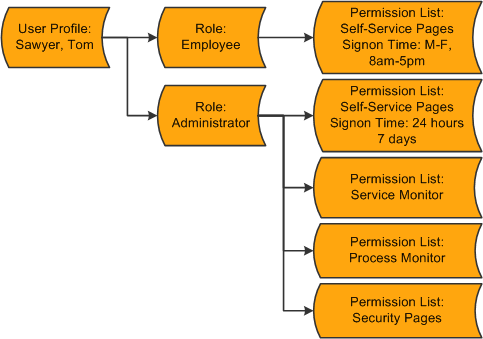
The following diagram illustrates how permission lists are assigned to roles, which are then assigned to user profiles. A role may contain numerous permissions, and a user profile may have numerous roles assigned to it. A user inherits all permissions assigned to each role to which the user belongs. User access is determined by the combination of all assigned roles.
Security definitions hierarchy showing how permissions flow to roles, which flow to user profiles
The diagram represents the security authorizations of Tom Sawyer. Mr. Sawyer inherits the five permission lists that are assigned to the two roles that are assigned to his user profile. In this example, he has access to the employee self-service pages, the service monitor, PeopleSoft Process Monitor, and PeopleTools Security. If Tom were to become a manager, then the permission lists assigned to the Manager role would be added to his profile.
Theoretically, you could create a permission list tailored for every role, and that permission list could contain a permission for every category, from General to Web Libraries. However, permission lists like this do not scale to encompass roles that might be similar but not exactly alike. For a similar role, you would have to create a new role from the beginning. This kind of approach is not efficient for larger, more complicated implementations.
Alternatively, you can use a more modular, or mix-and-match, approach whereby you create numerous, generic permission lists that you can add to and remove from role definitions. Suppose you have three 8-hour shifts at your site. Using the modular approach, you could create three different versions of sign-in permissions: one for 6 a.m. to 2 p.m., one for 2 p.m. to 10 p.m., and another for 10 p.m. to 6 a.m. Then, depending on the shift for a particular role, you can easily apply or remove the appropriate permission as needed without affecting any other permissions.
Although how you decide to implement Permission Lists depends on your site's security scheme and your security administrator, the modular approach provides increased scalability. As a general rule, your permission lists should be assigned to roles so that the common user has between 10 to 20 lists. This range represents the best balance of performance and flexibility. If you have too many permission lists, you may notice performance degradation, and if you have too few permission lists, you may sacrifice flexibility.
Managing Permission Lists
This section discusses how to:
Create new permission lists.
Copy permission lists.
Delete permission lists.
View related content references.
 Creating New Permission Lists
To create a new permission list:
Select PeopleTools, Security, Permissions & Roles, Permission Lists.
On the search page, click Add a New Value.
In the Permission List edit box, enter the name of permission list to create.
Note. Permission list names have a 30-character limit. PeopleSoft HCM requires certain naming conventions for permission lists, but PeopleTools does not enforce these application-specific requirements. Therefore, when creating permission lists, keep in mind that PeopleSoft HCM requires primary permission lists to start with PP and data permission lists to start with DP.
From the pages in the Permission List component, select the appropriate permissions.
Save your permission list.
Copying Permission ListsTo copy a permission list:
Select PeopleTools, Security, Permissions & Roles, Copy Permission Lists.
On the search page, locate and select the permission list that you want to copy (clone).
The Permission List Save As page appears.
On the Permission List Save As page, enter a new name in the To: edit box for the permission list that you want to copy.
Click Save.
Note. When copying a permission list, you also copy the access specified for content references by the original permission list. When deleting a permission list, you also remove access to the content references associated with that permission list.
Deleting Permission ListsTo delete a permission list:
Select PeopleTools, Security, Permissions & Roles, Delete Permission Lists.
On the search page, locate and select the permission list that you want to delete.
The Delete Permission List page appears.
Click Delete Permission List.
Click OK to confirm the deletion, or click Cancel to end without deleting.
Note. This action deletes content reference permissions and all references to the permission list (even where referenced in application data).
Viewing Related Content References
This section discusses:
Viewing content references.
Synchronizing content references.
Viewing Content References
Select PeopleTools, Security, Permissions & Roles, Permission Lists, Pages to access the Pages page, and then click the Edit Components link to access the Component Permissions page.
When you set component permissions and web library permissions, use the View Content References link to view the content references pointing to a given component or script. PeopleTools automatically propagates changes to permission lists to the content references.
When you click the link, the Content References page appears, showing the following:
Name of the portal.
Name of the content reference.
The label.
Whether or not it is accessible.
The path.
Synchronizing Permission Lists and Content References
Use the PORTAL_CSS application engine program to synchronize permission lists with content references for the portal. By default, the system synchronizes changes in permission lists with content references; however, after an upgrade or any time when you want to make sure, you can run the PORTAL_CSS program. A process definition of the same name also exists.
See
Defining Permissions
This section discusses how to:
Set general permissions.
Set page permissions.
Set PeopleTools permissions.
Set process permissions.
Set sign-on time permissions.
Set component interface permissions.
Set web library permissions.
Set web services permissions.
Set personalization permissions.
Set query permissions.
Set mass change permissions.
Display additional links.
View when a permission list was last updated.
Run permission list queries.
Pages Used to Define Permission Lists|
Page Name |
Definition Name |
Navigation |
Usage |
|
General |
ACL_GENERAL |
PeopleTools, Security, Permissions and Roles, Permission Lists, General |
Set general or miscellaneous attributes and system defaults. |
|
Pages |
ACL_MENU2 |
PeopleTools, Security, Permissions and Roles, Permission Lists, Pages |
Set page permissions. |
|
PeopleTools |
ACL_MISCTOOLS |
PeopleTools, Security, Permissions and Roles, Permission Lists, PeopleTools |
Grant access to PeopleTools applications, such as PeopleSoft Application Designer, and grant access for specific operations within PeopleTools. |
|
Process |
ACL_PROCESS |
PeopleTools, Security, Permissions and Roles, Permission Lists, Process |
Specify to what capacity a user or role can modify PeopleSoft Process Scheduler settings. |
|
Sign-on Times |
ACL_SIGNON2 |
PeopleTools, Security, Permissions and Roles, Permission Lists, Sign-on Times |
Specify when users are authorized to sign in to the PeopleSoft system. If users are signed in to the system when the sign-in time expires, they are automatically signed out. |
|
Component Interface |
ACL_COMP_INTERFACE |
PeopleTools, Security, Permissions and Roles, Permission Lists, Component Interface |
Grant access to any component interfaces that a user may need to use to complete business transactions. |
|
Web Libraries |
ACL_WEBLIBS |
PeopleTools, Security, Permissions and Roles, Permission Lists, Web Libraries |
Set web library permissions. |
|
Web Services |
ACL_WS_OPR |
PeopleTools, Security, Permissions and Roles, Permission Lists, Web Services |
Set web services permissions. |
|
Personalizations |
PLIST_OPTN |
PeopleTools, Security, Permissions and Roles, Permission Lists, Personalizations |
Specify which personalizations users can use and customize. |
|
Query |
PERMLIST_QUERY |
PeopleTools, Security, Permissions and Roles, Permission Lists, Query |
Control the query operations a user can perform and the data a user can access while using PeopleSoft Query. |
|
Mass Change Operator Security |
MC_OPR_SECURITY |
PeopleTools, Security, Mass Change Operator Security |
Set mass change security permissions. |
|
Audit |
PERMLIST_AUDIT |
PeopleTools, Security, Permissions and Roles, Permission Lists, Audit |
Inquire when a permission list was last updated and by whom. |
Setting General Permissions
Access the General page (select PeopleTools, Security, Permissions and Roles, Permission Lists and click the General tab).
Setting Page Permissions
Access the Pages page (select PeopleTools, Security, Permissions and Roles, Permission Lists and click the Pages tab).
This table describes the fields on the Pages page.
|
Click to grant access to mobile application pages. Important! PeopleSoft Mobile Agent is a deprecated product. These features exist for backward compatibility only. |
|
|
Displays all menu names in the database. Add new rows to add more menu names. The name reflects the definition name in PeopleSoft Application Designer. |
|
|
Menu Label |
Displays the menu label associated with the PeopleSoft Application Designer menu name. |
|
Edit Components |
Click to grant access to specific pages. |
Page permissions refer to the pages to which a user has access. Pages are contained within components, which are ultimately contained within a menu name. To grant access to a particular page, determine the component it is in and the menu name the component falls under. This enables you to drill down to the appropriate page.
When you click the Edit Components link, the Component Permissions page appears:
This table describes the fields on the Component Permissions page:
|
Authorized |
This field indicates whether at least one page in the component is authorized for current the permission list. This field is display-only. |
|
Component Name |
This field indicates the component where the pages reside. This field is display-only. |
|
Item Label |
This field indicates the item label on the menu definition where the component resides. This field is display-only. |
|
Edit Pages |
Click this link to grant access to individual pages and the appropriate actions. |
|
View Content References for this Component |
Click this link to access the content reference. |
When you click the Edit Components link, the Page Permissions page appears:
This table describes the fields on the Page Permissions page:
|
Panel Item Name |
This is the name of the panel item as entered in the component in Application Designer. This field is display-only. |
|
Authorized? |
Select this check box to authorize user access to the page. |
|
Display Only |
Select this check box to authorize view only user access to the page. No fields are active when this check box is selected. |
|
Actions |
Select from the following check boxes: Add: The user can create new high-level key information through the search page. Update/Display: The user can view the current row. The user can view, insert, and update future rows. Update/Display All: The user can view the history and current rows. The user can view, insert, and update future rows. Correction: The user can view, insert, and update history, current, and future rows. Note. Only actions that are selected in the component definition in Application Designer are enabled. |
Note. To find the name of a menu, component, or page, you can press Ctrl+J while accessing the page with the browser, or use the Find Definition References feature in PeopleSoft Application Designer.
Granting access to PeopleTools and PeopleSoft applications requires serious consideration. For each role, carefully consider what the members of that role must access to complete their jobs and to what degree they need access. Then make the appropriate permission lists.
After you add a menu name, you grant access to its components and pages on an item-by-item basis. In PeopleSoft applications, menu items represent components. If a component consists of more than one page, then selecting the menu item opens another layer with more items—individual pages. For example, if you added the UTILITIES menu name to a permission list, you could then grant access to the Utilities, Use menu items but not to the Utilities, Process menu items. Alternatively, you could grant access to only a few of the Use menu items or make some items display only.
You grant access permission to two categories of components:
All PeopleSoft applications
Page-driven PeopleTools
Note. With PeopleTools programs, the process of editing menu items varies. With page-based PeopleTools, such as PeopleSoft Process Scheduler, you can grant access to menu items just as you can for PeopleSoft applications. However, the other PeopleTools programs do not allow you to grant item-by-item access; you can either access all the menus and menu items or you cannot. PeopleSoft Application Designer is an exception; you can restrict access to it at the definition level.
Granting Access to Components and Pages
The following procedure describes how to set access permissions to your PeopleSoft applications and your page-driven PeopleTools. You begin at the component level and drill down to the page level, making the appropriate selections as you go.
Note. The same procedure applies to both PeopleSoft applications and page-driven PeopleTools.
To add access to PeopleSoft components and pages:
Locate the menu name of the component to which you want to add access.
Click Edit Components.
The Components page appears.
Locate the component to which you want to grant access.
By default, when adding a new permission list, no components are authorized.
Click the Edit Pages button associated with each component to which you want to grant access.
The Page Permissions page appears. You specify the actions that a user can complete on this page. You can select from these options for each page that appears in the Page column:
Authorized?
Select to enable a user to access the page. Decide the degree to which a user is authorized on a page by selecting Display Only or one or more of the available options in the Actions group.
Display Only.
Select to enable the user to view the information provided by the page but not to alter any data.
Actions.
Specify how users can alter information on a page, such as Add, Update/Display, and Correction. The available options depend upon the options selected when the page was initially developed in PeopleSoft Application Designer.
To grant access to all pages and all actions for each page, click Select All.
When you have finished making the appropriate selections, click OK on the Page Permissions page, and then again on the Component Permissions page.
Repeat each step for each menu name.
Note. After you delete access to a component or iScript, you must clear the browser cache or wait for 20 minutes (default time) for the deletion to appear in the menu.
Granting Access to Mobile Pages
To add access to mobile pages:
Important! PeopleSoft Mobile Agent is a deprecated product. These features exist for backward compatibility only.
Select PeopleTools, Security, Permissions & Roles, Permission Lists, and select the Pages page.
Click the Mobile Page Permissions link.
The Mobile Page Permissions page appears.
To add a new mobile page to the permission list, click the plus sign.
For the Mobile Page Name edit box, click the search button.
Search for and select the mobile page for which you need to grant access.
Click OK.
Save the permission list.
Setting PeopleTools Permissions
Access the PeopleTools page (select PeopleTools, Security, Permissions and Roles, Permission Lists and click the PeopleTools tab).
The PeopleTools Permissions section of this page applies to standalone PeopleTools applications. They are not Pure Internet Architecture-based, but are Microsoft Windows programs that were not developed using PeopleSoft Application Designer. They include:
PeopleSoft Application Designer.
PeopleSoft Data Mover.
PeopleSoft Definition Security.
PeopleSoft Query (Microsoft Windows interface, not the browser interface).
The Performance Monitor PPMI Access check box does not control access to an application; rather, it enables PeopleSoft Performance Monitor data collators to insert performance data into the database, which enables you to view the data.
See Enterprise PeopleTools 8.50 PeopleBook: PeopleSoft Performance Monitor.
To grant access to these PeopleTools features, select the check box next to the appropriate item.
With PeopleSoft Application Designer, the procedure for applying permissions is slightly more complex, because security for PeopleSoft Application Designer also controls what object definition types can be accessed and what degree of modifications can be made. The Definition Permissions, Tools Permissions, and Miscellaneous Permissions links enable you to provide more detail to PeopleSoft Application Designer access permissions.
Access the Definition Permissions page (click the Definition Permissions link on the PeopleTools page).
Grant access to the definitions that developers create using PeopleSoft Application Designer. Each type of definition that you create with PeopleSoft Application Designer appears in the definition permissions list.
Note. On this page, you add permissions to a definition type, such as Application Engine programs. You grant access to specific definitions, such as PeopleSoft Payroll Application Engine programs, using Definition Security.
Note. If change control locking is enabled, the Change Control access setting on the Tools Permissions page can override object types settings.
See Building and Maintaining Data, Implementing Definition Security.
Access the Definition Permissions page (click the Tools Permissions link on the PeopleTools page).
In addition to securing definitions, PeopleSoft Application Designer security also involves a collection of tools, such as Build and the PeopleCode Debugger, to which developers need access.
The tools within PeopleSoft Application Designer include:
Build/Data Admin (select Build, Project and Tools, Data Administration).
Change Control (select Tools, Change Control).
Language Translations (select Tools, Translations).
PeopleCode Debugger (select Debug, PeopleCode Debugger Mode).
SQL Editor (the PeopleSoft Application Designer utility for adding SQL objects and statements to applications and application engine programs).
Upgrade (select Tools, Upgrade).
This tool includes Copy Project, Compare and Report, and so on.
You can set the access level individually for the Tools Permissions page options or your can use the (ALL) buttons to set across the board settings. Remember that every button affects every access level for the tools.
The following table shows the relationship between the permissions that are set up within the source and the target databases, which you should consider in upgrade situations:
|
Source DB |
Target DB |
Compare? |
Copy? |
Export? |
Import? |
|
No access |
No access |
No |
No |
No |
No |
|
No access |
Read-only access |
No |
No |
No |
No |
|
No access |
Full access |
No |
No |
No |
No |
|
Read-only access |
No access |
No |
No |
Yes |
No |
|
Read-only access |
Read-only access |
Yes |
No |
Yes |
No |
|
Read-only access |
Full access |
Yes |
Yes |
Yes |
No |
|
Full access |
No access |
No |
No |
Yes |
Yes |
|
Full access |
Read-only access |
Yes |
No |
Yes |
Yes |
|
Full access |
Full access |
Yes |
Yes |
Yes |
Yes |
Access the Miscellaneous Permissions page (select the Miscellaneous Permissions link on the PeopleTools page).
Set access levels for the Miscellaneous Definitions items that appear in the PeopleSoft Application Designer Tools menu, including Access Profiles, Color, Field Format, Style, and Tool Bar.
Each of the miscellaneous definitions can be set for No access, Read-only access, or Full access. You can select the (ALL) buttons to grant the same permissions to each item.
Real-time Event Notification Permissions
Access the REN Permissions page (click the Realtime Event Notification Permissions link on the PeopleTools page).
The REN Permissions page enables you to control REN server access. Before you grant any permissions to these actions, read the PeopleSoft MultiChannel Framework documentation.
See Configuring REN Server Security.
PeopleSoft Data Archive Manager is a page-driven PeopleTools application that you use to archive your application data as part of regular database maintenance. The security options in this group relate specifically to actions a system administrator would make while using PeopleSoft Data Archive Manager. The actions that a system administrator can perform within PeopleSoft Data Archive Manager are controlled by permission lists. Before you grant any permissions to these actions, read the PeopleSoft Data Archive Manager documentation.
See Also
Using PeopleSoft Data Archive Manager
Setting Process Permissions
Access the Process page (select PeopleTools, Security, Permissions and Roles, Permission Lists and click the Process tab).
Just as you define permissions for the pages a user can access, you also must specify the batch (and online) processes that users can invoke through PeopleSoft Process Scheduler. Typically, process groups are arranged by department or task. For example, the batch programs used by your payroll department probably all belong to the PAYROLL process group, or a similarly named group.
When you create a process permission list, you add the appropriate process groups so that a user belonging to a particular role can invoke the proper batch programs to complete their business transactions. You do this using the Process Group Permission page.
You use the Process Profile Permission page to specify when a user or role can modify certain PeopleSoft Process Scheduler settings. Access the Permission Lists-Process page.
Note. You grant Process Profile permissions directly to the user profile and Process Group permissions through permission lists.
Access the Process Groups page (select the Process Group Permissions link on the Process page).
This page lists the process groups associated with a permission list. Process groups are collections of process definitions that you create using PeopleSoft Process Scheduler.
Typically, you group process definitions according to work groups within your organization, and typically that work group has a particular role associated with it. Regardless of how you organize process definitions, you must assign process groups to a permission list.
Users can run only the processes that belong to process groups assigned to their roles. For example, you may have a set of process definitions that relate to your Human Resources department and another set for your Manufacturing department.
Access the Process Profile Permission page (select the Process Profile Permissions link on the Process page).
|
Server Destinations |
You can specify output variables when running processes or jobs on a server. You have the following options:
|
|
Note. This group of options applies only to DB2 UDB for z/OS. All PeopleSoft Process Scheduler shell JCLs use meta-strings to pass data stored in the database. PeopleSoft Process Scheduler takes advantage of meta-strings to generate the JCL job cards based on the user who initiated the request. For example, Job Name and Job Account can be passed by setting the Name and Account values, respectively, on the Process Profile page. For z/OS, you have the following options:
See your relational database management system documentation and the PeopleSoft installation guides for details about JCL meta-variables and strings. |
|
|
These options apply to using PeopleSoft Process Monitor. You can restrict which users are permitted to view or update a given process based on the user who launched (and owns) the process. You can specify restrictions as follows:
Note. Be careful as you grant update authority to submitted processes. An inexperienced user can easily disrupt batch processing by deleting or holding processes, especially when restarting processes. If a program is not coded for a restart, then users should not be able to restart it. Restarting a program that is not properly coded to acknowledge the previous program run can threaten data integrity. Remember, the process profile permissions are based on the profile of the user who is submitting the process, not the user viewing the process monitor. |
The Allow Requestor To options apply to using PeopleSoft Process Monitor and PeopleSoft Process Scheduler Request pages. These options enable you to restrict the authority that a user has while monitoring scheduled processes.
|
Override Output Destination |
Select to allow a user to change the value in the Output Destination column on the Process Scheduler Request page. |
|
Override Server Parameters |
Select to enable users to select the server name and modify the run date/time group on the Process Scheduler Request page. |
|
View Server Status |
Select to enable users to access the Server List page in PeopleSoft Process Monitor. |
|
Update Server Status |
Select to allow a user to suspend, restart, or bring down a server using the Server Detail page from the server list in PeopleSoft Process Monitor. |
|
Enable Recurrence Selection |
Select to enable a run recurrence value for processes and jobs scheduled to run on the server. |
See Also
Setting Up PeopleSoft Process Scheduler Privileges and Profiles
Setting Process Definition Options
Setting Sign-on Time Permissions
Access the Sign-on Times page (select PeopleTools, Security, Permissions and Roles, Permission Lists and click the Sign-on Times tab).
Pick a day and set a sign-in duration.
Sign-in times use the 24-hour clock and run through the end time value. For example, a user with an end time of 16:30 can use the system until 4:31 p.m.
To create a sign-in time that spans multiple days, use adjoining sign-in times. For example, to create a sign-in time running from 8 p.m. Tuesday to 6 a.m. Wednesday, you need a Tuesday start time of 20:00 and end time of 23:59. Then you need to add a Wednesday sign-in time with a start time of 0:00 and an end time of 5:59.
By default, all start times are 0:00 and end times are 23:59, and all days are listed. Delete days and change the times to restrict access.
A single day can have more than one sign-in period as long as the periods do not overlap. If a single day has multiple non-overlapping sign-in periods, then that day appears once for each period.
Setting Component Interface Permissions
Access the Component Interfaces page (select PeopleTools, Security, Permissions and Roles, Permission Lists and click the Component Interfaces tab).
|
Name |
Shows the name of the component interface. |
|
Edit |
Click to access the Component Interface Permissions page and grant access to a particular component interface method. |
Click the Edit button to authorize individual methods in each component interface:
|
Method |
Displays each method created within the component interface. |
|
Method Access |
Select from these two types of authorization: Full Access: The method is authorized. No Access: The method is not authorized. |
|
Full Access (All) |
Grants full access to all scripts listed on the page. |
|
No Access (All) |
Denies access to all scripts listed on the page. |
You grant access to component interfaces similarly to adding page access. Add a new row to insert a component interface into the definition list. You must also grant access to the component interface methods.
After adding a new permission to a component, you must delete the web server cache for users to access the component through the portal. To delete the web server cache, reboot the web server.
Note. If more than one JVM services the web server, then rebooting the web server only purges the in-memory cache. No procedure exists to specify which JVM receives the request. For this reason, you must reboot all JVMs that service the web server.
Setting Web Library Permissions
Access the Web Libraries page (select PeopleTools, Security, Permissions and Roles, Permission Lists and click the Web Libraries tab).
A web library is a derived/work record whose name starts with WEBLIB_. All PeopleSoft iScripts are embedded in records of this type. An iScript is a specialized PeopleCode function that generates dynamic web content.
Administrators should make sure that users have the proper access to web libraries. For example, the default navigation system for application users is implemented using a web library. If users do not have the proper authorization to the web library and its associated scripts, then they will not have proper access to the system. If users are not authorized for a particular web library or script, then they cannot invoke it.
After you add a web library, you set the access for each script function individually. Invoking an iScript requires the assembly of a URL. Developers assemble the URL using PeopleCode.
|
Web Library Name |
Displays the web libraries added to the permission list. |
|
Edit |
Click to set access to web library functions. Select from these access rights for each function: Full Access: Select this value to authorize the script. No Access: Select this value to deny access to the script. |
Click the Edit button to authorize each script in the web library:
|
Function |
Displays each script stored in the web library. |
|
Access Permissions |
Click to set access to web library functions. Select from these access rights for each function: Full Access: Select this value to authorize the script. No Access: Select this value to deny access to the script. |
|
Full Access (All) |
Grants full access to all scripts listed on the page. |
|
No Access (All) |
Denies access to all scripts listed on the page. |
|
View |
Click to launch the content reference associated with the iScript. |
Note. You must grant access to at least one script in the web library, otherwise the system removes the web library from the permission list when you leave the component—even if you save the component.
See Also
Setting Web Services Permissions
The web services offered by the PeopleSoft Integration Broker can be secured at the user ID level through the use of the web services permissions you specify. This applies to external web service requests only, not internal web service requests. Internal requests are those submitted from within your PeopleSoft system by a PeopleSoft user of one of your deployed PeopleSoft applications. External requests are those received from third party systems, such as other applications in your organization or other systems outside your organization sending requests over the internet.
If the user ID and password contained in the web service request has the appropriate permissions, the user can invoke the web service. If the submitted user ID and password fails authentication, then user has no permission to invoke the service. If only a User ID is provided, the PeopleSoft system attempts to verify if the user ID is a valid PeopleSoft user. If the verification fails, the system checks if the request is from a trusted node, and then uses the external user ID and password associated with the node from which the request was generated. If the request is not from a trusted node, the system checks the user ID associated with the ANONYMOUS node. How PeopleSoft Integration Broker handles authenticating web service request permissions is discussed in detail in the PeopleSoft Enterprise Integration Broker PeopleBook.
See Setting Up Secure Integration Environments.
Access the Web Services page (select PeopleTools, Security, Permissions and Roles, Permission Lists and click the Web Services tab).
Add the web services to which a permission list should have access. Add and remove web services to and from the list using the standard plus and minus buttons.
Note. Web service requests contain user IDs. For the web service to be invoked, the submitted user ID must be valid in the PeopleSoft system. For example, the user account cannot be locked, the request must be submitted during the user ID's valid signon times, and the user ID must have permission to invoke the web service operation.
Web Services
|
Service |
Displays the name of the web service defined in the PeopleSoft system. |
|
Edit |
Click to launch the Web Service Permissions page. |
|
Full Access (All) |
Click to grant full access to all services listed on the page. |
|
No Access (All) |
Click to set all services listed on the page to No Access. |
Web Service Permissions
Access the Web Service Permissions page (click the Edit link on the Web Services page).
|
Service Operation |
Each operation performed by the web service appears in the Service Operation list. |
|
Access |
Grant access to the operation by selecting Full Access. Deny access by selecting No Access. Note. By default, the system sets the value to No Access. Make sure to modify the access values to reflect the desired level. |
See Also
Setting Permissions to Service Operations
Configuring WS-Security For WSRP Consumption and Production
Setting Personalization Permissions
Access the Personalizations page (select PeopleTools, Security, Permissions and Roles, Permission Lists and click the Personalizations tab).
Note. Only those personalization options that accept customization are available for your users to modify.
|
Option Category Level |
Displays the high-level grouping of personalizations. |
|
Option Category Group |
Shows the further categorizations of personalization options within the category level. |
|
Edit Options |
Click to access the Personalization Permissions page and enable specific personalization options for an option category group. |
When you click the Edit Options link, the Personalization Permissions page appears.
|
Category |
Categorizes and encompasses a set of options for the end user. This field is display-only. |
|
User Option |
Displays the code associated with the user option. The code that the system (PeopleCode) recognizes at runtime. This field is display-only. |
|
Description |
Displays the description of the user option. This field is display-only. |
|
Allow User Option |
Select this check box to enable the user option. |
|
Select All |
Click this button to select the Allow User Option check box for each row in the grid. |
|
Deselect All |
Click this button to deselect the Allow User Option check box for every row in the grid. |
See Managing PeopleSoft Personalizations.
Setting Query Permissions
Access the Query page (select PeopleTools, Security, Permissions and Roles, Permission Lists and click the Query tab).
The Query page has links to the Permission List Access Groups page, where you can define the records to which the user can have access in PeopleSoft Query, and the Query Profile page, where you can define the query operations that the user can perform.
Access the Permission List Access Groups page (click the Access Group Permissions link on the Query page).
Access groups are nodes in a query tree, which you build with PeopleSoft Tree Manager. After you build a query tree, you give users access to one or more of its access groups. Then, they can generate queries on any tables in the access groups accessible to them.
When you open Query Manager, it displays either an access group structure or an alphabetical list of records to which you have access. Access groups enable you to logically organize the record components to control security access within PeopleSoft Query. This listing is not a physical representation of your database.
You can generate queries on and retrieve information only from the tables whose record definitions are within these access groups. If, for example, you were querying an order table and wanted to display data from a related table (like the customer name rather than the customer code), you must have both tables—the order table and the customer prompt table—in your access groups.
To create new queries, or even to run existing ones, users must have access rights to the record components used in the queries. After you build your query trees, you must grant users access to them. You can grant and restrict access to entire query trees or portions of them through the Access Groups page.
To add an access group to a permission list:
Open the permission list and select Query, Access Groups Permissions.
Select a tree name.
Select the highest access group that the user can access.
The system displays access groups in the selected query tree only.
The access group that you select should be the highest-level tree group to which this permission list needs access. The Accessible check box is selected by default. For example, users in the ALLPANLS permission list have access to all record components in the EIS_ACCESS_GRP and all access groups below it in the QUERY_TREE_EIS query tree—in other words, to all record components in the tree.
(Optional) Deselect the Accessible check box.
To grant access to most of the record components in a high-level access group but restrict access to one of the lower-level groups, you can add a new row for the lower-level access group and deselect the Accessible check box. Users can then access all record components within the higher-level group except for those you explicitly made inaccessible.
Note. Because it hinders system performance, do not deselect the Accessible check box for lower-level access groups. To restrict access to record components on a particular branch of a tree, consider creating a new tree for those definitions. Attempting to expand an access group that is not accessible causes all access groups below that access group to be loaded into memory.
Save your changes.
Note. When the system loads an access group into memory for the first time, you will likely experience a small delay. This delay is the result of a physical database read for each record component that is associated with that access group. For this reason, do not group a large number of record components into a single access group.
Access the Query Profile page (click the Query Profile link on the Query page).
Query profiles specify available query operations. You can give users the right to run queries but not create them, or to create regular queries but not workflow queries, and you can restrict the SQL operations that users can perform. You control these options through the query profile.
Each permission list has its own query profile, and the combination of all permission lists that are assigned to a role determine the total query access for the role. User profiles inherit query access only through the roles that you assign to them.
Note. The first level of security is access to PeopleSoft Query itself. Not every user needs to create queries. You grant access to the Windows client of PeopleSoft Query by selecting the Query Access check box on the PeopleTools page of a permission list. You grant access to Query Manager by including the QUERY_MANAGER menu and its related components on the Pages page of a permission list.
You select at least one of the options in the PeopleSoft Query Use section of this page to give users query access.
|
PeopleSoft Query Use |
Select from:
|
|
PeopleSoft Query Output |
Select at least one of these values:
Note. If using PeopleSoft Query in the Microsoft Windows environment, you grant runtime access through PeopleSoft Navigator by selecting at least one of the PeopleSoft Query output options. |
|
Advanced SQL Options |
Restrict less experienced users from generating complex queries, as such queries can affect system performance. |
Setting Mass Change Permissions
Access the Mass Change page (select PeopleTools, Security, Permissions and Roles, Permission Lists and click the Mass Change tab).
Mass change operator security controls:
What mass change templates a user can access to create new definitions.
Whether a user can run mass change definitions online.
What mass change definitions a user can open, view, or run.
These definitions must also be based on a template with the same PeopleSoft owner as the user.
Note. Users inherit mass change authorizations through their primary permission lists, not through roles.
Before you can use a new template to create definitions, you must have permission to access it.
To modify mass change template permissions:
Add or remove templates from the Mass Change Template ID list.
Select or deselect OK To Execute Online, as needed.
When you have enabled the OK To Execute Online option, users with the given primary permission list can run mass change definitions after saving any modifications to the Mass Change Definitions pages.
Save your work.
Displaying Additional Links
Access the Links page (select PeopleTools, Security, Permissions & Roles, Permission Lists and click the Links tab).
Use this page to access links to other pages within your PeopleSoft system. For example, perhaps a PeopleSoft application requires a specific security setting to be associated with a permission list. If this application-specific setting appears on a page not in PeopleTools Security, add a link to the application page so that anyone updating the permission list can easily navigate to it.
Note. The Links page is read-only. You create the inventory of links to pages that exist outside of PeopleTools Security by using the Security Links (PeopleTools, Security, Security Objects, Security Links) component.
See Also
Administering Security from Applications
Viewing When a Permission List Was Last Updated
Access the Audit page (select PeopleTools, Security, Permissions & Roles, Permission Lists and click the Audit tab).
View when a permission list was last updated and by whom. You can also view who has made changes to security tables by using the Database Level Auditing feature.
See Also
Understanding Database Level Auditing
Running Permission List Queries
Access the Permission List Queries page (select PeopleTools, Security, Permissions & Roles, Permission Lists and click the Permission List Queries tab).
Permission list queries provide detailed information regarding a permission, such as the user IDs and roles that are associated with a permission list. The available queries are documented on the page.
To run permission list queries:
Click the link associated with the query that you want to run.
A new browser window opens.
View the information the query returns or click a download results link.
Note. The size of the file appears in parentheses beside the download options.
For downloading, you have the following options:
Microsoft Excel spreadsheet.
Downloads the query results as a Microsoft Excel spreadsheet (.xls) file.
CSV text file.
Downloads the query results as a comma-separated values (.csv) file.
XML file.
Downloads the query results as a xml (.xml) file.