
 Understanding REN Servers
This chapter provides an overview of real-time event notification (REN) servers, provides an example of configuring a reverse proxy server and REN servers, and discusses how to:
Configure REN server security.
Configure REN servers.
Configure REN server clusters.
Understanding REN ServersThis section discusses:
REN server failover, scalability, and security configuration.
REN server failover.
REN server clusters.
The REN server, an application server domain process, is essential to PeopleSoft MultiChannel Framework (MCF) architecture. MCF events are sent to REN servers, which deliver them to recipients of those topics.
REN servers are also used by other PeopleSoft applications to push event notifications to users, such as the Reporting Window output option and the Optimization Progress Window.
The REN server is a modified web server using the HTTP 1.0 or 1.1 communications protocol. Communication with MCF server processes and browser windows is bidirectional, as they maintain persistent connections to the REN server. Events can be sent proactively to browser windows without polling or page refreshes.
REN Server Failover, Scalability, and Security ConfigurationREN servers can be configured to support both failover and scalability, and should be protected with firewalls and appropriate security measures, as illustrated in the following diagram:
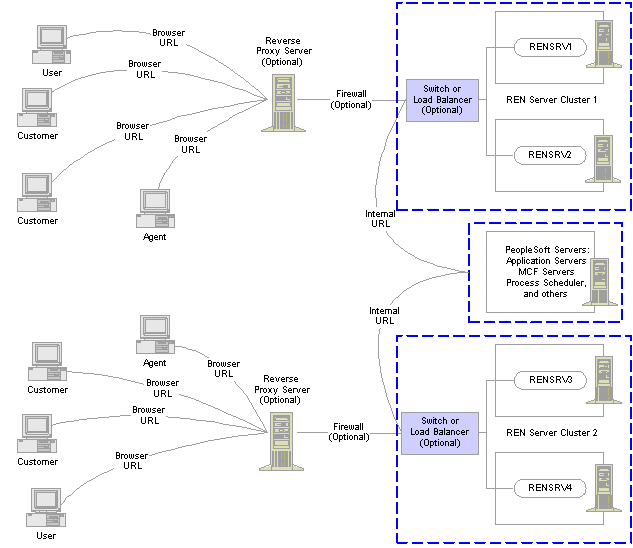
REN server configuration example
REN Server Failover
Although the REN server is integrated into an application server domain, it is not a standard PeopleTools server process (it has no database connection) and therefore has a separate failover mechanism. There are two scenarios for failure recovery:
For a standalone REN server, BEA Tuxedo restarts the server if it fails.
MCF servers and consoles reconnect to the REN server. However, any active browser sessions (such as MCF chat) will be interrupted until a connection can be reestablished between the chat console and the restarted REN server.
For clustered REN servers, each REN server in the cluster is a peer that mirrors the current state.
This configuration has two advantages over a standalone REN server:
Clustered REN servers guard against hardware failure (provided that the clustered REN servers are on different host machines).
Active browser sessions are not lost.
REN Server ClustersYou can configure a REN server cluster with only one REN server member. However, a REN server cluster configured with two or more REN servers provides failover.
All REN servers in a cluster mirror each other and appear to external processes as a single URL. The REN server cluster must have an HTTP load balancer or switch as its front end. All connections with browsers and application server processes address the front end’s URL. The load balancer should use an active standby content switching rule to route all traffic to a designated REN server in the cluster. The front end selects an alternate member of the cluster only when the designated REN server fails to respond.
The REN server cluster maintains mirrored state in all members by relaying events with HTTP messages. The REN server cluster therefore does not address scalability issues. Clustering REN servers does not improve performance and may increase processing overhead and internal network traffic. The internal HTTP connections between cluster members should be high speed for best performance.
If a REN server crashes, it does not rejoin the cluster, because it would not be synchronized with the other clustered REN servers. The entire cluster must be shut down and rebooted in order to restore all members back to full participation.
Incoming cluster requests must eventually route to the front end's HTTP address. Queue servers and application servers use the cluster URL, which is typically set to be the URL of the front end. Browser clients make requests using the browser URL, which may be set to the front end, or to a server that proxies to the load balancer. If browser transactions are encrypted with Secure Socket Layer (SSL), then the browser URL is an HTTPS address to a reverse proxy server or SSL accelerator.
Note. If you use SSL between the browser and REN server, then you must use a reverse proxy server or SSL accelerator.
Configuring REN Server SecurityThis section provides an overview of REN server security configuration and discusses how to define permission lists for REN server access.
Understanding REN Server Security Configuration
Protect the REN server behind firewalls. A reverse proxy server can be used between browser clients and the REN server. Browser sessions can be SSL-encrypted using a reverse proxy server or hardware SSL accelerator.
Note. The security of your PeopleSoft system, and configuration of load balancers, switches, and reverse proxy servers, is beyond the scope of this document. Refer to your PeopleBooks for more information.
REN server access from browser clients is restricted to users currently logged into PeopleSoft with appropriate REN server permissions. You must enable single signon security to obtain REN server access. Permission to access REN server applications is granted on permission lists, which are in turn associated with security roles and user IDs. Clients lacking access permission receive a “403 Forbidden” page from the REN server.
Note. REN server access requires that single signon is enabled.
See Also
Enterprise PeopleTools 8.46 PeopleBook: Security Administration
Enterprise PeopleTools 8.46 PeopleBook: System and Server Administration
Defining Permission Lists for REN Server AccessAccess the REN Permissions page.
Define access to REN servers in the appropriate permission lists.
To define access to REN servers in a permission list:
Select PeopleTools, Security, Permissions & Roles, Permission Lists.
On the search page, search for and select your permission list.
On the Permission List page, select the PeopleTools tab.
Click Realtime Event Notification Permissions.
On the REN Permissions page, select your permissions.
To enable REN server access for roles defined with the current permission list, select Full Access for each object required by the role. For example, users who require access to the MultiChannel Console must have Full Access defined for the MCF Agent object.
The MultiChannel Console link appears in the universal navigation header for any user with full access permissions defined for the MCF Agent object. However, the user must also be configured as an MCF or CTI agent to access the MultiChannel Console or CTI console.
Note. To enable access to the Report-to-Window functionality, add WEBLIB_RPT to the permission list's Web Libraries page, and set
Reporting Window to Full Access on the REN Permissions page.
Grant full access to the MCF CTI Server object only on the permission list assigned to the CTI server role. No other users
should have MCF CTI Server access.
The user ID that is configured to start the Process Scheduler must have full access to the Reporting Window REN permission
on at least one permission list for that user ID. If the user ID does not have full access to the Reporting Window, then the
pop-up window will stay in a status of queued.
See Also
Configuring REN ServersTo configure REN servers, use the REN Server (REN_SERVER_CMP) component.
This section discusses how to:
Create REN servers.
Configure REN servers.
Define REN servers.
Determine REN server configuration options.
Selecting REN Server Configuration OptionsDepending on your requirements, choose one of two REN server creation and configuration options:
To create a single REN server in a particular database using default configuration parameters, create an application server domain using PSADMIN.
Event Notification is enabled by default in the quick-configure menu. An associated REN server cluster is also created by default.
To create additional REN servers in a particular database, configure each REN server as required on the REN Server Definition and REN Server Cluster pages.
Then create the associated application server domains. Event Notification is enabled by default in the quick-configure menu.
When a REN server starts up it looks for configuration information in the database, using the application server domain name and host name as keys. If the associated configuration information exists in the database, the REN server uses it. If no such configuration information exists, the REN server is configured using defaults, which also configure a REN server cluster for each REN server. The default REN server configuration can be changed using the REN Server Configuration pages, but such changes do not take effect until the REN server starts up again.
Note. You can create only one REN server per application server domain.
This section discusses some possible REN server configurations, dependent on domain server topology.
Simple Configuration: Mycompany.com
In this configuration, the REN server is on the host machine “MachA,” the REN server uses the default port number 7180, DNS addresses the host machine as MachA.mycompany.com, and there is no SSL or reverse proxy server involved:
|
Parameter |
Value |
|
PeopleSoft Pure Internet Architecture Authentication Token Domain |
mycompany.com |
|
Authentication Domain in REN Server Cluster Configuration |
mycompany.com |
|
REN Server Cluster Root Path |
/psren |
|
REN Server Cluster URL |
http://MachA:7180 |
|
REN Server Browser URL |
http://MachA.mycompany.com:7180 |
Reverse Proxy Server with SSL Configuration
This configuration includes a single REN server and a reverse proxy server. The reverse proxy server could be either a dedicated reverse proxy server or a web server with a proxy plug-in configured to redirect both PeopleSoft Pure Internet Architecture and REN server requests. The application server host machine is MachA, and the REN server uses its default port 7180. The reverse proxy server is on MachRPS using port 8080 for HTTP. The DNS server must recognize MachRPS.mycompany.com.
|
Parameter |
Value |
|
PeopleSoft Pure Internet Architecture Authentication Token Domain |
mycompany.com |
|
Authentication Domain in REN Server Cluster Configuration |
mycompany.com |
|
REN Server Cluster Root Path |
/psren |
|
REN Server Cluster URL |
http://MachA:7180 |
|
REN Server Cluster Browser URL |
http://MachRPS.mycompany.com:8080 |
Reverse Proxy Server with SSL Configuration and Secure HTTP
For SSL, install certificates on the reverse proxy server, set the server to encrypt all communications, and use HTTPS URLs from the browser. In this example the reverse proxy server uses port 8443 for SSL:
|
Parameter |
Value |
|
PeopleSoft Pure Internet Architecture Authentication Token Domain |
mycompany.com |
|
Authentication Domain in REN Server Cluster Configuration |
mycompany.com |
|
REN Server Cluster Root Path |
/psren |
|
REN Server Cluster URL |
http://MachA:7180 Note. The cluster URL should never be a secure HTTP address. |
|
REN Server Browser URL |
https://MachRPS.mycompany.com:8443 Note. This is a secure HTTP address (HTTPS). |
Note. If you use SSL between the browser and REN server, then you must use a reverse proxy server or SSL accelerator.
See Also
Enterprise PeopleTools 8.46 PeopleBook: Security Administration
Page Used to Configure REN Servers
|
Page Name |
Object Name |
Navigation |
Usage |
|
REN Server Configuration |
REN_SERVER_DET_PG |
PeopleTools, REN Server Configuration, REN Server Definition |
Define a REN server. |
Configuring REN ServersSpecify REN server configuration parameters depending on your network topology and server arrangement.
Define the parameters for REN server configuration in three locations:
Authentication token domain, set during PeopleSoft Pure Internet Architecture installation or in web profile configuration.
Specify REN server configuration parameters in an application server domain using PSADMIN.
REN server parameters, including cluster and browser URLs, set in the PeopleTools REN Server and REN Cluster components. Configuration parameters set in the REN Server and REN Cluster components override any defaults in PSADMIN.
The authentication domain tells PeopleSoft Pure Internet Architecture the internet domain name that browser clients use when accessing PeopleSoft applications across the internet. The token is required to comply with the same-origin security policy that is enforced by most browsers. The domain name specified in the REN Server Configuration page must be identical to the domain name specified as the authentication token domain during PeopleSoft Pure Internet Architecture installation.
If not set during PeopleSoft Pure Internet Architecture installation, define the authentication domain in web profile configuration to match the REN server configuration.
Note. You must specify the authentication token domain if the REN server and the PeopleSoft Pure Internet Architecture web server are accessed using different DNS names from the browser client (for example, if they are on different machines).
Configuring a REN Server with PSADMIN
If necessary, you can specify parameters in the PSRENSRV section of PSADMIN application server domain configuration, as illustrated in the following screen shot:
Specify parameters as described in the following table:
After specifying REN server configuration parameters, be sure to specify Y (Yes) when asked if you want event notification configured.
Note. Use PeopleSoft Pure Internet Architecture REN server definition and configuration pages to modify configuration parameters
whenever possible. REN server configuration parameters made using PSADMIN are written to the psappsrv.cfg file in the application
server directory. REN server configuration values found in the database override default values found in psappsrv.cfg.
Use static IP addresses for your web servers. If you use dynamic IP addresses (DHCP), ensure that the domain name server (DNS)
can map fully qualified domain names to the dynamic IP addresses.
If you are using Microsoft Internet Explorer internet security zones, include both the web server and REN server addresses
in the same security zone; alternatively, exclude both addresses from security zones.
Socket Binding
The REN server listens on the port defined in the REN Server Definition page, which is by default 7180. However, the host name to which the REN server binds is determined by information in the psrenconfig.txt file for each application server domain. If the host machine contains multiple network interface cards (NICs) then the REN server binds by default to only one NIC, which is given by uname() on Unix, or GetComputerName() on Microsoft Windows.
To bind a REN server to a specific NIC, manually edit psrenconfig.txt for the appropriate application server domain, changing both set address and set hostname to the IP address and locally-known host name of the NIC. For example:
set address 192.168.10.1
set hostname hostsrv.example.com
Note. If you enter an invalid IP address in the psreconfig.txt file, the REN server may not start correctly. Check the REN server log for error messages that identify the issue.
Defining REN ServersAccess the REN Server Configuration page.
|
Application Server Domain |
Specify the application server domain serving this REN server. |
|
Host Machine |
Specify the name of the host machine on which the specified application server domain runs. This entry requires the host machine name, not its DNS name. However, the host machine name may need to be fully-qualified; for example, machineA.example.com. On a Unix machine, determine the host name by executing uname -a. On a Microsoft Windows machine, determine the host name by executing hostname at a command prompt. |
|
Port Number |
Specify the HTTP port number on which this REN server is addressed. Change the HTTP port value if multiple REN servers run on the same host machine to avoid port conflicts. |
|
Process Instance |
Reserved for future use. |
Configuring REN Server ClustersTo configure REN server clusters, use the REN Cluster (REN_CLUSTER_CMP) component.
This section discusses how to:
Cluster REN servers.
Configure REN server ownership.
Configure REN server cluster members.
REN server clusters address failover and scalability.
Pages Used to Configure REN Server Clusters
|
Page Name |
Object Name |
Navigation |
Usage |
|
REN Server Cluster |
REN_CLUSTER_PG |
PeopleTools, REN Server Configuration, REN Server Cluster, REN Server Cluster |
Define a REN server cluster. |
|
REN Server Cluster Owner |
REN_OWNER_PG |
PeopleTools, REN Server Configuration, REN Server Cluster, REN Server Cluster Owner |
Define the ownership of the REN server cluster. |
|
REN Server Cluster Members |
REN_CLUST_RSERV_PG |
PeopleTools, REN Server Configuration, REN Server Cluster, REN Server Cluster Members |
Define the REN server clusters member REN servers. |
Clustering REN ServersAccess the REN Server Cluster page.
By default, if you start a REN server from PSADMIN without configuring a REN server cluster, then a cluster is created with a cluster ID RENCLSTR_000n
|
State Flag |
Select Active or Inactive. This flag determines whether the cluster can receive new client requests. For scalability, configure multiple REN server clusters with the same ownership and set them to active status. Then the reporting window and customer chat applications will direct new client requests to a randomly chosen active REN server cluster. If all clusters are inactive, the client receives an error message. If the cluster supports MCF servers, current chat sessions continue even after a cluster is inactive. But the MCF system does not route an additional requests to an inactive cluster. Inactivate a cluster before deleting the cluster, or before removing a member REN server from the cluster. You can inactivate a REN server cluster without deleting the cluster. |
|
REN Server Cluster Root Path |
The default REN server cluster root path is /psren. Change this as required so that multiple REN server clusters are addressable through a single reverse proxy server. Changes to the root path should also be reflected in the URL mapping of any reverse proxy server. |
|
REN Server Cluster URL |
The REN server cluster URL is the address used to reach the REN server cluster internally. This is the URL used by internal processes. If the MCF cluster is served by a REN server cluster, the cluster URL is that of the switch or load balancer in front of the clustered REN servers. The cluster URL must be unique for each cluster. No two clusters can address the same cluster URL. Specify the cluster URL in the form <http://<DNS_machine_ name>:<port>, where:
|
|
Click Buffer Test to initiate a test of the REN servers’ ability to break up and send a large file using multiple internal buffers. The buffer test bypasses REN server security, and does not depend on specified domain names (authentication domain), so you can use it to verify that the REN server is running on the network. |
|
|
The REN server browser URL is the address used by external clients and by agent chat to reach the application served by this REN server cluster. The browser URL may be different from the cluster URL, which should not have to go through any firewall, reverse proxy server or other outward-facing security barrier. If the REN server is reached through a load balancer, switch, or reverse proxy server, specify the fully-qualified URL of that device as accessed from the user’s browser. The URL must be the address of the gateway machine (proxy server, load balancer, or SSL accelerator). Specify the address in the form http: or https://<DNS_machine_ name>.<domain_name>:<port>, where:
|
|
|
Click Ping Test to initiate a test of the REN server specified in the browser URL fields. Failure may indicate that a URL or authentication domain is incorrectly specified, the REN server is not running, or that single signon is not implemented. |
|
|
Specify the authentication domain. This must be the same as the authentication domain specified in the PeopleSoft Pure Internet Architecture installation or in the web profile configuration. |
Specifying REN Server OwnershipAccess the REN Server Cluster Owner page.
|
REN Server Cluster Owner |
Select the owner of this REN server cluster from the drop-down list box. Options are:
Specifying an owner for a REN server cluster limits client access to that cluster. This is useful to ensure performance under load. Specifying an owner for a REN server cluster also supports security. For example, an MCF cluster can only be created on a REN server cluster owned by MCF or ALL. |
Specifying REN Server Cluster MembersAccess the REN Server Cluster Members page
|
REN Server ID |
Select a REN server from the drop-down list box. |
Each REN server can belong to only one REN server cluster.
Example: Configuring a Reverse Proxy Server with a REN Server
This section provides an overview of configuring a reverse proxy server (RPS) for use with one REN server running on separate host machines and provides an example.
Understanding RPS Configuration
Production PeopleSoft installations may configure the REN server behind an RPS. The RPS isolates the REN server and other web servers from the open internet, provides SSL session handling (the REN server has no native SSL handling), and presents a single-server origin to outside clients. PeopleSoft customers may put REN servers and PeopleSoft Pure Internet Architecture web servers behind one RPS, or just REN servers.
This example presents one possible configuration for a REN server running on one host machine, and installs an RPS to run on a second host machine, using BEA WebLogic 8.1. The RPS redirects clients to both a REN server and to the PeopleSoft Pure Internet Architecture web server.
This example assumes:
That you have installed PeopleTools 8.46 on both host machines.
The you have configured a web server using the default parameters on the first host machine.
That you have configured a REN server using the default parameters on the first host machine.
Example: Configuring a WebLogic 8.1 RPS for a REN Server on Another Host Machine
To configure an RPS for a REN server on another host machine:
Install a new web server domain on the second machine.
Name the domain rps.
Configure the following values:
AppServer Name: <application_server_machine_name>
JSL Port: 9999
The RPS will not make Jolt connections.
HTTP Port: 8080
HTTPS Port: 8443
Start the new web server.
Navigate to <PS_HOME>\webserv\rps, and run startPIA.cmd.
Log on to the WebLogic Server Administrative Console for the rps web server.
Access the WebLogic Server Administrative Console at http://<webserver>:<port>/console (for example, http://localhost:8080/console).
When prompted for a User Name and password, specify the WebLogic system ID and password. If you've followed the default WebLogic Server install, the ID and password are system and password.
Using the console's hierarchical navigation, navigate to rps -> Deployments -> Applications -> peoplesoft. Select the Targets tab.
Clear the PIA option.
Click Apply.
Using the console's hierarchical navigation, navigate to rps -> Deployments -> Web Application Modules -> HttpProxyServlet. Select the Targets tab. Select the PIA option. Click Apply.
For better web server performance, navigate to rps -> Servers -> PIA, select the Protocols tab, select the HTTP tab, and set both Duration and HTTPS Durationto 120 secs.
Stop the rps web server.
Navigate to <PS_HOME>\webserv\rps and run stopPIA.cmd.
Configure RPS parameters for the rps server.
Locate the file web.xml at PS_HOME/webserv/rps/applications/HttpProxyServlet/WEB-INF.
Edit web.xml in a text editor, changing the WebLogic port and WebLogic host from 8080 to 80 (the value 8080 is a default value derived during installation of the domain rps). For example:
<init-param> <param-name>WebLogicPort</param-name> <param-value>80</param-value> <description>HTTP listen port of WebLogic PIA/PORTAL server.</description> </init-param>
To specify the associated REN server, (which is on another machine), edit web.xml, changing the REN server host machine, port, and root URL from their default RPS values.For example:
<init-param> <param-name>WebLogicHost</param-name> <param-value>MACHINE_2</param-value> <description>Hostname of REN server.</description> </init-param> <init-param> <param-name>WebLogicPort</param-name> <param-value>7180</param-value> <description>Listen port of REN server.</description> </init-param>
and
<servlet-mapping> <servlet-name>RENHttpProxyServlet</servlet-name> <url-pattern>/psren/*</url-pattern> </servlet-mapping>
Reboot the RPS web server.
Navigate to <PS_HOME>\webserv\rps, and run startPIA.cmd.
(Optional) Configure and enable SSL on the RPS machine.