Creating and Managing Action Items
This topic discusses creating and managing action items, searching within action items, viewing action item list and change log.
|
Page Name |
Definition Name |
Usage |
|---|---|---|
|
EPPAI_BROWSE |
View the action items in the list. |
|
|
EPPAI_ITEM_INFO |
Define details for the action item. |
|
|
EPPAI_ITEM_NOTIFY |
Send notifications to list members. |
|
|
EPPDF_VIEW_TOPIC |
Post and view discussion topics for an action item. |
|
|
EPPAI_CHANGE_LOG |
View the change log for the action item. |
|
|
EPPAI_SEARCH |
Search for action items. |
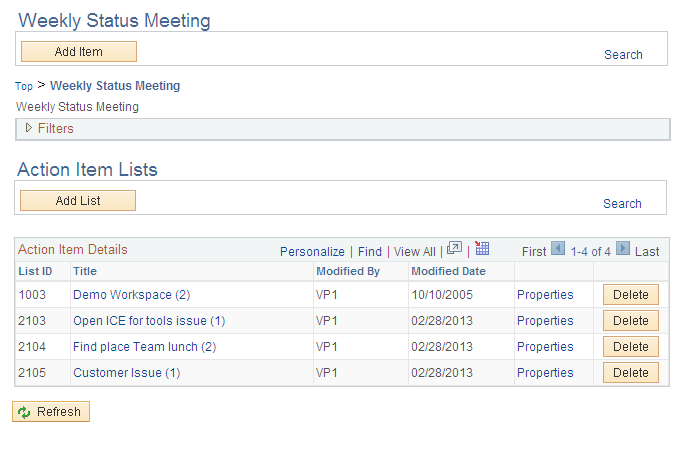
Access the Action item list homepage (click the link for a list on the My Action Item Lists page) as shown below.
The following example illustrates the Weekly status meeting in Action item list homepage .
Field or Control |
Description |
|---|---|
Add Item |
Click to access the Action Item Details page on which you can create a new action item. |
Search |
Click to access the Search Action Items page on which you can search for action items. |
Status |
Select the state or condition of the action items you want to select as your filter criteria. |
Category |
Select an action item category to use as filter criteria. |
Filter |
Click the Filter button to filter the list based on the selected criteria. |
Item ID |
The identifier that the system assigned to the action item. |
Title |
Click the item title to display the Action Item Details page and view the details of the action item. |
Priority |
The priority assigned to the action item |
Status |
The state or condition of the action item. |
Modified Date |
The date that the action item was last modified. |
Due Date |
The date that the action item is scheduled to be completed. |
Delete |
Click to delete the action item. Note: This button appears only if you have delete privileges. |
Use the Action Items Detail page (EPPAI_ITEM_INFO) to define details for the action item.
Navigation:
Click the Add Item button on the action item list homepage.
Click the link for an action item on the action item list homepage.
The following example illustrates the Action Items Details page.
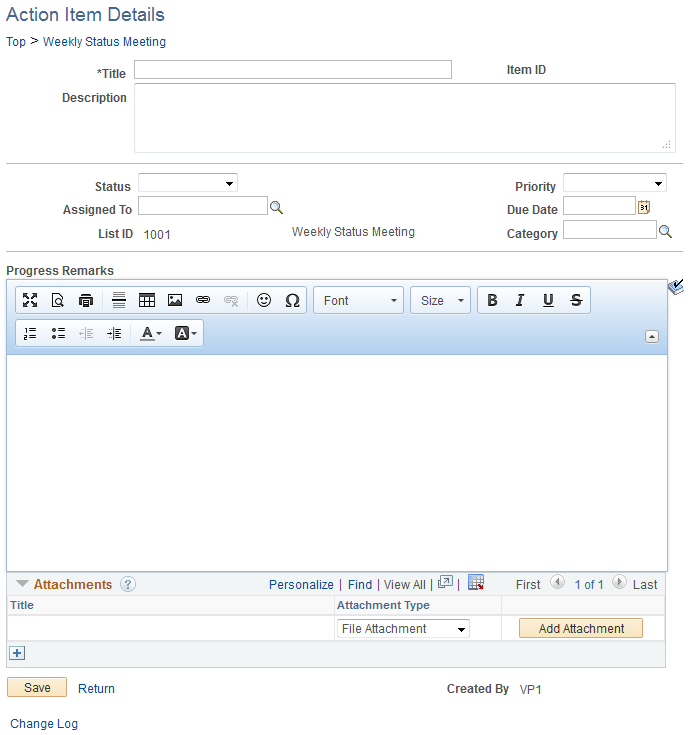
Use the Action Items Details page to define the action item.
Field or Control |
Description |
|---|---|
Top and <List Title> |
Click Top to access the My Action Item Lists page. Click list title link to access the action item list homepage. |
Title |
Enter the title for the action item. |
Item ID |
When the action item is saved, the system generates and displays a unique item ID. |
Description |
Enter a description of the task or activity. |
Status |
Select a value for the status of the action item. Note: Completed action items do not appear in a pagelet for this action item list if one is published. Completed and cancelled action items can be filtered out of the action item list homepage, the Review Action Items page, and the Tasks pagelet when the filter is set to display active or open items only. |
Priority |
Select a priority for the action item: High, Low, or Medium. |
Assigned To |
Select an assignee from the list of all users in the system. Initially, the lookup modal window displays all users with list members appearing at the top of the list. To find members of the list only, select User Type in the Search By drop-down and then select Member Users in the second drop-down list box. Note: You must have edit privileges to be able to assign an action item to a user. After you select an assignee, their profile name appears next to the Assigned To field. You can click the profile name to view the profile page for the user. |
Due Date |
Select a date from the calendar. By default, action items are displayed in order of their due dates. Note: Action items must have an assigned due date to appear in the Upcoming Action Items pagelet in Workspaces. |
List ID |
The identification number of the current list appears in this field. If you have edit privileges, you can move the action item to another list by selecting another ID from the action item lists that you have access to. Note: An action item can be associated with one list only. |
Category |
Select a category in the lookup modal window or enter a new one. When you save the action item, the new category is saved to the list of categories and is available across sites and lists. |
Progress Remarks |
Use the rich text editor to enter comments and updates regarding the action item. |
Completed By |
Select the ID of the person who completed the action item. The system automatically defaults to the user ID and profile of the person who changes the Status field to Completed. |
Complete Date |
Select the date that the action item is completed. The system automatically defaults to the date that the Status field is changed to Complete. |
Attachments
Use this section of the page to add attachments to the action item. Attachment types include file attachments and managed content.
Field or Control |
Description |
|---|---|
Attachment Type |
Select the type of attachment you want to include with the action item. Available values include: File Attachment. Select to upload a local file. Managed Content. Select to attach a piece of managed content from the content management system. |
Add Attachment |
If you have selected the File Attachment attachment type, click to access a modal window that enables you to browse directories for the file you want to attach. |
Select Content |
If you have selected the Managed Content attachment type, click to access the Look Up Managed Content page on which you can select the piece of managed content you want to attach. |
Other Action Item Functions
Field or Control |
Description |
|---|---|
Save |
Click to save changes to the action item. |
Return |
Click to return to the action item list. |
Change Log |
Click to view the log of changes made to this action item. |
Notify |
Click to send a notification to selected recipients. |
Start Discussion orView Discussion |
Click to start or view a discussion related to the action item. |
Add to Personal Calendar |
Click to add the action item to your personal calendar. |
Use the Action Item Notification page (EPPAI_ITEM_NOTIFY) to send notifications to list members.
Navigation:
Click the Notify link on the Action Item Details page.
The following example illustrates the Action Item Notification page.
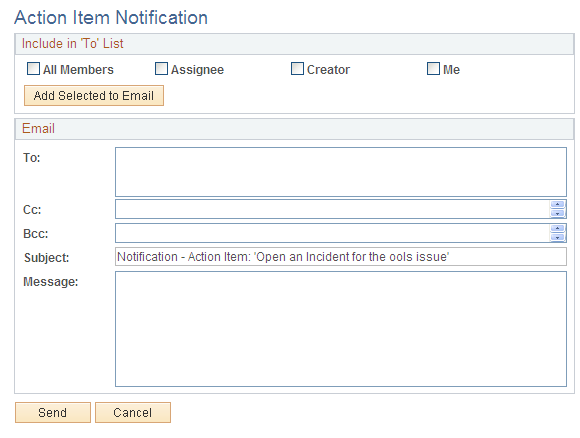
Use the Action Item Notification page to send messages to users associated with the action item. Notifications can originate because notifications have been enabled for the list on the List Properties page or they can originate as ad hoc notifications after the user has selected the Notify link.
Include in 'To' List
Select the people you want to receive the notification. Selecting any of these options populates the To field with the corresponding users from the list. Additionally, you can manually enter email addresses in the To: field.
Note: Addresses for the Cc: and Bcc: fields must be manually entered or copied and pasted from the To: field.
Field or Control |
Description |
|---|---|
All Members |
Sends the notification to all members of the list. |
Assignee |
Sends the notification to the person to whom the action item has been assigned. |
Creator |
Sends the notification to the person who created the action item. |
Me |
Sends the notification to you. |
Add Selected to Email |
Populates the To field with email addresses of those people you have selected to receive the notification. |
Use this section of the page to enter additional address information as well as the text of the notification. The system displays the title of the action item as the subject of the notification.
Field or Control |
Description |
|---|---|
To, Cc, or Bcc |
Manually enter additional email addresses in these fields. |
Subject |
Enter a subject for the email. A default subject is generated by the system. |
Message |
When sending an ad hoc notification, type the text of the message in this text box. The text appears in the email message along with a URL to the Action Item Detail page. When the notification is created because notifications have been enabled on the List Properties page, the system populates the message text box with information stating who modified the item and what they changed. You can add any additional information by typing it after the system-generated text. |
Send |
Click to send the email notification. |
Use the Post Details page (EPPDF_VIEW_TOPIC) to post and view discussion topics for an action item.
Navigation:
Click the Start Discussion link on the Action Item Details page.
Click Yes.
Click the View Discussions link on the Action Item Details page.
The following example illustrates the Post Details page for an action item.
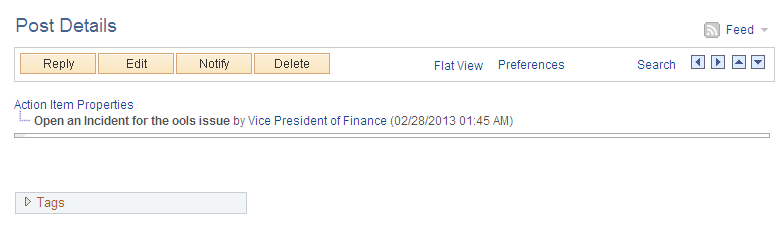
The Post Details page starts a single-topic discussion forum for this action item. List members can edit the topic and post replies. If there is already a forum started for this item, the link on the Action Item Details page will display as View Discussion.
Note: Discussions started for an action item will not appear in the Discussion Forums pagelet.
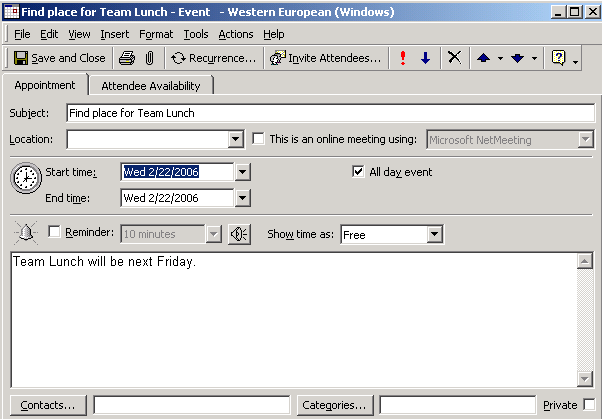
Click the Add to Personal Calendar link on the Action Item Details page.
Depending on the options defined in the Installation Options page, the system can either create a calendar event that you can save to your default calendar application or it can send you an email that you can add to your calendar. The remarks appear in the body of the calendar event and the title field is the subject of the calendar event.
The following example illustrates the Personal Calendar link page.
Use the Action Items Change Log page (EPPAI_CHANGE_LOG) to view the change log for the action item.
Navigation:
Click the Change Log link on the Action Item Details page.
Use the Action Items Change Log page to review and audit all changes associated with the action item, including who made the change and when they made it.
Use the Search Action Items page (EPPAI_SEARCH) to search for action items.
Navigation:
Click the Search link on the action item list homepage.
Click the Search link on the My Action Item Lists page.
The following example illustrates the Search Action Items page. Access the Search Action Items Page (click the Search link on the action item list homepage, or click the Search link on the My Action Item Lists page) as shown below.

Use the Search Action Items page to search for action items to which you have access.
Field or Control |
Description |
|---|---|
Search Text |
Enter the text query in the Search Text field. |
Search Tips |
Click Search Tips to get more information about searching action items. |
Search In |
Select a scope to search for action items. Available options are:
|