Creating and Updating Workspaces in Batch Mode
This section discusses how to run the process to create and update workspaces in batch mode.
|
Page Name |
Definition Name |
Usage |
|---|---|---|
|
Batch Create Workspaces Page |
EPPCW_IMPORT_RUN |
Specify the XML and other parameters for the workspace batch process. See Running the Process to Create and Update Workspaces in Batch Mode |
|
Document Type Definition (DTD) Page |
EPPCW_IMPRTDTD_SBP |
Review the DTD that provides the specification for the XML for the workspace batch process. See Running the Process to Create and Update Workspaces in Batch Mode |
|
Sample XML File Page |
EPPCW_IMPRTXML_SBP |
View example XML that can be copied and modified to be the input to the workspace batch process. See Running the Process to Create and Update Workspaces in Batch Mode |
This section discusses how to:
Create and update workspaces in batch.
Review the DTD.
View the example XML.
Modify XML attributes for workspace creation and update.
Batch Create Workspaces Page
Access the Batch Create Workspaces page (Portal Administration, Workspaces, Batch Create Workspaces, Batch Create Workspaces).
This example illustrates the fields and controls on the Batch Create Workspaces page. You can find definitions for the fields and controls later on this page.
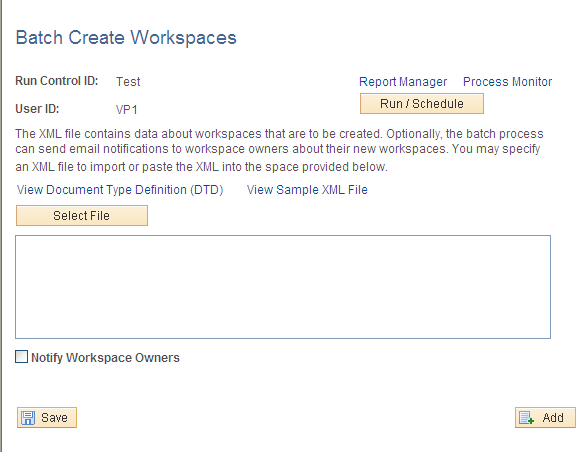
Use the Batch Create Workspaces page to specify XML and other parameters for the workspace batch process (EPPCW_IMPORT). The EPPCW_IMPORT Application Engine program returns a standard processing log for the job and an XML file of any workspaces that had errors and were not created by the process, for example, workspaces that had blank values for required elements. You can correct the XML blocks and resubmit them for processing.
Field or Control |
Description |
|---|---|
Report Manager |
Click to access the Report Manager module to view report results. See the product documentation for PeopleTools: Process Scheduler,“Using Report Manager.” |
Process Monitor |
Click to access the Process Monitor to view the status of job requests. See the product documentation for PeopleTools: Process Scheduler, “Using Process Monitor.” |
Run / Schedule |
Click to schedule and run this process. Process Scheduler runs the EPPCW_IMPORT process at the user-defined time. See the product documentation for PeopleTools: Process Scheduler“Submitting and Scheduling Process Requests.” |
View Document Type Definition (DTD) |
Click to review the DTD that provides the XML specifications for the workspace batch process. |
View Sample XML File |
View example XML that demonstrates how to create and update workspaces. Copy and modify this XML to be the input to the workspace batch process. Save the XML as a file, or paste the modified XML directly into the text box. |
Select File |
Click to browse to a local file that you want to use to create or modify workspaces in batch mode. |
Upload |
Insert the XML that defines the workspaces to be created or updated. |
Notify Workspace Owners |
Select this check box to send an email to the owner of each workspace indicating that the workspace was created or modified. |
The output file is named EPPCW_BATCH_ERROR.xml and is written to the application server. Use the Process Monitor to access the log file.
Reviewing the DTD
Access the Document Type Definition (DTD) page (click the View Document Type Definition (DTD) link on the Batch Create Workspaces page).
Use the Document Type Definition (DTD) page to review the DTD, which provides the XML specifications for the workspace batch process. The workspace DTD is included here for reference:
<!DOCTYPE WORKSPACES >Viewing the Example XML
Access the Sample XML File page (click the View Sample XML File link on the Batch Create Workspaces page).
Use the Sample XML File page to view example XML that demonstrates how to create and update workspaces. You can copy and modify this XML to be the input to the workspace batch process. Save the XML as a file or paste the modified XML directly into the text box on the Batch Create Workspaces page.
Modifying XML Attributes for Workspace Creation and Updating
Copy the delivered sample XML and modify it to create or update specific workspaces. To create or update multiple workspaces, copy and modify the block of XML for each workspace you are modifying or creating.
The workspace DTD specifies the following XML elements:
Field or Control |
Description |
|---|---|
<workspaces> |
Requires at least one <workspace> element. |
<workspace> |
Each <workspace> element corresponds to a workspace and has two attributes:
|
<portalname> |
Enter the name of the portal. This attribute is required for UPDATE mode only. |
<description> |
Optional attribute. Enter a text string describing the workspace. |
<welcometext> |
Optional attribute. Enter text that you want to appear as a welcome message in the Welcome pagelet. |
<invitationtext> |
Optional attribute. Enter the text that is sent out in an email as an invitation to participate in the workspace. |
<category> |
Optional attribute. Enter the name of the category you want to assign to the workspace. |
<template> |
Optional attribute. Enter the template name for the workspace. |
<validfrom> |
Optional attribute. Enter the date that the workspace becomes valid. |
<validto> |
Optional attribute. Enter the date that the workspace is no longer valid. |
<members> |
Each <workspace> element requires a <members> element, which in turn requires at least one <member> element. |
<member> |
Each <member> element corresponds to a workspace member and has three required elements:
|
<keys> |
The <keys> element is optional and is only valid when the workspace template defines contextual keys. If used, you must define at least one <key> element. |
<key> |
Each <key> element corresponds to a contextual data key for the workspace and has four required elements:
|