Creating Child Workspaces
This section discusses how to create a child workspace.
|
Page Name |
Definition Name |
Usage |
|---|---|---|
|
EPPCW_WS_CREATE |
Create a child workspace of the selected parent. |
Access the Create Child Workspace page (select a parent workspace and click the Create Child Workspace button on the Workspaces - Hierarchy page).
This example illustrates the fields and controls on the Create Child Workspace page. You can find definitions for the fields and controls later on this page.
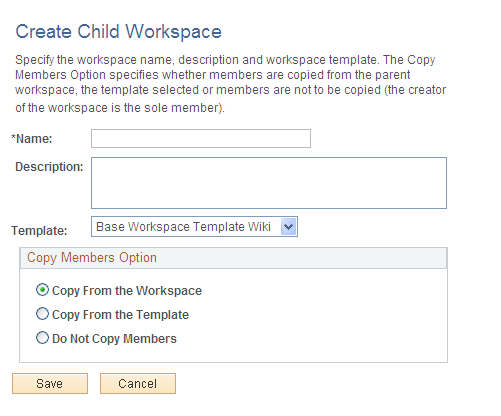
Use the Create Child Workspace page to create a child of the parent workspace. As an alternative to the five steps of the workspace wizard, this page allows you to specify the name, description, template, and default members in one step. If the child workspace uses the same template as the parent, then the default option is to copy workspace members from the parent. If the child workspace uses a different template, then the default option is to copy workspace members from the template.
Field or Control |
Description |
|---|---|
Name |
Enter a name for the workspace. The name of the workspace appears in the header on the workspace homepage, at the top of the workspace menu, and anywhere workspaces are listed—for example, on pages to search for or manage workspaces, in pagelets, in search results, and so on. |
Description |
Enter an optional description for the workspace. This description also becomes the default welcome text, which is displayed in the Welcome module if that module is configured for this workspace. |
Template |
Select the template on which you want to base your child workspace. The template used by the parent workspace is selected by default, but can be overridden. |
Copy Members Option |
Select the copy option:
|