Setting Up Multiple Application Instances
This topic discusses how to set up multiple instances of an application in PeopleSoft Interaction Hub.
For purpose of illustrating the use of multi-instance setup, this topic describes a sample scenario that will be referenced when discussing the steps in multi-instance setup. This sample scenario does not attempt to cover all the business requirements that you may need in your organization. Your multi-instance setup may vary from this sample scenario.
Sample Scenario to Illustrate Multi-Instance Setup
This sample scenario has four HCM databases that are split based on product areas and geographical regions.
The four databases and their portal nodes are listed here:
HR Core
Portal Node: HRMS
Recruiting
Portal Node: HRMS_RECRUIT
Time and Labor EMEA
Portal Node: HRMS_EMEA
Time and Labor APAC
Portal Node: HRMS_APAC
The HR Core is the primary application and the Recruiting, Time and Labor EMEA, and Time and Labor APAC are participating instances.
Before attempting to set up multiple instances of an application, you must ensure that you have successfully configured unified navigation on your portal system for the application that requires a multi-instance setup.
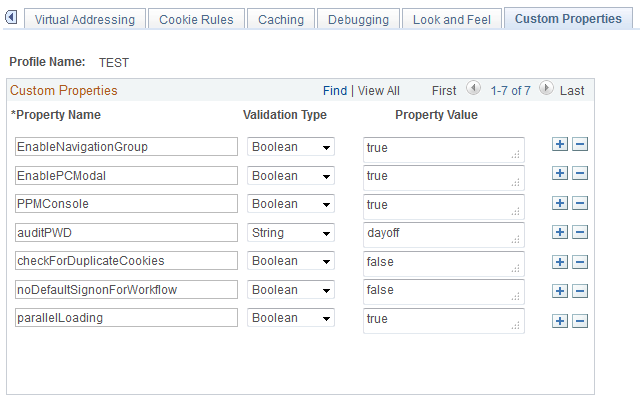
The EnableNavigationGroup custom property must be added in the portal system, the core application system, and in the participating instances. This custom property must be added in the default web profile of the portal system, the core application system, and the participating instances.
Use the Custom Properties tab of Web Profile Configuration page to add the EnableNavigationGroup custom property in the default web profile.
Navigation:
and click the Custom Properties tab.
This example illustrates the fields and controls on the Web Profile Configuration - Custom Properties page.

Field or Control |
Description |
|---|---|
Property Name |
Enter EnableNavigationGroup. |
Validation Type |
Select validation type as Boolean. |
Property Value |
Select property value as true. |
Note: By default, navigation group is not enabled in the PeopleSoft Interaction Hub. If you want to set up multiple instances, you must enable the EnableNavigationGroup property in the Web Profile Configuration page.
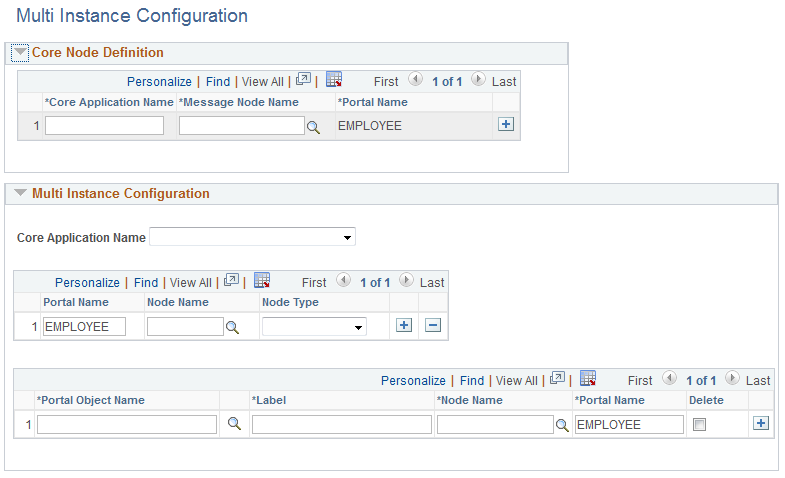
Use the Multi Instance Configuration page to define the core application and the participating instances.
Navigation:
This example illustrates the fields and controls on the Multi Instance Configuration Page. You can find definitions for the fields and controls later on this page.

Core Node Definition
Field or Control |
Description |
|---|---|
Core Application Name |
The name of the core application for which you need to set up multiple instances. The core application is the content provider system in unified navigation. |
Message Node Name |
The message node of the core application. For example, HRMS. |
Portal Name |
The portal on which the unified navigation cluster is created. The portal name is populated by default based on your unified navigation configuration. On clicking Save, the core application information is saved and is available for selection in the Multi Instance Configuration section. |
Multi Instance Configuration
Field or Control |
Description |
|---|---|
Core Application Name |
The core application name entered in the Core Node Definition section is available for selection. |
Portal Name |
The portal on which the unified navigation cluster is created. The portal name is populated by default based on your unified navigation configuration. |
Node Name |
Select a node. For example, select HRMS, |
Node Type |
Choose a node type from the following: Participant - the node that represents the participating instances, for example, HRMS_RECRUIT, Portal - the node that represents the portal system, for example, EMPL. Primary - the node that represents the core application, for example, HRMS. |
Portal Object Name |
The application instance that you want to include in the multi-instance setup. For example, HC_TIME_AND_LABOR. |
Label |
The label entered here is visible on the folder structure. For example, Time and Labor EMEA. |
Node Name |
The node applicable for the instance. For example, HRMS_EMEA. |
When you configure a navigation group, an Application Engine program is invoked that synchronizes the navigation group data across the participating application instances in the unified navigation cluster and updates the portal registry.
The navigation group must be configured for each portal in a unified navigation cluster. For example, if you are logged into the EMPLOYEE portal and configure a navigation group, the configuration is applicable only to the EMPLOYEE portal. You must log on to each participating portal and configure the navigation group for each portal.
When you add or delete folders and content references (CREFs), you must update the navigation group so that the AE program is invoked to synchronize the navigation group and portal registry across the unified navigation cluster.
PeopleSoft Interaction Hub provides you the flexibility to configure a functional navigation group or a user based navigation group.
Navigation Group Based on Functional Split
In a functional split, all users who log into the multi-instance system are directed to a specific instance by default.
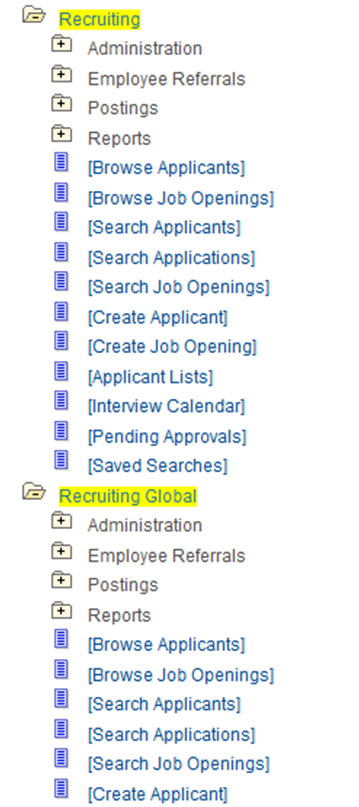
For example, when you select the Recruiting folder and label it as Global Recruiting, and set the node to HRMS_RECRUIT, all users are directed to the recruiting instances hosted in HRMS_RECRUIT by default. The AE program creates a new recruiting folder with label as Recruiting Global.
This example illustrates the folder structure when you create navigation group based on functional split.

Navigation Group Based on User Level Split
In a user-level split, you direct a user to an appropriate instance.
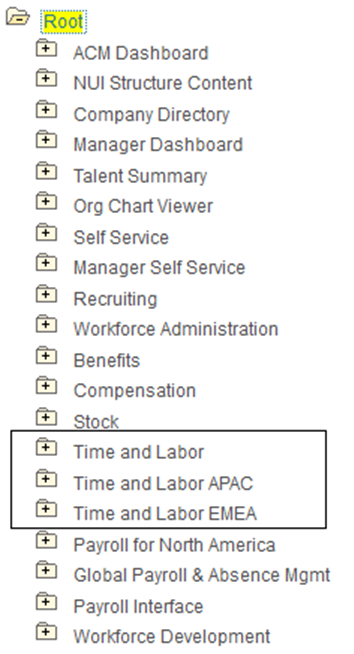
For example, two instances of Time and Labor are set up in the multi-instance system based on geographical location (EMEA and APAC) and user is directed to the appropriate instance based on the geographical location.
This example illustrates the folder structure when you create navigation group based on user-level split.

In a multi-instance unified navigation cluster, to access the folders and content references specified in the navigation group, additional roles and permission lists are required to authorize access for users.
Security administrators must create additional roles and permission lists to synchronize security across the multi-instance unified navigation cluster.
When you create a navigation group, only the content reference URLs are resolved automatically on the multiple instances of an application. You must manually configure pagelets from the multiple instances into the dashboard or WorkCenter.
To configure pagelets from multiple instances:
Navigate to the Manage Dashboard Pages page (), and click the Pagelets button for the required dashboard.
On the Tab Content page, click the Pagelet Search button.
On the Pagelet Search page, enter the appropriate node name, and click Search.
Add the pagelet.
In a multi-instance unified navigation cluster, if related actions are available for different instances, you must configure the related actions separately to point to the different instances. In such a case, for users who have access to only one instance, a single related action pointing to the specific instance will be available, but for users who have access to both the instances, two related actions will be available, so the user can choose the instance they want to navigate to.
To configure related actions separately for different instances:
Navigate to the Define Related Content Service page () and select the required service definition.
Click the Copy Service Definition button.
Enter a service ID and an appropriate label for the service.
Click Save.
Navigate to the newly created service definition.
Enter the appropriate node in the Node Name field, and click Save.
Assign the service definition to the appropriate pages.
Repeat steps 1—7 to configure related actions for another instance.