Setting Up Instant Messaging
This topic discusses methods to load instant messaging information using a comma-delimited (CSV)-formatted file and a component interface.
|
Page Name |
Definition Name |
Usage |
|---|---|---|
|
EPPRC_IM_IMPORT |
Run the Import User Instant Message Information Application Engine process (EPPRC_IM_IMP) to load user instant message data contained in CSV-formatted files. |
|
|
EPPRC_IM_ADMIN |
Manually enter user instant messaging information. Once the Import User Instant Message Information process has completed successfully, review or edit loaded user instant messaging information. |
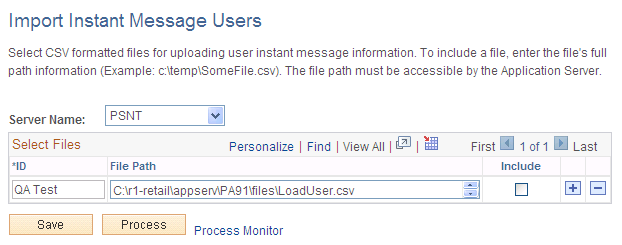
Use the Import Instant Message Users page (EPPRC_IM_IMPORT) to run the Import User Instant Message Information Application Engine process (EPPRC_IM_IMP) to load user instant message data contained in CSV-formatted files.
Navigation:
This example illustrates the fields and controls on the Import Instant Message Users page. You can find definitions for the fields and controls later on this page.
The CSV-formatted file you use to load user instant message data should contain the following information in this order:
<PeopleSoft Interaction Hub user ID>,<instant message domain>,<domain screen name>
For example, the following user’s instant messaging information should appear in the CSV-formatted file entry as shown here:
Field or Control |
Description |
|---|---|
PeopleSoft Interaction Hub user ID |
VP1 |
Instant message domain |
YAHOO |
Domain screen name |
pat_smith |
CSV-formatted file line entry |
VP1,YAHOO,pat_smith |
Entries in the CSV-formatted file are case sensitive. For example, instant message domains must be capitalized (GTALK, SAMETIME, XMPP, or YAHOO), and the PeopleSoft Interaction Hub user ID and domain screen name in the CSV-formatted file must use the case formatting of your actual user ID and screen name.
In addition, there should be no spaces around commas in the CSV-formatted file.
You can generate a CSV-formatted file by creating a spreadsheet formatted like the one shown in the following example.
This example illustrates a spreadsheet formatted to generate CSV-formatted file.
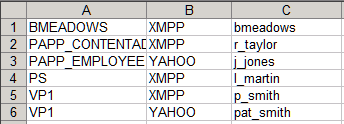
When you save the spreadsheet, select a Save as type value of CSV (Comma delimited (*.csv).
If you open the file in a text editor, it should appear as shown in the following example.
This example illustrates a CSV-formatted file content.
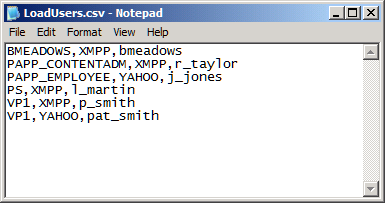
Create one CSV-formatted line entry for each unique user ID and instant message domain combination.
Field or Control |
Description |
|---|---|
Server Name |
Select the server you want to use to run the process. Select a server that can access the designated file path to the CSV-formatted file. |
Select Files
Field or Control |
Description |
|---|---|
ID |
Enter an identifier for the data in the designated CSV-formatted file. |
File Path |
Enter the full path to the CSV-formatted file that contains the user instant message data you want to load. The file path you enter must be accessible by the server selected in the Server Name field. |
Include |
Select to include the CSV-formatted file in your run of the Import User Instant Message Information process. |
After the process has completed successfully, review or edit loaded user instant messaging information on the Manage Instant Messaging page.
Rather than using a CSV-formatted file to load user instant messaging data, you can use the EPPRC_IM_USER_CI component interface (CI) with the Excel-to-CI spreadsheet load utility to load this data from a spreadsheet, or any other external application you want to create to interact with the CI.
The Excel-to-CI spreadsheet utility supports the automatic configuration of a Microsoft Excel spreadsheet to match the properties of a designated CI. For example, the fields related to the CI; PeopleSoft Interaction Hub user ID, instant message domain, and domain user ID as discussed earlier; appear as columns in the spreadsheet. After entering data into the spreadsheet, you load it into your PeopleSoft Interaction Hub database using the associated CI.
See the product documentation for PeopleTools: Component Interfaces, “Using the Excel to Component Interface Utility.”
Use the Maintain Instant Messaging Users page (EPPRC_IM_ADMIN) to manually enter user instant messaging information.
After the Import User Instant Message Information process has completed successfully, review or edit loaded user instant messaging information.
Navigation:
This example illustrates the fields and controls on the Maintain Instant Messaging Users page. You can find definitions for the fields and controls later on this page.
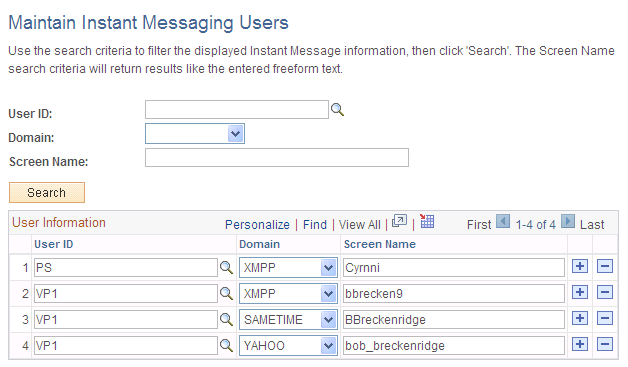
Use the elements at the top of the page to enter user instant messaging information search criteria. Elements in the scroll area on the page display your search results. You can also use the elements in the scroll area to add, delete, and edit user instant messaging information.
Field or Control |
Description |
|---|---|
User ID |
Enter the user ID of the user for which you want to view instant messaging information. |
Domain |
Select the domain name for which you want to view instant messaging information. |
Screen Name |
Enter the screen name of the user for which you want to view instant messaging information. |
Search |
Select to execute a search using any criteria you have entered in the User ID, Domain, and Screen Name fields. Your search results are displayed in the lower portion of the page. |
User ID |
Select a user’s PeopleSoft Interaction Hub user ID. |
Domain |
Select an instant messaging domain: GTALK — Google Talk. SAMETIME — IBM Lotus Sametime. XMPP — Extensible Messaging and Presence Protocol. YAHOO — Yahoo! Messenger. |
Screen Name |
Add or edit a user’s screen name for the selected domain. |