Setting Up and Maintaining Message Errors
This section discusses how to:
Create error-correction pages.
Set up the error handling utility.
Set up row security.
Set up workflow notification in PeopleSoft Application Designer.
Test the error handling utility.
Warning! Effective with the PeopleTools 8.48 release, the Integration Broker Service Operations Monitor supersedes the Error Handling utility.
Use PeopleSoft Application Designer to create error-correction pages and components.
Note: The Header Details page and the Error Details page are applicable only if data resides in the messaging queues. Use one Header Details page and one Error Details page for each field.
When creating error-correction pages, follow these guidelines:
Use EO_EIP_CTL as the main header table if you use staging tables.
Developers can use unique EIP_CTL_ID generator functions (Generate_EIP_CTL_ID and Increment_EIP_CTL_ID) available in the FUNCLIB_EOEIP.EIP_CTL_ID FieldFormula event.
Use the generate EIP_CTL_ID function to generate a unique key value for EIP_CTL_ID, based on the subscription process instance.
The EIP_CTL_ID function is the sole key in the EO_EIP_CTL header table.
Hook to EO_EIP_CTL to use the Error Handling utility for staging-table-based error handling.
Modify the record PeopleCode in the derived work record EO_EIP_CTL_WRK.
The derived work record called EO_EIP_CTL_WRK contains most of the processing logic for the utility. Although most of the codes are generic, you must write application-specific codes for the return button field (EIP_RETURN_BTN).
Add codes to return the user to the main Error Handling page.
Use the EO_EIP_CTL_WRK derived record in your component and write component PeopleCode for the record to handle any unique requirements.
Note: This unique code belongs only to your component and cannot be shared.
FUNCLIB_XXEIP Codes
Functions are created and stored in product-specific FUNCLIB_XXEIP records, with XX representing the product. Application developers can look up these function libraries for possible use as templates.
Common integration-related functions are placed in the FUNCLIB_EOEIP record.
EIP_DETAIL_BTN FieldFormula
Function Copy_Detail_Errors (&WRK_FIELD, &J, &WRK_ROWSET) copies edit errors to a generic error subpage.
Function BuildQueueRowset (&WRK_ROWSET1 As Rowset, &WRK_ROWSET2 As Rowset, &MSG_ROWSET As Rowset, &SCROLL, &RECORD_FROM, &RECORD_TO) generically builds the queue-based transfer page. This function is useful for single record messages.
FUNCLIB_EOEIP.EIP_CTL_ID FieldFormula
You need an EIP_CTL_ID every time that you process a message to maintain error handling. Use Function Generate_EIP_CTL_ID and Increment_EIP_CTL_ID to create EIP_CTL_IDs based on a new subscription process instance. For the Generate_EIP_CTL_ID function, invoke method 4 from the list of process instances.
Note: Although in some cases a random number generator is used for creating a new EIP_CTL_ID by calling Generate_EIP_CTL_ID(1), you should use the subscription process instance if possible. Generate_EIP_CTL_ID(4) uses the identifier number of the message subscription process. Remember to activate this on the message subscription properties by selecting the Generate Subscription Process Instance check box.
Warning! The Generate_EIP_CTL_ID and Increment_EIP_CTL_ID functions call other functions in FUNCLIB_ININTFC (an FDM record). You must re-create these additional functions whenever you use Generate_EIP_CTL_ID and Increment_EIP_CTL_ID within applications.
Use the Data Maintenance page (EO_EIP_CTL_SETUP1) to set up the Error Handling utility and correct message errors.
Navigation:
This example illustrates the fields and controls on the Data Maintenance page. You can find definitions for the fields and controls later on this page.
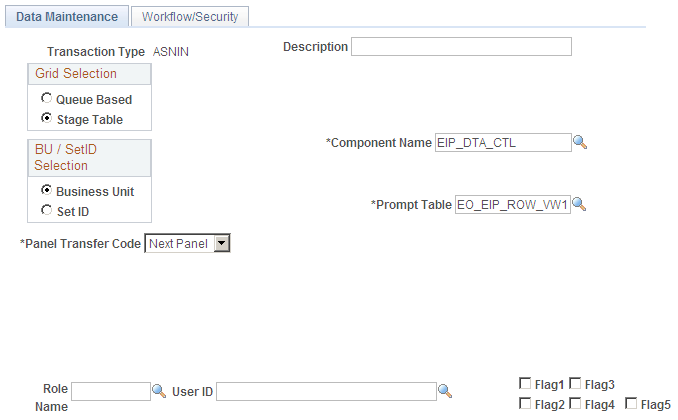
Use this page to set up the Error Handling utility and correct message errors.
Field or Control |
Description |
|---|---|
Queue Based and Stage Table |
PeopleTools messages are queue-based; bulk data or application data is usually staged. |
Business Unit and SetID |
Select a business unit or setID on which to base the data. |
Component Name |
Select the name of the component for accessing the Error Handling/Data Maintenance page (EO_EIP_CTL_MAINT). This is the component that the user opens for error-correction activities. You should select EIP_DTA_CTL. This component uses the same fonts and images for all incoming data maintenance or error-correction activities within the PeopleSoft system for non-real-time integration. |
Prompt Table |
Follow the navigation path to use the Error Handling utility, and select a prompt table for the data maintenance program (EIP_PROGRAM). The PeopleSoft system includes a common error handling menu structure that points to the main component EIP_DTA_CTL. Based on user privileges, the Error Handling utility prompts from a selected list of data maintenance programs. |
Panel Transfer Code |
Select Next Panel to receive a transfer panel name prompt, which gives you a selection of pages that are part of the main data maintenance component that you selected in the Main Data Maint Panel Group field. Select one page. Selecting either Transfer or Modal opens additional fields. |
Role Name |
Select a name to set up workflow notification and to notify all role users listed. |
User ID |
Select to notify only specific role users. |
Flag1, Flag2, Flag3, Flag4 and Flag5 |
Users often do not see these check boxes. Application developers use them for extra coding flexibility. Developers must create documentation for these check boxes to use them. |
Use the Workflow/Security page (EO_EIP_CTL_SETUP2) to set up row security.
Navigation:
This example illustrates the fields and controls on the Workflow/Security page. You can find definitions for the fields and controls later on this page.
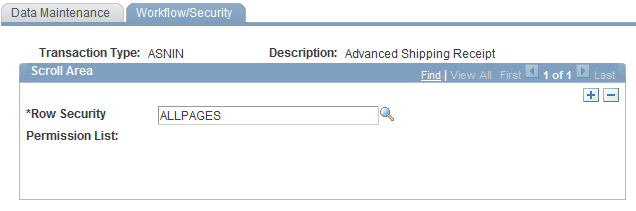
Use this page to set up row security.
Field or Control |
Description |
|---|---|
Row Security Permission List |
Assign a row security class to the transaction type that you are setting up. Note: The value that you select determines which user can see the given transaction type. You can enter multiple row security classes. |
You can set up an EO_WF_ERR Application Engine process to scan the EO_EIP_CTL table periodically to look for rows with ERROR status. When the system finds errors, it generates workflow notifications and routes them to the role users that you designated in the User ID field on the Data Maint Setup1 page. Clicking the worklist item in the workflow notification transfers the user to the Error Handling/Data Maint (error handling/data maintenance) page.
To set up workflow notification:
Open an instance of PeopleSoft Application Designer.
Select File, Open.
Select Business Process from the Definition drop-down menu.
Open business process EC_MANAGE_ERRORS.
Right-click the MANAGE ERRORS icon and select View Definition.
Double-click the Correct Errors icon to open the Step Definition dialog box.
Click the Attributes button to open the Step Attributes dialog box.
Complete the required navigation information to the error correction page in the Step Attributes dialog box and click OK.
Use the Data Maintenance page (EO_EIP_CTL_MAINT) to test the error handling utility.
Test subscription processes must error out. Create a message subcontract with Error status, or create a stage-based incoming transaction with a status value of 1 (Error).
Navigation:
This example illustrates the fields and controls on the Data Maintenance page. You can find definitions for the fields and controls later on this page.
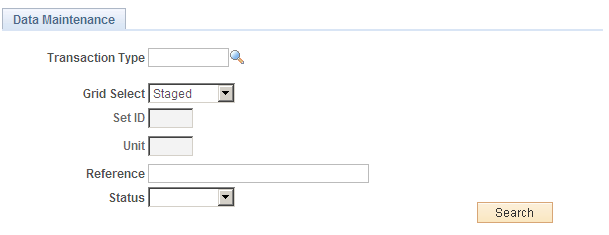
Use this page to test the error handling utility.
Test subscription processes must error out. Create a message subcontract with Error status, or create a stage-based incoming transaction with a status value of 1 (Error).
Note: Error conditions depend on processes that are specific to the application.
The Review Centralized Error page features the following page elements:
Field or Control |
Description |
|---|---|
Transaction Type |
These values are provided by your application. |
Grid Select |
Select whether the errors you want to check are queue-based, stored in a staging table, or select and search for a specific error. |
SetID |
Enter a setID. |
Unit |
Enter the unit of measure. |
Reference |
Enter a reference name. |
Status |
Select from Cancelled, Complete, Error, Hold, In Process, Incomplete, New and Reprocess. |
|
Click the Show Detail Entry icon to transfer to the application page for necessary error-correction activities. |
