Setting Up Configurable Analysis Framework
|
Page Name |
Definition Name |
Usage |
|---|---|---|
|
CAF_HANDLER_TBL |
Register application classes used as handlers in Configurable Analysis Framework (CAF). |
|
|
CAF_CONFIG_TBL_GEN |
Define data analysis. |
|
|
CAF_CONFIG_TBL_ENT |
Define the entity for the analysis. |
|
|
CAF_CONFIG_TBL_FCT |
Define the factors for the analysis. |
|
|
CAF_FACTOR_SEC |
Add factors to the Factor Analysis page. |
|
|
CAF_CONFIG_TBL_FLS |
Create a pre-selected list of factors that are available to all users. |
|
|
CAF_CNF_FL_SEL_SEC |
Copy a factor list from other users. |
|
|
CAF_CONFIG_TBL_ACT |
Define configured related actions for different levels of data. |
|
|
CAF_ACTION_SEC |
Add a related action to the Related Action Configuration page. |
|
|
CAF_CONFIG_TBL_MSC |
Perform administrative tasks. |
|
|
CAF_ACC_CTL_TBL |
Set up access control for factors and related actions for an analysis. |
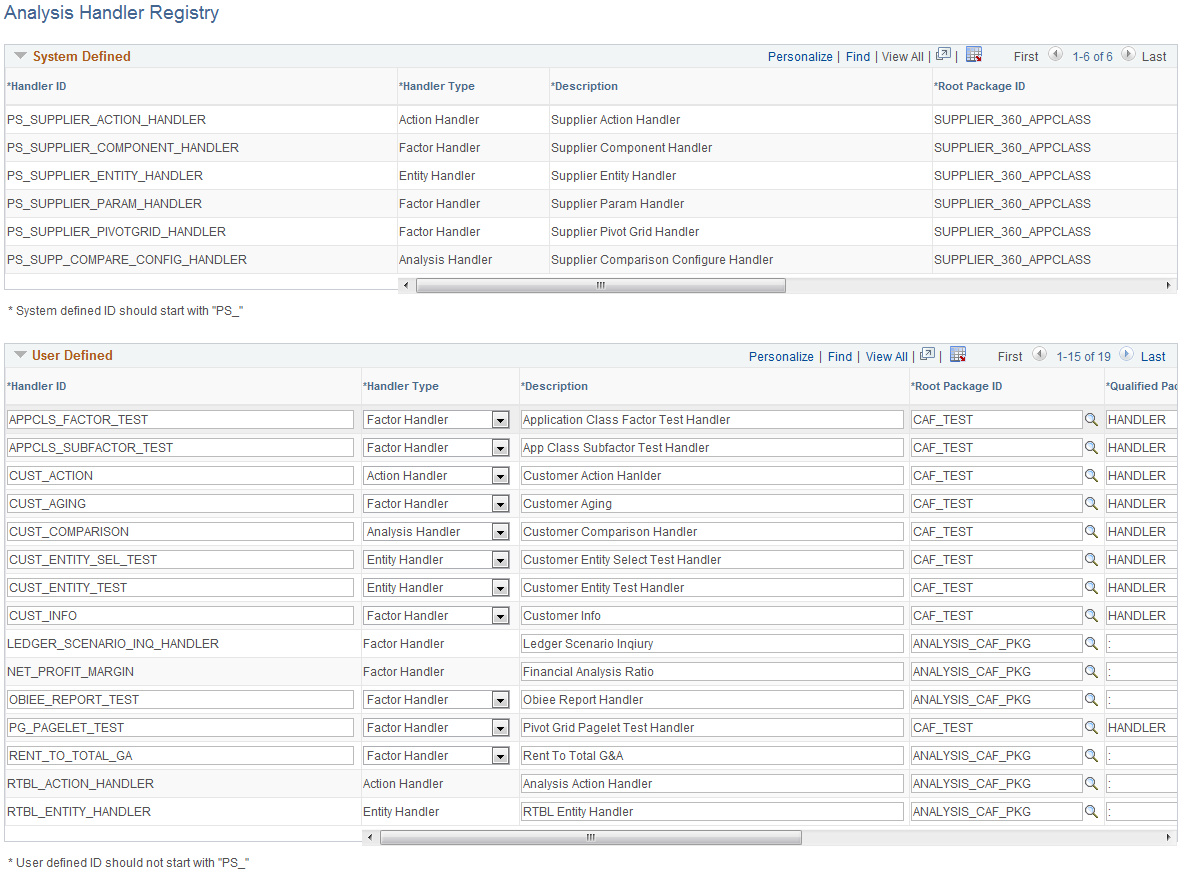
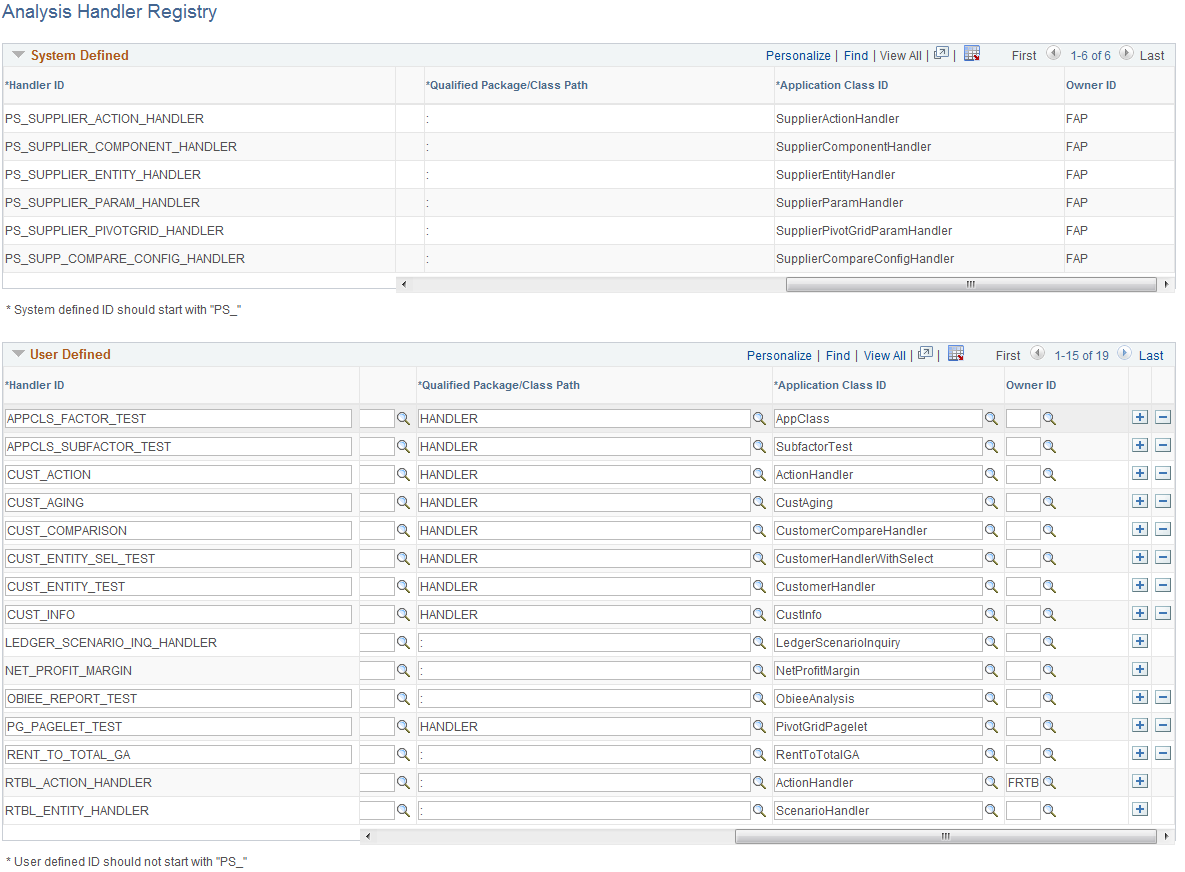
Use the Analysis Handler Registry page (CAF_HANDLER_TBL) to register application classes used as handlers in Configurable Analysis Framework (CAF).
Navigation:
This example illustrates the fields and controls on the Analysis Handler Registry page (1 of 2)
This example illustrates the fields and controls on the Analysis Handler Registry page (2 of 2) after scrolling to the right.
Application developers use this page to create user defined handler ID’s.
User Defined
System defined handlers are available for you to use. However, if you need to create your own handlers, use this section to create user defined handlers.
Field or Control |
Description |
|---|---|
Handler ID |
Enter a unique Id that is used when referencing the application class. Note: System defined handlers should always begin with “PS_”. User defined handlers should NOT begin with “PS_”. |
Handler Type |
Select the type of handler that is being registered. Options include:
For a description of each option and additional information, see Handler Types. |
Root Package ID, Qualified Package/Class Path, and Application Class ID |
Select the full path to the application class. The system verifies that the application class is a valid subclass of the handler type when you save the page. |
Owner |
Select a product or owner ID for the handler. This is an optional field. |
Use the Analysis Configuration page (CAF_CONFIG_TBL_GEN) to define data analysis.
Navigation:
This example illustrates the fields and controls on the Analysis Configuration page.
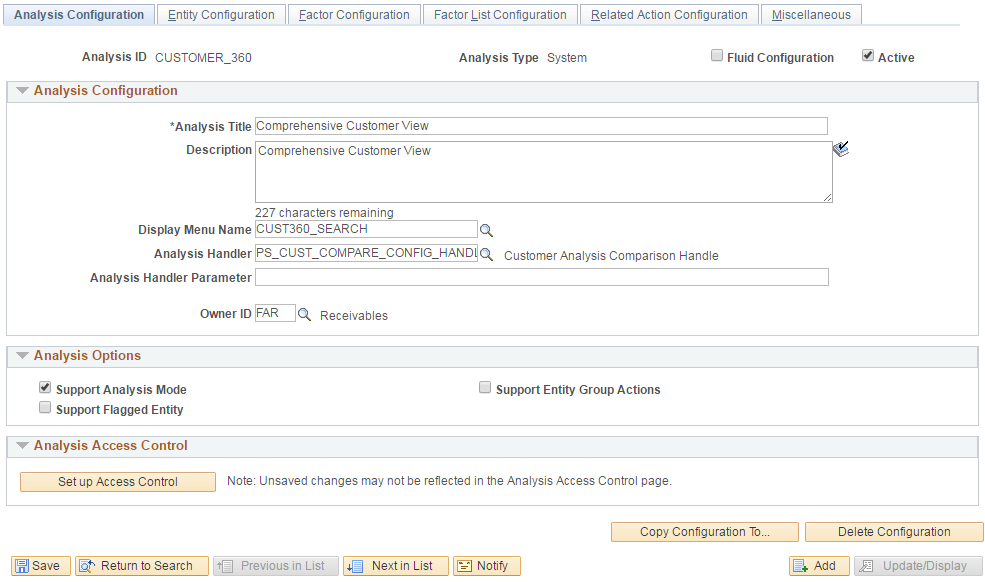
Use this page to set up general information about the analysis.
Field or Control |
Description |
|---|---|
Analysis ID and Analysis Type |
Displays key fields for the analysis. The analysis type is System Defined or User Defined, which corresponds to the Analysis Handler Registry Page. |
Fluid Configuration |
Select to indicate if this is a Fluid configuration. |
Active |
Select to indicate that the analysis can be used. |
Analysis Configuration
Field or Control |
Description |
|---|---|
Analysis Title |
Enter a title that appears on the Analysis Display page for Classic implementations. For more information about the Analysis Display page, see Using Configurable Analysis Framework. |
Display Menu Name |
Select the name of the menu where the Display Analysis page is accessed or the Tile in case of CAF Fluid implementation. For Classic Implementations:
For Fluid Implementations:
|
Analysis Handler and Analysis Handler Parameter |
(Optional) Select the handler and enter its parameter. |
Owner ID |
(Optional) Select an owner for the analysis. This field is informational only and is not used by the system. |
Analysis Options
Field or Control |
Description |
|---|---|
Support Analysis Mode |
Select to support analysis mode. |
Support Entity Group Actions |
Select to support entity group actions. This is not allowed for Fluid configurations. |
Support Flagged Entity |
Select to allow users to flag one or more entities. |
Analysis Access Control
Access control must be set up for the analysis.
Field or Control |
Description |
|---|---|
Set up Access Control |
Select this button to access the Analysis Access Control Page in a modal window. Note: The current data for the analysis configuration must be saved before changes are reflected in the Analysis Access Control component. For example, if a new factor is added on the Factor Configuration page, you must save the page before the factor is reflected on the Analysis Access Control component. |
Field or Control |
Description |
|---|---|
Copy Configuration To ... |
Select this button to copy this configuration to a new configuration. This button accesses the Copy Configuration window where you can select an analysis type and enter a new analysis ID. |
Use the Entity Configuration page (CAF_CONFIG_TBL_ENT) to define the entity for the analysis.
Navigation:
This example illustrates the fields and controls on the Entity Configuration page.
Field or Control |
Description |
|---|---|
Entity Label and Entity Label (Plural) |
Enter a singular and plural description for the entity label. The framework requires singular and plural forms so that it can properly create labels. Examples include Customer and Customers so that CAF can display messages such as “Flag this Customer” and “Select All Customers”. |
Entity Record Name |
Select a record or view that indicates the structure of the entity and the record from which to retrieve the data. If the keys of the record or view include OPRID (operator ID), then row-level security is used to select entities that are accessible to the user when CAF selects the data, For Fluid CAF, when the record has a field of type Image, the image is displayed in Comparison Mode at the Header. |
Key Separator |
Enter a value that is used to separate key values. The session tracks the entity keys using a composite key This key is obtained by concatenating the key fields of the entity. The key fields are separated by a key separator. If you leave the key separator blank, the system uses “~|~” as the default value. However, if you believe that “~|~” can be found in some key values, then you should specify a different value as the key separator. Note: Use caution when changing key separators or entity keys because any saved views or saved sessions will not be valid. |
Description Field |
Select a field from the entity record that is used to retrieve the title or name for the entity. For example, NAME1 for customer name. |
Entity Handler and Entity Handler Parameter |
Select the handler ID and the parameters if a handler is implemented for the entity. |
Use the Factor Configuration page (CAF_CONFIG_TBL_FCT) to define the factors for the analysis.
Navigation:
This example illustrates the fields and controls on the Factor Configuration page.
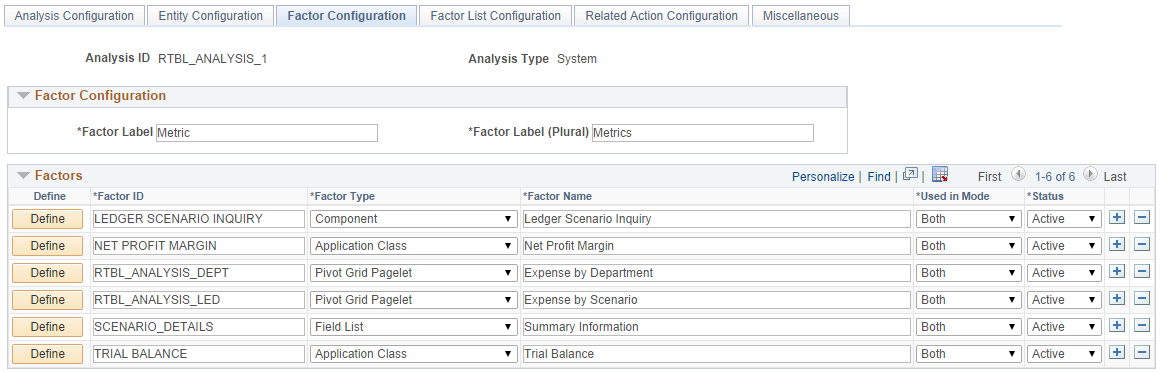
Factor Configuration
Field or Control |
Description |
|---|---|
Factor Label and Factor Label (Plural) |
Enter a singular and plural description for the factor label. The framework requires singular and plural forms so that CAF can properly display messages. Examples include Measure and Measures. |
Factors
Use this section to add factors that are to be used in the analysis.
Field or Control |
Description |
|---|---|
Define |
Click this button to access the Define Factor Page. |
Use the Define Factor page (CAF_FACTOR_SEC) to add factors to the Factor Comparison page.
Navigation:
. Click the Define button in the Factors section of the page.
This example illustrates the fields and controls on the Define Factor page.
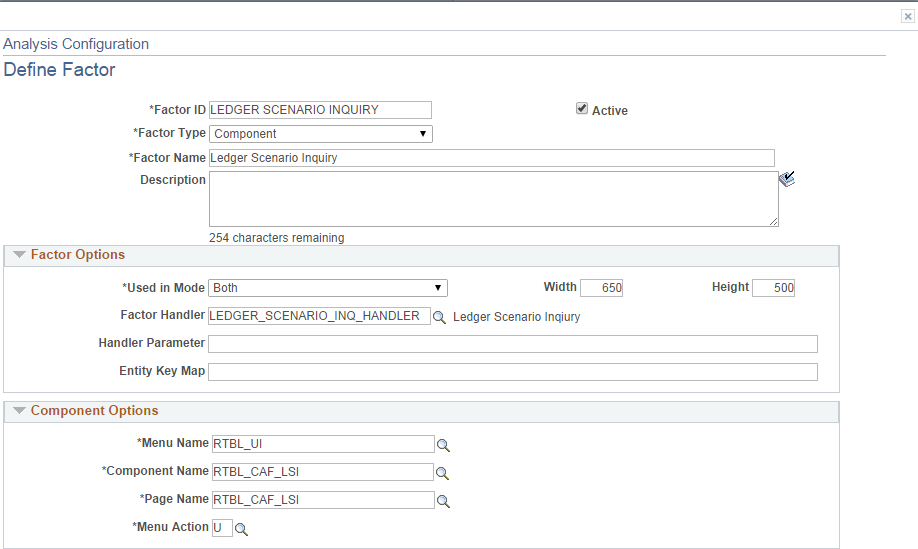
Field or Control |
Description |
|---|---|
Factor ID |
Enter an ID that identifies the factor. |
Factor Type |
Select the type of factor you want to use to display the data.. Depending on the option selected, additional fields are displayed to define the factor details. Options include:
When an option other than Application Class is selected, a new section with additional fields appears lower on the page. For a description of each option and additional information, see Factor Types. |
Factor Name |
Enter a name for the factor, which is used when displaying it to the user. |
Factor Options
Field or Control |
Description |
|---|---|
Used In Mode |
Select a mode for which this factor can be used. Options include:
|
Width and Height |
Enter a value that represents the size of the factor. The system defaults the size to 400 (width) and 300 (height). Note: For fixed size factor types, such as Component, Chart, and pagelets, the size should be large enough to accommodate the content and avoid scroll bars that the user would need to view the data. |
Factor Handler and Handler Parameter |
Select the factor handler and specify its parameters. This is a required field when the Factor Type is Application Class. When the Factor Type is anything other than application class, then factor handler is already determined. However, if you need to extend, or override, the built-in handler, then you can specify a customized handler and its parameters. The custom handler should extend or subclass from the built-in handler class. |
Entity Key Map |
Enter a value that is used to map the key values when a the record specified uses different key fields. For example, the entity record for Customer can be CUSTOMER, which is keyed by SETID and CUST_ID. If the data is retrieved from a view or record that is keyed by BILL_TO_SETID and BILL_TO_CUST_ID, then the Entity Key Map that can be used to specify the mapping could be BILL_TO_SETID=SETID,BILL_TO_CUST_ID=CUST_ID For some factor types, CAF automatically passes the selected entity keys to retrieve the data for display. For example, with the HTML factor type, an administrator can use the expression #{RECORD.FIELD} to specify the record and the field to retrieve the data. In most cases, the record specified should be keyed at the entity level and use the same key fields. However, it is possible that the record specified uses different key fields. |
Component Options
Data is displayed by entity and the search record for the component should be keyed by entity. CAF automatically passes the entity keys to the component to bypass the search dialog. The Entity Key Map field can be used if the key fields are different. However, this create a transaction to display the data. Therefore, it may be more efficient to use other factor types such as PS Query, Field List, and so on.
Field or Control |
Description |
|---|---|
Menu Name, Component Name, Page Name, and Menu Action |
Enter the values for the target component. |
Field List Options
When this option is selected the left column is intended to display field labels and right justified. The right column is intended to display the field values and is left justified.
Field or Control |
Description |
|---|---|
Label Column Width and Value Column Width |
Enter the column width for field labels and field values. The preferred method is to enter one column a percentage so that the data display can automatically adjust based on the cell size of the data. Then, enter the other column using “*”, which indicates that it will use the remaining width. |
Seq (sequence) |
Enter the sequence of each row. The rows are ordered in this sequence when viewed by a user. |
HTML Options
If the HTML generated for each entity is the same except for the data, then this factor type can be used. The HTML can be coded to format the data and the value expressions can be used to substitute the data in the HTML.
Field or Control |
Description |
|---|---|
HTML |
Enter the HTML code. Value expressions should be used to substitute the data that is specific to each entity. You may provide formatting for this data. |
PS Query Pagelet Options
When this option is selected, you must perform theses steps:
Create a PS Query.
Use the Pagelet Wizard to create the Pagelet for the PS Query.
Create a factor that uses PS Query Pagelet as the factor type and complete the PS Query Pagelet Options.
The data that is generated for this option is a static HTML, image, or both, and the factor is not interactive. However, this options provides the best performance when displaying the data. Therefore, if you want a simple chart, grid, or both, this option should be used instead of the Component option.
Field or Control |
Description |
|---|---|
Maximum Rows |
Enter the maximum number of rows to display. This field overrides the MAXROWS parameter in the pagelet. |
Pagelet Width and Pagelet Height |
Enter the size of the container that holds the pagelet. This value should be slightly larger than the size of the pagelet specified in the Pagelet Wizard, and smaller than the size entered in the Factor Options. This provides clean margins and reduces scrolling. |
Pagelet ID |
Select the ID of the Pagelet that you created in the Pagelet Wizard. |
Pivot Grid Pagelet Options
When this option is selected, you must perform theses steps:
Create a PS Query.
Use the Pivot Wizard to create the Pivot Grid.
Use the Pagelet Wizard to create the Pagelet for the Pivot Grid.
Create a factor that uses Pivot Grid Pagelet as the factor type and complete the Pivot Grid Pagelet Options.
For Fluid, use Publish as a Grouplet found at the last page of the Pivot Grid Wizard to create the grouplet. The new Pivot Grid Content Reference should have exactly the same name of the Pagelet.
The data that is generated for this option uses iframe and is interactive. Therefore a user can make changes to the Pivot Grid view. Changes are independent for each view, therefore to apply changes to all views, you must use the Configure Factor related action for the factor.
Field or Control |
Description |
|---|---|
Pagelet Width and Pagelet Height |
Enter the size of the pagelet. these values override the values in the Pagelet Wizard. These values should be slightly smaller than the size entered in the Factor Options. This provides clean margins and reduces scrolling. |
Pagelet ID |
Select the ID of the Pivot Grid pagelet that you created in the Pagelet Wizard. |
URL Options
Field or Control |
Description |
|---|---|
URL |
Enter the URL for the factor. The URL should be based on the entity, the installed system, or both. Note: Due to security limitations, not all URLs are supported. |
Pivot Grid Pagelet Options for Fluid
The Fluid Configurable Analysis Framework allows users to setup how each prompt field of their Pivot Grids should be populated. Handlers are not needed in most cases. Use the Pivot Grid Prompt Fields to populate the prompt fields.
Pivot Grid Prompt Fields for Fluid CAF.
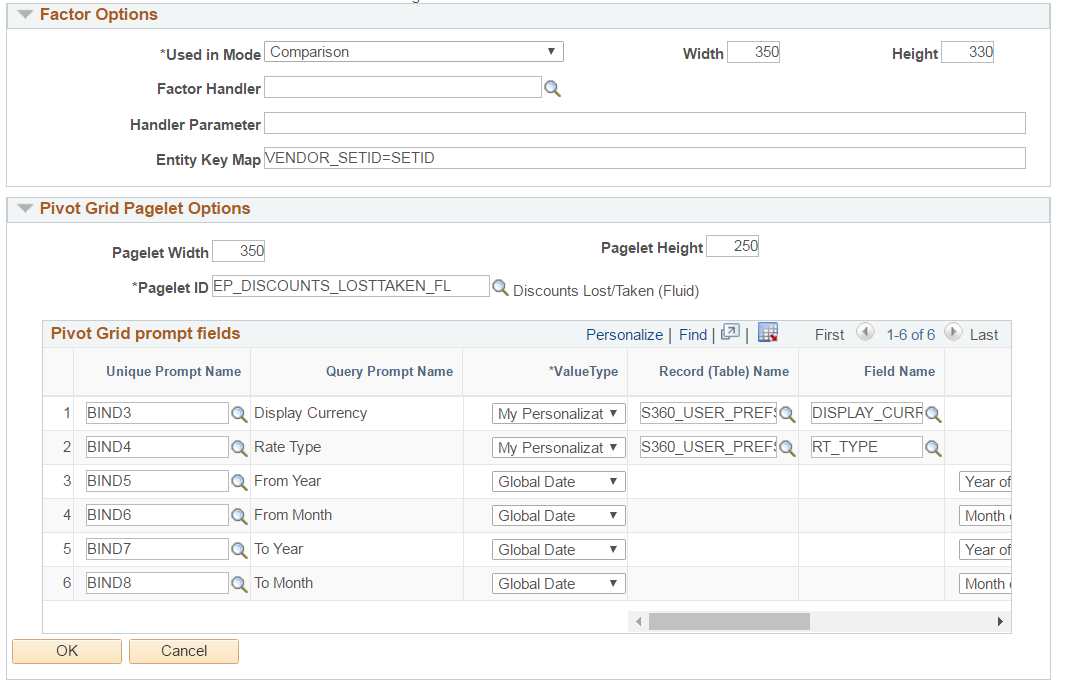
Pivot Grid Prompt Fields for Fluid CAF (2 of 2).
Field or Control |
Description |
|---|---|
Unique Prompt Name |
The Pivot Grid prompt fields defined in Pivot Grid Wizard. |
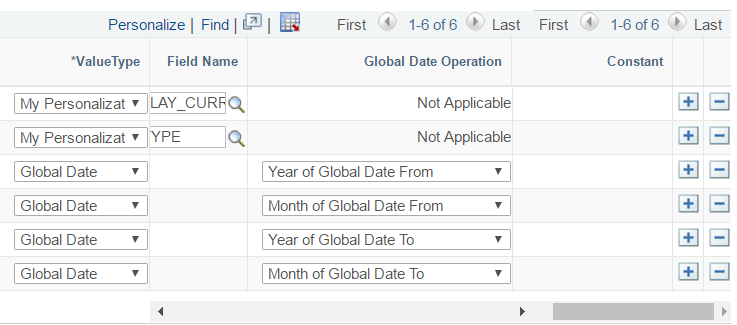
Value Type |
The options users can use to populate the prompt fields. Available options are:
|
Record (Table) Name |
This field is enabled only when the Value Type is My Personalization. The personalization can be changed dynamically if the Action Level is set to Analysis. For more details, see Related Action Configuration Page |
Field Name |
This field is enabled only when the Value Type is My Personalization. Specify a field of the My Personalization record. |
Global Date Operation |
This field is enabled only when the Value Type is Global Date. The options available are:
|
Constant |
This field is enabled only when the Value Type is Constant. Specify a constant value for this field. |
Use the Factor List Configuration Page (CAF_CONFIG_TBL_FLS) to create a pre-selected list of factors that are available to all users.
Navigation:
.
This example illustrates the fields and controls on the Factor List Configuration page..

Depending on the needs of your users, this page allows them to switch between different sets of factors without having to select individual factors, or without having to create their own factor lists. The list includes the position and size of the factor for the administrator to create the list using the CAF Display page (for the classic CAF implementations) or the Fluid CAF for Fluid implementation as opposed to entering the data in this page. Therefore, to set up a factor list, create it using the CAF Display page or the Fluid CAF page and then use this page to copy the factor lists as part of your configuration. Alternatively, the administrator can copy public factor lists from other users and make them part of the configuration.
Factor Lists
This section displays all the factor lists that have been configured for the analysis. Each row represents one factor list.
Field or Control |
Description |
|---|---|
Default |
Select to indicate that this row is the default factor list for each display mode. Therefore, only one row can be selected for an Analysis mode row and a second row can be selected as long as it is for a Comparison mode row. The select factor list is used the first time a user accesses the analysis without specifying any factors. |
Analysis Mode |
Displays the mode to which the factor list belongs. |
Factor List Name |
Displays the name of the factor list. This value is copied from the source factor list and can be changed. |
Factors |
Displays the list of factors of the factor list. |
Status |
Select Active or Inactive. Active factor lists are available to users. |
Copy Factor Lists |
Click this button to access the Copy Factor Lists page where you can copy factor lists from users. |
Use the Copy Factor Lists page (CAF_CNF_FL_SEL_SEC) to copy a factor list from other users.
Navigation:
. Click the Copy Factor Lists button.
This example illustrates the fields and controls on the Copy Factor Lists page.

Follow these steps to search for and copy a factor list into the Factor List Configuration page:
Enter or select a user ID.
(Optional) Select the analysis mode.
Click the Search button.
Select the check box next to the factor list that you want to copy.
You can select more than one if you want to copy multiple factor lists.
Click the OK button to copy the factor list and return to the Factor List Configuration page.
Use the Related Action Configuration page (CAF_CONFIG_TBL_ACT) to define configured related actions for different levels of data.
Navigation:
.
This example illustrates the fields and controls on the Related Action Configuration page.

Field definitions are available below the Define Related Action page.
Field or Control |
Description |
|---|---|
Define |
Click this button to access the Define Related Action Page. |
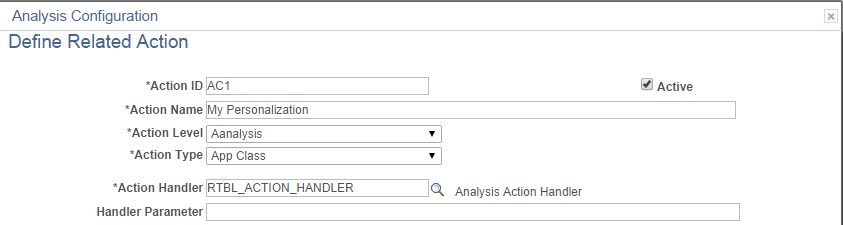
Use the Define Related Action page (CAF_ACTION_SEC) to add a related action to the Related Action Configuration page.
Navigation:
. Click the Define button.
This example illustrates the fields and controls on the Define Related Action page.
Field or Control |
Description |
|---|---|
Action ID and Action Name |
Enter a unique action ID and a name for the related action. The name appears for users. |
Active |
Select the check box to indicate that the action is active. Only active related actions are displayed to users. |
Action Level |
Select the level to which the related action is associated. Options are:
|
Factor ID |
Select the factor to which this action is associated. Or, you can leave this field is blank and it will be applicable to all factors in the analysis. This option is only available when the action level is Factor and Factor Data. |
Configure Action |
Select to indicate that this is the configuration action for the factor. It is the action that is associated with the Configuration Factor button for the factor. Only one related action can have the this check box selected and it overrides any dynamic configure action from the faction handler. This check box is only available when the action level is Factor. |
Action Type |
Select the type of related action. Options include:
|
Action Handler and Handler Parameter |
Select the action handler for the related action. This field is required for the application class action type, and is optional for the component action type. When the action handler is selected, it overrides the built-in handler and you can enter the parameter of the handler. |
To create an Analysis Related Action My Personalization:
Create an action with Action Level = Analysis, and Action Type: App Class.
Create a handler to display a page where the user can maintain the fields for My Personalization record.
Enter Handler Parameter = refreshall=y.
A value is changed by doing this action every time. The Pivot Grids using Value Type = My Personalization will be automatically refreshed to reflect this change.
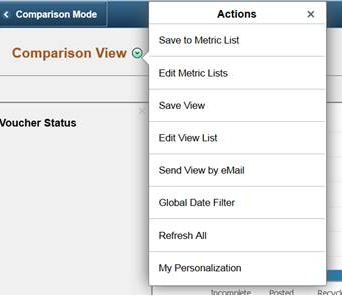
My Personalization in Related Actions for an analysis
Component Options
This section appears when Component is selected as the action type.
Field or Control |
Description |
|---|---|
Key Map |
Enter the map, which is similar to the entity key map. This option maps the key differences between the data from CAF and the data in the search record of the target component. The key fields and values that are passed from CAF when opening the component are defined in record CAF_XFRSRCH_WRK. |
Navigation Type |
Select to indicate how the component is to be opened. Options include:
|
Menu Name, Bar Name, Item Name, Panel Name, and Menu Action |
Select the path and action of the component. |
Use the Miscellaneous page (CAF_CONFIG_TBL_MSC) to perform administrative tasks.
Navigation:
.
This example illustrates the fields and controls on the Miscellaneous page.
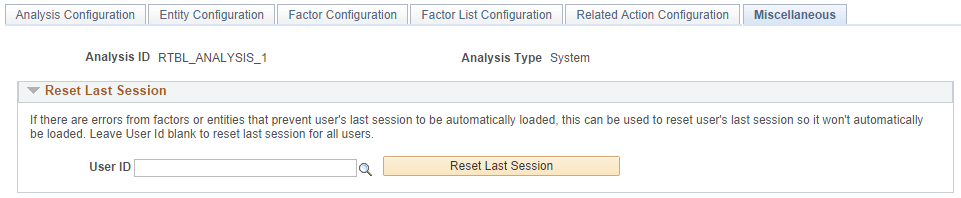
Use this page to reset the last session for a specific user or for all users.
Every time a user accesses the CAF_DISPLAY page (for Classic CAF implementations) or the Fluid CAF, a new session is created. When a user makes changes on the page, such as adding, deleting, or rearranging the entities, factors, or both the session data is saved. When the user comes back to the CAF_DISPLAY page for the same analysis, the last session that the user accessed is loaded, unless a specific session is entered by the user. If there is problem with the factors, entities, or both from the last session, during configuration or factor development, the session may not load and the page may not be displayed properly. The Reset Last Session button is provided for an administrator or developer to reset the last session, which loads a blank session instead of the last session that had the issue.
Field or Control |
Description |
|---|---|
User Id |
Select a user ID to reset the last session for a specific user. Leave this field blank to reset the last session for all users. |
Reset Last Session |
Click to reset the last session to a blank session for the specified user, or for all users, if a User ID is not specified in the User Id field. |
Use the Analysis Access Control page (CAF_ACC_CTL_TBL) to set up access control for factors and related actions for an analysis.
Navigation:
.
. Click the Set Up Access Control button on the Analysis Configuration page.
This example illustrates the fields and controls on the Analysis Access Control page. This setup page is used by both Classic CAF and Fluid CAF

Use this page to grant access to each analysis.
Field or Control |
Description |
|---|---|
Enabled |
Select to allow access control. |
Access Level |
Select the level of access. Options include:
|
All Factors |
Select to indicate that access is granted to all factors. When this option is selected, Factors and Select Factors are not displayed. |
Select Factors |
Select to access the Select Factors page, where you can select which factors of the analysis are available for the access level. This option is available when the All Factors check box is not selected. |
All Actions |
Select to indicate that access is granted to all related actions. When this option is selected, Related Actions and Select Actions are not displayed. |
Select Actions |
Select to access the Select Related Actions page where you can select which related actions are available for the access level. This option is available when the All Actions check box is not selected. |