Understanding Fluid Global Payroll Formula Designer
The Global Payroll Formula Designer interface helps you to create, edit and update formulas with free form text editor. GP Core will analyze and convert this text into the appropriate formula components.
Key features include:
User-Friendly Interface: Navigate easily with a simplified design.
Direct Formula Entry: Enter your formula text directly into the editor, eliminating the complexities of the legacy Formula Element.
Enhanced Readability: Benefit from color coding and error highlighting that improve clarity and make it easier to identify issues in your formulas.
Easy Configuration: Configure your formulas with minimal effort, allowing for quick adaptations to meet changing payroll needs.
This topic discusses:
Creating Formulas
Viewing and Editing Formulas
To define formula elements, use the GP_FRML_MAIN_FL component.
This section discusses how to create new formulas.
|
Page Name |
Definition Name |
Usage |
|---|---|---|
|
GP_FRML_MAIN_FL |
Used to name the formula element and define its basic parameters. |
|
|
GP_FRML_MAIN_FL |
Used to define your formula, edit it and confirm that it's correct. |
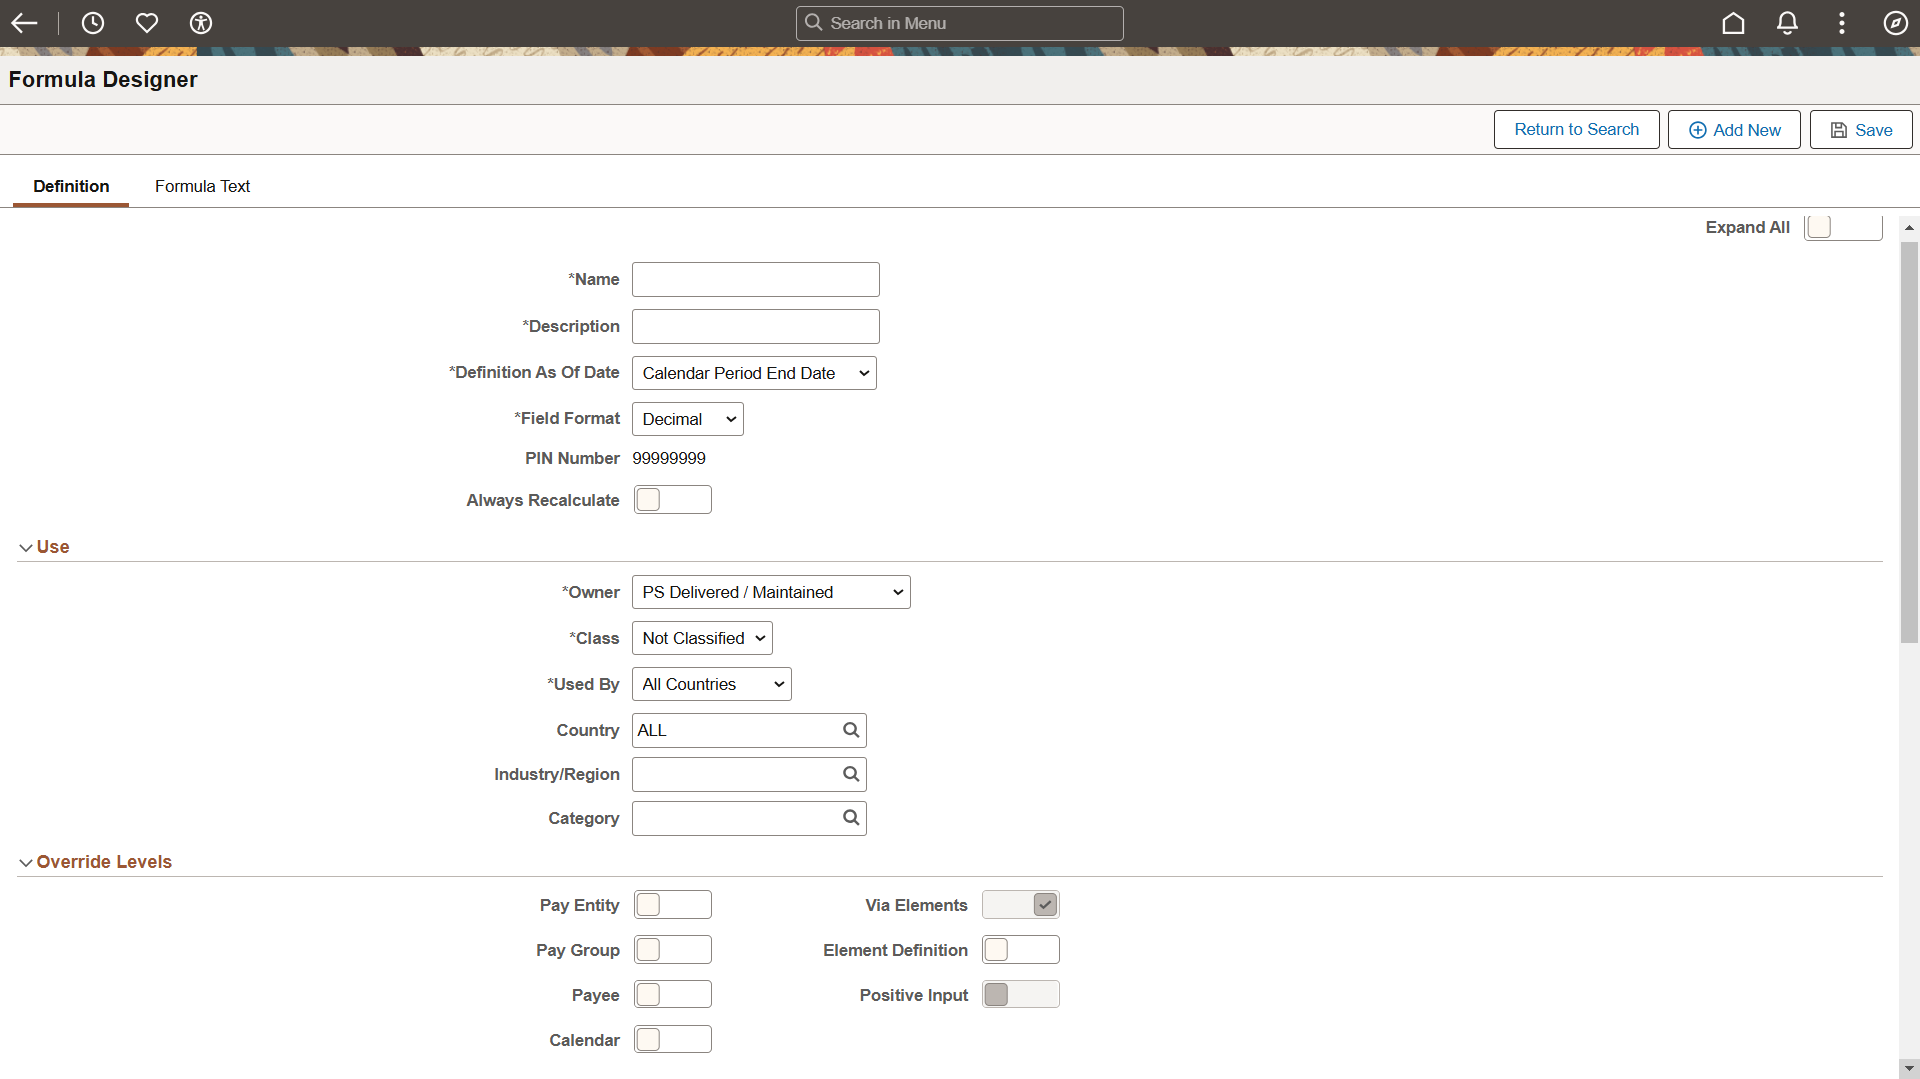
Use the Formula Designer - Definition page (GP_FRML_MAIN_FL) to name the formula element and define its basic parameters.
Navigation:
This example illustrates the fields and controls on the Formula Designer - Definition page (1 of 2).
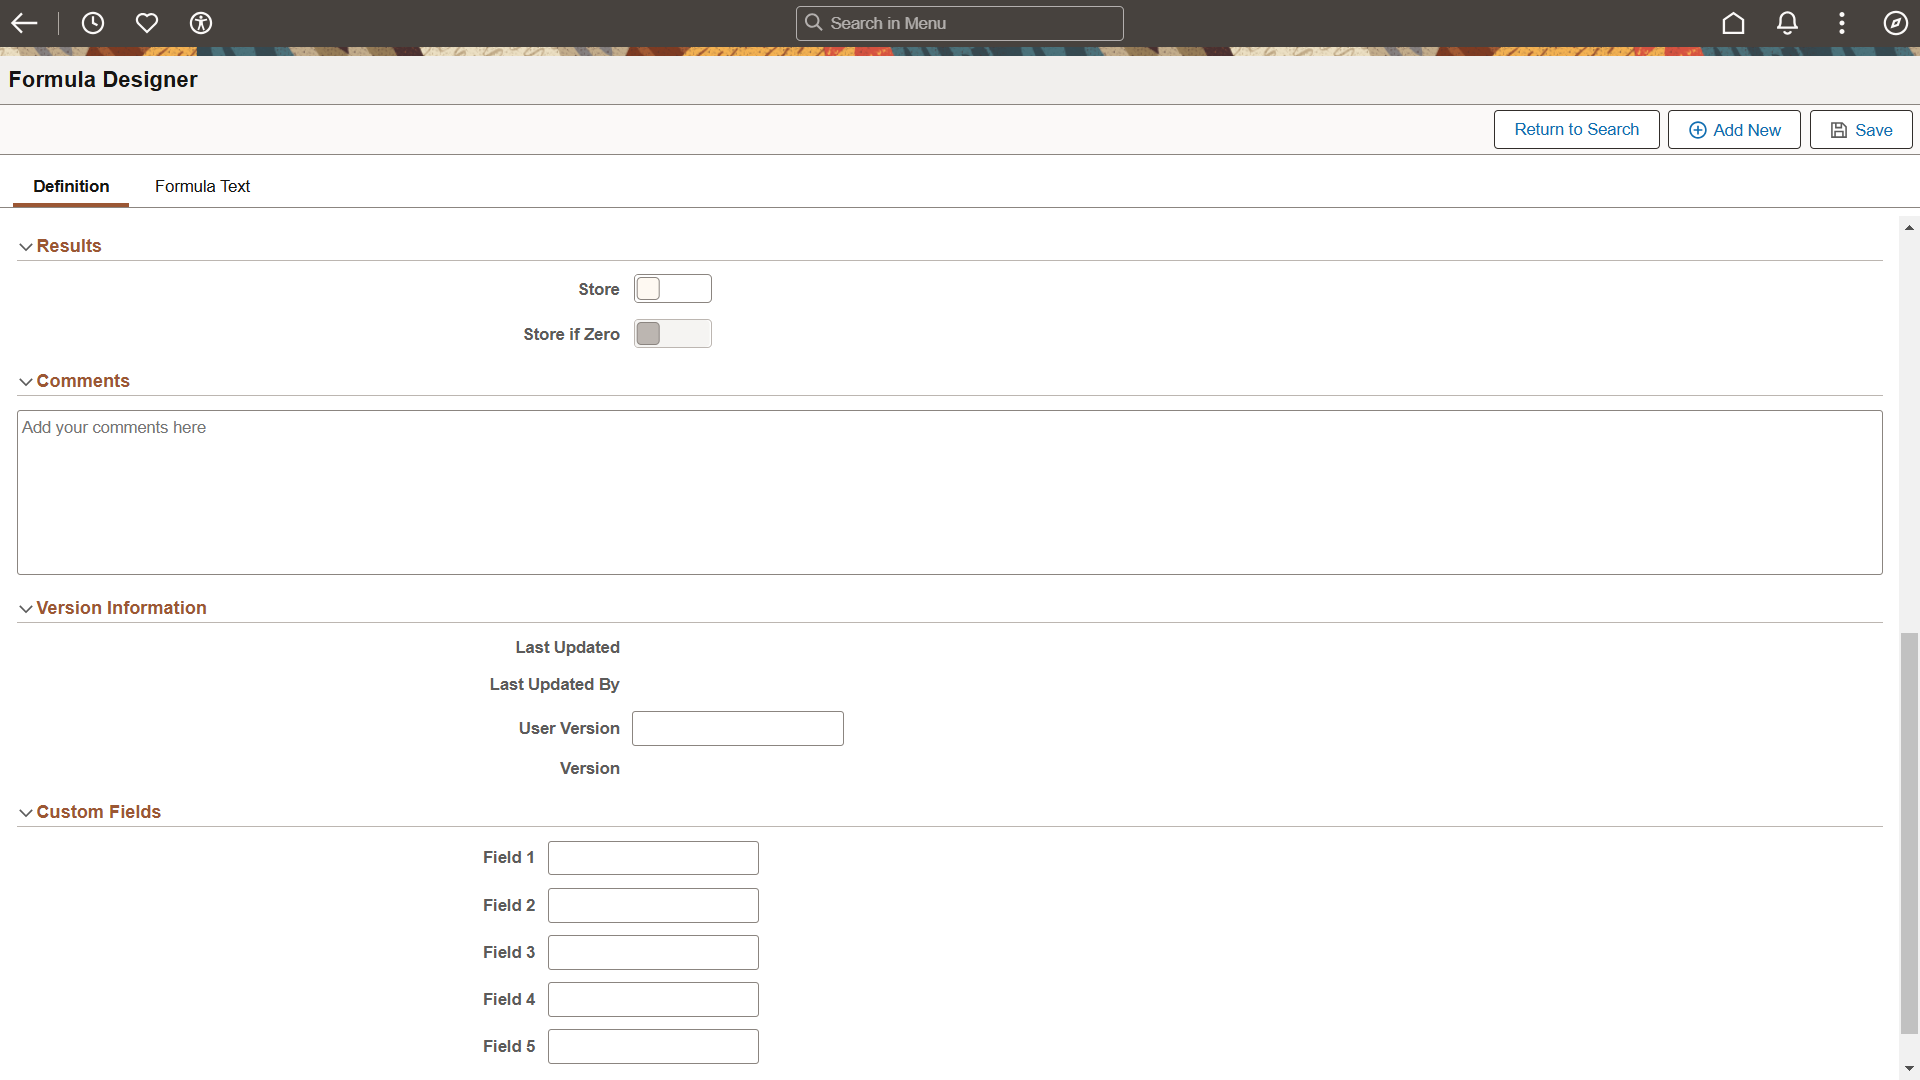
This example illustrates the fields and controls on the Formula Designer - Definition page (2 of 2).
|
Field or Control |
Description |
|---|---|
|
Name |
Enter the formula element name. |
|
Description |
Enter a meaningful description for the formula element. |
|
Definition As of Date |
Select the date on which the system is to retrieve the element definition during a process run. Available options are:
|
|
Field Format |
Select the required format for variables. Available options are:
Note: When you assign a value to a variable either directly or by means of another element (for example, an array), consider whether the variable can support the assigned value in terms of field length and field format. For example, 50 characters of text should not be assigned to a character variable with a field length of 30 spaces. Similarly, a monetary value should not be assigned to a variable with a character format. |
|
PIN Number |
Displays the pin number of formula element. |
|
Always Recalculate |
Applies only to the period of time that is being resolved and is selected by default. If selected, the system recalculates the element every time that it encounters it in the calculation process. If this check box is clear, the system uses the previous resolved value of the element. Select this check box if you think that the previous value is incorrect and needs to be updated—for example, in formulas that need to be applied within a loop, an array, or a count. |
Use
In this group box, you define several security-related options.
|
Field or Control |
Description |
|---|---|
|
Owner |
Identifies who controls and maintains the definition of the element. Available options are: PS Delivered/Maintained: The element is delivered and maintained by PeopleSoft. To edit any fields, you can take control of the element by selecting the Customer Control Indicator check box. This changes the owner to PS Delivered/Customer Modified. If PeopleSoft later releases an updated version of the element, you can accept the updated definition or retain your changes. Either way, element ownership does not change. |
|
Class |
Indicates the type of rule for the element. Available options are: Customary: Sample rules that are created by PeopleSoft. They are not statutory requirements, but are commonly followed rules. An example of when a customary rule is used is with tariffs. Customary rules are often used in a production environment. Not Classified. Sample Data: Rules that are created by PeopleSoft for sample data purposes. They are not used in a production environment. Statutory: Rules that are created by PeopleSoft for calculating rules that are required by law. System Data: Rules that are created by PeopleSoft. They are either system elements or system data that are delivered with the application—for example, common constants and dates. |
|
Used By |
Select whether the element is used by All Countries or a Specific Country. This field is also used in User Rules Profile security to determine which elements a user can access. |
|
Country |
If you selected Specific Country in the Used By field, the Country field appears. Select the country for which the security-related options apply. |
|
Industry/Region |
To classify your element further, select an industry code or region code. You define industry codes on the Industry/Region Types page. If an element is created for a specific industry, select an industry code here. Typical industry codes include Banking, Insurance, and Metallurgy. |
|
Category |
To classify your element further, select a category code. Category codes are defined on the Categories page (GP_PIN_CATEGORY). |
Override Levels
In this group box, you enable security-related override levels for the selected element. That is, you define when users can override the element’s value, or, in some cases, exclude the element from processing.
|
Field or Control |
Description |
|---|---|
|
Pay Entity, Pay Group, Payee, Calendar, Via Elements, Element Definition and Positive Input |
Select each type of override that you want to enable. Options vary by element type. |
Results
In this group box, you specify when to store the resolved value of the element in the result tables. The options vary by element type.
Select these options with caution to avoid creating large tables that are difficult to manage. Consider storing only the values that you need for reporting and auditing purposes or for retroactivity or other situations where you need to refer to the prior value of an element.
|
Field or Control |
Description |
|---|---|
|
Store |
Select to store the resolved value of the element in the result table during processing. For certain element types, you can specify the conditions under which the value is stored by selecting an option below the check box. When Store is clear, the resolved value is never stored. |
|
Store if Zero |
Appears for all element types except earnings and deductions. You cannot select this check box without first selecting Store. The Store if Zero check box is a way to further define what is sent to the results tables. Select Store if Zero to store a resolved value even when the value is 0. If you select Store but not Store if Zero, the element is written to the result tables only if the resolved value is not equal to zero, blank, or null. If you select both check boxes, the resolved value is written to the result tables, even if it is zero, blank, or null. If you select neither check box, the system never stores the resolved value. |
Comments
In this group box, you can provide detailed comments for an element. The comments that you enter are for informational purposes only and do not affect payroll processing.
Version Information
|
Field or Control |
Description |
|---|---|
|
User Version |
You can enter up to 14 alphanumeric characters in this field to identify changes you make to the element definition. When you save the definition, the system adds a prefix of INT_ to indicate that this is a user-defined value. You can use the Absence Management utilities to stamp and package elements by version. The value that you enter here appears in the Version field of the pages that you update. |
|
Version |
Displays the version of the element. The prefix P_ identifies versions released by PeopleSoft. The prefix C_ identifies versions created by customers. The system clears the version from this page when any of the following conditions occur:
Note: Version may be entered in either the Definition page or the Formula Text page. The sync will be based on which details are changed. |
Custom Fields
In the Custom Fields group box you can add user-defined fields to a formula definition.
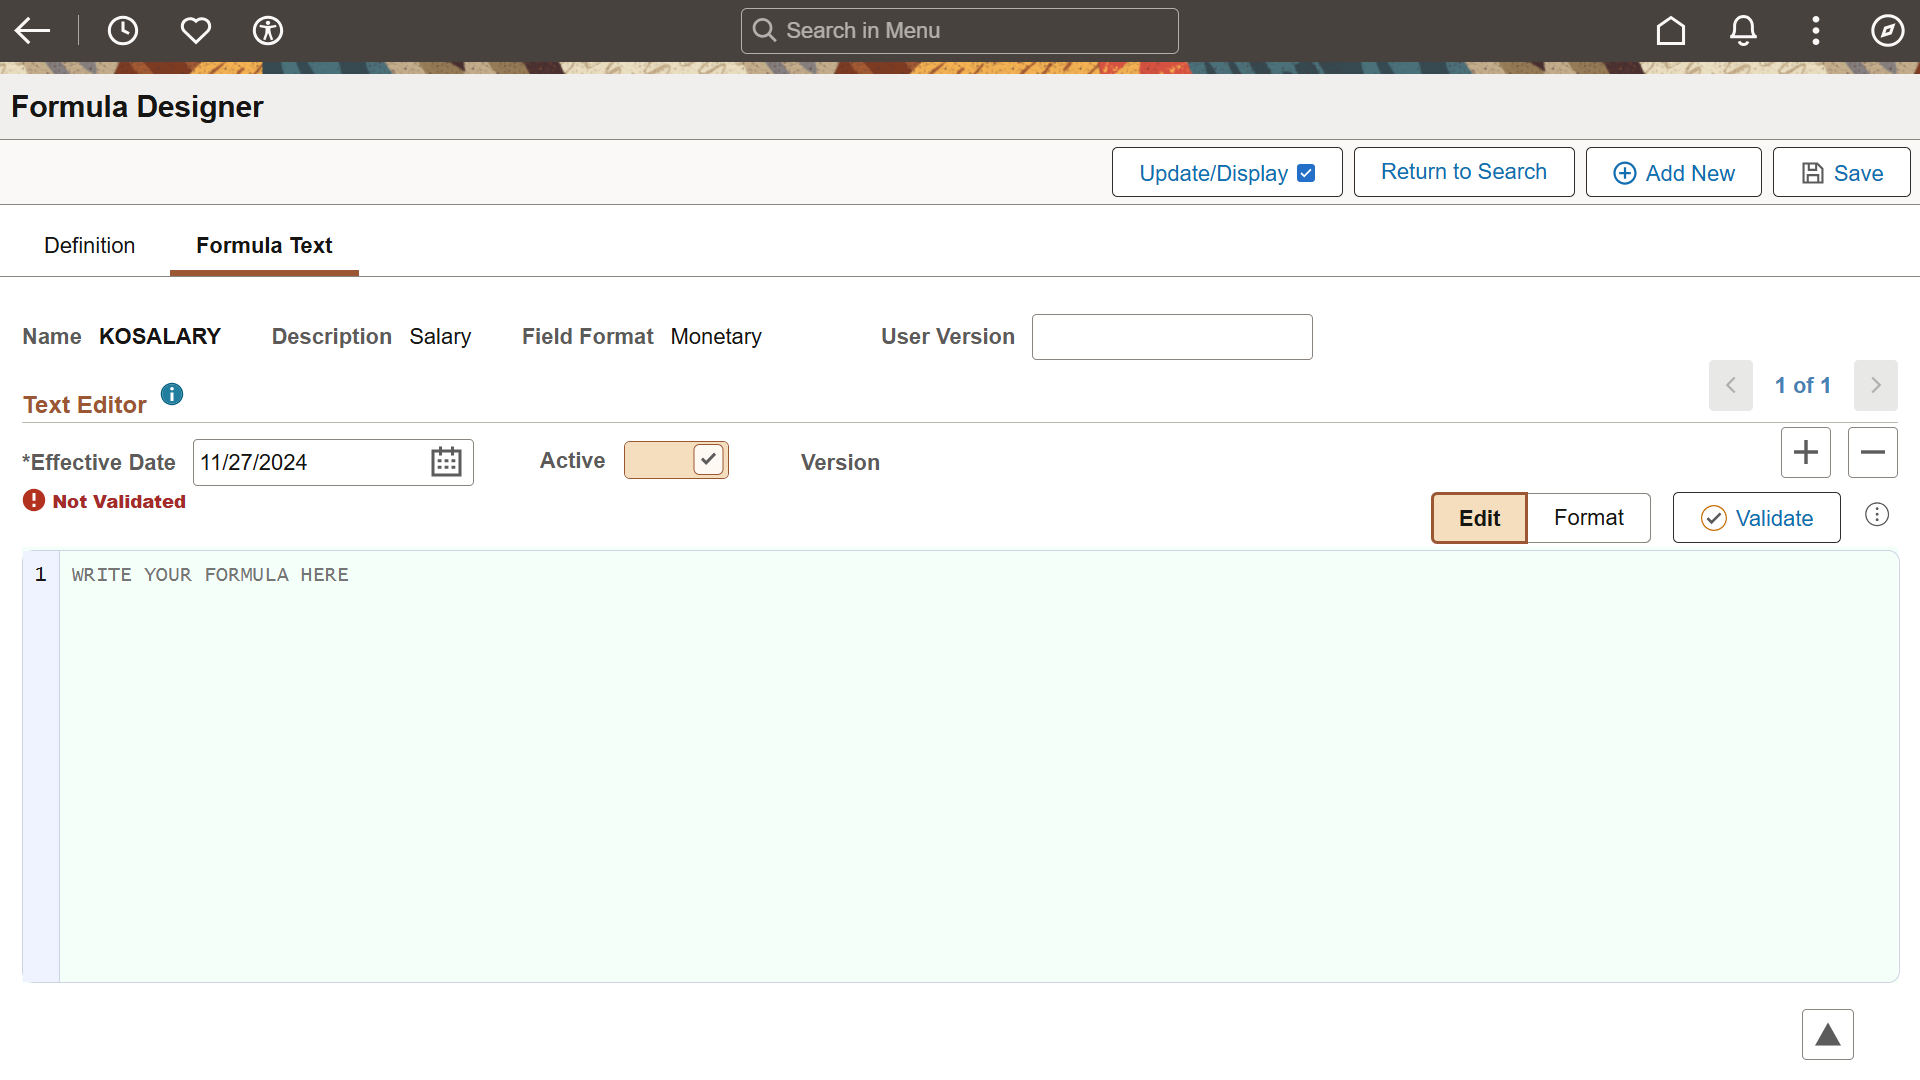
Use the Formula Designer - Formula Text page to define your formula, edit it and confirm that it's correct.
This example illustrates the Formula Designer - Formula Text page.
|
Field or Control |
Description |
|---|---|
|
|
Click the information icon to access the help page for Formula Designer. |
|
User Version |
You can enter upto 14 alphanumeric characters in this field to identify changes you make to the element definition. |
|
Effective Date |
Select the date from which the formula definition is effective. |
|
Active |
Select the Active button to activate the formula definition. |
|
Edit |
Click the Edit button to edit the formula definition. |
|
Format |
Click the Format button to format the formula definition. Users have the option to toggle between edit and format modes to observe the application of color coding. For details, see Syntax Highlighting |
|
Validate |
Click this button to validate your formula. (Validating a formula automatically saves the formula.). For details, see Validating your Formula. |
|
|
Click the Related Actions icon to access Refer an Element menu. Selecting this menu will navigate you to Element Browser page. For details, see Browsing Elements. |
Building your Formula
You can enter your formula in the text editor section. Follow the below instructions while creating or editing codes in Formula Designer.
Each line of code should end with ‘;’.
Remarks or Comments start with the delimiter ‘/* …. and end with the delimiter ‘*/’.
Comments should be 254 characters in length.
‘>>’ should be used as an assignment operator.
There should be space before and after an operator is specified.
The Rounding Rule for an Element should be enclosed in brackets [] adjacent to the corresponding element to which the rule applies. For example, VR[SL VR SUPP1][GBR RR TRUNC 0DP].
If you intend to use an element number, prefix the entry type with PTR_. For example, PTR_ER[CH_00_72].
If you are using Use Old Value for Entry Types 1 and 2, you need to add a capital O after specifying the element. For example, AC[SS AC BS CPNRM126S] [O].
Literal should be tagged within single quotes.
Valid operators allowed are: + ,-,*,/, =,<>,< ,>,>= and <=
Valid functions allowed are IF ELSE ENDIF, SUM, AVG, MIN, MAX, AND, OR, IN, EXIT, THEN.
Condition should be enclosed in () to group it as one.
Append ‘;’ at the end of each statement
For comment, append ‘;’ at the end of the comments delimiter, that is, ‘*/’
Note: Spaces will be added automatically. A semicolon gets added to the end of each line automatically. (OR) The system will add spaces between words and a semicolon at the end of each line.
Syntax for Entering Formula
Syntax of function ‘If’ ( use ‘AND’ or ‘OR’ operator as per your conditions).
Note: ET represents Entry Type.
If ET[] >> <Cond> then;
   <Stmt>;
   End-If;
IF ET[] >> <Cond> then;
 <Stmt> ;
Else;
 <Stmt>;
 End-if;
Syntax for Avg ()
Avg(ET1[] ET2[] )>> ENTRY TYPE[];Syntax for Min ()
Min(ET1[] ET2[]) >> ENTRY TYPE[];Syntax for Max ()
Max(ET1[] ET2[]) >> TYPE[];Syntax for Sum()
Sum (ET1[] ET2[]) >> TYPE[];Syntax for ‘In’
If ET[] In (ET1[],ET2[])  then ;
<Stmt>;
 End-If;

If ET[] In (‘Numeric/Character’)  then ;
<Stmt> ;
End-If
Syntax Highlighting
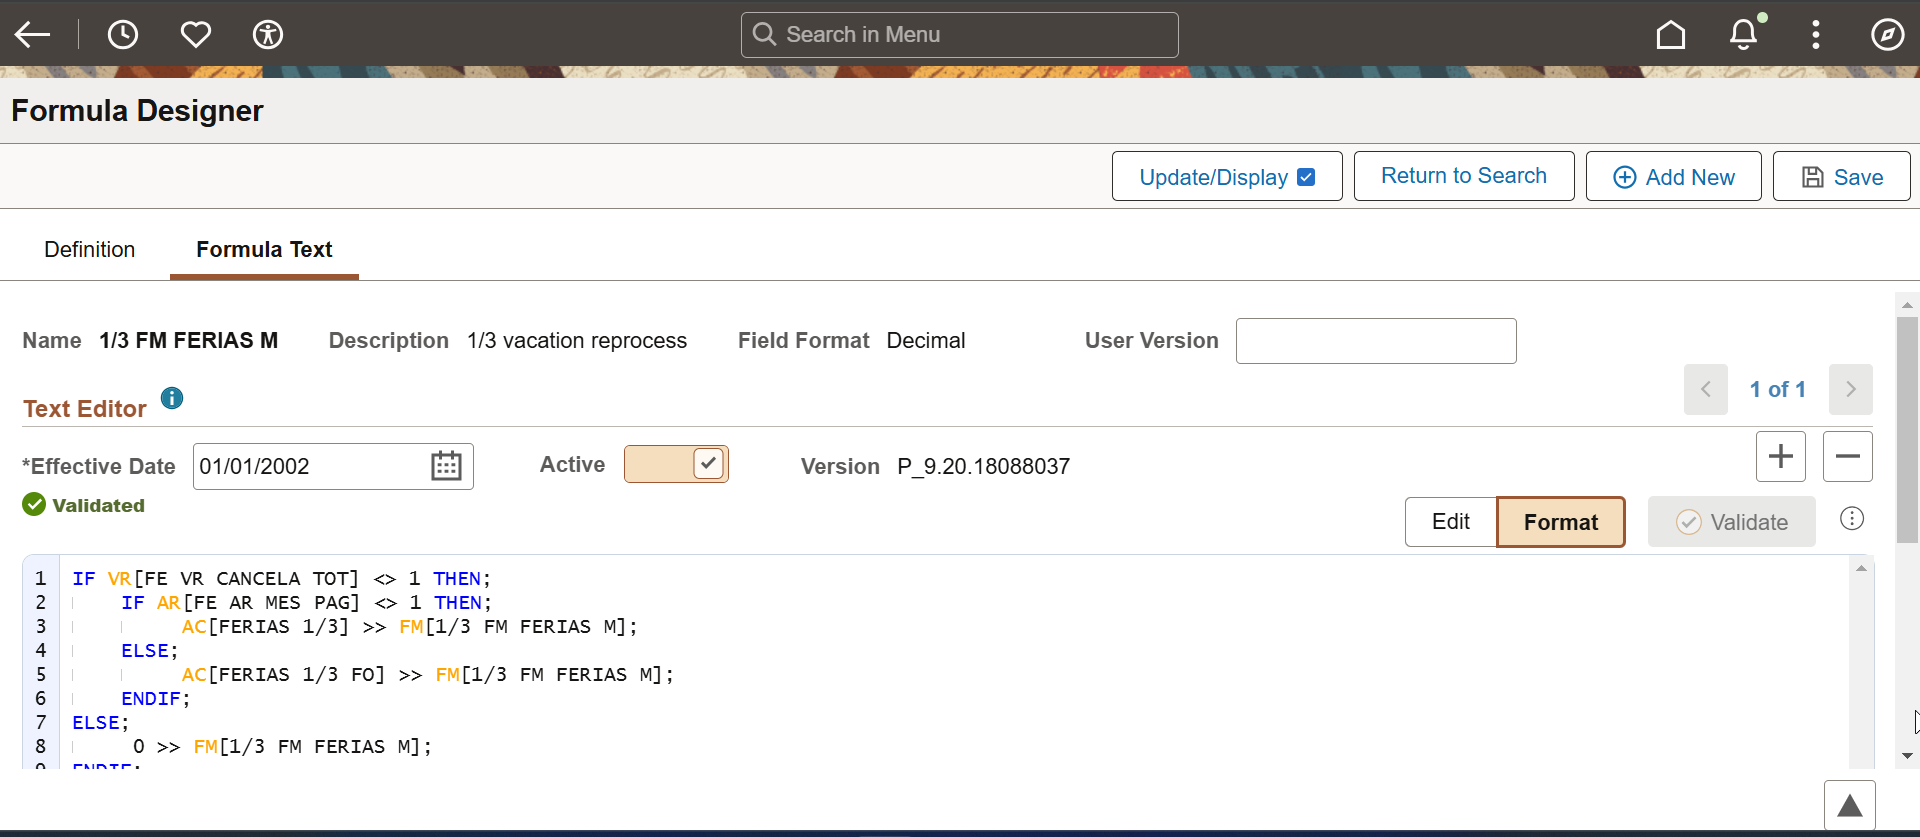
The color codes within the formula illustrate the syntactic structure by emphasizing keywords, functions, and types of elements. Users have the option to toggle between edit and format modes to observe the application of color coding, with keywords displayed in blue and entry type (elements) in orange.
The fluid Formula Designer tool also includes extra syntax features, like indentation for nested 'If' conditions.
Type Ahead Functionality
This functionality enhances user experience by providing timely suggestions as users input data. Specifically, the Formula Designer will commence offering suggestions for various categories, including keywords, functions, entry types, and element names corresponding to each entry type.
To enable Type Ahead, navigate to My Preferences page (Select the Actions button from the page banner. From the Actions menu, select My Preferences > Global Payroll). Select the Enable Type Ahead field. The Type Ahead functionality is enabled by default within the system. If you want to disable it, deselect the Type Ahead checkbox.
The suggestions generated through the Type Ahead functionality are derived from the strings present in the Element Types with its corresponding descriptions. This ensures that users receive relevant and contextually appropriate recommendations as they work within the system.
Validating your Formula
After you define your formula, save it, then validate and edit the formula. Whenever you alter the formula, re-validate it.
If the formula passed validation then you can see Validated status in the Text Editor group box as shown:
The Formula Designer page with successful validation is shown in this example.
Note: In both legacy formula elements and Fluid Formula Designer, modified formulas will be synchronized and can be edited.
If the validation is not performed or validation fails, the status is shown as Not Validated and the formula will not be executed in the payroll.
This example illustrates the Formula Designer page with failed validation.
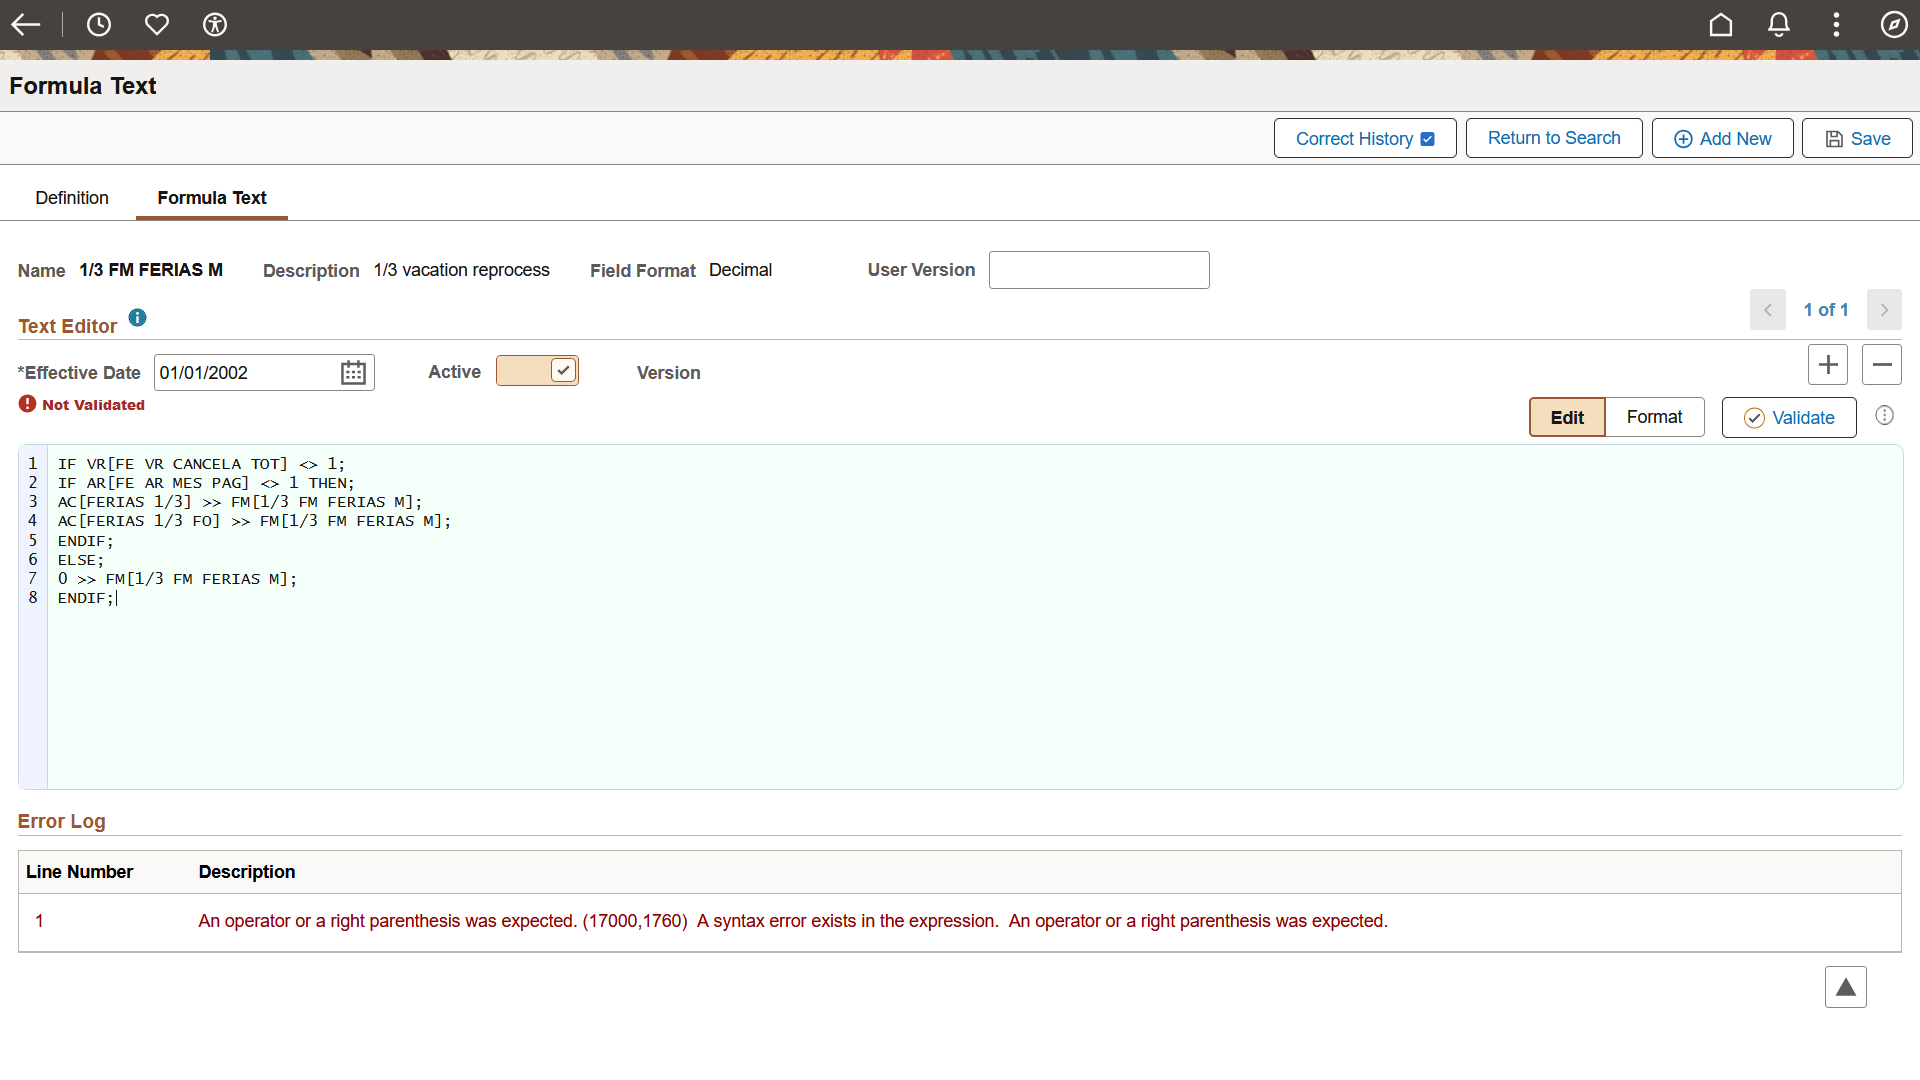
Access the Error Log section, where you can identify the specific lines where errors have occurred along with their respective causes. By clicking on the line number, you will be directed to the location of the error, allowing you to make the necessary corrections and validate once more.

