Using Fluid Candidate Gateway to Respond to Job Offers
This section discusses on how an applicant can review a job offer, accept or reject it, and upload documents to send to the recruiter.
This section describes the steps to setup Personal Data section on the online Job Offer page.
Create a Content Item for Driving License in the Content Items - Item Details Page. Use LIC (Licenses and Certifications) for Content Type and select the Content Item created for Driving License.
For the Personal Data section to appear for the applicant in the online Job Offer page, configure the Online Offer Preboarding Personal Data Configuration section in the Recruiting Installation – Applicants Page.
Select Enable Driving License Section check box to display the Driving License section under the Personal Data section on the online Job Offer page. Mark Yes for Required if the applicant's driving license is mandatory to submit the personal data. Select the Candidate Gateway instructional text catalog HRAM_FLOFR_INS1 for Instructional Text. This text is displayed under the Driving License section of Personal data section on the online Job Offer Page. For Content Item ID, select a newly added ID or use an existing ID. The Content Item ID should be of content type LIC (Licenses and Certifications). For information on how to create Content Item, see Content Items - Item Details Page. The Driving License Content Item is required to collect Driving License data for the Job Offer.
Select Enable Date Of Birth Section check box to display the Date Of Birth (DOB) section under the Personal Data section on the online Job Offer page. Mark Yes for Required if the applicant's DOB is mandatory to submit the personal data. Select the Candidate Gateway instructional text HRAM_FLOFR_INS2 catalog for Instructional Text. This text is displayed under the Date Of Birth section of Personal data section on the online Job Offer Page.
Select National ID Section check box to display the National ID section under the Personal Data section on the online Job Offer page. Mark Yes for Required if the applicant's National ID is mandatory to submit the personal data. Select the Candidate Gateway instructional text catalog HRAM_FLOFR_INS3 for Instructional Text. This text is displayed under the National ID section of Personal data section on the online Job Offer Page.
Note: You can create instructional text catalogs and add it for Instructional Text. When you create text catalogs, select Object Owner ID as HRAM and Sub ID as CG. For more information, see Maintaining Text Catalog Entries for Candidate Gateway.
If required, the recruiter can override the Online Offer Preboarding Personal Data Configuration defined in the Recruiting Installation – Applicants Page. To override this configuration, go to and search for the application. Prepare and approve the job offer for the applicant who is being offered the job. Select the Notify Applicant check box under Offer Details and select Personal Data Required for Preboarding link to open up the modal and override the personal data configuration. Post the job offer.
In Candidate Gateway, the applicant accepts or rejects the job offer using the Job Offer Page. The applicant can submit his personal data such as Driving License number, DOB, and National ID details using the Personal Data section configured in above steps.
|
Page Name |
Definition Name |
Usage |
|---|---|---|
|
HRS_ONL_OFR_DTL_FL |
Review a job offer, accept or reject it, and upload documents to send to the recruiter. |
|
|
Job Description |
HRS_JOB_DTL_SCF |
View job details for the interview. This modal page displays the same information as the Job Description Page, but it does not include options for acting on the job (applying, marking as a favorite, or emailing the job). |
|
HRS_CE_ATTNOTE_SCF |
View offer-related notes that were created using the document definition capabilities of the PeopleSoft HCM attachment framework. Note: Document definitions are not typically used in recruiting. See Setting Up Online Job Offer Attachments |
|
|
HRS_ONL_OFR_DD_SCF |
Enter a description for a file that is being attached to the Return Documents grid on the Job Offer page. |
|
|
HRS_ONL_OFR_NT_SCF |
Send attached documents to the primary recruiter for the job opening. |
When PeopleSoft Talent Acquisition Manager is configured to support online job offers, recruiters can post offers to Candidate Gateway. Applicants can then review offer documents and accept or reject the offer. Applicants can additionally upload and send any documents that need to be returned to your organization.
When the job offer is posted to Candidate Gateway, the system sends the applicant an email (notification template HRS_OFFER_NOTICE) alerting the applicant that the offer is posted. In Candidate Gateway, both the offer and the offer notification appear on the My Job Notifications page. Clicking either the offer or the offer notification displays the detailed offer information on the Job Offer page.
The system creates an applicant note and sends the recruiter an email notification when:
The applicant accepts or rejects the offer (notification template HRS_OFFER_RESPONSE)
The applicant uses the option to send uploaded documents to the recruiter (notification template HRS_OFFER_DOC_ATCH).
The recruiter notifications are sent to the email address that is associated with the recruiter’s user ID rather than the recruiter’s personal data record. Note that the workflow settings for the recruiter’s user ID must specify that the user is an email user.
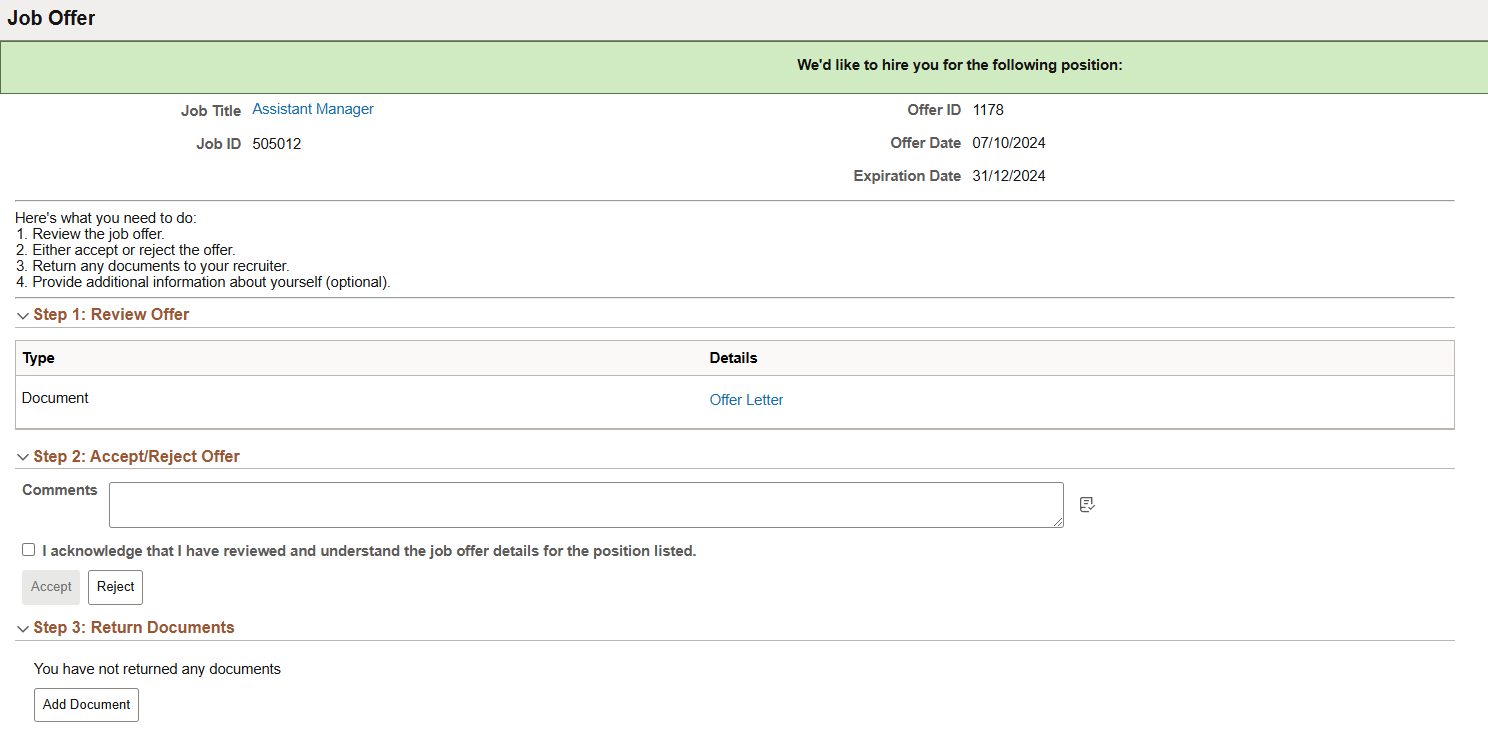
Applicants use the Job Offer page (HRS_ONL_OFR_DTL_FL) to review job offers, accept or reject them, and upload documents to send to the recruiter.
Navigation:
Click an offer or an offer notification on the My Job Notifications page.
The example illustrates the Job Offer page (Page 1o f 2).

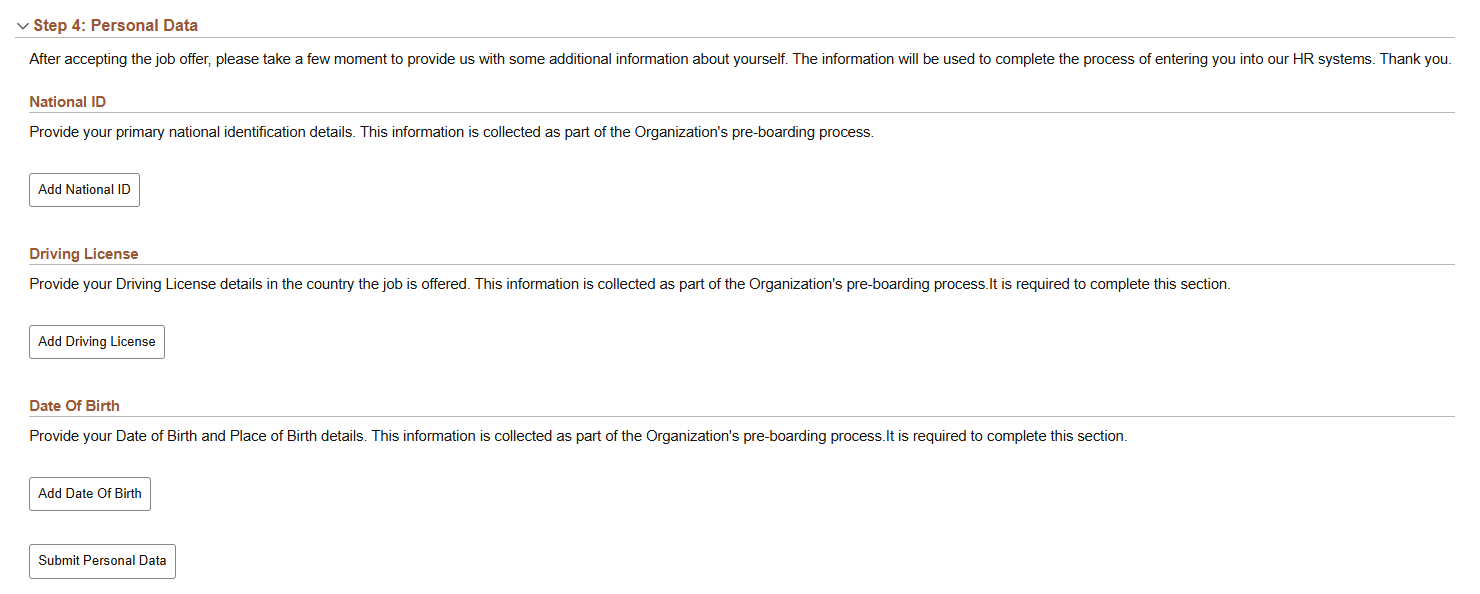
The example illustrates the Job Offer page (Page 2 of 2).

Offer Message
The greeting at the top of the offer page varies depending on the offer status. The following table lists the text catalog entries for the greeting:
|
Offer Status |
Text Catalog ID for Message |
Delivered Text |
|---|---|---|
|
Accepted |
HRAM_FLONLNOFR_10 |
Congratulations! We are delighted that you have accepted this offer of employment. |
|
Rejected |
HRAM_FLONLNOFR_11 |
We are sorry you have decided to reject this offer of employment. |
|
Expired |
HRAM_FLONLNOFR_12 |
We are sorry this offer for employment has expired. |
|
Open |
HRAM_FLONLNOFR_13 |
We’d like to hire you for the following position. |
Offer Summary
Field or Control |
Description |
|---|---|
Job Title |
Click to open the Job Description page in a modal page. This page displays the same information as the Job Description Page, but it does not include options for acting on the job (applying, marking as a favorite, or emailing the job). |
Job ID |
Displays the unique identifier for the job opening. |
Offer Date |
Displays the offer date as shown on the Prepare Job Offer Page. |
Expiration Date |
Displays the last date that the applicant can respond to the offer online. |
<instructional text> |
Lists the steps for the applicant to respond to the offer. |
Step 1 – Review Offer
This grid lists the documents, links, and notes that were attached to the offer on the Prepare Job Offer Page. Typically this grid includes an offer letter.
Field or Control |
Description |
|---|---|
|
The Action Required icon appears when the Action Required check box was selected for an item on the Prepare Job Offer page. This icon draws highlights items that the applicant needs to review or return. |
Type |
Indicates whether the item is a Document, a URL, or a Note. Typically, the recruiting system is not configured to support notes in offers. Instead, recruiters incorporate any notes into the offer letter. |
Details |
Displays the item name. Clicking this link opens the document, URL, or note. Documents and URLs open in new windows. Notes are displayed on the Job Offer Note page. |
Step 2 – Accept/Reject Offer
The fields in this step are disabled after the applicant accepts or rejects the offer. This prevents applicants from changing their responses. To change a response, the applicant must contact the recruiter, who can update the response in Talent Acquisition Manager.
Field or Control |
Description |
|---|---|
Comments |
The applicant can enter comments before accepting or rejecting an offer. The comments are included in the contact note that the system adds to the applicant record when the applicant clicks the Accept or Reject button. In Talent Acquisition Manager, contact notes appear on the Manage Applicant Page: Notes Tab. |
I acknowledge that I have reviewed and understand the job offer details for the position listed. |
Before accepting an online job offer, the applicant must select this check box to acknowledge that the offer has been reviewed and understood. The Accept button is not enabled until the applicant selects this check box. |
Accept |
An applicant clicks this button to accept a job offer. This button is not available until the applicant selects the acknowledgement check box. An applicant who clicks the Accept button is prompted to confirm the accept action. If the action is confirmed, the system does the following:
|
Reject |
An applicant clicks this button to reject an offer. An applicant who clicks the Reject button is prompted to confirm the reject action. If the action is confirmed, the system does the following:
|
Note: Depending on the status change effects that you have configured, updating the offer status can also trigger various other status changes, including changes to the applicant's disposition. If notifications are active for the particular status changes that occur, the status changes also trigger the relevant recruiter notifications. Notifications for changes to the Offer status use the OtherStsEffct template. Notifications for changes to an applicant's disposition use the ApplicantStsEffct template.
Step 3 – Return Documents
Applicants can optionally upload and send documents such as completed employment forms either before or after accepting an offer. For example, an applicant can print a confidentiality agreement, sign it, scan and upload it, then send it to the recruiter.
The Return Documents grid shows the documents that the applicant has uploaded and provides a mechanism for sending those documents to the job opening’s primary recruiter.
Field or Control |
Description |
|---|---|
|
An applicant clicks this button to open a generic File Attachment dialog. The options for selecting files depend on the device and on any available integrations to cloud storage. After the applicant uploads a document, the Document Description page appears to prompt the applicant to enter a descriptive title. |
Send to Recruiter |
An applicant clicks this button to send the selected documents to the job opening’s primary recruiter. Applicants are not required to select documents before clicking this button. If no documents are selected, clicking this button enables the applicant to send a text notification to the recruiter. |
Remove |
An applicant clicks this button to remove any selected documents from the grid. After a document has been sent to the recruiter, it can no longer be selected, and the applicant cannot remove it. |
<check box> |
A check box appears next to documents that have been uploaded but not sent to the recruiter. Applicants select this check box to choose the documents that the Send to Recruiter or Remove button will act on. |
Attached File |
Displays the file name of a document that the applicant has uploaded. Clicking the link opens the document. |
Description |
Displays the description that the applicant provided when uploading the document. The applicant cannot change the description except by deleting the document and uploading it again. |
Date Attached |
Displays the date and time that the applicant uploaded the document. |
Date Sent |
If the applicant has already sent the document to the recruiter, this field displays the date and time that the document was sent. Otherwise, this field is blank. |
Step 4 – Personal Data
Applicants can optionally enter their personal information such as National ID, Driving License, and Date of Birth (DOB). The National ID is checked for correct format. No other validations are done for National ID.
The recruiting administrator can view these applicant details in the Manage Applicant page: Applicant Data Tab. See Create Applicant page: Eligibility & Identity Tab. Once the applicant is hired, this information can be transferred to the HR system during the Manage Hires process. For more information, see Manage Hire Setup Page.
A drop zone is available below the Date of Birth field that enables you to add additional data fields. For more information, see PeopleTools: Application Designer Developer's Guide, "Creating Page Definitions", "Configuring Drop Zones".
|
Field or Control |
Description |
|---|---|
|
Add National ID |
Select to open the National ID Details modal and enter the details. Once the details are saved and the modal is closed, the Add National ID button is replaced by Edit National ID button. |
|
Add Driving License |
Select to open the Driving License Details modal and enter the details. Once the details are saved and the modal is closed, the Add Driving License button is replaced by Edit Driving License button. |
|
Add Date Of Birth |
Select to open the Date Of Birth Details modal and enter the details. Once the details are saved and the modal is closed, the Add Date Of Birth button is replaced by Edit Date Of Birth button. |
|
Submit Personal Data |
Select to submit the personal information provided by the applicant. |
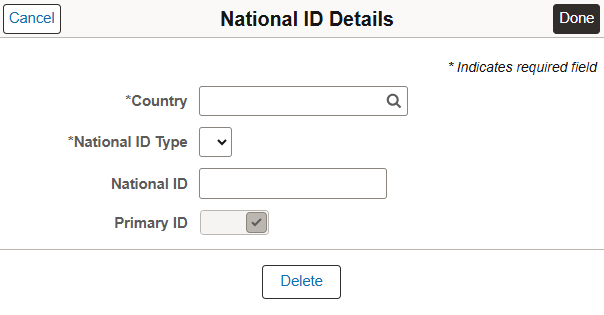
The example illustrates the National ID Details modal in the Personal Data section of the Job Offer page.The modal for Driving License and Date of Birth is similar to this modal.

Applicants use the Job Offer Note page (HRS_CE_ATTNOTE_SCF) to view offer-related notes that were created using the document definition capabilities of the PeopleSoft HCM attachment framework.
Note: Document definitions are not typically used in recruiting. See Setting Up Online Job Offer Attachments
Navigation:
On the Job Offer page, click the link for an offer note. These are items in the Review Offer grid that have the type Note.
This example illustrates the Job Offer Note page.

This page displays the note subject, date, and text.
Applicants use the Document Description page (HRS_ONL_OFR_DD_SCF) to enter a description for a file that is being attached to the Return Documents grid on the Job Offer page.
Navigation:
Click the Add Document button on the Job Offer page, then upload a file. This page appears immediately after the upload is complete.
This example illustrates the Document Description page.

Field or Control |
Description |
|---|---|
Cancel |
Click to close this page without adding the uploaded document to the offer. |
Save |
Click to save the document and description to the offer. |
Description |
The applicant enters an optional document description. The default value is the file name. The applicant cannot edit this description after closing this page, nor can the applicant add a description later after leaving the field blank on this page. To change or add a description, the applicant needs to remove the original document and upload the file again. |
Attached File |
Displays the file name of the document. Clicking the link opens the attached file in a new window. |
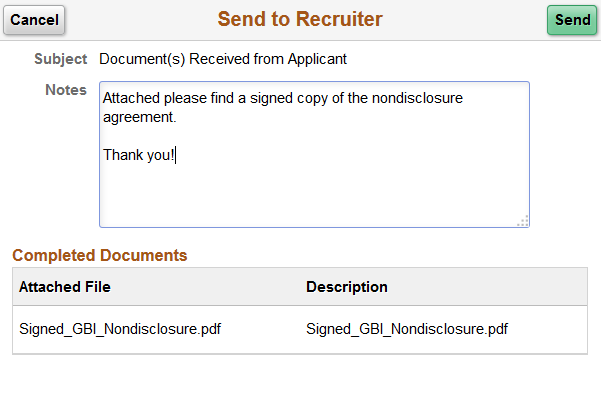
Applicants use the Send Notification to Recruiter page (HRS_ONL_OFR_NT_SCF) to send attached documents to the primary recruiter for the job opening.
Navigation:
Click the Send Document button on the Job Offer page.
This example illustrates the Send Notification to Recruiter page.

Field or Control |
Description |
|---|---|
Cancel |
Applicants click this button to close the dialog box without sending a message to the recruiter. |
Send |
Applicants click this button to submit the message. The system creates a contact note that includes any attachments and sends an email notification (HRS_OFFER_DOC_ATCH) to the primary recruiter for the job opening. |
Subject |
If no documents were selected when the applicant accessed this page, the applicant enters a subject for the message. If there were documents selected, then the system sets the subject text, and this field is read-only. |
Notes |
Applicants use this field to enter additional information to send to the recruiter. |
Completed Documents |
This grid appears only if the applicant selected documents before accessing this page. The read-only grid displays the file names and descriptions of the selected documents. |

