Using Time and Labor Launch Pad Pages for Managers
This section discusses how to use the Time and Labor Launch Pad pages for Managers.
|
Page Name |
Definition Name |
Usage |
|---|---|---|
|
TL_LAUNCH_PAD |
View which days in the specified month have payable time, forecasted payable time, reported elapsed time, reported punch time, exceptions, and recommended actions associated with each exception. You can change the calendar view to display the actual number of payable hours, forecasted payable hours, reported elapsed hours, reported punch hours, or scheduled hours that have been reported for each day. You can also click a link to review, by day, the details of the reported, payable, forecasted time, exceptions and recommended actions for the employee. |
|
|
TL_APP_ITEM_PNL |
Specify the items that are available within an application suite. |
|
|
TL_APP_SUITE_PNL |
Set up the application items that are available to both managers and time reporters using the Go field on the Time and Labor Launch Pad page. |
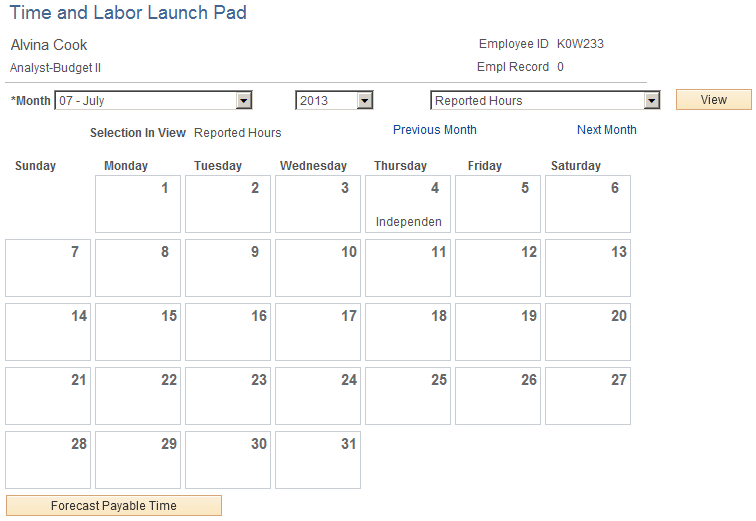
Use the Time and Labor Launch Pad page (TL_LAUNCH_PAD) to view which days in the specified month have payable time, forecasted payable time, reported elapsed time, reported punch time, exceptions, and recommended actions associated with each exception.
You can change the calendar view to display the actual number of payable hours, forecasted payable hours, reported elapsed hours, reported punch hours, or scheduled hours that have been reported for each day. You can also click a link to review, by day, the details of the reported, payable, forecasted time, exceptions and recommended actions for the employee.
Navigation:
Enter values in the Employee Selection Criteria grid and select the Get Employees button to return a list of employees. Then select the employee name link on the Time and Labor Launch Pad - Select Employee page.
See Setting Up Manager Search Options.
This example illustrates the fields and controls on the Time and Labor Launch Pad page (1 of 2). You can find definitions for the fields and controls later on this page.
This example illustrates the fields and controls on the Time and Labor Launch Pad page (2 of 2). You can find definitions for the fields and controls later on this page.
When you first enter the Launch Pad page, the current month and year are displayed by default.
Field or Control |
Description |
|---|---|
View |
Select the information that you want to appear—the employee's actual number of forecasted payable hours, exceptions, payable hours, reported elapsed hours, or scheduled hours for each day in the specified month—and click this button. The calendar view changes depending on what you select. For example, suppose that you select the Scheduled Hours view option and 8.00 appears for one of the days in the calendar. This means that the employee is scheduled to work eight hours that day. |
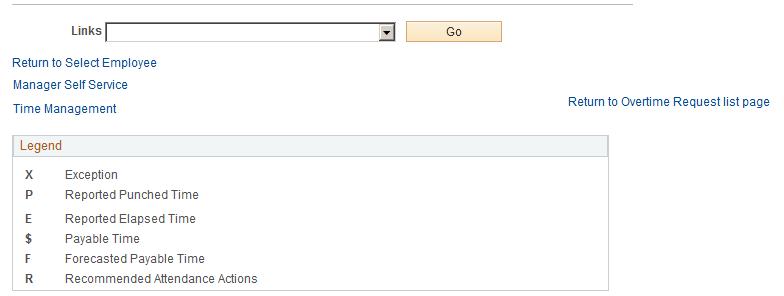
At any given time, any day in the calendar may display the following values: X, P, E, $, F, or R. These values indicate that there is information about reported time for that day. For example, suppose E appears for one day on the calendar. This means that the employee has elapsed time reported for that day. If $ appears, it means that payable time exists for that day. See the bottom of the Launch Pad page for a description of each of the values. If any of the days are highlighted or linked, that indicates that the day has elapsed time, punch time, payable time, exceptions or recommended attendance actions associated with that day. Click the day to view the time reporting details that exist for that day.
Field or Control |
Description |
|---|---|
Forecast Payable Time |
Start the Forecasted Payable Time process that calculates forecasted payable time for the employee by clicking this button. The system looks at the employee's schedule and any time they have reported for this month. It then forecasts what the payable time would be for those days and displays an F on the day. The forecasted time is not actually payable time, but an estimate of what the payable time would look like. To view the number of forecasted hours for that day, change the view at the top of the page to Forecasted Payable Hours and click the View button. To view the details of the forecasted time, click the link for the day that you want to view. |
Previous Month and Next Month |
Use these buttons to skip to the preceding or next month. |
Finally, if you want to navigate to a different part of the system to perform other transactions or just to get more information, use the Links field at the bottom of the page. Select the application item that you want to navigate to from the drop-down list, click the Go button, and navigate to the feature that you selected. Depending on how the application suites are set up, different options are available for the Links field.
Use the Application Suites page (TL_APP_SUITE_PNL) to set up the application items that are available to both managers and time reporters using the Go field on the Time and Labor Launch Pad page.
Navigation:
This example illustrates the fields and controls on the Application Suites page. You can find definitions for the fields and controls later on this page.
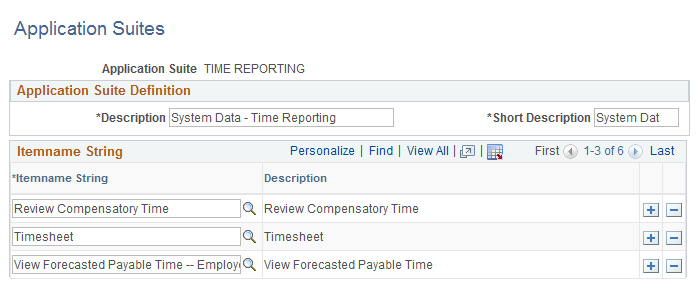
There are two application suites that apply to the Self-Service components: the Time Management Application Suite and the Time Reporting Application Suite. The Time Management Application Suite is used to set up the Links field on the Time and Labor Launch Pad page for managers. Likewise, the Time Reporting Application Suite is used to set up the Links field on the Time and Labor Launch Pad page for employees. Both suites are delivered with the system. For each one you set up, specify which application items the users (managers or employees) can access via the Links field on the Time and Labor Launch Pad page.
Note: Only the items for which the user has Permission List access are available in the Links drop-down list box. For example, the Time Management Application Suite may have access to Adjust Payable Time, but the user may not. In that case, Adjust Payable Time would not be available to that specific user in the Links drop-down list box.
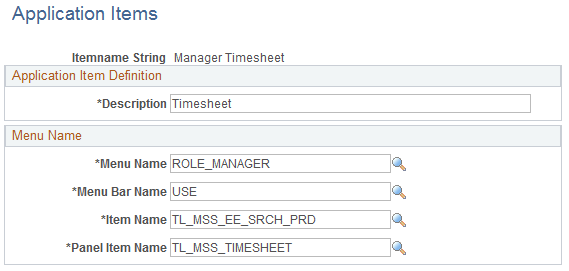
Use the Application Items page (TL_APP_ITEM_PNL) to specify the items that are available within an application suite.
Navigation:
This example illustrates the fields and controls on the Application Items page. You can find definitions for the fields and controls later on this page.
Field or Control |
Description |
|---|---|
Save |
Click the Save button for the application items to appear in the Go function's drop-down list box on the Time and Labor Launch Pad page. |