Setting Up Smart HR Templates
To set up Smart HR templates, use the Smart HR Template Record/Field (HR_TBH_RECDEFN), Template Section (HR_TBH_SECDEFN), Smart HR Transaction Type (HR_TBH_TXN_TBL), Copy Smart HR Transaction Type (HR_TBH_COPY_TXN), Smart HR Template Creation (HR_TBH_CREATION), Copy Smart HR Template (HR_TBH_COPY), and Smart HR Category Table (HR_TBH_CTG_TBL) components.
These topics provide an overview of Smart HR Templates, list common elements used to setup up Smart HR templates, and discuss setting up Smart HR templates.
|
Page Name |
Definition Name |
Usage |
|---|---|---|
|
HR_TBH_RECDEFN |
Set up and maintain the records and fields to be used in the Smart HR transaction templates. The records/fields that should be available to be included in the templates will be stored in the Template Record Setup Table (HR_TBH_RECDEFN) and Template Field Setup Table (HR_TBH_RECDTL). The Template Record Setup Table contains one row for each table currently included in the core Hire process with at least one enterable field (except for tables with multiple instances, such as phone numbers, email addresses, and so forth, where more than one row exists). It also contains views of the Profile Management tables. |
|
|
HR_TBH_SECDEFN |
Identify and configure sections, and list and configure the fields contained in a section. |
|
|
HR_TBH_SECDTL |
Add additional user exit information for field changes and field prompts. |
|
|
HR_TBH_CTG_TBL |
Set up template categories for grouping templates and for row-level security. |
|
|
HR_TBH_TXN_TBL |
Define template transaction types that identify the function of a template and the application class ID and path to specify the location of the implementation code for the transaction type. Transaction types can also be used to determine which users have security access to a template. |
|
|
HR_TBH_TXN_CMP |
Identify which components will be updated when the end user or HR administrator saves the data to HR during the Smart HR Transactions process. |
|
|
HR_TBH_TXN_SEC |
Specify label details related to a component. The Manage Hire and Manage Transactions Details pages display the labels you enter on this page for the HR administrator to manage transactions that require attention. |
|
|
HR_TBH_TXN_SCT |
Define which sections should be available to a template when it uses this transaction type. Valid values come from the Template Section table. |
|
|
HR_TBH_COPY_TXN |
Copy a template transaction type. |
|
|
HR_TBH_TMPL_HDR |
Create and modify templates. |
|
|
HR_TBH_TMPL_CFG |
Set up general options and the search page configuration for a template. |
|
|
Section Field Label Override Page |
HR_TBH_TMPL_FLDL |
Change a field label by selecting another text ID for the field. |
|
Section Field Default Value Page |
HR_TBH_TMPL_FLDC |
Identify a default value for the field that will appear for the end user to assist with data entry for fields that would often use the same value. |
|
HR_SSTEXT_TEXT |
Define text catalog entries, and define the values for context-sensitive keys. |
|
|
HR_TBH_TMPL_PAG |
Set up the page number order and tab names that should appear on the Smart HR Transaction pages. |
|
|
HR_TBHTAB_DTL_SEC |
Identify the page names on the Smart HR Transaction pages. |
|
|
HR_TBH_TMPL_SEC |
Add and configure template sections. |
|
|
HR_TBH_TMPL_FLDS |
Configure the fields for a section within the template. |
|
|
HR_TBH_TMPL_PER |
Enable or disable Search Match functionality for a template and define options for handling existing person data and employment instances in the database. |
|
|
HR_TBH_COPY |
Copy a Smart HR template and make modifications to the new template. |
Smart HR templates are a simplified and streamlined approach to completing various transaction processes, such as hiring, updating a person’s personal or job data, or managing a person’s profile data. Smart HR templates are created and configured by the template administrator, someone who is very familiar with your organization's HR transaction processes. After the template administrator has created and tested templates, line managers or human resources (HR) representatives can use these templates for hiring, managing personal or job data or maintain profile information. Access to the various Smart HR transaction templates is based on the security rules that you establish.
The template administrator determines the following aspects of each transaction template:
The sections, or logical groupings of fields, that are included in a transaction type and template, as well as the sequence in which the sections appear of the template pages.
The sequence of fields within a section.
Default values for fields.
Hidden fields.
Display-only fields.
If data entered by the end user can be directly submitted for processing or must be reviewed by an HR administrator.
The template administrator can test a template by performing a mock transaction, like a hire, without actually applying the transaction to the system.
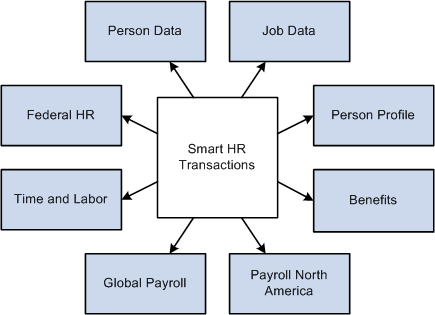
This diagram shows the integration between the Smart HR template process and other products. Template administrators can create templates that enable the user to enter or update person, job, or profile data. This data populates the person, job, and profile records in the core HR and federal HR systems, and it provides default values for the PeopleSoft Benefits, Global Payroll, Payroll for North America, and Time and Labor applications:
Smart HR Template Security
Implement security for the Smart HR template and transaction components using PeopleTools permission lists and roles. This table lists the role, permission list, and components:
|
Role |
Permission List |
Components |
|---|---|---|
|
HR Template Setup |
HCCPHR3321 |
HR_TBH_RECDEFN HR_TBH_SECDEFN HR_TBH_TXN_TBL HR_TBH_COPY_TXN |
Note: The template setup components have no row-level security.
Implement security for using the Smart HR templates through the existing Human Capital Management row-level security. Smart HR templates use the following fields for security: Template ID, Organizational Relationship (Employee or Contingent Worker), Transaction Type, Country, and Category.
Delivered Smart HR Template Sections
The fields available for templates are grouped into sections, like group boxes. For example, you may have a Work Location - Job Fields section that includes fields to enter a company, department, and location code. You can determine which sections and the order in which the sections should be presented to the end user when creating a Smart HR template. Sections and their fields are delivered as system data. Sections are maintained in the Template Section component These delivered sections can be modified within your templates to suit your organization's needs for hiring.
The following table lists the delivered Personal Data sections used for template creation:
|
Section Number |
Section Name |
Countries with Country Specific Sections |
|---|---|---|
|
10 |
Name |
BEL, BRA, CHE, CHN, DEU, ENG, ESP, FRA, HKG, ITA, JPN, MEX, and NLD |
|
20 |
Birth Information |
|
|
40 |
Data Protection |
|
|
50 |
Gender |
|
|
60 |
Education |
|
|
70 |
Person Marital Status |
|
|
80 |
Language |
|
|
85 |
Person Student Status |
|
|
90 |
Alternate ID |
|
|
100 – 108 |
National ID |
AUS, BEL, BRA, CAN, CHE, CHN, DEU, ESP, FRA, GBR, HKG, IND, IRL, ITA, JPN, MEX, MYS, NLD, SGP, THA, and USA |
|
120 – 121 |
Address |
AUS, BEL, BRA, CAN, CHE, CHN, DEU, ESP, FRA, GBR, HKG, IND, ITA, JPN, MEX, MYS, NLD, NZL, SGP, and USA GBL (global address) |
|
125–128 |
IM Chat |
|
|
130 – 133 |
Personal Phone |
|
|
135 – 136 |
E-mail Address |
|
|
140 |
Ethnic Group |
AUS, CHN, MYS, NZL, SGP, and THA |
|
145 |
Religion |
AUS, CHN, MYS, NZL, SGP, and THA |
|
147 |
Person Hukou Data – China |
CHN |
|
148 |
Person Working Life – China |
CHN |
|
150 |
Person Smoker Status |
CAN, JPN, and USA |
|
210 |
General Registration – Brazil (Registro Geral) |
BRA |
|
211 |
CTPS – Carteira de Trabalho e Previdencia Social |
BRA |
|
212 |
Voter Registration – Brazil |
BRA |
|
213 |
Military Registration – Brazil |
BRA |
|
214 |
PIS/PASEP |
BRA |
|
220 |
Diversity |
CAN |
|
221 |
Health Care |
CAN |
|
230 |
Guardianship |
CHE |
|
231 |
Place of Origin |
CHE |
|
240 |
HR Responsibility |
DEU |
|
241 |
Military Status |
DEU |
|
242 |
Nationality |
DEU |
|
260 |
Personal Data – France |
FRA |
|
270 |
Diversity |
GBR |
|
280 |
Diversity |
IND |
|
290 |
Military Status |
ITA |
|
300 |
Honseki Prefecture |
JPN |
|
310 |
Personal Data – Mexico |
MEX |
|
320 |
Diversity |
USA |
|
330 |
Personal Data – United States |
USA |
The following table lists the delivered Job Data sections used for template creation:
|
Section Number |
Section Name |
Countries with Country Specific Sections |
|---|---|---|
|
400 |
Work Location – Job Indicator |
|
|
410 |
Work Location – Position Data |
|
|
420 |
Work Location – Expected Job End Date |
|
|
430 |
Work Location – Job Fields |
|
|
431 |
Work Location – Spain |
ESP |
|
432 |
Work Location – Japan |
JPN |
|
435 |
Work Location – Military |
|
|
440 |
Job Information – Job Code |
|
|
450 |
Job Information – Reporting Information |
|
|
460 |
Job Information – Status |
|
|
470 |
Job Information – Employee Classification |
|
|
480 |
Job Information – Shifts |
|
|
490 |
Job Information – Standard Hours |
|
|
500 |
Job Information – Contract |
|
|
505 |
Job Information – Military |
|
|
510 |
Job Information |
AUS, BEL, BRA, DEU, ESP, FRA, GBR, ITA, MEX, MYS, NLD, and USA |
|
511 |
Job Information – Australian Higher Education |
AUS |
|
520 |
Job Labor – Bargaining Unit and Labor Agreement |
|
|
530 |
Job Labor – Employee Categories |
|
|
540 |
Job Labor – Union Code |
|
|
550 |
Job Labor – Exemptions |
|
|
560 |
Job Labor |
DEU, ESP, FRA, IND, and ITA |
|
570 |
Payroll – Payroll System |
|
|
580 |
Job – Absence System (Payroll) |
|
|
590 |
Payroll – Payroll Information |
|
|
600 |
Job – Global Payroll/Absence Information |
|
|
610 |
Payroll – Balance Group Number |
AUS, HKG, MYS, NZL, and SGP |
|
620 |
Job – Salary Plan |
|
|
625 |
Military (Salary Plan) |
|
|
630 |
Job Compensation – Payroll Currency and Frequency |
|
|
640 |
Job Compensation – Auto Calc Premium |
|
|
650 |
Job Compensation – Pay Components |
|
|
660 |
Employment Information – Original Start Date |
|
|
670 |
Employment Information – Organizational Assignment Data |
|
|
675 |
Employment Information – Military |
|
|
680 |
Employment Information – Additional Data |
|
|
690 |
Employment Information |
BEL, BRA, CAN, JPN, NLD, and USA |
|
690 |
Festive Advance |
MYS and SGP |
|
691 |
Employment Information – E & G |
CAN and USA |
|
700 |
Benefit Program – Benefit Record Number |
|
|
710 |
Benefit Program – Benefit Status |
|
|
720 |
Benefit Program – Ben Admin Eligibility |
|
|
730 |
Benefit Program – Participation |
|
|
740 |
Benefits Affordable Care Act Eligibility |
USA |
|
740 |
Time Reporter Status |
|
|
750 |
Time Reporter Type |
|
|
760 |
Time Reporter IDs |
|
|
770 |
Time Reporter Type – Rule Elements |
(USF) The following table lists the delivered Federal sections used for template creation:
|
Section Number |
Section Name |
Industry Specific Section Type |
|---|---|---|
|
10 |
Data Control Dates & Action |
Federal |
|
20 |
Data Control Codes |
Federal |
|
30 |
Data Control PAR Request |
Federal |
|
40 |
Data Control PAR Remarks |
Federal |
|
41 |
Data Control PAR Remarks |
Federal |
|
42 |
Data Control PAR Remarks |
Federal |
|
43 |
Data Control PAR Remarks |
Federal |
|
44 |
Data Control PAR Remarks |
Federal |
|
50 |
Tracking Data |
Federal |
|
60 |
Name |
Federal |
|
70 |
Gender and Other Personal Data |
Federal |
|
80 |
Citizenship Status |
Federal |
|
90 |
National ID |
Federal |
|
100 |
Additional Birth Information |
Federal |
|
110 |
Home Address |
Federal |
|
111 |
Mailing Address |
Federal |
|
121 |
Personal Phone Number 01 |
Federal |
|
122 |
Personal Phone Number 02 |
Federal |
|
123 |
Personal Phone Number 03 |
Federal |
|
124 |
Personal Phone Number 04 |
Federal |
|
130 |
Veterans Information |
Federal |
|
140 |
Marital Information |
Federal |
|
150 |
Education Details |
Federal |
|
160 |
Position Number |
Federal |
|
170 |
Job Data |
Federal |
|
180 |
Position Data |
Federal |
|
190 |
Compensation |
Federal |
|
200 |
Compensation - Quoted Pay |
Federal |
|
210 |
Other Pay Information |
Federal |
|
220 |
Accounting Information |
Federal |
|
230 |
Dates |
Federal |
|
240 |
Expiration Dates |
Federal |
|
250 |
Appointment Data |
Federal |
|
260 |
Service Computation Dates |
Federal |
|
270 |
Service Conversion Dates |
Federal |
|
280 |
Within-Grade Increase Data |
Federal |
|
290 |
Union Data |
Federal |
|
300 |
Permanent Data RIF |
Federal |
|
310 |
Probation Dates |
Federal |
|
320 |
Retained Grade Expires |
Federal |
|
330 |
Non-Pay Data |
Federal |
|
340 |
Security Information |
Federal |
|
350 |
Benefits System |
Federal |
|
360 |
Benefits Control |
Federal |
|
370 |
Benefits Administration Eligibility |
Federal |
|
380 |
FEHB Eligibility |
Federal |
|
390 |
FEHB Date |
Federal |
|
400 |
NFC Benefits Coverage |
Federal |
|
410 |
FEGLI Data |
Federal |
|
420 |
Retirement Data |
Federal |
|
430 |
FICA Status |
Federal |
|
440 |
NFC Military Service Deposit |
Federal |
|
450 |
Time and Labor - Reporter Status |
Federal |
|
460 |
Time and Labor - Reporter Type |
Federal |
|
470 |
Time and Labor - Reporter Ids |
Federal |
|
480 |
Time and Labor - Rule Elements |
Federal |
The following table lists the delivered Manage Profile sections used for template creation:
|
Section Number |
Section Name |
Countries with Country Specific Sections |
|---|---|---|
|
805 |
JPM Competencies |
|
|
806 |
JPM Responsibilities |
|
|
810 |
JPM Honors and Awards |
FRA |
|
811 |
JPM Language Skills |
|
|
812 |
JPM Licenses and Certifications |
|
|
813 |
JPM Memberships |
|
|
814 |
JPM Tests |
|
|
815 |
JPM School Education |
|
|
816 |
JPM Degrees |
AUS, DEU, and JPN |
|
817 |
JPM Areas of Study |
|
|
818 |
JPM Special Projects |
E&G |
|
819 |
JPM Current Location |
|
|
820 |
JPM Location Preferences |
|
|
821 |
JPM Geographic Preferences |
|
|
822 |
JPM International Preferences |
|
|
823 |
JPM Travel Preferences |
As the template administrator, you can use the section label name listed, or create a text catalog entry for those fields in which you want to change the label.
Required and Recommended Sections within a Hire Template
These sections are required when creating a hire template:
NAME_01_xxx (Names) - where xxx is the country code.
BIRTH_INFO (Birth Information)
GENDER (Gender)
JOB_PAYROLL_SYSTEM (Payroll System)
Note: The Name, Birth Information, and Gender sections are sequentially listed before the National ID section. Oracle highly recommends that you keep this order in the PeopleSoft Smart HR template for the National ID validations to work properly for certain countries.
Oracle recommends that these sections be included in the PeopleSoft Smart HR hire template:
WORK_LOC_JOB_FLDS (Work Location - Job fields)
JOB_ABSENCE_SYSTEM (Absence System)
JOB_PAYROLL_INFO (Payroll Information)
JOB_COMP_PAY_CMPNT (Job Compensation - Pay Components) or JOB_SALARY_PLAN (Job - Salary Plan)
BEN_PROG_BEN_STAT (Benefit Status)
Multiple Instances of an Element in a Template
The Template Record Setup table contains one row for each table currently included in the core hire process with at least one enterable field. However, there are some tables with multiple instances, such as phone numbers, email, addresses, and so forth, where more than one row exists. The system supports the use of these multiple elements in hiring templates. This way you are able to maintain more than one address section in a hiring template for different countries or multiple pay elements.
Note: If you need to have multiple instances of information in a template, such as names, addresses, or compensation, you need to specify a unique record alias for each additional instance.
For example, to add multiple pay components, rather than adding multiple copies of the same compensation section in a template, you must first create a new record and record alias, such as COMPENSATION1, and then add the fields from the original compensation record to your newly created record.
In addition, each template section must use a unique record alias. For example, if you need two address sections in your hiring template, one for addresses in Australia and another section for addresses in Brazil, selecting ADDRESS_01_AUS and ADDRESS_01_BRA can cause errors since both template sections use the ADDRESSES_01 record alias. In this example you should use a different address alias selection, such as ADDRESS_01_AUS and ADDRESS_02_BRA.
An alternative to creating multiple sections with different record instances, the section on the template can be specified as a grid section. On the grid section, the record instances will automatically be added behind the scenes and will correspond to the row number.
Troubleshooting Templates
During a Smart HR transaction of a hire, if a hire transaction for a person uses a past effective date and the hire fails, check the Default Benefit Program and default Pay Group values for the organization and make sure they are the correct. When the benefit system is Base Benefits or Benefits Administration, the benefits code invoked during a hire requires a default benefit program to be set on the Pay Group Table.
Check the Default Benefit Program value on the Pay Group table and make sure it has the correct value.
Check the Pay Group value on the Company table and make sure it has the correct default Pay Group value.
Field or Control |
Description |
|---|---|
Template |
A pre-configured template that enables end users to enter a subset of the data required for a transaction, such as a hire, update to personal data, or update to a profile. Other data is pre-entered by the template administrator during the template creation process. |
End user |
For the Smart HR Template process, the end user is typically a line manager or HR (Human Resources) representative in the field. This person is usually not familiar with the details of the hiring process. Whenever complex issues arise, the process is handed over to a centralized HR administrator. |
HR administrator |
The HR administrator is somebody who knows the hiring process very well and can easily deal with any level of complexity. This person reviews the data entered by end users and takes over the hiring process whenever errors occur or issues arise. |
Template administrator |
The person in your organization who knows the hiring process very well (may be an HR administrator). The person assigned this role sets up and maintains hiring templates to be made available to end users. |
Implementer |
For the Smart HR Template process, the implementer is typically an IT (Information Technology) specialist who works closely with the HR administrator and template administrator to review the delivered template records/fields and sections and modifies them, if necessary. |
Template section (or section) |
The fields available for the templates will be grouped into sections. For example, the Work Location section will include the following fields (all on the Job record): Regulatory Region, Company, Business Unit, Department, Department Entry Date, Location, and Establishment ID. Sections are the building blocks for creating templates, not the individual records/fields. PeopleSoft delivers these sections as system data, but the implementer can modify them, delete them, or add new sections. |
Template page (or pages) |
The dynamically generated data entry page visible to the end user, consisting of one or more template sections. The template administrator decides whether the sections are displayed in one long page or divided into smaller pages. |
Template Transaction Type |
The template administrator assigns each template to a template transaction type. Template transaction types identify the function of a template and the application class ID and path to specify the location of the implementation code for the transaction type. Transaction types can also be used to determine which users have security access to a template. |
Person/Job Indicator |
The template administrator identifies if a transaction type will include changes to personal data, job data, both, or neither. |
Template category |
The template administrator assigns each template to a category. The category provides row-level security for a template and can be used to group templates. A category may represent a specific department, location, business unit, region, and so forth. |
Auto-updates |
Determines whether data entered by the end user can be directly submitted for processing (auto-updating is turned on) or will need to be reviewed by an HR administrator (auto-updating is turned off). This auto-update functionality is set by the template administrator (the end user is not able to change it). |
Search match parameters |
The template administrator can associate a search match rule with a template to determine if the person already exists in the system. This search is done in the background and the results are displayed using the Search Match Results page. |
Use the Template Record/Field page (HR_TBH_RECDEFN) to set up and maintain the records and fields to be used in the Smart HR templates.
The records/fields that should be available to be included in the templates will be stored in the Template Record Setup Table (HR_TBH_RECDEFN) and Template Field Setup Table (HR_TBH_RECDTL). The Template Record Setup Table contains one row for each table currently included in the core Hire process with at least one enterable field (except for tables with multiple instances, such as phone numbers, email addresses, and so forth, where more than one row exists). It also contains views of the Profile Management tables.
Navigation:
This example illustrates the fields and controls on the Template Record/Field page. You can find definitions for the fields and controls later on this page.

Field or Control |
Description |
|---|---|
Record Name |
Indicate the name of the table to be included. (Prompted from the same field in the PeopleTools Record Definition table.) |
Record Instance |
Displays the instance number of the record. Defaults to 1. Use for records with more than one instance, such as phone numbers, email addresses, and so forth. |
Record Name Alias |
Enter the alternative name of the table to be included. Defaults to the Record Name value. This field enables the implementer to differentiate between two different instances of the same record. For example, business address (ADDRESSES_1) from mailing address (ADDRESSES_2). This is the prompt shown for the record when adding a new record/field to a section. |
Internal Use Only |
Select this check box to designate fields that are used in the Smart HR process but are not passed to the Services/CI. |
Key Field |
This check box is selected (in PeopleCode) if the field is defined as a key field at the system level (in the PeopleTools Record Field table PSRECFIELD). This field cannot be changed by the Implementer (display-only). |
Required |
This check box is selected by default (in PeopleCode) and is based on the PeopleTools Record Field table PSRECFIELD. This field cannot be changed by the implementer (display-only). |
Use the Template Section page (HR_TBH_SECDEFN) to identify and configure sections, and list and configure the fields contained in a section.
Navigation:
This example illustrates the fields and controls on the Template Section page. You can find definitions for the fields and controls later on this page.
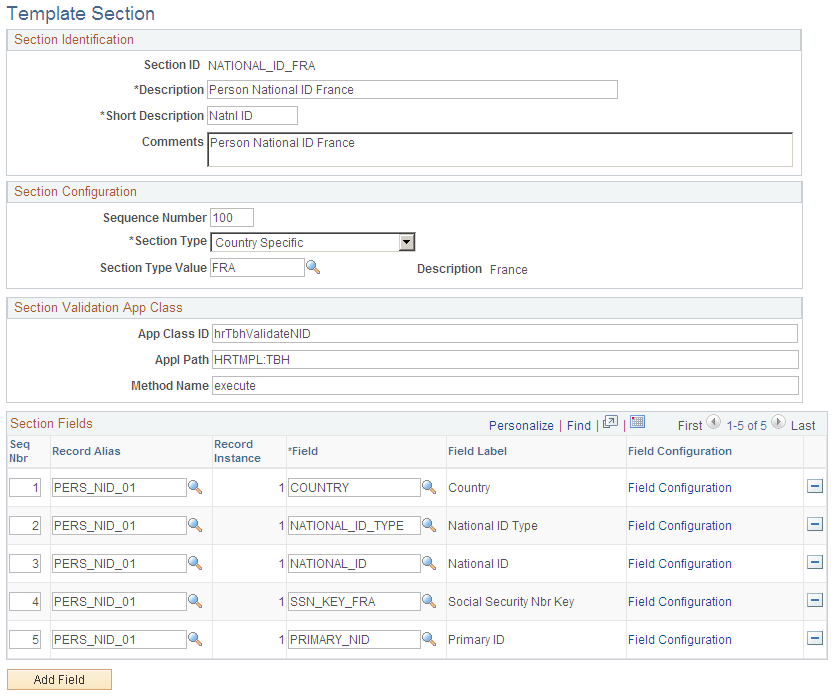
Field or Control |
Description |
|---|---|
Sequence Number |
Enter the number to determine the order of sections on the end user data entry page. |
Section Type |
Specify a type that defines the section. Valid values are General, Country, Name, Address, and Federal. Note: (USF) U.S. Federal customers will only see National Finance Center (NFC) interface fields if the database is federalized and Payroll Interface is selected on the HR Installation table. |
Section Type Value |
Enter the value for the section type you specified. For Name sections, this field stores the name format code. For the Country and Address sections, this field stores the appropriate country code. The field is empty for Federal and General sections. For JPM sections, the category type is stored here. |
Add Field |
Click this button to add additional fields in the Section Fields grid area. |
Section Validation App Class
A user-exit is provided for each section for validation that might be required by your organization. These are implemented as application class methods routines and appear in the App Class ID, App Class Path, and Method Name fields. There are three section validation methods delivered as system data: National IDs, Addresses, and Names.
Use the Template Section Field Configuration page (HR_TBH_SECDTL) to add additional user exit information for field changes and field prompts.
Navigation:
Click the Field Configuration link on the Template Section page.
This example illustrates the fields and controls on the Template Section Field Configuration page. You can find definitions for the fields and controls later on this page.
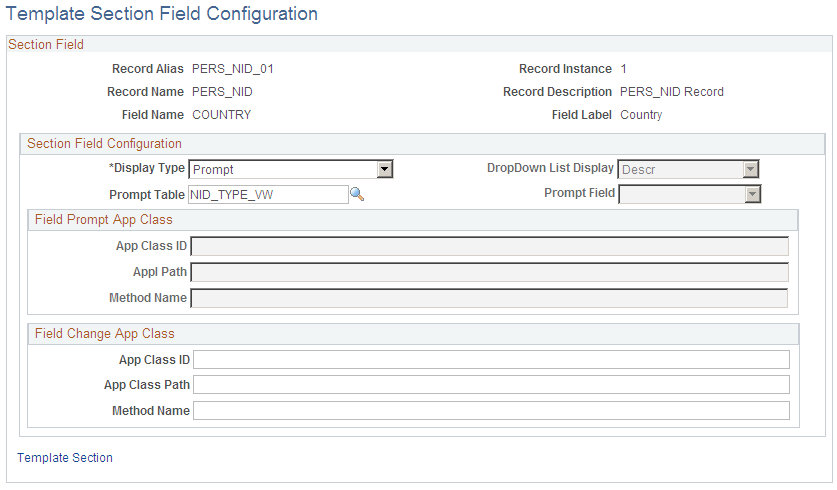
Section Field Configuration
Field or Control |
Description |
|---|---|
Display Type, DropDown List Display, Prompt Table, and Prompt Field |
Select how a field type should appear on the template to an end user and from which table it should retrieve valid values. The Display Type value options depend upon the field selected. For example, a field may or may not require a prompt table, it may use a date field, require a yes and no response, or needs to display a push button. The prompt table fields are disabled for all but the fields with a prompt table. |
Field Change App Class
The Field Change App Class provides a user exit for field change code to be added. Some delivered section fields include field change code. For example, the Company field on the Work Location - Job Fields section has field change code that builds prompt lists for other fields in the section, such as Location and Establishment ID.
Note: Oracle recommends that any validation methods added to the PeopleSoft application at implementation be stored in a customer-created application class.
Use the Template Category Table page (HR_TBH_CTG_TBL) to set up template categories for grouping templates and for row-level security.
Navigation:
This example illustrates the fields and controls on the Template Category Table page. You can find definitions for the fields and controls later on this page.
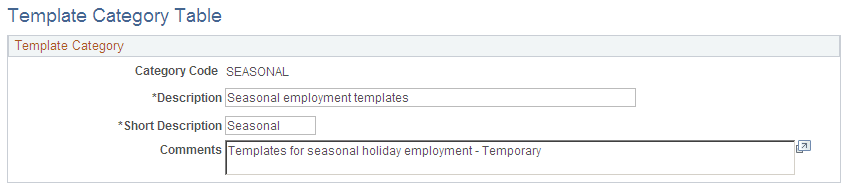
When you create your templates, you will need to assign each template to a category. Template categories:
Groups templates.
Categories are helpful when a template administrator is trying to narrow their search results when looking for a particular template. On the Template Creation page, you can perform an advance search for existing templates by category, as well as by other defined fields.
Provide row-level security for a template.
End users will only see templates for which they have security access.
Note: To set up row-level security for end users, you will need to enable the security set (TBHTMPL) and security access types for Smart HR Templates and set up security for the end user's permission list.
Use the Smart HR Transaction Type - Transaction Type page (HR_TBH_TXN_TBL) to define transaction types for your Smart HR templates.
Navigation:
This example illustrates the fields and controls on the Smart HR Transaction Type - Transaction Type page. You can find definitions for the fields and controls later on this page.
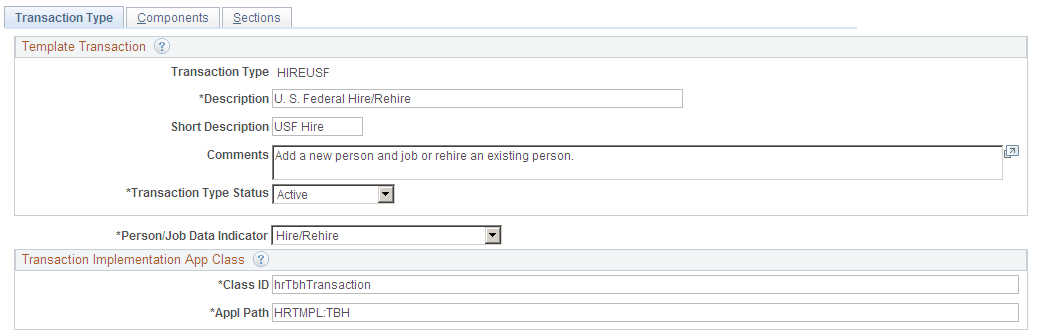
Note: You can use transaction types when determining which users have security access to a template.
Field or Control |
Description |
|---|---|
Transaction Type Status |
Defaults to Test. Valid values are Active, Inactive, and Test. You must change the status to Active in order for the transaction type to be available for selection on a Smart HR template. You can set it to Inactive once a transaction type is no longer needed. Note: Existing active templates that use a transaction type that has since been changed to inactive will still be valid. However, you cannot create new templates using a transaction type with an Inactive status. |
Person/Job Data Indicator |
Indicate if the transaction type will include changes to personal data, job data, both, or neither. Valid values are Hire/Rehire, Neither, Update Job, Update Person, and Update Person and Job. |
U.S. Federal Transaction Type |
(USF) Select this check box to indicate that this is for a U.S. Federal transaction. When you select a transaction type in the Smart HR Template Creation component that has been specified as U.S. Federal, the U.S. Federal Template check box on the Configuration page of the template will be selected automatically as display only. This check box is only available when the Federal check box has been enabled on the Installation table. |
Class ID and Path |
Enter the application class ID and path to specify the location of the implementation code for the transaction type. |
Use the Smart HR Transaction Type - Components page (HR_TBH_TXN_CMP) to identify which components will be updated when the end user or HR administrator saves the data to HR during the Smart HR Transactions process.
Navigation:
This example illustrates the fields and controls on the Smart HR Transaction Type - Components page. You can find definitions for the fields and controls later on this page.

Identify the HR or other components that should be updated by a template. These components will be updated upon saving the data to HR during the Smart HR Transactions process.
Field or Control |
Description |
|---|---|
Seq Nbr (sequence number) |
Indicates the order in which the system will access the components. The first sequence number must start with 1 and all numbers must be consecutive, without gaps. |
Component |
Define at least one component for a transaction type. You can include up to 10 components. The system automatically provides Personal Data or Job Data components by default based on the value you entered in the Person/Job Data Indicator field and the U.S. Federal Transaction Type check box field selection on the Transaction Type page. These components cannot be changed or deleted unless you change either of the previously mentioned field values, and then they will be replaced with the new default components that correspond to that indicator. Any existing non-defaulted components will be re-sequenced so that they follow the newly defaulted components. When the Person/Job Data Indicator value is Neither, the system does not provide any components by default. Note: The system will issue an error message if you add a Personal Data or Job Data-related component manually. This list identifies the Personal Data or Job Data-related components that you cannot include manually:
|
Market |
Identify the market for the component you selected. |
Label Details |
Select this link to access the Transaction Component Details page and add label details for the selected component. |
Use the Transaction Component Details page (HR_TBH_TXN_SEC) to specify label details related to a component.
Navigation:
Click the Label Details link from the Smart HR Transaction Type - Components page.
This example illustrates the fields and controls on the Transaction Component Details page. You can find definitions for the fields and controls later on this page.
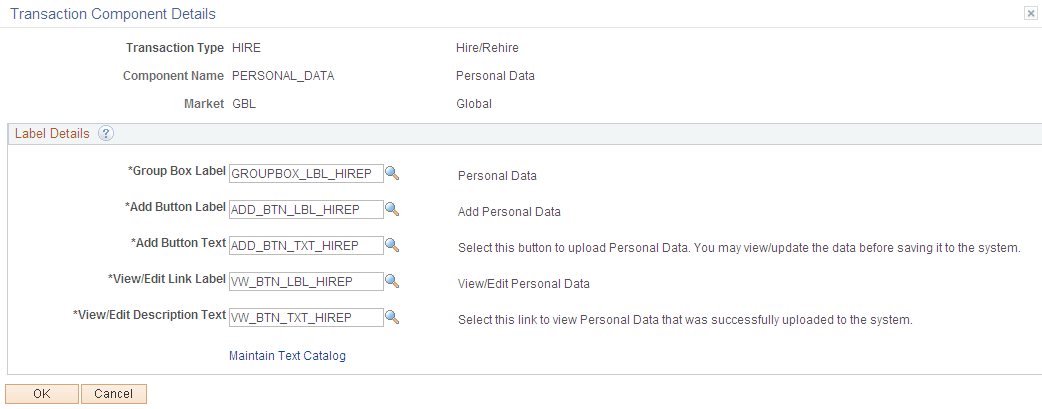
When the HR administrator is required to review or complete a Smart HR transaction, he or she will access the transaction using the Manage Hire or Manage Transaction Details pages. Each component associated with a transaction will appear on these pages as a group box, with corresponding links and buttons to either view, edit, or add information to the component.
Use the Transaction Component Details page to configure the group-box, add button, and view/edit labels and text for the component you selected. For each field, select labels and text IDs from the Text Catalogue specific to your business processes. Valid values for Smart HR templates are text IDs that have Human Resources (HHR) as the object owner and a sub ID of TBH.
Field or Control |
Description |
|---|---|
Group Box Label |
Identify a header for the group box that identifies the component you will update or view. |
Add Button Label and Add Button Text |
Enter text information related to the Add button that appears on the page for the HR administrator to add information to the person’s Smart HR transaction. The system displays the Add button when no data for the respective component has been saved to the system. Select a text ID that introduces the button in the Add Button Text field, such as text that says to select the button to add Personal Data. Select text that will appear on the button in the Add Button Label field, such as Add Personal Data. |
View/Edit Link Label and View/Edit Description Text |
Enter text information related to viewing and editing data that was added during the Smart HR transaction. The system displays the view and edit field labels when data was successfully uploaded to the system during the Smart HR transaction. Although the data was saved successfully during the Smart HR transaction process, the HR administrator can select the link to review and update the user’s entry. Select a text ID that introduces the link in the View/Edit Description Text field, such as text that says to select the link to view Personal Data. Select text that will appear as a link in the View/Edit Link Label field, such as View or Edit Personal Update. |
Maintain Text Catalog |
Select this link to access the Maintain Text Catalog page to add or update a text message. |
Use the Smart HR Transaction Type - Sections page (HR_TBH_TXN_SCT) to define which sections should be available to a template when it uses this transaction type.
Navigation:
This example illustrates the fields and controls on the Smart HR Transaction Type - Sections page. You can find definitions for the fields and controls later on this page.
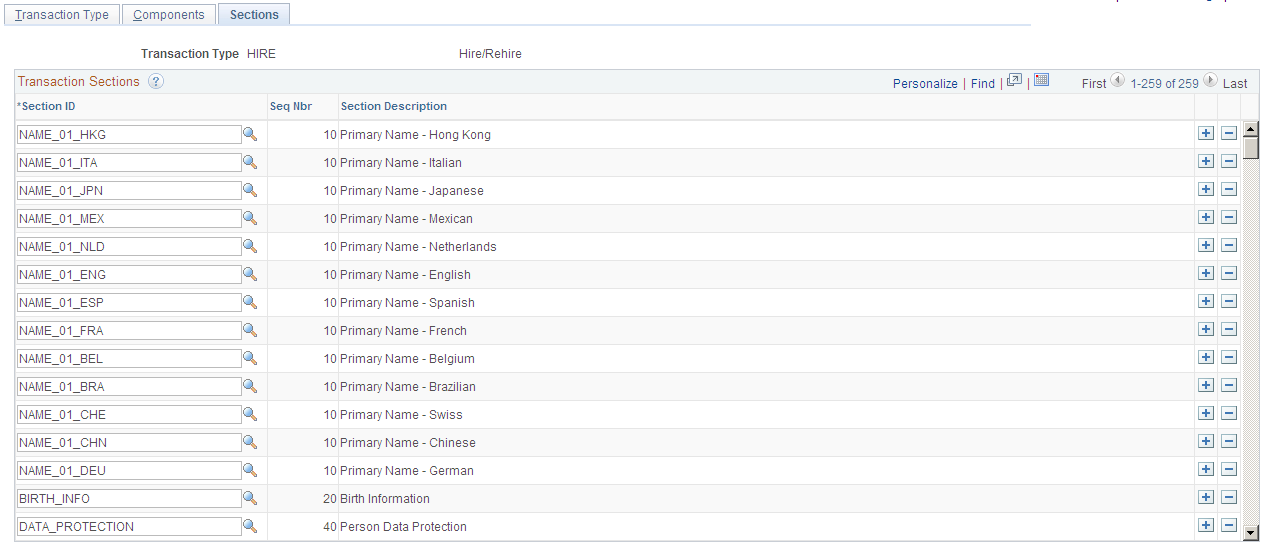
Field or Control |
Description |
|---|---|
Section ID |
Identify sections that are part of this transaction type. At least one section must be defined for a transaction type. Valid values are defined on the Template Section Page. Note: Personal data sections are required for all transaction types, even if there are no updates to Personal Data, so that a person can be found in the system using the Search Match process. These should be the sections which include data typically used in Search Match (defined in the Search/Match Rules and Search/Match Parameters components) such as name, address, national ID, birth date and gender. Templates associated with this transaction type can contain only those sections you define here. For example, if for addresses you associate only the Person Address - Canada section to this transaction type, you will not be able to associate other person address sections, such as Person Address - United States, to the templates that use this transaction type. Use the Load/Reload Sections button on the Smart HR Template Creation - Sections Page to have the system populate the template with all the sections defined for the transaction type. You can delete those sections that are not applicable to a template but you cannot add sections that are not defined for the transaction type. |
Seq Nbr (sequence number) and Section Description |
Displays the sequence number and description defined on the Template Section Page. |
Use the Copy Transaction Type page (HR_TBH_COPY_TXN) to copy a template transaction type.
Navigation:
This example illustrates the fields and controls on the Copy Transaction Type page. You can find definitions for the fields and controls later on this page.
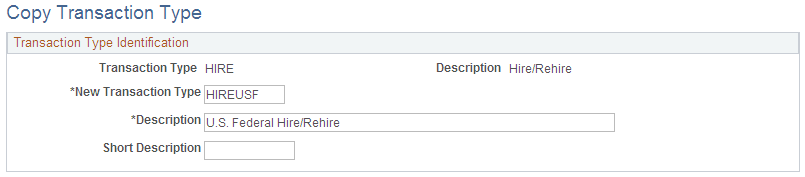
When you access the Copy Transaction Type, select an existing transaction type you want to copy. Enter the new transaction type information and click Save. The system will open the Smart HR Transaction Type - Transaction Type Page where you can update the appropriate information for the new transaction type.
Use the Smart HR Template Creation - Template Creation page (HR_TBH_TMPL_HDR) to create and modify templates.
Navigation:
This example illustrates the fields and controls on the Smart HR Template Creation - Template Creation page. You can find definitions for the fields and controls later on this page.

Field or Control |
Description |
|---|---|
Template |
Enter a template name that defines this template. |
Status |
Select a status. The default option for this field is Test when creating a new template. You can change the value to Active when it's time to be published, or Inactive when the template is no longer necessary. Only active templates are available to the end user. |
Effective Date |
Determine the effective date of a template. The default value for this field is today's date. |
Use the Smart HR Template Creation - Configuration page (HR_TBH_TMPL_CFG) to set up general options and the search page configuration for a template.
Navigation:
This example illustrates the fields and controls on the Smart HR Template Creation - Configuration page. You can find definitions for the fields and controls later on this page.
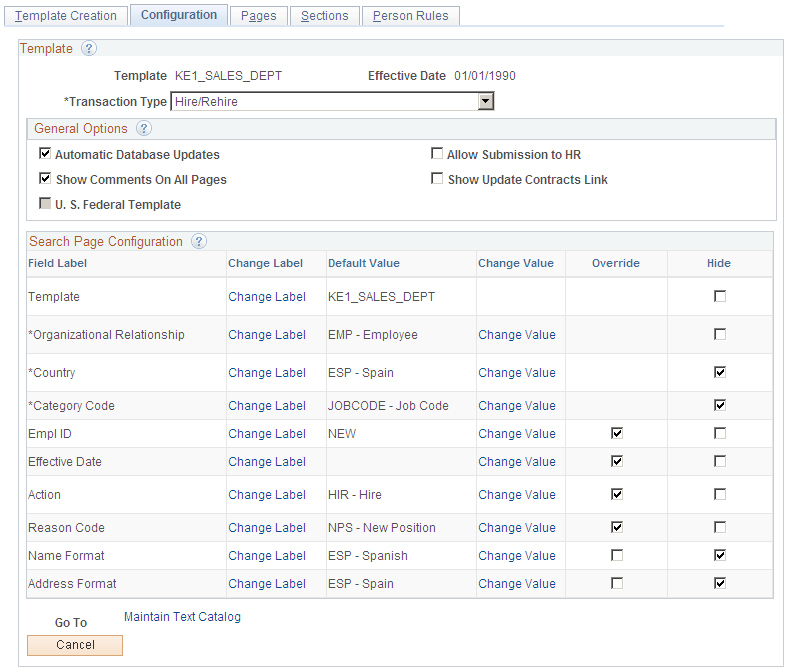
The system uses Transaction Type, Template ID, Org Relationship, Country, and Category Code fields as part of row-level security. Use these fields to determine to which templates end users will have access.
Field or Control |
Description |
|---|---|
Transaction Type |
Select a transaction type that will identify how the template will be used and determines which components will be updated. For example, a transaction type of Change Job Data may update the Job Data component only, while a Hire/Rehire type will update both Job Data and Personal Data. The transaction type also defines which sections will be available on the Sections page when creating a template. This information is defined on the Smart HR Transaction Type - Sections Page. When creating or working with a Smart HR transaction, the user can use the Transaction Type field as a filter to search for a specific template or transaction. When you change a transaction type, the system will clear the Action and Reason Code fields, if previously populated, and display a warning message to indicate that the sections for the template will need to be updated to ensure that the sections are valid for the transaction type. |
Automatic Database Updates |
Select this check box to have the data entered by the end user automatically update the database. Note: When ACA eligibility is associated with a hire template, the hire is saved successfully, and the regulatory region associated with the new employee is associated with the country code USA, then the transaction will update the system and HR will raise the ACAEligibility event. If the submission of the transaction is unsuccessful, the transaction will be sent to the HR administrator for final processing. Deselect this check box to have the data entered by the end user sent to an HR administrator for final processing. |
Allow Submission to HR |
Select this check box if the end user does not have all the required data, such as a National ID, and needs to submit the transaction request to HR to complete. This check box is only available when the Automatic Database Updates check box is selected. If Automatic Database Updates is selected, the following applies:
|
Show Comments On All Pages |
Select to have a Comments edit box appear at the bottom of each page of the Smart HR Transactions or Smart HR for Managers component when an end user performs a Smart HR transaction. Deselect to have the Comments edit box appear at the bottom of only the last page of the Smart HR Transactions or Smart HR for Managers component when an end user performs a Smart HR transaction. If there is only a single page, the Comments box will appear on that page. |
Show Update Contracts Link |
Select to have the Update Contracts link to the Contracts component appear on the Confirmation page after performing a Smart HR transaction. This enables users to update contract information for a person. This link appears on the Confirmation page when Automatic Database Updates is selected on the template and the transaction is saved successfully. Note: Users of the template must have access to the Contract Data component. |
U.S. Federal Template |
(USF) Displays this check box as selected when the transaction type is defined as a U.S. Federal transaction type. This enables you to see the standard U.S Federal (USF) sections. This check box is only available when the Federal check box has been enabled on the Installation table. Note: Do not use a U.S. Federal-defined transaction type when you are creating templates for U.S. Federal contingent workers. |
Search Page Configuration (Fields)
Displays the fields available to the end user on the Enter Transaction Details page of the Smart HR Transactions or Smart HR for Managers component.
Note: See the following section on how to select the field labels, determine whether the end user should be able to override a default value, or if the field should be hidden from the user.
Field or Control |
Description |
|---|---|
Template |
Displays the template ID you entered for this template. |
Organizational Relationship |
Select an organizational relationship of the worker. The default option for this field is Employee. The other available option is Contingent Worker. Note: Person of Interest is not an option. |
Country |
Enter a default country code for the template.
|
Category Code |
Select a category code for template grouping and as part of the row-level security for this template. A category may represent a specific department, location, business unit, region, and so forth. |
Empl ID (employee ID) |
Accept the default value of NEW to have the system automatically assign the next ID or leave the field blank to have the end user manually enter the ID. |
Effective Date |
Click the Change Value link to access the Section Field Default Value page and specify a fixed or default effective date of a Smart HR transaction, if applicable. Note the following:
Note: Usually you will select the Override check box for this field and set the default value to blank. When left blank, the Job Effective Date field for the hire will default to the current system date. If the Override check box is selected, the end user can update this information to provide the actual transaction date. |
Action |
Enter the action of adding this employment instance. When using a hire or rehire transaction type, values for an employee are Hire and Rehire, while values for adding a contingent worker are Add and Renewal. For non-hiring transaction that update job data, all valid actions will be available except the ones listed for hires and rehires. When using a personal or profile data transaction type that does not involve a change to job data, this row will be unavailable for entry. |
Reason Code |
Determine if you want to provide a default reason code, which is associated with the action. When using a personal or profile data transaction type that does not involve a change to job data, this row will be unavailable for entry. |
Format Using |
Specify a name format that may be used during the Smart HR transaction. The name format that you select impacts the actual transaction page. You can hide this field from the end user if you do not want the end user to select a different name format. If you enable the end user to choose another name format, you must include at least two different name sections on the Sections page. |
Address Country |
Specify an country address format that may be used during the Smart HR transaction process. The country address format that you select impacts the actual transaction page. You may hide this field from the end user if you do not want the end user to select a different address format. If you enable the end user to choose another address format, you must include at least two different address sections on the Sections page. |
Maintain Text Catalog link |
Click the Maintain Text Catalog link to open the Text Catalog - Maintain search page or Maintain Text Catalog page in a new browser window. Use the Maintain Text Catalog page to change or create labels. |
Search Page Configuration (Columns)
Determine how you want to display each field to the end user on the Enter Transaction Details page of the Smart HR Transactions or Smart HR for Managers component. Select the field label and select whether the end user should be able to override a default value, or if the field should be hidden from the user.
Field or Control |
Description |
|---|---|
Field Label and Change Label |
Click this link to open the Section Field Label Override page and use the Text Catalog to select another text ID to change the field label. |
Default Value and Change Value |
Click the Change Value link to open the Section Field Default Value page and define a default value for the field. The value you select displays in the Default Value field. |
Override |
Select this check box to enable the end user to change the default value when performing a Smart HR transaction. Deselect this check box when the end user is not allowed to change the value. When you select this check box, the system deselects the Hide check box so the end user has access to the field to edit the value. |
Hide |
Select this check box to hide this field and the default value from the end user when performing a Smart HR transaction. When you select this check box, the system deselects the Override check box. The end use will not be able to change the default value since the field is hidden. |
Use the Pages page (HR_TBH_TMPL_PAG) to set up the page number order and tab names that should appear on the Smart HR Transactions or Smart HR for Managers pages.
Navigation:
This example illustrates the fields and controls on the Pages page. You can find definitions for the fields and controls later on this page.
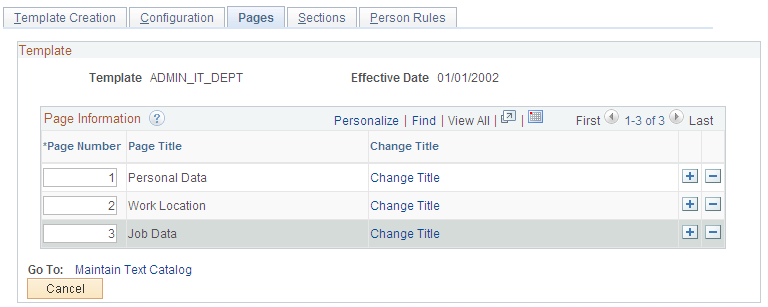
Field or Control |
Description |
|---|---|
Page Number |
Enter a number that will define the page tab order on the Enter Transaction Information page. On the Sections page, you will assign sections to one of these page numbers. This will group sections together or separate them onto different tabbed pages. The system will display these tab names when the end user or HR administrator is entering a transaction using the Smart HR Transactions - Enter Transaction Information page. For example, you may want to group all compensation and payroll information-related sections and fields within a page called Salary Data. You can have all the sections appear on one page, by entering only one page number and label, or you can group the sections on different pages, by creating numerous page numbers and labels. |
Change Title |
Click this link to access the Define Tab Detail page and define how the tab label should appear on the Enter Transaction Information page during the Smart HR transaction process. |
Maintain Text Catalog |
Click the Maintain Text Catalog link to open the Text Catalog - Maintain search page or Maintain Text Catalog page in a new browser window. Use the Maintain Text Catalog page to change or create labels. |
Use the Define Tab Detail page (HR_TBHTAB_DTL_SEC) to identify the tab names in the Smart HR Transactions or Smart HR for Managers component.
Navigation:
Click the Change Title link on the Pages page.
This example illustrates the fields and controls on the Define Tab Detail page. You can find definitions for the fields and controls later on this page.
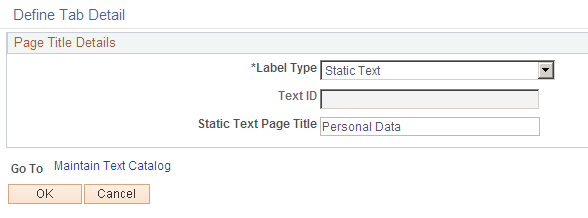
Field or Control |
Description |
|---|---|
Label Type |
Select the type of label that you will use. Values are Static Text and Text Catalog. |
Text ID |
Select the text ID from the Text Catalog if you have selected Text Catalog in the Label Type field. |
Static Text Page Title |
Enter the tab label name if you have selected Static Text in the Label Type field. |
Maintain Text Catalog |
Click the Maintain Text Catalog link to open the Text Catalog - Maintain search page or Maintain Text Catalog page in a new browser window. Use the Maintain Text Catalog page to add or change labels. |
Use the Smart HR Template Creation - Sections page (HR_TBH_TMPL_SEC) to add and configure template sections.
Navigation:
This example illustrates the fields and controls on the Smart HR Template Creation - Sections page. You can find definitions for the fields and controls later on this page.
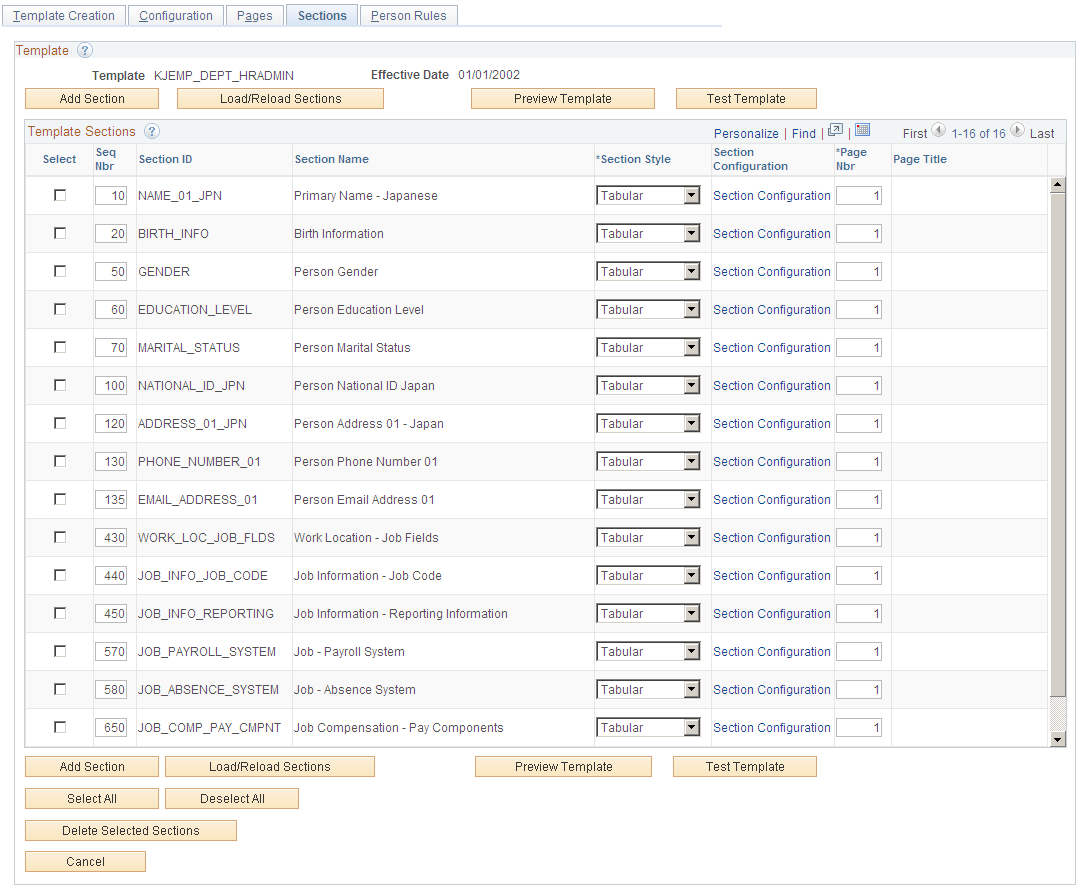
The template administrator uses the Sections page to define which sections will appear in the template for the end user.
The template administrator has access to all commercial fields and U.S. Federal fields which can be entered as part of the Smart HR transaction process in the Personal Data, Job Data, and profile components. The administrator organizes the fields into sections, ranging from one field in a section to ten or more fields in a section, and determines which sections are hidden from the end user during the Smart HR transaction process for each template.
Note: If a position number is selected on the template definition it will not populate values from Position Management. The administrator must hide fields that are populated by position number because they are overridden at the time the position number is loaded in Job Data and defaults are automatically entered. See the PeopleSoft Human Resources Manage Positions documentation for a list of fields that are provided by default into Job Data (from Position Data—this does not include what may also be defaulted in the job code).
Field or Control |
Description |
|---|---|
Add Section |
Click this button to add a new row for another section. |
Load/Reload Sections |
Click this button to add all viable sections to the template. The system looks at the values that were entered for the transaction type, country, name format, address format, and at the U.S. Federal flag to determine which sections to load. The following actions occur when the load process adds or removes sections:
|
Select All and Deselect All |
Click the Select All button to easily select all the sections on this page for easy deletion or deselect all section rows to avoid deletion. |
Delete Selected Sections |
Click this button to have the system delete all selected section rows from this template. |
Preview Template |
Click this button to open a new browser window to preview the template. Preview mode displays each template page and the sections on those pages. |
Test Template |
Click this button to validate if the template is set up correctly. Note: The template administrator is able to test the template only if Automatic Database Updates is selected on the Configuration page. Test mode is not available if Automatic Database Updates is deselected since the CI/Service is not called. The Template Administrator clicks this button and the Smart HR Transactions - Enter Transaction Details pages displays in a new browser. The administrator then enters a person's data as an end-user would and then clicks the Test Template button on the last Smart HR Transactions or Smart HR for Managers page. If the template is set up correctly, the Test Confirmation page appears stating that your template configuration is successful. If the template is not set up correctly, the Test Confirmation page appears with a link to view the errors that the template encountered. Note: Testing a template does not update any of the components associated with the template transaction's type. |
Template Sections
Field or Control |
Description |
|---|---|
Seq Nbr (sequence number) |
Enter a sequential number to reorder sections. The lower numbered section will appear first on a page for the end user. Sequence numbers come from the Template Section Page, but can be overridden here. |
Section Style |
Indicate whether the section should be displayed in Tabular format or Grid format. The Grid format is for multi-row sections such as Profile Management items, addresses, phone numbers, emails, and so forth. |
Section Configuration |
Select this link to open the Template Section Configuration page and use the Text Catalog to update fields values within a section. |
Page Nbr (page number) and Page Title |
Assign sections to a page number you defined on the Pages page. The page title will automatically display from either the Text Catalog value or static text you entered Define Tab Detail page. |
Use the Template Section Configuration page (HR_TBH_TMPL_FLDS) to configure the fields for a section within the template.
Navigation:
Click the Section Configuration link on the Sections page.
This example illustrates the fields and controls on the Template Section Configuration page. You can find definitions for the fields and controls later on this page.
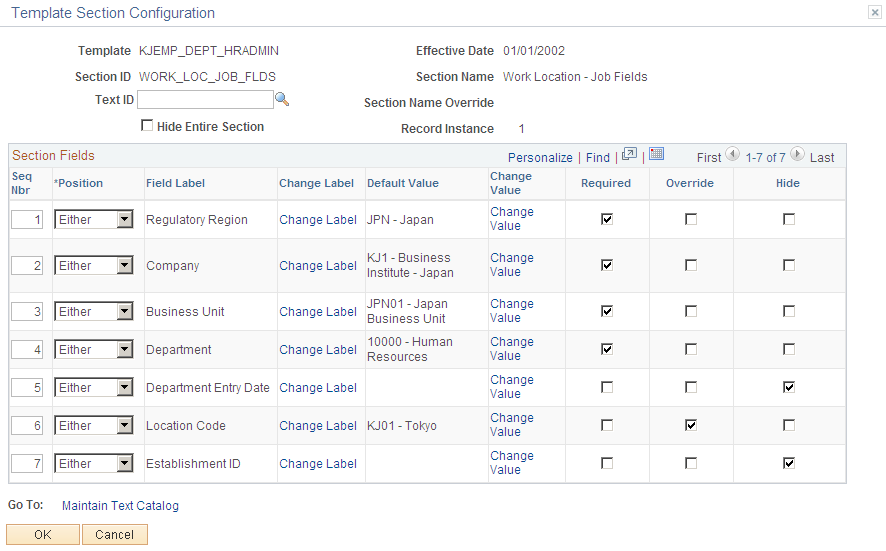
The template administrator uses the Template Section Configuration page to determine which fields will appear in a section and determine if the field should be required, have a default value provided, and if the end user can change any values.
Field or Control |
Description |
|---|---|
Text ID andSection Name Override |
Enter a different text ID to if you want to change the group box header on the Smart HR Transactions or Smart HR for Managers page. The new name displays in the Section Name Override field. |
Hide Entire Section |
Select this check box to hide this section from the end user when entering the Smart HR transaction. |
Section Fields
Field or Control |
Description |
|---|---|
Seq Nbr (sequence number) |
Enter a sequential number to reorder the fields in this section. The sequence number is defined on the Template Section Page but can be overridden here. |
Position |
Enter the location that the field should appear within the section. Values are Either, Left, and Right. By selecting Either, the system will place the field in the next logical order location, either left or right. |
Field Label and Change Label |
Click the Change Label this link to open the Section Field Label Override page and use the Text Catalog to select another text ID to change the field label. |
Default Value and Change Value |
Click the Change Value link to open the Section Field Default Value page and define a default value for the field. The system displays this value in the Default Value field. |
Required |
Select this check box if the end user is required to enter a value in the field. |
Override |
Select this check box to enable the end user to change the default value when performing a Smart HR transaction. Deselect this check box when the end user is not allowed to change the value. When you select this check box, the system deselects the Hide check box so the end user has access to the field to edit the value. |
Hide |
Select this check box to hide this field and default value from the end user when performing a Smart HR transaction. When you select this check box, the system deselects the Override check box. The end use will not be able to change the default value since the field is hidden. |
Maintain Text Catalog |
Click the Maintain Text Catalog link to open the Text Catalog - Maintain search page or Maintain Text Catalog page in a new browser window. Use the Maintain Text Catalog page to change the label sections. |
Use the Smart HR Template Creation - Person Rules page (HR_TBH_TMPL_PER) to enable or disable Search Match functionality for a template and define options for handling existing person data and employment instances in the database.
Navigation:
This example illustrates the fields and controls on the Smart HR Template Creation - Person Rules page. You can find definitions for the fields and controls later on this page.
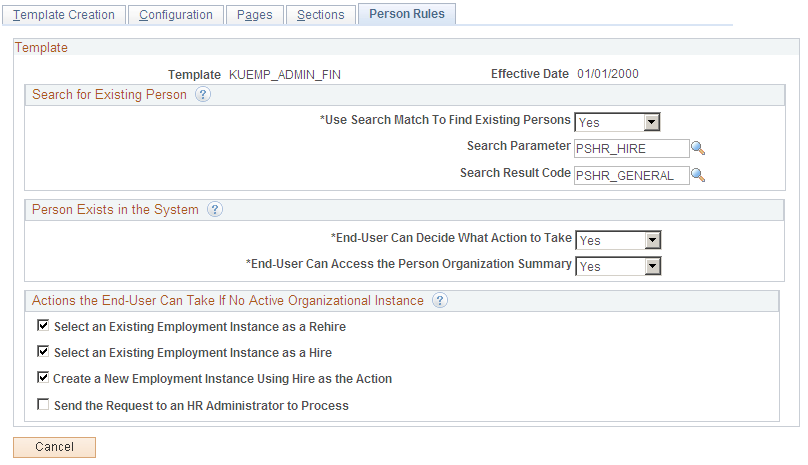
Search for Existing Person
Use these fields to enable or disable Search Match.
Field or Control |
Description |
|---|---|
Use Search Match To Find Existing Persons |
Select whether the Smart HR process should use the Search Match functionality. If you select:
|
For templates with a transaction type where the Person/Job Data Indicator field value is not equal to Hire/Rehire, the Use Search Match To Find Existing Persons field is automatically set to Yes and is grayed out so it cannot be changed. These transaction type templates require a person to already be in the system. Only the Search for Existing Person group box fields display on the page.
Note: When the Person/Job Data Indicator field for a template’s transaction type is set to Update Job or Update Person and Job and the template is configured for automatic database updates, the target person must have only one active job in the system. If not, the transaction will be routed to the HR Administrator to update the person model.
See Smart HR Transaction Type - Transaction Type Page.
Field or Control |
Description |
|---|---|
Search Parameter |
Enter a search parameter, which contains a set of one or more search rules. The search parameters are what the users select prior to performing a search to determine the search fields that they are permitted to search on. This field appears when you select Yes in the Use Search Match To Find Existing Persons field. |
Search Result Code |
Enter a search result code, which specifies the data that you want Search/Match to return in the grids on the Search Results page for the potential matching IDs that it finds. This field appears when you select Yes in the Use Search Match To Find Existing Persons field. |
Person Exists in the System
Field or Control |
Description |
|---|---|
End-User Can Decide What Action to Take |
Determine whether the end user decides what action to take when Search/Match is activated. When you select Yes, the page displays the End-User Can Access the Person Organization Summary field and the Actions the End-User Can Take If No Active Organizational Instance Is Found group box. When you select No, the page displays the Action to Take if Only One Inactive Employment Instance Is Found and Action to Take if More than One Inactive Employment Instance (or None) is Found group boxes. |
End-User Can Access the Person Organization Summary |
Determine whether the end user can view more information about a person by selecting either Yes or No. When you select Yes, a Per Org Summary link is made available to the user to view organization details about a person. The End-User Can Access the Person Organization Summary field is available when you select Yes in the End-User Can Decide What Action to Take field. |
Note: Depending on the Organizational Relationship value defined on the Configuration page of the Template, the field text will vary. An Employee relationship displays the text Employment Instance, where as a Contingent Worker relationship displays the wording Contingent Worker Instance. This applies to every instance of this wording on the Person Rules page.
Actions the End-User Can Take If No Active Organizational Instance
When the template administrator selects Yes in the End-User Can Decide What Action to Take field, the page displays this group box.
Select one or more check boxes to enable functionality for the end user for the template. This group box appears when you select Yes in the End-User Can Decide What Action to Take field. Field selection options are:
Select an Existing Employment Instance as a Rehire.
Select an Existing Employment Instance as a Hire.
Create a New Employment Instance Using Hire as the Action.
Send the Request to an HR Administrator to Process.
Action to Take if Only One Inactive Employment Instance
When the template administrator selects No in the End-User Can Decide What Action to Take field, the page presents a set of different group boxes for inactive employment instance matches.
This example illustrates the fields and controls on the Person Rules page where the end user cannot decide what action to take when a person exists in the system. You can find definitions for the fields and controls later on this page.
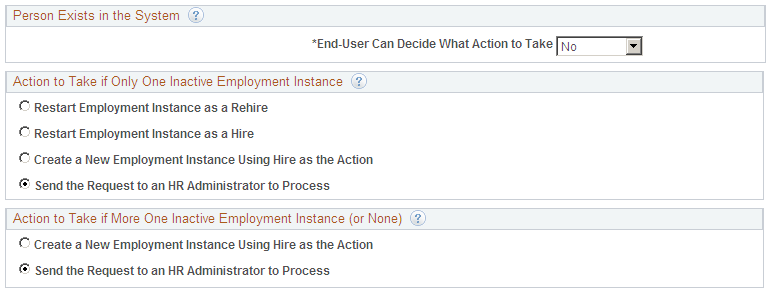
To define what action should occur if an inactive matching person is found during the transaction, select one of the options in this group box. Values are:
Restart Employment Instance as a Rehire.
Restart Employment Instance as a Hire.
Create a New Employment Instance Using Hire as the Action.
Send the Request to an HR Administrator to Process.
Action to Take if More than One Inactive Employment Instance (or None)
Select one option the end user can perform during a template transaction when more than one inactive employment instance is found. This group box appears when you select No in the End-User Can Decide What Action to Take field. Values are:
Create a New Employment Instance Using Hire as the Action.
Send the Request to an HR Administrator to Process.
Use the Copy Template page (HR_TBH_COPY) to copy a Smart HR template and make modifications to the new template.
Navigation:
This example illustrates the fields and controls on the Copy Template page. You can find definitions for the fields and controls later on this page.
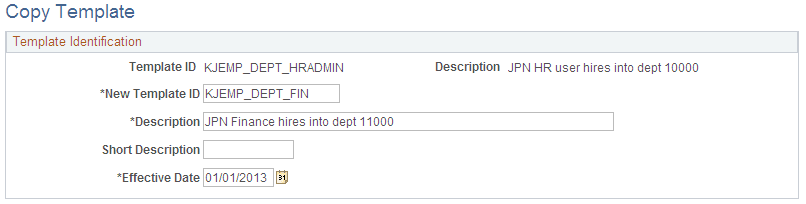
Enter the new template information and click Save. The system will open the Smart HR Template Creation - Template Creation Page where you can update the appropriate information.
Country Changes
If you copy a country template and save it for another country, only the related country sections appear on the page. The original country sections and their defaults do not display. For example, if a template for France (FRA) is copied and you change the country for the new template to Spain (ESP), the FRA sections are removed; the ESP sections appear, are blank, and ready for input.
Note: You will need to access the Sections page and select the Load/Reload Sections button to update the template with the related country sections and delete the original country sections and their defaults.