Setting Up XML Reporting Framework
This topic discusses setting up the XML reporting framework.
|
Page Name |
Definition Name |
Usage |
|---|---|---|
|
XML_CODE_TBL |
Define the auxiliary XML code tables and the valid values that your company uses for XML nodes. |
|
|
XML_SET_TBL |
Maintain XML set definitions. |
|
|
XML_NODE_TBL1 |
Define the nodes that comprise the XML file structure for your country-specific functionality. |
|
|
XML_NODE_TBL2 |
Map existing system values for nodes to alternate values that the XML file requires. |
|
|
XML_TEMPLATE |
Define templates for use during XML file generation. |
|
|
XML_RC_TESTER |
Allow running any XML file defined using previous setup, so that the user can validate if the resultant report is the expected one. |
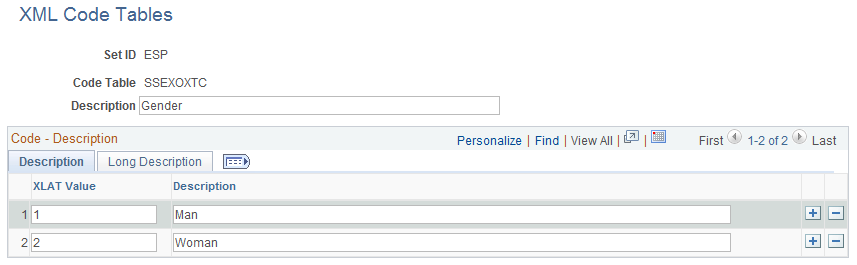
Use the XML Code Tables page (XML_CODE_TBL) to define the auxiliary XML code tables and the valid values that your company uses for XML nodes.
Navigation:
This example illustrates the fields and controls on the XML Code Tables Page. You can find definitions for the fields and controls later on this page.
Field or Control |
Description |
|---|---|
Code Table |
The name of the code table. |
Description |
Enter the description of the code table. |
Field or Control |
Description |
|---|---|
XLAT Value |
Enter the translate value for the code table. |
Description |
Enter the description of the translate value. |
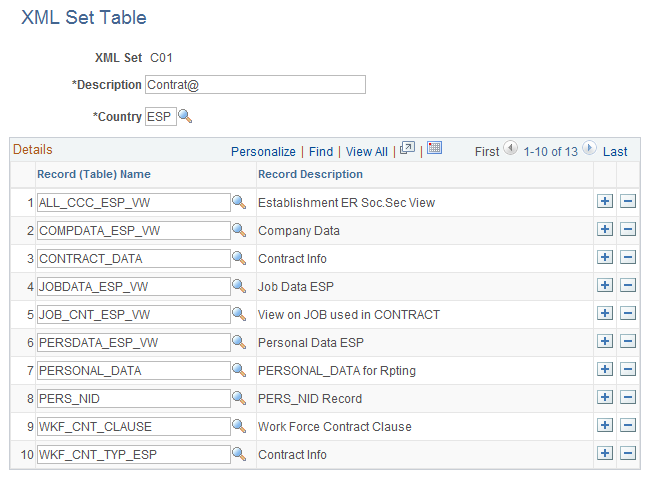
Use the XML Set Table page (XML_SET_TBL) to maintain XML set definitions. For example, Human Resources and Global Payroll Spain provide XML sets for:
Delta reporting
Contrat@ reporting
Tripartita Foundation reporting
Contract printing
Company Certificates
Cret@ reporting
Navigation:
This example illustrates the fields and controls on the XML Set Table Page. You can find definitions for the fields and controls later on this page.
Field or Control |
Description |
|---|---|
XML SetandDescription |
Displays the XML set code and description. |
Country |
Select the country for which the XML set is being defined. |
Field or Control |
Description |
|---|---|
Record (Table) Name |
Enter the record name eligible to work with this XML Set. The records entered here will be available in other parts of this framework. |
Record Description |
Displays the description of the record or table you selected. |
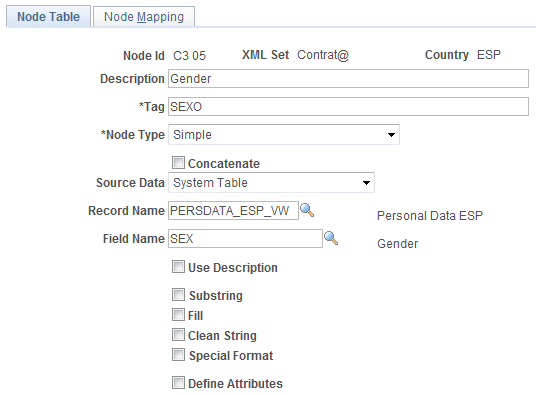
Use the Node Table page (XML_NODE_TBL1) to define the nodes that comprise the XML file structure for your country-specific reporting.
Navigation:
This example illustrates the fields and controls on the Node Table Page. You can find definitions for the fields and controls later on this page.

This example illustrates the fields and controls on the Node Table Page (simple node type). You can find definitions for the fields and controls later on this page.
Field or Control |
Description |
|---|---|
Node Id |
When creating a new node, enter a code to identify the node. |
XML Set |
Select the XML set to specify the functional area for which you are defining this node. |
Country |
Displays the country associated with the selected XML set. |
Description |
Enter a description of the node. |
Tag |
Enter the name of the XML tag for the node. |
Node Type |
Select whether the node is Simple or Complex. Simple nodes are associated with values, whereas complex nodes are composed of other simple or complex nodes. |
Root Node |
Select this check box to indicate that this complex node is a root node, meaning that it is the node from which all other nodes in the XML file structure are derived. This field appears only when the node type is Complex. |
Preview XML |
Click this button to access the XML Preview ESP page, where you can preview the XML file structure for the complex node. You can only preview XML files structure for complex node types. This button appears only when the node type is Complex. |
Concatenate |
Select this check box if the data in this node is the concatenation of two or more fields in the database. The system displays the Node ID field for you to select the concatenated node. This check box becomes available for edit only for simple nodes. |
Node Id |
Select the concatenated node. This field becomes available only if you select the Concatenate check box. |
Source Data |
Select how you want to define the source data for the node. During XML file generation, the system uses the option that you select to retrieve and validate node values in the XML file. This field becomes available for edit only for simple nodes. Valid values are:
|
Record Name and Field Name |
The system displays these fields when you select system data as the as source data of a simple node. If you select the System value in the Source Data field, you then need to specify which record and field contain the valid values for the XML node. To specify a record and field, first select a record from the list of valid records (added via the XML Set Table page). Then select a field from the list of available fields in the view. The system uses your selection to retrieve data when generating XML files. |
Validation Type |
Manually select the type of data validation that you want to occur when the system validates the node values that users enter for a person in an XML file. This field becomes available only when the Source Data field value is manual. Valid values are:
|
Default Value |
For a simple node where the source is manual, you can set up a default value. This field is available only when you select manual in the Source Data field. |
Use Description |
Select this check box if you want to print the Description, instead of the Code. This field is available only if the field that you selected has a XLAT associated or it has a prompt table with a DESCR field. |
Use Related |
Select this check box if you want to print any data from the prompt table associated to this field. This field is available only if the field you selected has a prompt table. |
Substring |
Select this check box if you want to print just a part of the field value. On selecting this check box, you have to enter the Start Position and Length value. |
Fill |
Select this check box if you want to populate the field value with the character specified in the Char Fill field to complete the length that you need. |
Clean String |
Select this check box if you want to remove one or more characters specified in the Character to Clean field. |
Special Format |
Select this check box if you want to use one of the special formats defined in the framework:
|
Define Attributes |
Select this check box if you want to enter attributes to the node. |
Reg Region (regulatory region) |
Select the regulatory region to use to filter possible code tables to a specific setID. Code tables contain a setID. By selecting the regulatory region, the system enables you to select only the code tables with the same setID as the regulatory region. This field is available only for simple node types that use code tables. |
Code Table |
If you select a validation type of code table, select the table from which you want the system to prompt users with values to select for a node. This field is available only for simple node types that use code tables. |
Formatted |
Select how you want the date field to be formatted. This field is available only if you select a validation type of Date. |
Field Name |
Select the field from which the system prompts users with translate values. This field is available only if you select a validation type of Xlat Field. |
Children Nodes
Use this group box to define the children node members of a complex node. All children nodes that you define for a given node appear at the same level in an XML file structure. If children nodes are complex nodes that require their own children nodes, you must define members for these nodes in their own node definition. This group box appears only when the node type is Complex.
Field or Control |
Description |
|---|---|
Sequence Number |
Enter the sequence in which you want the children nodes to appear in the file structure within the parent node. The system arranges the children nodes in order from lowest to highest. |
Node ID |
Select the child node. Define child nodes using this same component. |
Description |
The system displays the description of the child node. |
Node Type |
The system displays the node type of the child node, either Simple or Complex. |
Required Field |
Select this check box to make this node a required field in the XML file. When you validate the XML file through the appropriate reporting component, the system requires that the user enter a value for this field before generating the XML file. |
Print Node if Blank |
Select this check box if you want an XML file to contain a specific node even if the value is null. |
Iterative Node |
Select this check box to indicate that you can repeat this node inside the XML file. |
Edit Table (Iterative Record) |
Enter the record that contains the iterative data. Select the record from the XML Set page. This field is available for editing only if the Iterative Node check box is selected. |
Use the Node Mapping page (XML_NODE_TBL2) to map existing system values for nodes to alternate values that the XML file requires.
Navigation:
Note: This page becomes available only when you define the Node Type as Simple and the Source Data as System on the Node Table page.
This example illustrates the fields and controls on the Node Mapping Page. You can find definitions for the fields and controls later on this page.
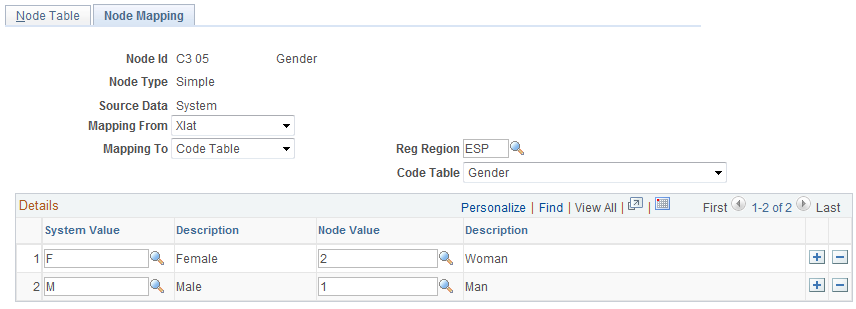
Use this page in cases where the values for the node exists in the application but the system values do not match the values that the XML file requires. Through this page, you can map the existing system values to other, more appropriate values that you must use for the XML file.
Field or Control |
Description |
|---|---|
Mapping From |
For the field that you are mapping from, select how the field derives its valid values. After you make a selection, use the System Value field in the grid below to specify the system field values from which you want to map to alternate values. Your choices are:
Note: To successfully map system values to an alternate value, you must know the type of table edit that is associated with the field that you are mapping. In this way you preserve data integrity so that the system is able to accurately remap values during data validation of an XML file. You select the field on the Node Table page in the Field Name field. |
Edit Table |
If you select to map field values from a record, select the prompt table from which the field derives its valid values. |
Mapping To |
Select how you want to define the new valid field values that you are mapping to. After you make a selection, use the Node Value field in the grid below to specify the new value to replace the system value. Your choices are:
|
Reg Region (regulatory region) |
Select the regulatory region to use to filter possible code tables to a specific setID. Code tables contain a setID. By selecting the regulatory region, the system enables you to select only the code tables with the same setID as the regulatory region. |
Code Table |
If you select to map new field values to values from an XML code table, select the code table. Define XML code tables on the XML Code Table page. |
System Value and Description |
Specify the system field value from which you are mapping to another more appropriate value for the XML file. If you are mapping from a field where the valid values are derived from translate tables or prompt tables, select the value that you want to change. If you are mapping from fields where the valid values are derived by manual entry into the system, enter the value that you want to change. The value that you enter manually must be identical to the value defined through user entry. For translate values and table record values, the system displays the description of your selection. |
Node Value and Description |
Select or enter the node value to which you are mapping the system value. If you have selected to map to a code table in the Mapping To field, the system prompts against the values in the XML code table that you specify. For XML code table values, the system displays the description of your selection. |
Use the XML Template page (XML_TEMPLATE) to define templates for use during XML file generation. The XML set defines the functional area, whereas the XML template defines the specific XML scheme.
Navigation:
This example illustrates the fields and controls on the XML Template Page. You can find definitions for the fields and controls later on this page.
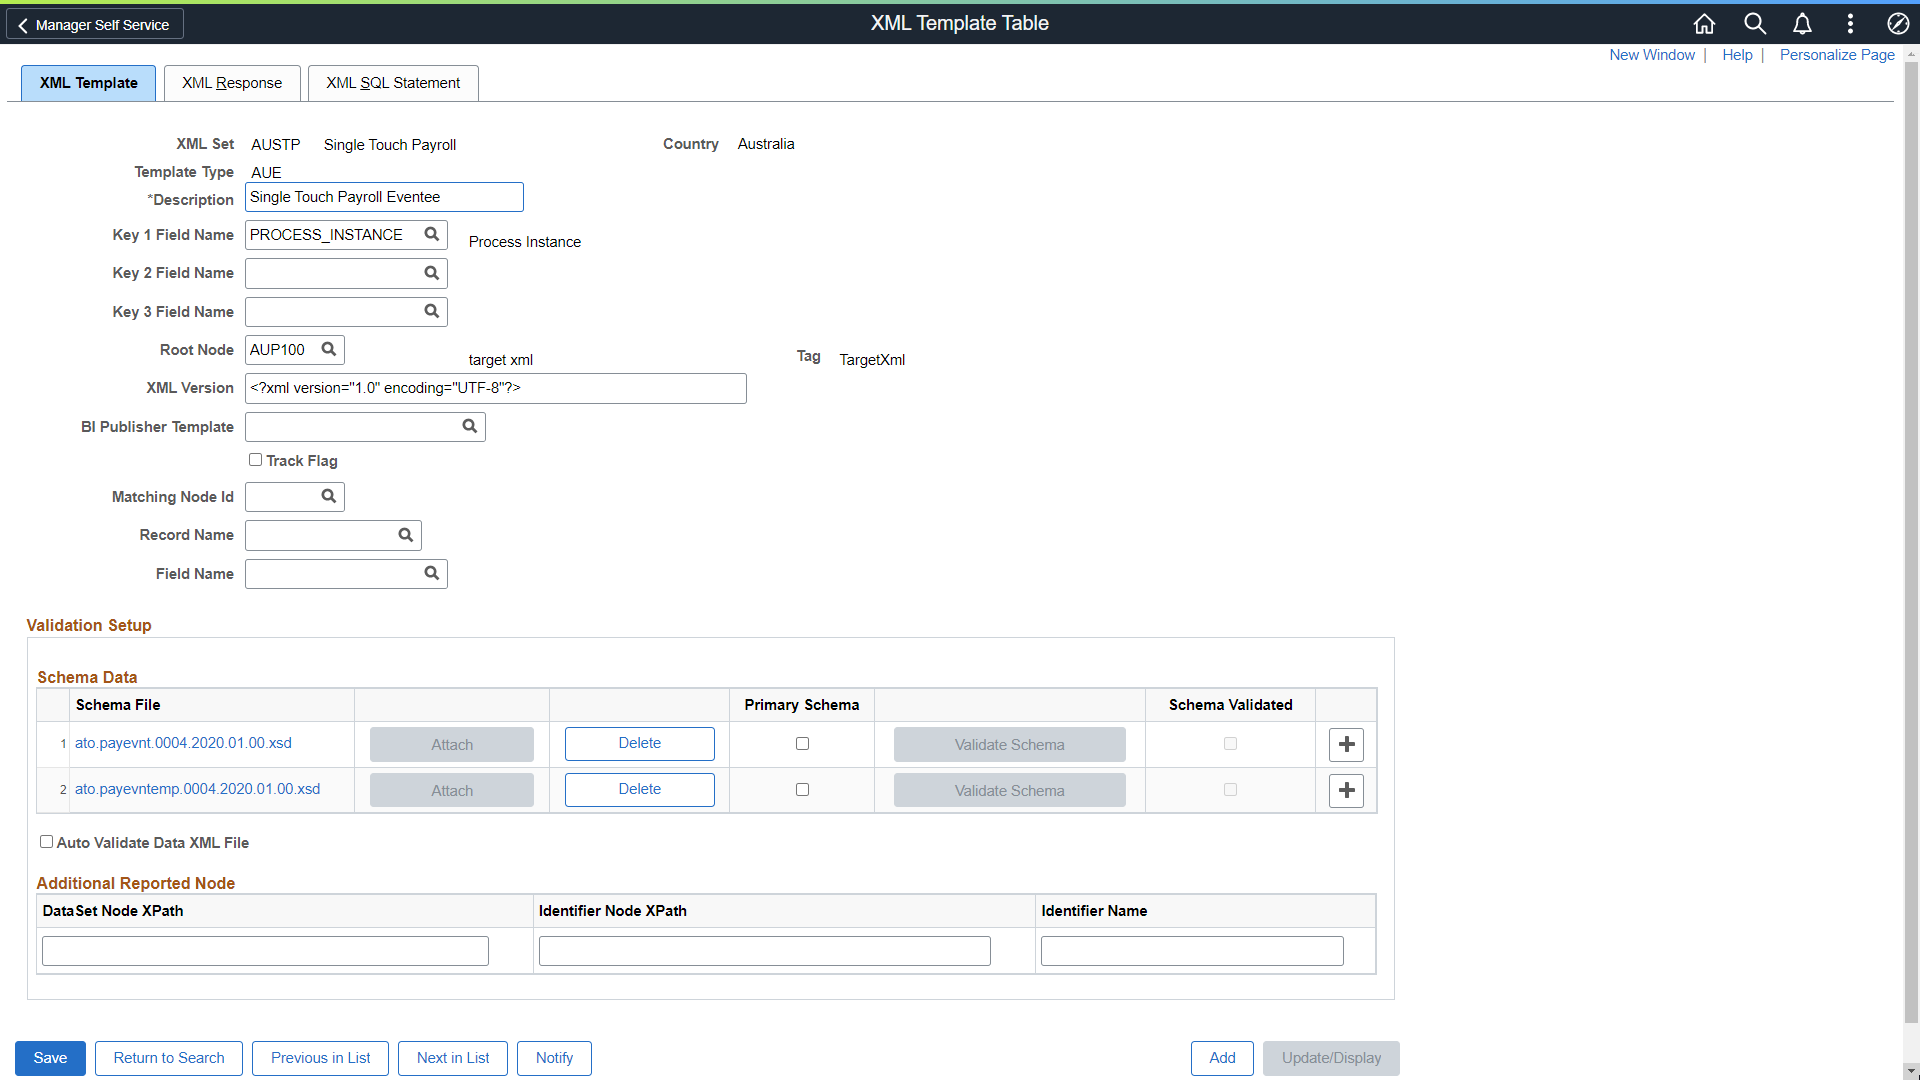
Field or Control |
Description |
|---|---|
XML Set |
When defining new XML templates, select the XML set to which the template belongs. |
Template Type |
The identifying code of the template. |
Description |
Enter a description of the XML template. |
Key 1 Field Name Key 2 Field Name and Key 3 Field Name |
Specify the fields that you want to use as keys for the different levels of data that you are reporting with the XML template. These fields indicate the key structure of the table from which the system retrieves data for reporting through XML files. For example, in case of GP Spain, with Contrata reporting you define EmplID and EFFDT as the key fields to indicate that you are reporting employee information based on the effective date of the contracts. With Delta reporting in GP Spain (XML Set = D01), you define three levels – company, employee, and effective date (or the incident) - to deliver XML files that include information keyed at the company level, employee level, and incident level. When you map a node to a record and field that exist in the database through the XML Node Table component, the record that you select must have at least one of these keys as a record key because the Where clause is built dynamically to use these fields. |
Root Node |
Select the root node for the XML template. By identifying the root node for the XML template you are setting the whole structure of the XML file because the root node contains in a recursive mode the whole structure. The root node is the starting point of the XML structure. Define root nodes on the XML Node Table page. |
XML Version |
Specify the version of the XML files that are based on this template. Each XML file needs to include a first line that states the version. |
BI Publisher Template |
Select the BI Publisher template to which you want to link the XML template. This enables you to create a PDF document that helps you visualize the report. |
Schema Data
Use this section to validate the XML structure against the schema. You can attach one or more schema files (*.xsd) and validate if the order is correct or if node is missing.
Field or Control |
Description |
|---|---|
Attach |
Click this button to attach one or more schema file for validation. |
Delete |
Click this button to delete an already attached schema file. |
Primary Schema |
Select this check box to set the selected schema as the primary schema. Note: Only one schema can be set as primary schema. |
Validate Schema |
Click this button to validate the XML structure against the attached schema files. If the validation fails, it shows a warning message. |
Schema Validated |
If the XML structure validation is successful, the check box appears selected. Note: Only primary schema can be used for XML structure validation. |
Auto Validate Data XML File |
If you select this check this box, the XML file generated by the XML framework application engine will be automatically validated against the attached schema files( XSDs) and corresponding log file will be generated. |
Additional Reported Node
Use this section to add relevant node of XML to be displayed in the log file, if you have selected the Auto Validate Data XML File check box.
Note: If you left this section blank, the log file will be created in the default format with severity, line number, column number and error. In that scenario, the user has to open the XML file, check the line number, identify the error and find out the identifiers like employee, company etc to which it belongs manually. If not, line number and column number column will be replaced by the node provided by the user and will be listed under the given heading (Identifier Name).
Field or Control |
Description |
|---|---|
DataSet Node XPath |
Enter the absolute path (beginning from XML root node) to the dataset node that is getting validated. |
Identifier Node XPath |
Enter the relative path as per Data Set node that needs to be printed. |
Identifier Name |
Enter the identifier. This will be the column heading in the log file. Note: If not provided the identifier node name will be used as column heading. |
Use the XML Tester page (XML_RC_TESTER) to verify if the XML structure is working fine. This allows you to run a new XML report without creating a specific run control page, preferably during implementation phase to test new XML files.
Navigation:
This example illustrates the fields and controls on the XML Tester Page. You can find definitions for the fields and controls later on this page.

Field or Control |
Description |
|---|---|
XML Set |
Select the XML set to verify. |
Template Type |
Select the template type of the XML set to verify. The key fields in the Add Item to Report group box vary based on the template type you select. |
File Path and File Name |
Enter the server file path and the file name. |
Add Item to Report
Use this group box to view the iterative data to be reported.
Field or Control |
Description |
|---|---|
Record (Table) Name |
If the XML file has a unique iterative node right under the root node, the system retrieves the Record Name associated to that iterative node (Iterative Record) and displays here. |
Enable Fields |
Select this check box to overwrite the key fields defined in the XML Template. |
Add XML Item |
Click this button to add the items to the Items to Report grid. This adds an iterative complex node under the root node. |
Key 1 Field Name, Key 2 Field Name and Key 3 Field Name |
The key field names get populated when you select the Template Type. These correspond to the key fields defined in the XML template. |
Key 1 Field Value, Key 2 Field Value and Key 3 Field Value |
Select or enter the value for each key field. |