Setting Up PeopleSoft Integration with Clairvia
In order to share PeopleSoft Human Resources information with Clairvia, you must specify that Clairvia is installed and that an employee and employee record combination are enrolled in Clairvia. Time and Labor requires that you specify whether a manager can override Clairvia schedules and select default values.
These topics discuss how to
|
Page Name |
Definition Name |
Usage |
|---|---|---|
|
INSTALL_PIP_SEC |
Specify that Clairvia is installed. |
|
|
JPM Catalog Details Page (see Defining the Published Content Types) |
INSTALL_CATTYP_SEC |
Define which content types to publish to Clairvia. |
|
Employment Information Page (see Updating Job Data) |
EMPLOYMENT_DTA1 |
Enroll the selected employee in Clairvia. |
|
Configurations Page (see Adding Options and Default Values for Clairvia) |
TL_INSTL_PUNCH |
Set up schedule total options, schedule resolution options, and punch pattern defaults for your Time and Labor application. |
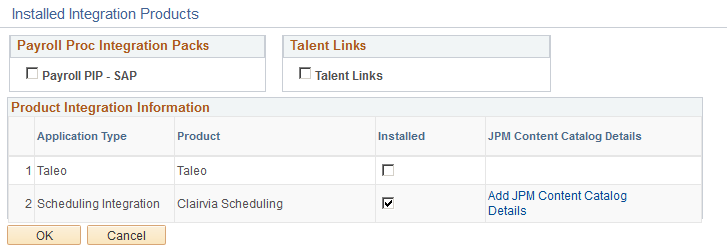
Use the Installed Integration Products page (INSTALL_PIP_SEC) to specify that Clairvia is installed.
Navigation:
This example illustrates the fields and controls on the Installed Integration Products page. You can find definitions for the fields and controls later on this page.
Field or Control |
Description |
|---|---|
Application Type |
This field shows the type of application that is being integrated. Scheduling is the default value. |
Product |
Select the product you want to use for integration. Clairvia is the default value. |
Installed |
Select to indicate the installation of an application type and product combination. The default value is deselected. |
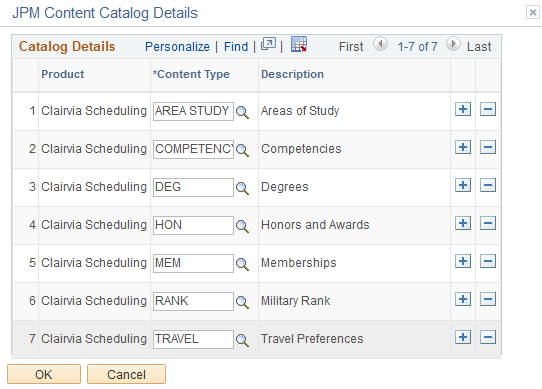
The system enables you to control the content types published to Clairvia, based on the primary person profile type defined on the Assign Profile Type Defaults page. Use the JPM Catalog Details page to select the content types published to Clairvia.
Use the JPM Catalog Details page (INSTALL_CATTYP_SEC) to define which content types to publish to Clairvia.
Navigation:
Click the Add JPM Content Catalog Details link on the Installed Integration Products page.
This example illustrates the fields and controls on the JPM Content Catalog Details page. You can find definitions for the fields and controls later on this page.
Field or Control |
Description |
|---|---|
Content Type |
Select the Profile Management content type to publish to Clairvia. |
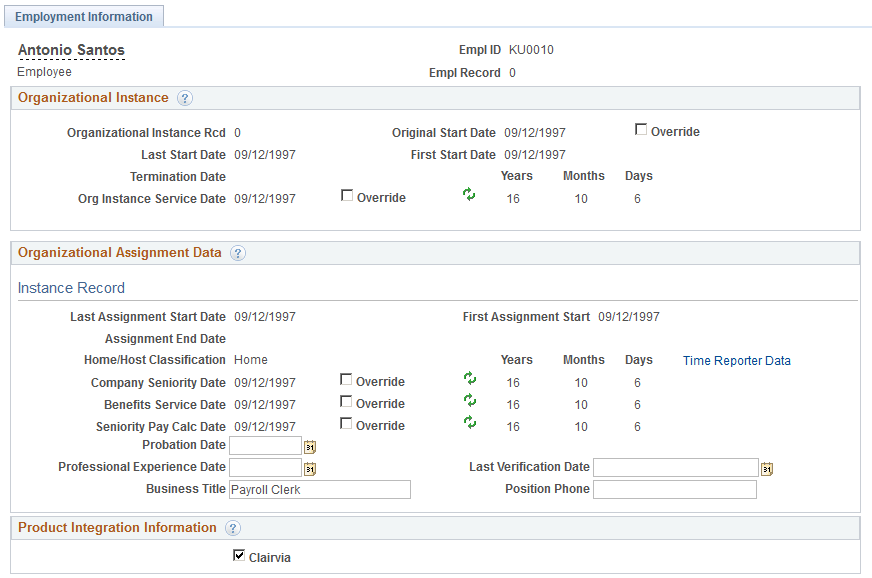
In order to send information to Clairvia, you must select the Clairvia field in the Product Integration Information region of the Job Data component for each Clairvia employee.
Use the Employment Information page (EMPLOYMENT_DTA1) to enroll the selected employee in Clairvia.
Navigation:
Click the Employment Data link at the bottom of any page in the Job Data or Current Job Data component:
This example illustrates the fields and controls on the Employment Information page, showing the Product Integration Information group box.
Field or Control |
Description |
|---|---|
Clairvia |
Select to enroll the employee in Clairvia. |
Since basic HCM data flows only from PeopleSoft to Clairvia, you must add new employees to PeopleSoft before adding them to Clairvia.
You can specify whether a manager can override the schedules sent from Clairvia. Enabling schedule overrides allows a manager to make ad hoc changes to schedules and create personal schedules for specific employees.
Use the Configurations page (TL_INSTL_PUNCH) to set up schedule total options, schedule resolution options, and punch pattern defaults for your Time and Labor application.
Navigation:
This example illustrates the fields and controls on the Configurations page, showing the Product Integration group box. You can find definitions for the fields and controls later on this page.

Field or Control |
Description |
|---|---|
Allow Override to Schedule |
Select to enable a manager to change or override a Clairvia schedule for the employee and employee record combination on the Manage Schedules page. Deselect this field to prevent manager overrides of Clairvia schedules on the Manage Schedules page. |