Configuring Attachments in Fluid Framework
These topics provide an overview of attachments and discuss how to configure attachments for Fluid User Interface.
The Fluid Attachment is enhanced to support Fluid and responsive design. Using this the administrator can configure attachments, notes and links to any transactions on Fluid pages compatible with all form factors such as Desktop, Tablets, and Smart Phones. Users can upload attachments from their desktop, mobile device, and third party online storage sites using Fluid in Self service transactions. The support is given for Desktop and Smartphone.
The Attachment framework is enhanced to support configuration id having multiple Entry ids. It also supports transactions having multiple configuration ids.
Note: The Fluid Attachment Framework handles add/ update for only Key fields and fields of common Sub Record (HR_ATT_DD_SBR) in the Store record. Any additional non key fields of the store record need to be handled by application’s own custom logic.
|
Page Name |
Definition Name |
Usage |
|---|---|---|
|
HR_ATT_AUTH |
Enter and maintain attachment authorization IDs which specify the level of user access for attachments. |
|
|
HR_ATT_AUTH_ENT |
Associate attachment authorizations with user roles. |
|
|
HR_ATT_CNFG |
Associate attachments and their authorizations and create links on the page displayed in the target application. |
|
|
HR_ATT_KEYS_HDR |
Define the prompt tables and key fields used by an application. |
|
|
HR_ATT_KEYS_C |
Enter content key prompt values. |
|
|
HR_ATT_KEYS_S |
Enter store key values. |
|
|
HR_ATT_DEFN |
Specify the attachment types available to an application. The context keys that appear on this page are determined by the Configure Keys component and are used to retrieve a list of valid Configuration IDs. |
The attachment feature enables you to attach files, notes, and URLs to a PeopleSoft application. An administrator can add URLs, common notes, and files to a component or page and enable others to view, download and edit the attachments. Attachments include notes, PDF files, spreadsheet files, document files, URLs, and so on. You can also define the types of attachments that users can add to a specific row of application data, such as medical or adoption certificates, fitness for duty forms, and so on.
Although the types of attachments you can add to a page are essentially unlimited, attachments are categorized as one of the following:
Attachments are any previously created electronic file that the administrator wants users to be able to download.
URLs are links to dynamic files or web sites.
Notes are free-form text that the user can enter through the attachment page in the PeopleSoft application.
Note: Only attachments and URLS are defined on the Define Attachments page. Notes are created by the user through the attachment pages of the PeopleSoft application.
Note: The Define Attachments page enables an administrator to create document definitions, as well as attachments and URLs. Document definitions are types of files that users can upload to the system. For example various medical certificates or evidence of class completion.
Since many uploaded attachments should not be visible to all users, the system enables an administrator to restrict access to the attachments. The administrator uses roles to define who can add, modify or delete their own attachments for a specific row of application data.
Adding Attachments to Applications Process Flow
Here are the steps for defining attachments to use in PeopleSoft applications:
Define attachment Authorization IDs
Specify the authorization level access required to edit or view attachments.
Define Authorization Entry IDs
For each attachment you plan to establish, specify the attachment object type, Attachment, Note, or URL, and the user roles that can access the attachment. Specify the access level of each user role by assigning an Authorization ID to the role.
Define attachment configuration IDs
Add common attachments, URLs, or document definitions and the roles that can see the attachments.
Configure keys
Integrate attachments into any application within any context. After defining the attachments, you can integrate them into any PeopleSoft application and the context varies depending on the product that uses the framework. The Configure Keys page enables you to define which application data field maps to each of the required context keys.
Configure context keys
Context keys are populated with values corresponding to a field in the associated application. To define the contextual variations, define contextual key prompt tables or views and key prompt fields based on the application using the attachment framework. These keys can come from any number of tables and are implemented as generic character fields that are defined as record keys in the data structure at the application level to denote alternate configuration IDs that can be used under different circumstances.
Configure store keys
For attachment configuration IDs that are document definitions, you must create a store record to launch the document definition and store the attachments added by a user to a specific row of application data.
Define store keys for document definitions in order to differentiate the row of data to which the attachment belongs. Each application can decide the number of keys to use, from 1 to N, creating its own record plus a sub record in Application Designer to store common fields related to the attachments. Once the store record has been created, it must be associated to the Object Owner ID and Sub ID to automatically retrieve the key field definitions and select the store key labels.
After creating the store record, associate it to the Object Owner ID and Attachment Sub ID and then select the field labels. When you enter the name of the store record definition, the key fields are automatically retrieved in the correct order by the key position defined in the record.
Maintain definitions
The system retrieves a list of valid Configuration IDs based on the defined context keys. In addition, the system uses the Definition ID and the effective date to choose the attachment from the database.
Implement the attachment framework
To implement the attachment framework use the application class methods in the HR_ATTACHMENTS application package PeopleSoft delivers. There are two classes in the delivered application package. The Attachment_Data application class enables you to create an object containing entries for all of the link labels, configuration IDs and group boxes that contain the links to the defined attachments. The Attachment_UI application class enables you to manage the user interface for the attachments.
See PeopleTools: PeopleCode Developer's Guide and PeopleTools: PeopleCode API Reference.
Use the Define Authorization page (HR_ATT_AUTH) to enter and maintain attachment authorization IDs which specify the level of user access for attachments.
Navigation:
This example illustrates the fields and controls on the Define Authorization page. You can find definitions for the fields and controls later on this page
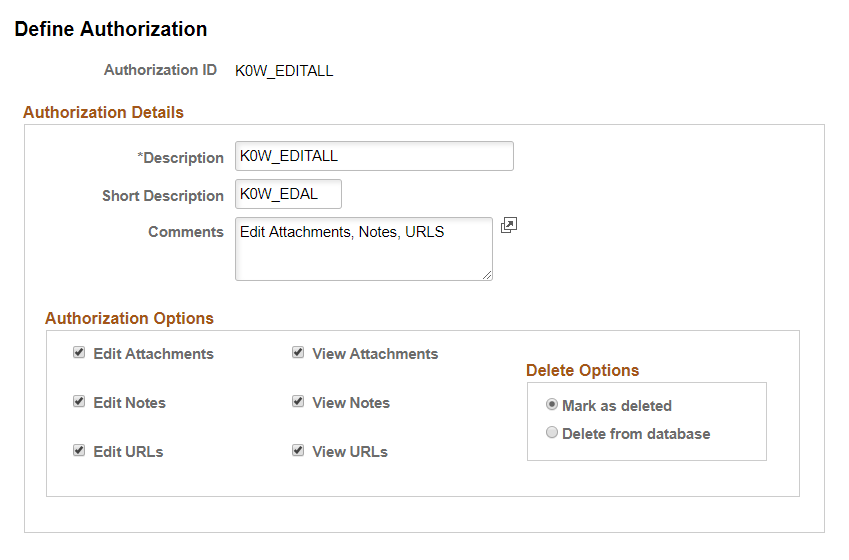
Authorization Options
|
Field or Control |
Description |
|---|---|
|
Edit Attachments |
Select the check box to enable the user to create, update, or delete attachments. The system automatically selects the View Attachmentscheck box when you select the Edit Attachments check box and save the page. |
|
View Attachments |
Select to enable users to view attachments. |
|
Edit Notes |
Select the check box to enable the user to create, update, or delete notes. The system automatically selects the View Notescheck box when you select the Edit Notes check box and save the page. |
|
View Notes |
Select to enable users to view notes. |
|
Edit URLs |
Select the check box to enable the user to create, update, or delete URLs. The system automatically selects the View URLscheck box when you select the Edit URLs check box and save the page. |
|
View URLs |
Select to enable users to view URLs. |
|
Mark as deleted |
Select to enable the user to track the deleted attachments. When an object is deleted, it appears in the scroll area list of existing attachments when they are deleted but the status column are grayed out. |
|
Delete from database |
Select to enable the users to immediately delete the attachment from the database. You will get a confirmation before deleting it. Note: Both Mark as deleted and Delete from database get a confirmation before deleting it. |
Delete Options
Select an option to determine the action of the system when the user deletes a existing attachment, note, or URL. Selecting Mark as Deleted, the system still lists the object as an attachment, but the object's status is Deleted and it cannot be selected. This option enables you to track deleted attachments. Selecting Delete from database completely removes the object from the database.
Note: The options in this group box are not available unless one or more of the editing fields, Edit Attachments, Edit Notes, or Edit URLs,are selected.
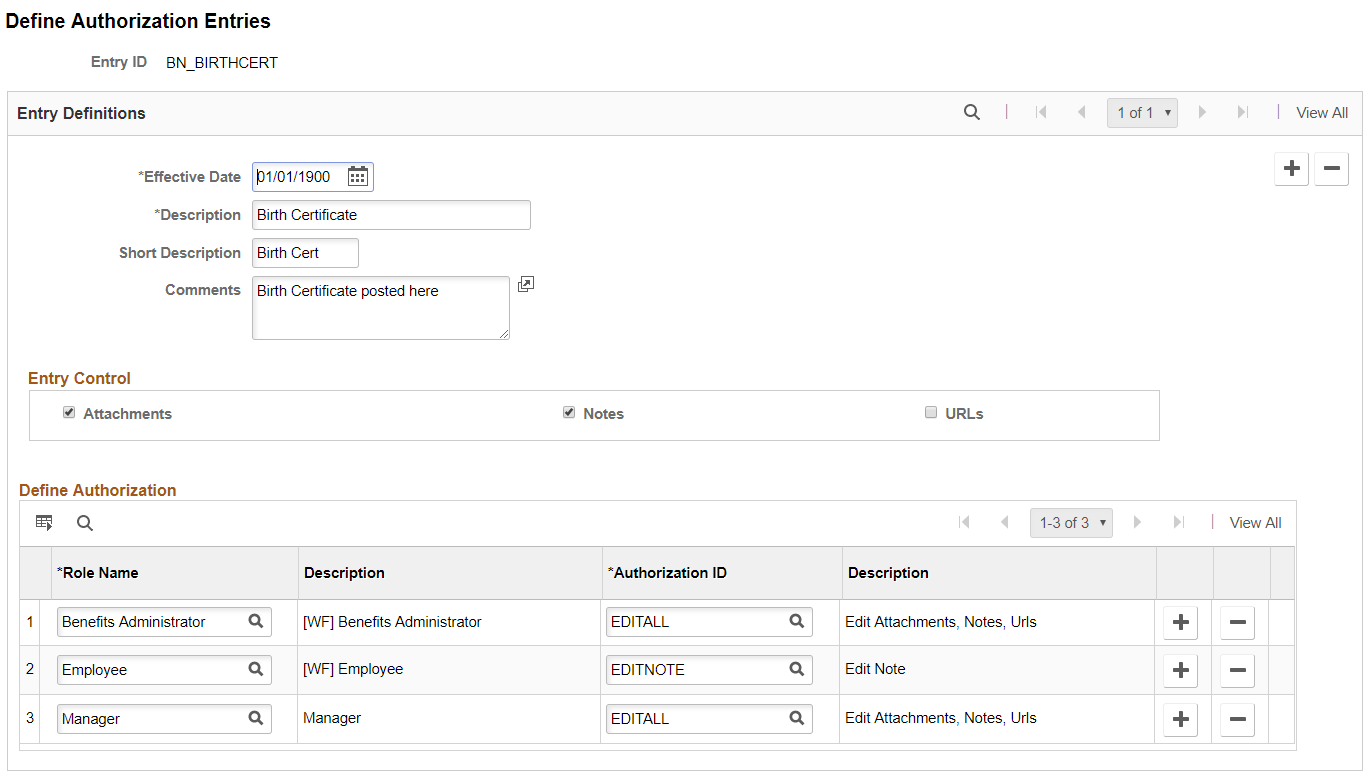
Use the Define Authorization Entries page (HR_ATT_AUTH_ENT) to associate attachment authorizations with user roles.
Important! For Life Events process, when you create the Entry ID, it should always be prefixed with BN_. For example: BN_BIRTH.
Navigation:
This example illustrates the fields and controls on the Define Authorization Entries page. You can find definitions for the fields and controls later on this page.
|
Field or Control |
Description |
|---|---|
|
Entry ID |
These are unique identifier for the attachment authorization entries. |
|
Effective Date |
The date on which the Attachment ID entry becomes active. The default value for a newly inserted row is the current system date. |
|
Description |
Description for the authorization entry. |
|
Attachments, Notes, and URLs |
Select to allow the Role Names listed in the Define Authorization area to create attachments based on the specified Authorization ID. You must select at least one of the options in the Entry Control region. Select any of the three options:
|
|
Role Name |
Select a role name. This field prompts against the Role Definition Table (PSROLEDEFN). |
|
Authorization ID |
Select an authorization ID. This field prompts against the Authorization IDs. |
Define Authorization
Use the fields in the Define Authorization region to specify the operations a role can perform by associating a role with an attachment Authorization ID. Select the Role Name and then select a valid Authorization ID in each row. Only one Authorization ID can be assigned to each role, but multiple roles can share the same Authorization ID. For example, if a user has the Role Name as Employee or AM EA Administrator then will be able to view and edit attachments or notes of type Adopt Certificates.
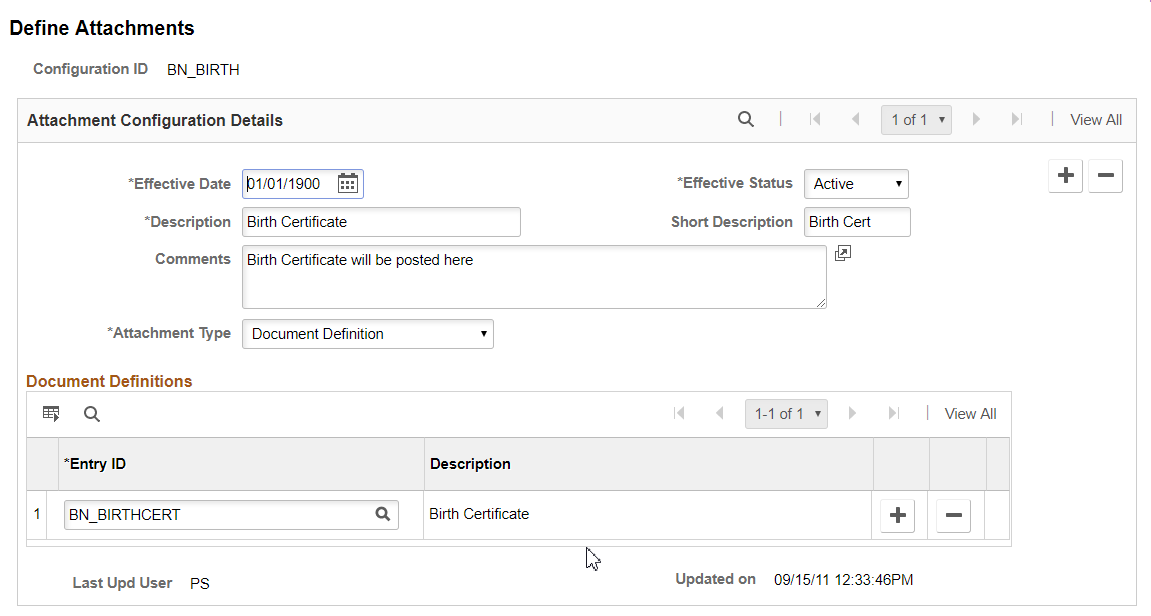
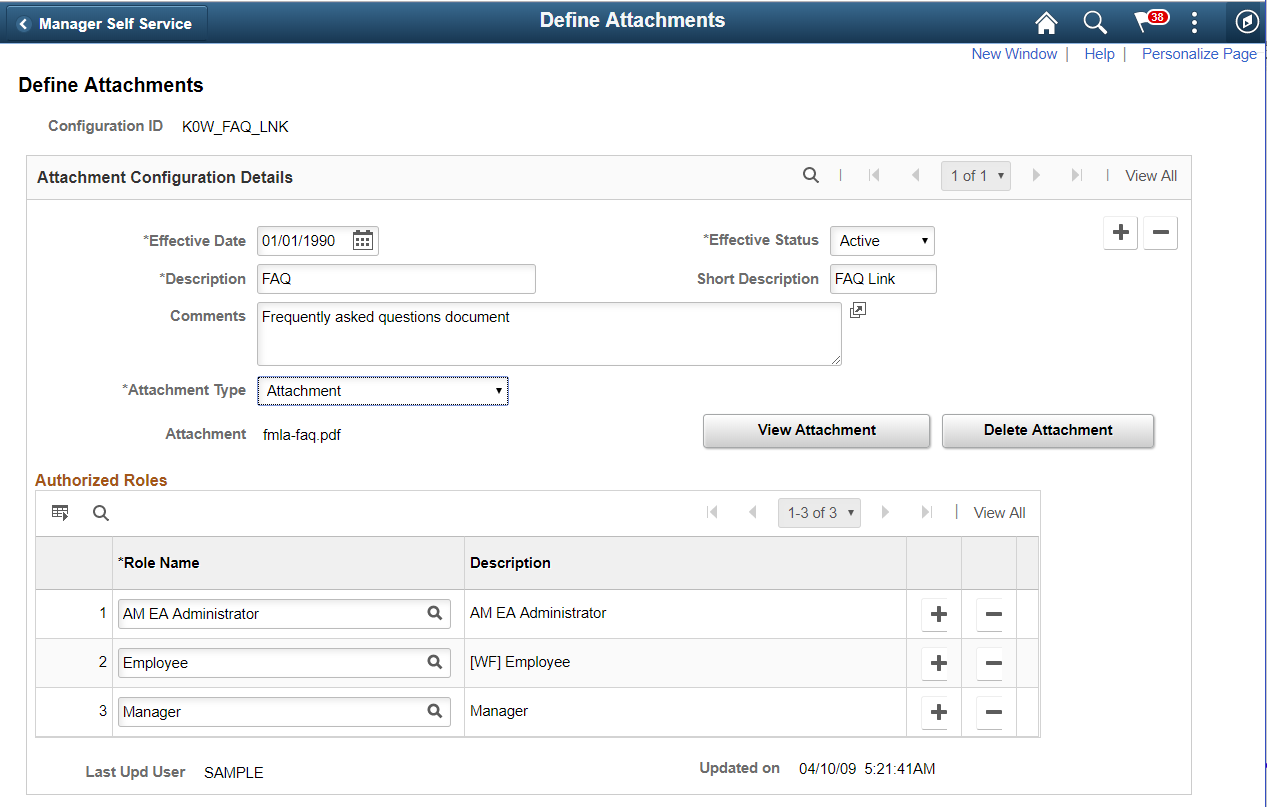
Use the Define Attachments page (HR_ATT_CNFG) to associate attachments and their authorizations and create links on the page displayed in the target application.
The Attachments entries Configuration Ids allows to add attachments that are common to more than one employee and to select Entry Ids already defined to enable users to add their own attachments to a specific row of application data.
Important! For Life Events process, when you create the Configuration ID, it should always be prefixed with BN_. For example: BN_MAR_CERT.
Navigation:
This example illustrates the fields and controls on the Define Attachments page. You can find definitions for the fields and controls later on this page.
This example illustrates the fields and controls on the Define Attachments page with Authorized Roles. You can find definitions for the fields and controls later on this page.
|
Field or Control |
Description |
|---|---|
|
Configuration ID |
Is the unique identifier for the attachments (Key Field). |
|
Description |
Enter a description for the Configuration ID. This description appears in the group boxes as a label for the link to the attachment. |
|
Attachment Type |
Select the type of attachment users can attach or access. Values are: URL, Attachment, and Document Definition. Based on your selection, the remainder of the fields on the page change. Select either Attachment or URL if you want to define common attachments or URLs such as policies, handbooks, FAQs, and so on. Select Document Definition if you want to create an entry that enables users to create their own attachments for a specific row of application data. Note: For now, only Document Definition type is supported as part of the support given to Fluid Interface for Desktop. |
|
Entry ID |
Select the Entry ID. This field prompts against the Authorization Entries table, for example PS_HR_ATT_ENT_TBL. |
|
Attachment |
Enter the file name of the attachment and then click the Add Attachment button. After uploading the file, this field displays the file name of the attachment. You can then use the View Attachment and Delete Attachment buttons to manage the content of the attachment. This field is visible only if the Attachment Type is Attachment. |
|
Effective Date |
The date on which the Attachment becomes active. The default value for a newly inserted row is the current system date. |
|
Effective Status |
Select either Active or Inactive. The default value is Active. |
|
URL |
Enter the desired URL to attach as a link. This field is visible only if the Attachment Type is URL. |
|
Add Attachment |
Click to add the file listed in the Attachment field. This button is visible only if the Attachment Type is Attachment and a file has not yet been uploaded. |
|
View Attachment and Delete Attachment |
Use these buttons to manage the content of the file listed in the Attachment field. These buttons are visible only if the Attachment Type is Attachment and a file has been uploaded. |
Authorized Roles
Enter the roles that you want to have access to the attachment or URL. If no role is selected, all of the available roles can see the link. This region is only visible if the Attachment Type is Attachment or URL.
|
Field or Control |
Description |
|---|---|
|
Role Name |
Select the role that you want to access the specified attachment. |
Document Definitions
Enter the list of defined authorization entries that the user can upload as an attachment. The Document Definitions region is visible only if the Attachment Type is Document Definition
|
Field or Control |
Description |
|---|---|
|
Entry ID |
Select the authorization entry that you want users to upload to the system. The system lists the Authorization Entry IDs defined on the Define Authorization Entries page. |
|
Last Upd User (Last Updated User) |
Displays the user name that last updated the Define Attachments page. |
|
Updated on |
Displays the date the Define Attachments page was last updated. |
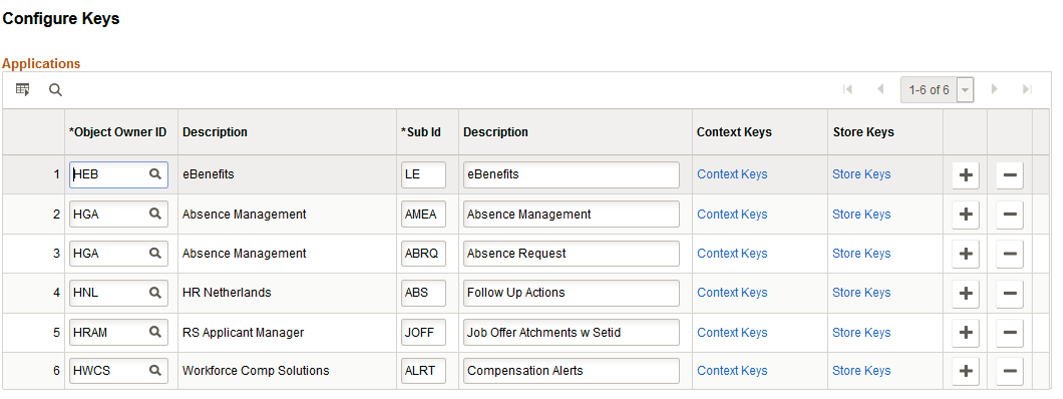
Use the Configure Keys page (HR_ATT_KEYS_HDR) to define the prompt tables and key fields used by an application.
Navigation:
This example illustrates the fields and controls on the Configure Keys page. You can find definitions for the fields and controls later on this page.
|
Field or Control |
Description |
|---|---|
|
Object Owner ID |
Enter the application in which a common component is used. |
|
Sub ID(Sub application ID) |
Enter a sub-application ID. Use the Sub ID field to create a definition for multiple lines of features within a single product line. |
|
Context Keys |
Click to open the Attachments Context Keys page. |
|
Store Keys |
Click to open the Attachments Store Keys page. |
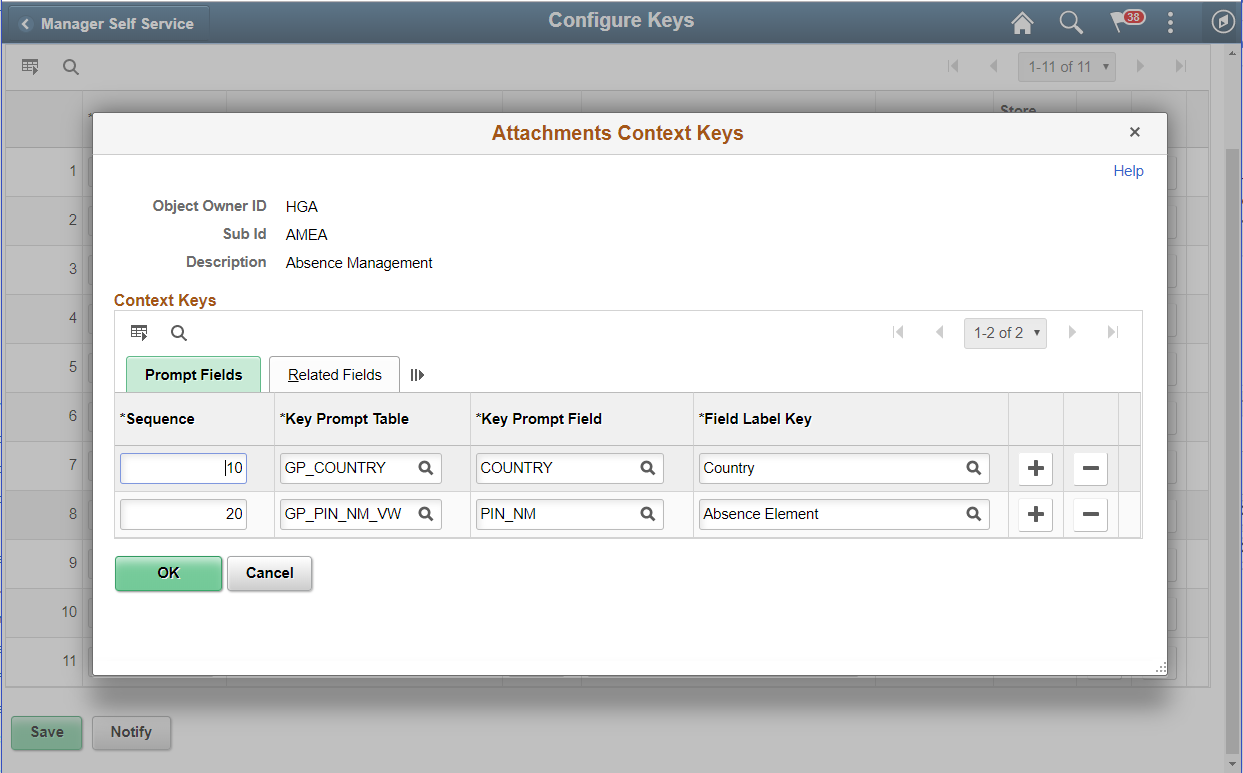
Use the Attachments Context Keys page (HR_ATT_KEYS_C) to enter content key prompt values.
To define the contextual variations, you have to define some contextual key prompt tables/views and key prompt fields by application in which the attachment framework will be used. These keys can come from any number or tables and are implemented as generic character fields that are defined as record keys in the data structure at application level to denote alternate “Configuration Ids” to be used under different circumstances.
Navigation:
Click the Context Keys link on the Configure Keys page
This example illustrates the fields and controls on the Attachments Context Keys page. You can find definitions for the fields and controls later on this page.
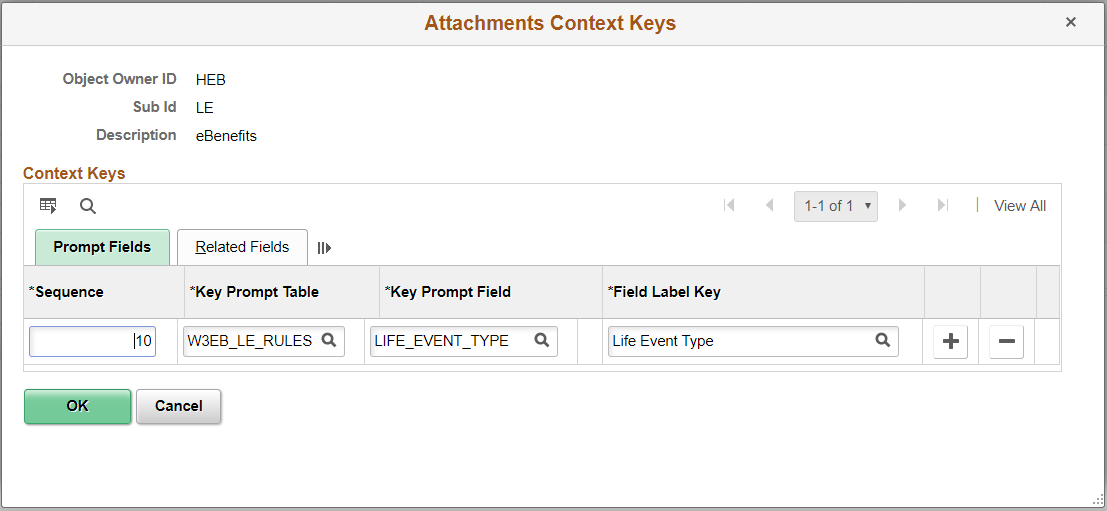
This example illustrates the fields and controls on the Attachments Context Keys page. You can find definitions for the fields and controls later on this page.
|
Field or Control |
Description |
|---|---|
|
Sequence |
Specify the order of the context keys on the Maintain Definitions page. |
|
Key Prompt Table |
Select the object name of the prompt table that defines the values by which attachments are partitioned for a an application. |
|
Key Prompt Field |
Select the prompt table field that contains the value in the prompt list for a specified key. |
|
Field Label Key |
Select the label in the prompt table. |
Related Fields
Click the Related Fields tab to select the fields related to the key prompt table and key prompt field by row.
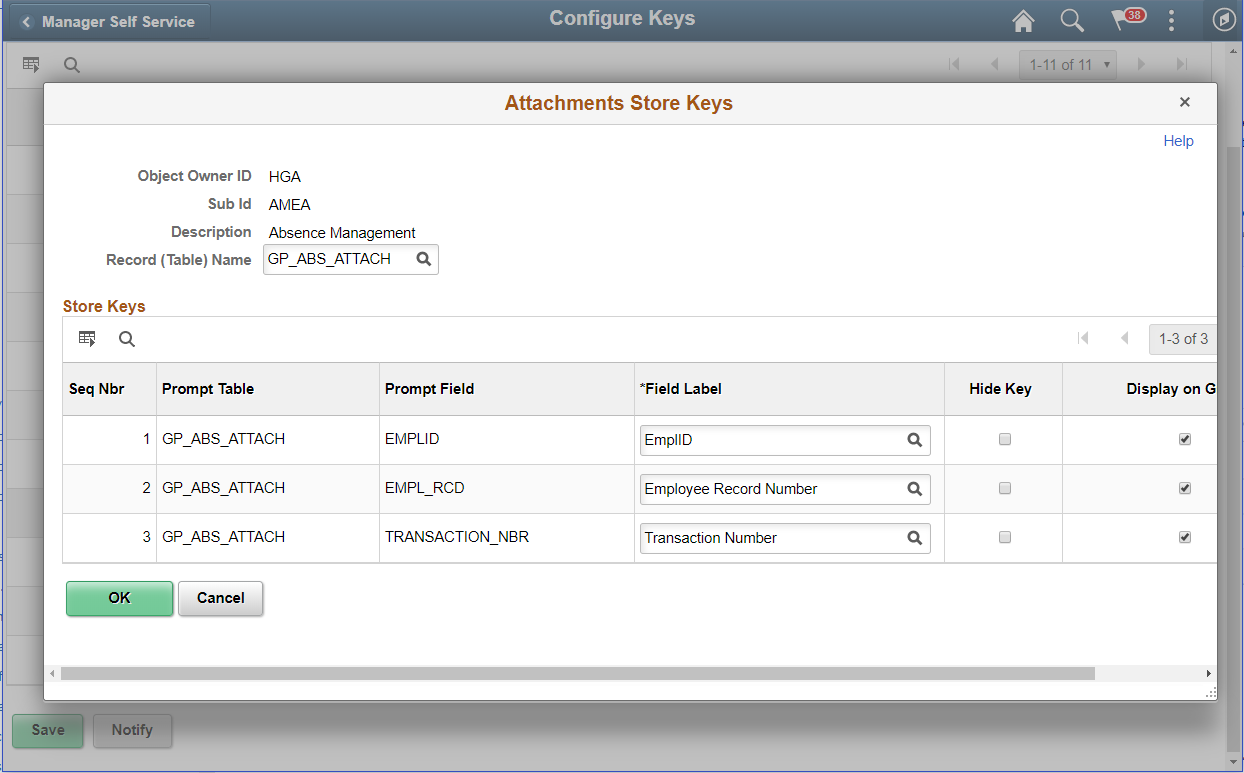
Use the Attachments Store Keys page (HR_ATT_KEYS_S) to enter store key values.
Navigation:
Click the Store Keys link on the Configure Keys page
This example illustrates the fields and controls on the Attachments Store Keys. You can find definitions for the fields and controls later on this page.
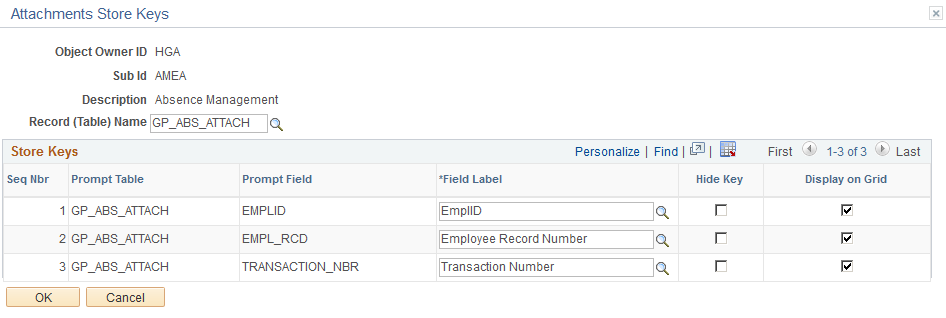
This example illustrates the fields and controls on the Attachments Store Keys. You can find definitions for the fields and controls later on this page.

This example illustrates the fields and controls on the Attachments Store Keys for Absence. You can find definitions for the fields and controls later on this page.
|
Field or Control |
Description |
|---|---|
|
Hide Key |
Select to indicate whether the key is displayed on the Document Definition page. |
|
Display on Grid |
Select to indicate whether the key field is displayed on the Document Definition Header page |
If you are using attachments of type Document Definition in the Define Attachment Page, you have to create a store record to launch the Document Definition and store the attachments added by a user to a specific row of application data. For those Document Definitions added, there should be store keys defined to differentiate the row of data to which the attachment belongs. Each product can decide the number of keys to use, from 1 to N, creating its own record plus a sub-record in Application Designer to store common fields related to the attachments. Once the store record has been created, it has to be associated to the Object Owner Id and Sub Id to retrieve the key fields definitions automatically and select the store key labels. For example, the Certificates attachments attached to the Extended Absence page should be stored by Emplid, Empl_Rcd and Transaction_nbr.
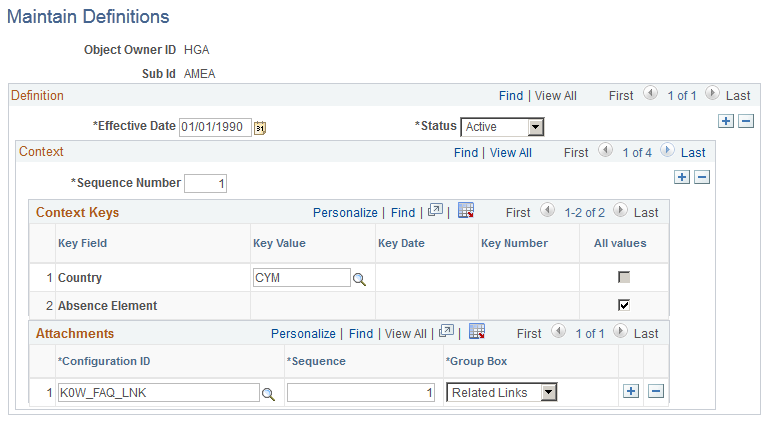
Use the Maintain Definitions page (HR_ATT_DEFN) to specify the attachment types available to an application.
The context keys that appear on this page are determined by the Configure Keys component and are used to retrieve a list of valid Configuration IDs.
Navigation:
This example illustrates the fields and controls on the Maintain Definitions page. You can find definitions for the fields and controls later on this page.
This example illustrates the fields and controls on the Maintain Definitions page. You can find definitions for the fields and controls later on this page.
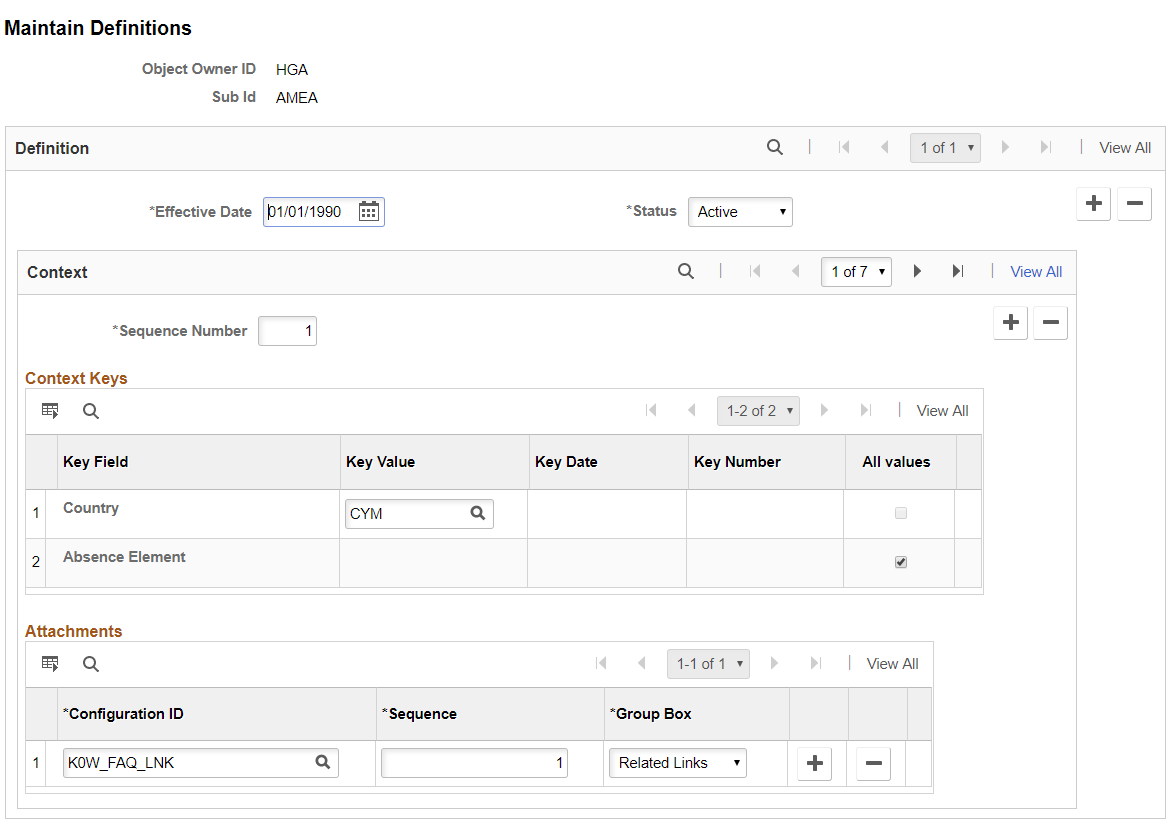
This example illustrates the fields and controls on the Maintain Definitions page for Absence. You can find definitions for the fields and controls later on this page.
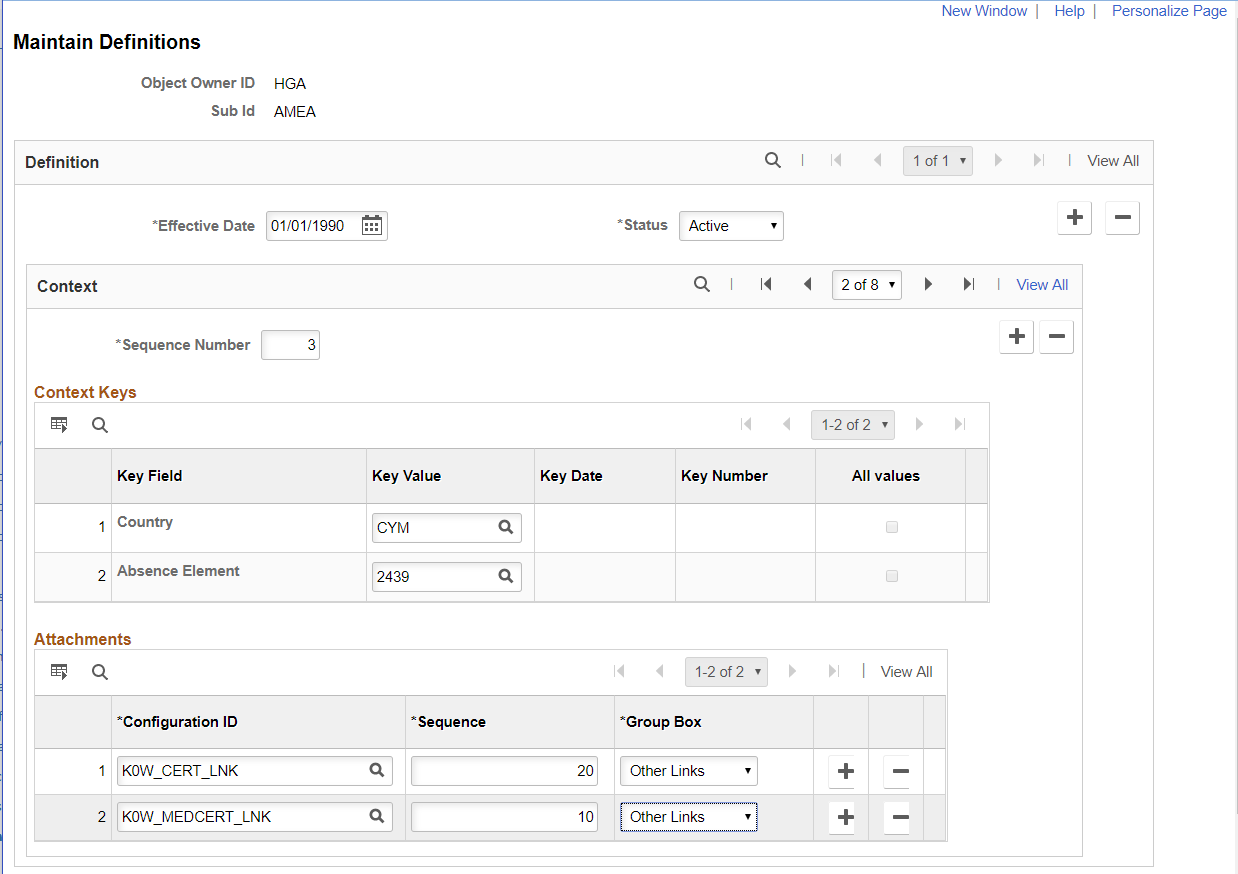
|
Field or Control |
Description |
|---|---|
|
Key Field |
Displays the list of context keys specified on the Attachments Context Keys page. |
|
Key Value, Key Date, and Key Number |
Select a valid value for the specified key field. The available field depends upon the Key Field type. For example, Cycle ID is a CHAR type field, so the Key Value field is available and the Key Date and Key Number fields do not allow you to enter data. The Budget Period Start Date is a DATE type field, which means the Key Datefield is available and the Key Value and Key Number fields do not allow you to enter data. None of these fields are available when the All Values check box is selected. |
|
All Values |
Select to specify that any value for the specified key field is valid. Selecting this field makes the Key Value field unavailable. |
Attachments
|
Field or Control |
Description |
|---|---|
|
Configuration ID |
Select a valid configuration ID. Only active attachment configuration IDs are displayed. |
|
Sequence |
Enter a number to specify the order in which the hyperlinks to attachments are retrieved from the database. |
|
Group Box |
Transactions having multiple configuration ids, can Select Other Links or Related Links from the drop down and add as many related information as attachments |
Note: The context keys are not displayed the first time you open the Maintain Definitions page. You must enter the Sequence Number and then the context keys automatically display.
URL Properties for URL definition HR_ATTACHMENT_FLU can be configured for restricting the file types that can be uploaded to or downloaded by the Fluid Attachment Framework.
The following video provides an overview of Attachments - Enhanced View of Types and Categories:
Request Absence Page with Multiple Attachments
This example illustrates the fields and controls on the Request Absence page with multiple attachments. You can find definitions for the fields and controls later on this page.
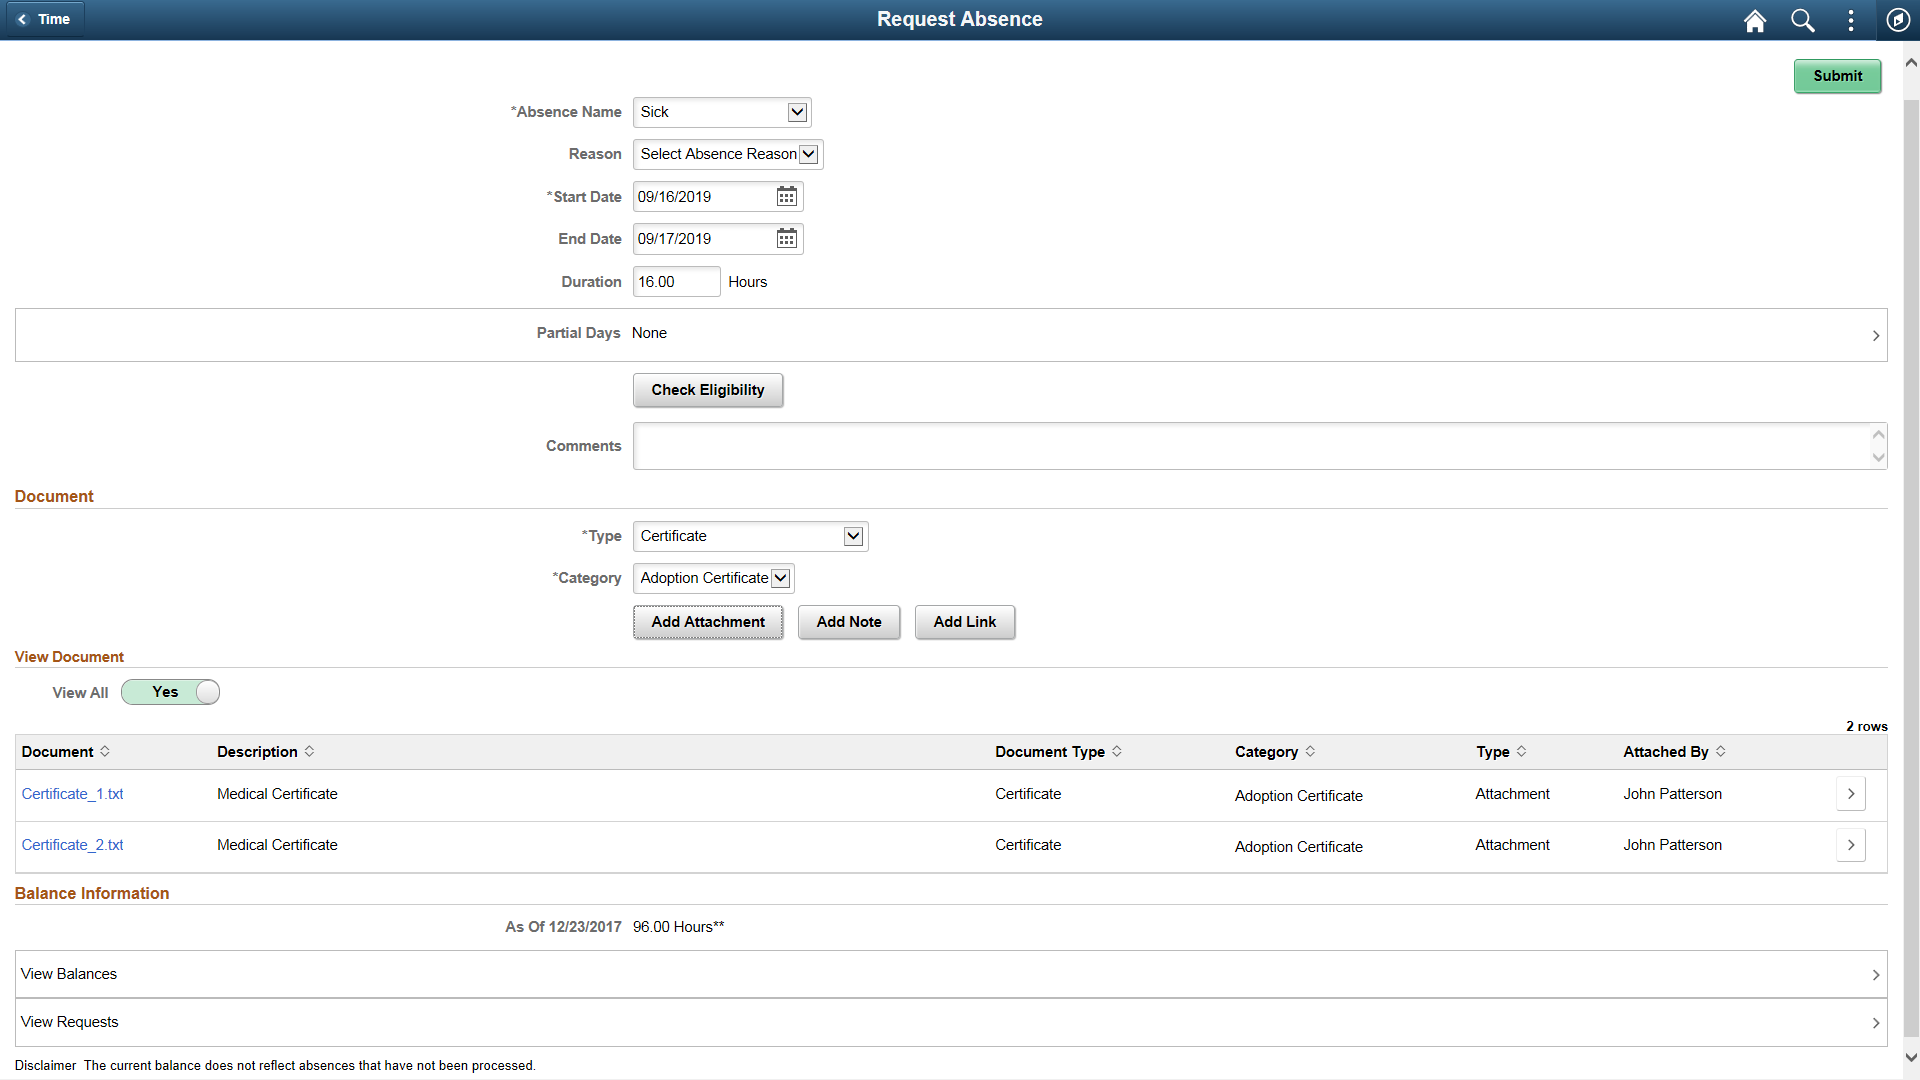
Document
Using the document grid you can attach the documents according to its Type and Category.
|
Field or Control |
Description |
|---|---|
|
Type |
Specify the type of the document you are going to attach. This type is enabled according to the configuration ID. |
|
Category |
Based on the type selection, you can select the category type of the attachment. |
|
Add Attachment |
Select the files to be added as attachments. |
|
Add Notes |
Select to add notes. |
View Document
|
Field or Control |
Description |
|---|---|
|
View All |
You can attach multiple documents for an absence request based on different types and categories. As an employee, manager or as an administrator, you can view all the attachments together even if the documents are attached with different types and categories using the View All option. If you select Yes, all the attachments will be listed together. If you select No, you can view only the attachment that belongs to the selected type and category. |
Implement the attachment framework using the application class methods in the HR_ATTACHMENTS application package PeopleSoft delivers. There are two classes in the delivered application package. The Attachment_Data application class enables you to create an object containing entries for all of the link labels, configuration IDs and group boxes that contain the links to the defined attachments. The Attachment_UI application class enables you to manage the user interface for the attachments.
Attachment_Fluid (Constructor) Application Class Method
The Attachment_Fluid method uses the statements that provide the initialization of the class. It Instantiates the new objects of Attachment_Fluid class.
The Attachment_Fluid method accepts these parameters:
|
Input Parameter |
Description |
|---|---|
|
&OwrId |
Specify the Object Owner Id (String). |
|
&SubId |
Specify the Object Attachment Sub Id as (String) |
|
&ATT_Effdt |
Specify the date for a transaction; for example, for Benefits Life Events transaction it can be Current date; for Absence transaction, it can be the request begin date etc. |
|
&CKeys |
Specify the current Context Keys values (array of strings) |
|
%UserID |
Use the system variable to specify the user currently logged on (optional). |
|
%Component |
Use the system variable to specify the component that is invoking the attachment framework (optional) |
|
&MyRole |
Specify the Roles (string) (*optional) |
|
&Store_Keys_Array |
Specify the Store Key values (array of strings) |
|
&dOnly |
Specify ‘true’ or ‘false’. True – Display only mode. False – Follow the attachment setup (Boolean) |
For attachment type 003, attachments are fetched from Store record based on Confid Id/Entry ID and are loaded on to the attachments grid.
The two options to retrieve or find out the role(s) to which the current user belongs, depends on the values passed by as parameters (&MyRoles, %Component, %UserID).
The system uses the %UserId and %Component variables to discover all of the valid role names for each content reference and user ID in order to perform the filtering.
Using the &Roles array of strings, only the role names in the array are considered for filtering.
Note: You must choose one of these options in order to perform further filtering by role name. The system automatically uses the &Roles array of strings if you pass three parameters at the same time.
Attachment_SaveProcessing Method
This Method performs the Save action for any Add/Update/Delete actions performed on the attachments grid.
An employee can upload documents to PeopleSoft components using the HR Attachment Framework and based on the type of documents being processed, the system displays the list of documents to be uploaded.
|
Page Name |
Definition Name |
Usage |
|---|---|---|
|
Document Upload Page or Attachments Page (Page name will vary based on the transaction you are performing) |
(Varies based on the page you are accessing.) |
Use this page to upload the attachment, notes and link documents. |
|
HR_ATTACH_FL_SCF |
Add attachments, notes, or links to a transaction. |
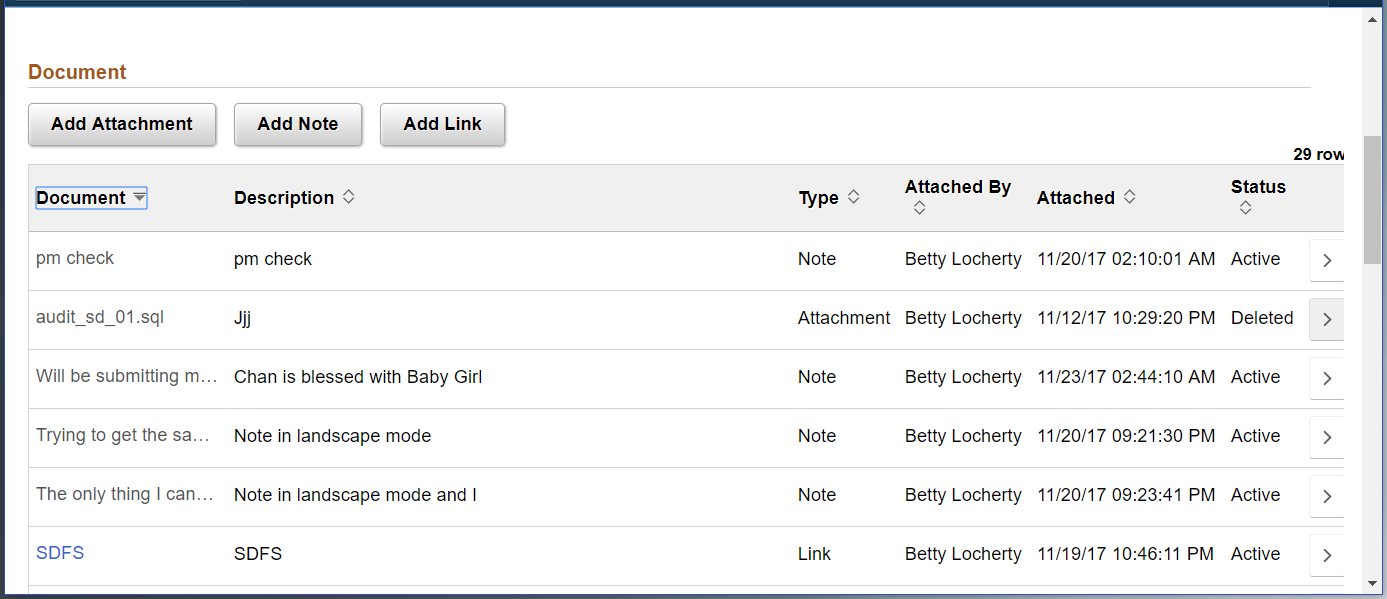
Use the designated Document Upload Page or Attachments Page to upload attachments, notes and link documents.
Note: The buttons and fields will vary based on the transaction page layout. Not all upload or attachment pages will have the same field and control properties.
(Desktop or Tablet) This example illustrates the fields and controls of a Document page with uploaded documents.
|
Field or Control |
Description |
|---|---|
|
|
Select to open Attachment modal from where you can attachment/upload the file. |
|
|
Select to open Note modal from where you can note. |
|
|
Select to open Link modal where you can insert link. |


Note: To view all the three types of documents upload options, use the entry controls checks in theDefine Authorization Entries Page
(Smartphone) This example illustrates the fields and controls of the Documents Upload page in a Smartphone.
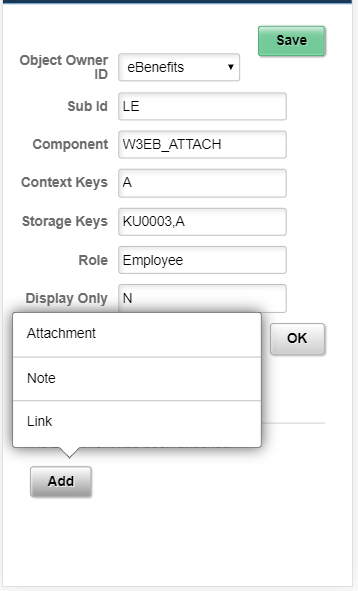
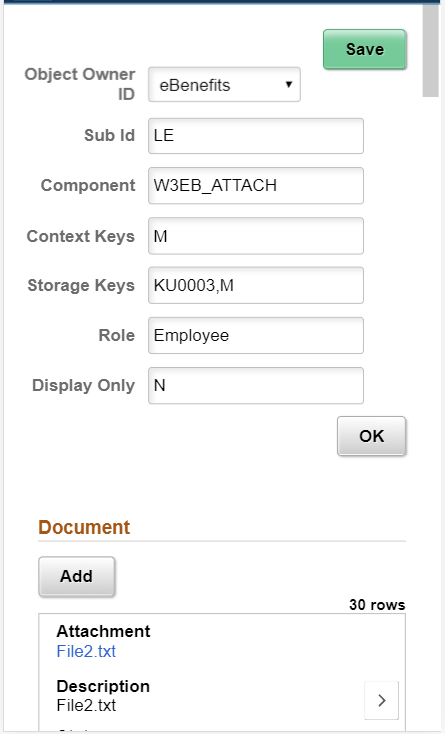
(Smartphone)This example illustrates the fields and controls of a Document page with uploaded documents.
|
Field or Control |
Description |
|---|---|
|
|
Select to choose the option of attachment, notes or link. Note: Different than the Desktop, in a Smartphone, a common Add with the drop-down option for attachment, notes and link are given to face the smaller size issue of the device. |

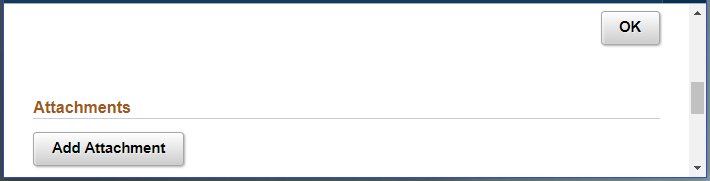
Use the File Attachment or Attachment pages to add attachments:
Use the Add Attachment button to begin the upload attachments process.
This example illustrates the fields and controls of Add Attachment page.
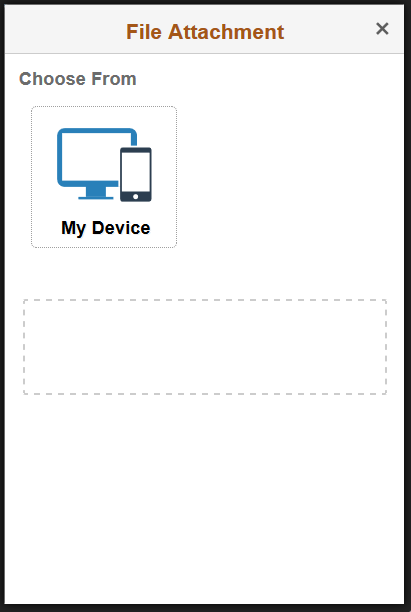
The Add Attachment opens a modal from where you can upload the file as attachment from the local directory.
Use the File Attachment page to select the attachment location.
This example illustrates the modal to upload the file attachment.

Note: The type of attachment which an employee or manager can add depends upon the entry control you have checked in the Define Authorization Entries Page
Select My Device to upload an attachment from the location in your computer.
This example illustrates the fields and controls of the File Attachment modal in a Smartphone.
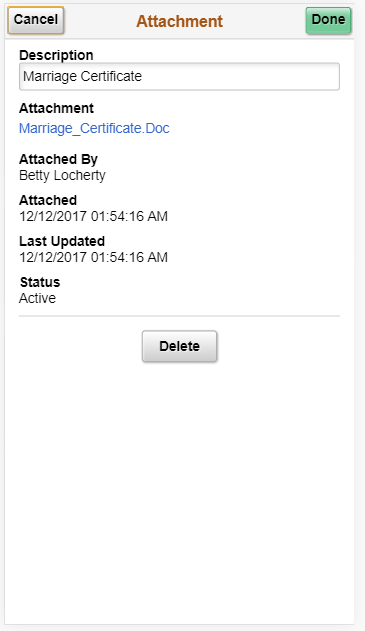
After uploading the attachment, you can update attachment descriptions.
The Attachment description can be updated using this screen.
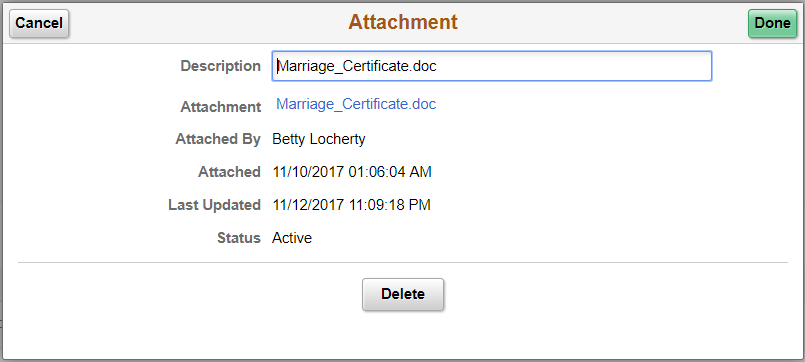
After making the updates, click Done to save or Delete for deleting the attachment.
This illustration demonstrates the attachment update screen in a smartphone.
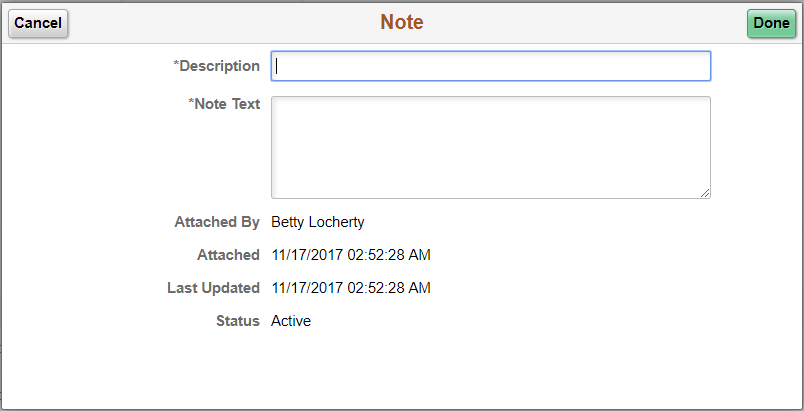
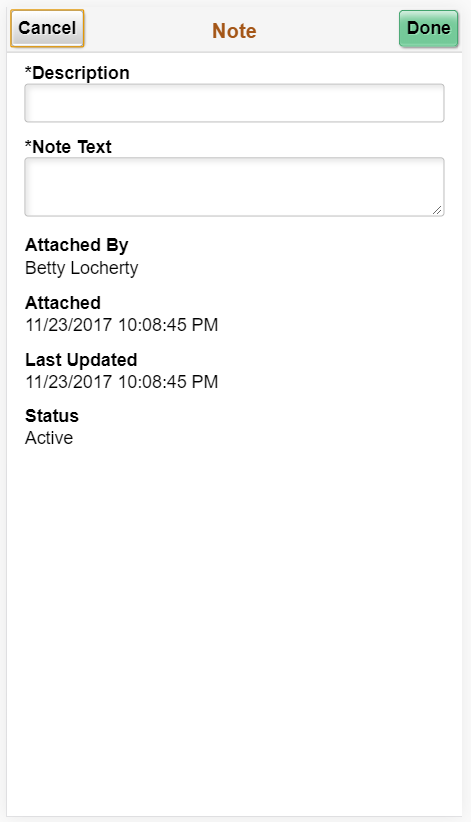
Use the Note pages to add or view additional comments about a transaction:
Select Add Note in the document upload, attachments, or notes page to open a modal from where you can add notes and comments.
(Desktop or Tablet) This example illustrates the fields and controls of the Note modal for uploading notes.
(Smartphone) This example illustrates the fields and controls of the Note modal for uploading the Notes using smartphones.
View, update, or delete a note by selecting the Document Details or Edit button for an existing note.
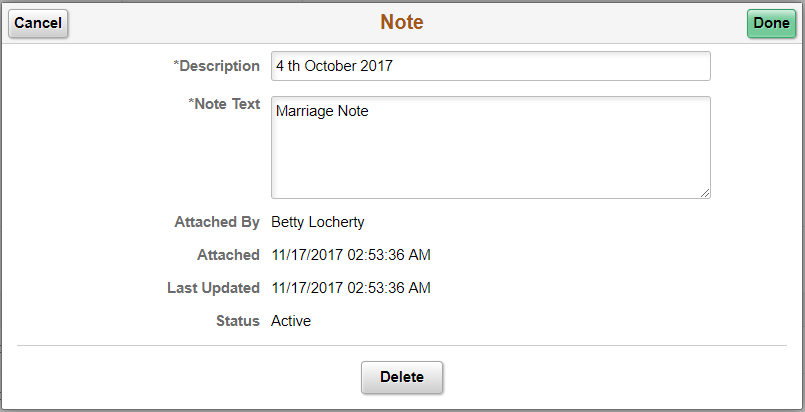
(Desktop or Tablet) This example illustrates the fields and controls of the Note modal for viewing, updating, or deleting notes.
(Smartphone) This example illustrates the fields and controls of the Note modal for viewing, updating, or deleting notes using smartphones.

|
Field or Control |
Description |
|---|---|
|
Description |
Enter the description for the file which you can going to upload. |
|
Note Text |
Enter the description which says more about the note. |
|
Delete |
This option is available when you have selected to view an existing note. Select to remove the note from the transaction. |
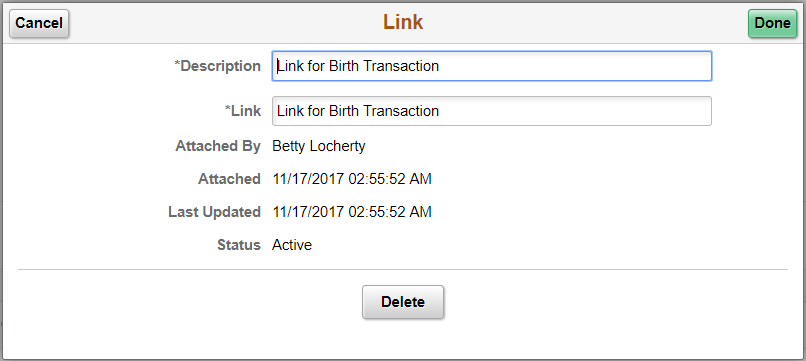
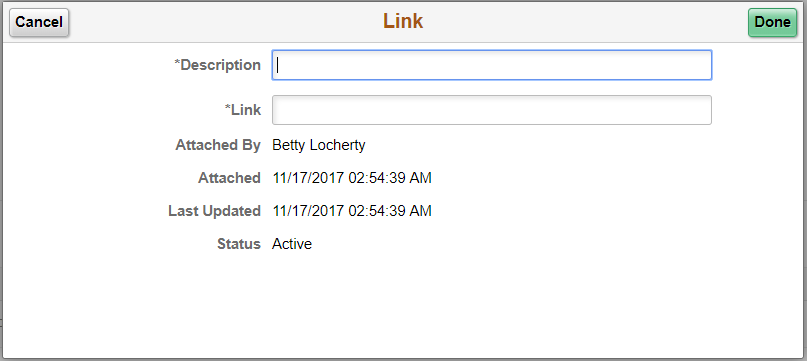
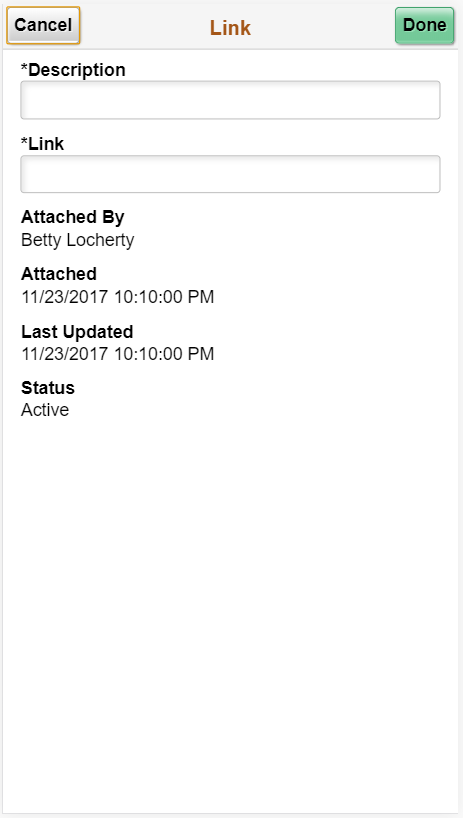
Use the Link pages to include links regarding a transaction:
Select the Add Link in the document upload, attachments, or notes page to open a modal from where you can upload links.
(Desktop or Tablet) This illustration demonstrates the fields and controls of Link modal to add a link.
(Smartphone) This illustration demonstrates the fields and controls of Link modal to add a link using a smartphone.
View, update, or delete a link by selecting the Document Details or Edit button for an existing link.
(Desktop or Tablet) This example illustrates the fields and controls of the Link modal for viewing, updating, or deleting links.