Managing Automatically Generated Triggers and Defining Triggers Manually
|
Page Name |
Definition Name |
Usage |
|---|---|---|
|
GP_TRIGGER_SEG |
View, add, or cancel segmentation triggers by payee. A segmentation trigger must be active to be viewed or managed on this page. |
|
|
GP_TRIGGER_RTO |
View, add, or cancel retroactive triggers by payee. A retroactive trigger must be unprocessed to be viewed or managed on this page. You can also view processed retroactive triggers (in an unfinalized calendar group) on this page. |
|
|
GP_TRIGGER_ITER |
View iterative triggers by payee. An iterative trigger must be unprocessed to be viewed on this page. |
|
|
GP_TRGRITER_CALRUN |
View iterative triggers by calendar group ID. An iterative trigger must be unprocessed to be viewed on this page. |
Use the Review Triggers (GP_TRIGGER) and Review Iterative Triggers (GP_TRGRITER_CALRUN) components to:
Review and manage triggers generated automatically by the online system.
Define retro and segmentation triggers manually when you want to bypass the setup for online trigger generation.
View the source record or field for a trigger as well as the field value changes that cause iterative, segmentation, or retroactive processing. This information is useful for debugging and troubleshooting when you are trying to determine why a particular instance of iterative, retro, or segmentation processing took place.
Note: The system does not display source data for manually defined triggers.
Note: You cannot define iterative triggers manually using the Review Triggers (GP_TRIGGER) or Review Iterative Triggers (GP_TRGRITER_CALRUN) components.
Warning! The pages in the Review Triggers and Review Iterative Triggers components enable you to cancel triggers. Do not cancel triggers while a payroll run is processing. This can lead to errors in your payroll results.
Use the Segmentation page (GP_TRIGGER_SEG) to view, add, or cancel segmentation triggers by payee.
A segmentation trigger must be active to be viewed or managed on this page.
Navigation:
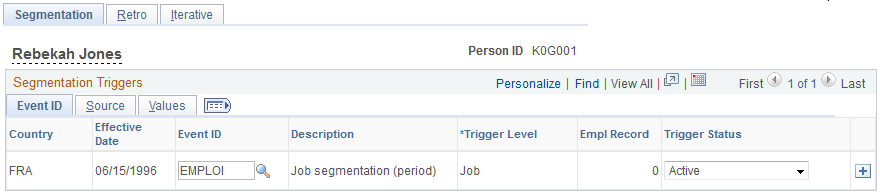
This example illustrates the fields and controls on the Segmentation page - Event ID tab.
This example illustrates the fields and controls on the Segmentation page - Source tab.

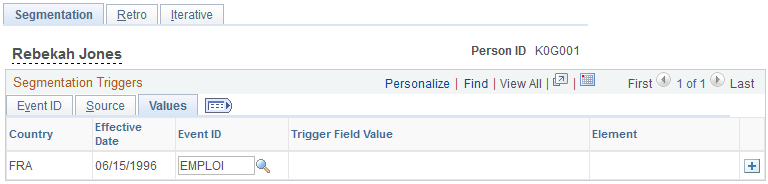
This example illustrates the fields and controls on the Segmentation page - Values tab.
Event ID
Select the Event ID tab.
Use the fields on the Event ID tab to view basic data such as the trigger effective date and trigger event ID for an automatically generated segmentation trigger, or add this data to define a trigger manually.
Field or Control |
Description |
|---|---|
Country |
Displays the country to which the trigger applies. Enter a country code if you are creating a trigger manually. |
Effective Date |
Displays the trigger effective date in relation to which a pay period or the elements in a pay period are segmented. Enter a trigger effective date if you are defining a trigger manually. |
Event ID |
Displays the event ID, which tells the system what type of segmentation to use to process segmentation events and which elements to segment (in the case of element segmentation). The event IDs displayed here are those that you defined on the Segmentation Event Definition page. Enter an event ID if you are creating a trigger manually. |
Description |
Displays a description of the trigger event ID that you defined on the Segmentation Event Definition page. |
Trigger Level |
Options are: Payee: If the trigger level is Payee, the system segments pay elements for all jobs belonging to the payee. Job: If the trigger level is Job, the system segments pay elements for the job identified by the employee record number in the Empl Rcd # field. |
Empl Record (employee record) |
Displays the employee record number (job) affected by the segmentation trigger. If you are defining triggers manually, select the employee record number (job) for which you want to create a trigger. If the trigger level is Payee, the system automatically sets the value of this field to 0. |
Trigger Status |
Select a trigger status. Options are: Active: By default, the value of this field is Active. Canceled: Select to cancel an active segmentation trigger. When you select Canceled, the trigger disappears when you click Save and reenter the page. |
Source
Select the Source tab.
Use the Source tab to view the source record and field for a segmentation trigger.
The system displays either the source record, or both the source record and field for a trigger, depending on the trigger level:
|
Trigger Level |
Information Displayed |
|---|---|
|
Record |
Record Information |
|
Field, Non-Value Based |
Record and Field Information |
|
Field, Value-Based |
Record and Field Information |
Field or Control |
Description |
|---|---|
Country |
Same as the Country field on the Event ID tab. |
Effective Date |
Same as the Effective Date field on the Event ID tab. |
Event ID |
Same as the Event ID field on the Event ID tab. |
Trigger Source |
Displays one of the following values:
|
Source Record |
View the record that is the source of a trigger. For manually defined triggers, this field is blank. |
Field Name |
View the field that is the source of the trigger. For segmentation triggers generated from the earning and deduction assignment record (GP_PYE_OVRD), the field name is PIN_NUM. For manually defined triggers, this field is blank. |
Timestamp |
Displays the day and time the trigger was created. For manually defined triggers, this field is blank. |
Values
Select the Values tab.
Use the Values tab to determine what field value change caused the system to generate a segmentation trigger.
The system displays field values only for triggers at the following trigger levels:
|
Trigger Level |
Information Displayed |
|---|---|
|
Field, Non-Value Based |
Field Value Information For segmentation triggers generated from effective dated records, the system displays the character, date, or numeric value that triggers segmentation. |
|
Field, Value-Based |
Field Value Information
|
Field or Control |
Description |
|---|---|
Country |
Same as the Country field on the Event ID and Source tabs. |
Effective Date |
Same as the Effective Date field on the Event ID and Source tabs. |
Event ID |
Same as the Event ID field on the Event ID and Source tabs. |
Character Value |
Displays the character value that generates a trigger. |
Date Value |
Displays the date value that generates a trigger. |
Numeric Value |
Displays the numeric value that generates a trigger. |
Element Name |
Displays the name of the element (earning or deduction) that causes a trigger to be generated (for segmentation triggers generated from the earning and deduction assignment record [GP_PYE_OVRD]). |
Adding Manual Segmentation Triggers
To manually insert a segmentation trigger:
Enter a country and an effective date on the Segmentation page – Event ID tab. The system uses the effective date entered here as the basis for the trigger effective date.
Specify an event ID for the trigger on the Segmentation page – Event ID tab.
The system uses the event ID to determine what type of segmentation to use and which elements to segment in the case of element segmentation.
The system sets the trigger source to Manual, and the trigger status to Active.
Note: Unlike automatically generated triggers, manual triggers are independent of any database change defined by a record or record and field combination on the Triggers Definition page. It is important to understand the potential consequences of creating manual triggers. Because they aren't linked to a specific data change, you might segment periods and elements where nothing has changed.
Updating and Cancelling Segmentation Triggers
For automatically and manually generated rows of trigger data:
You can change the event ID.
You can change the trigger status from Active to Cancelled.
You cannot reinstate a canceled trigger; you must add a new manual trigger.
For the effective date on generated rows of trigger data:
The effective date on the Segmentation page is the date in relation to which segmentation occurs.
You can change the effective date of a manually generated trigger.
You cannot alter the effective date of a trigger that was generated by the system based on predefined setup rules.
Use the Retro page (GP_TRIGGER_RTO) to view, add, or cancel retroactive triggers by payee.
A retroactive trigger must be unprocessed to be viewed or managed on this page. You can also view processed retroactive triggers (in an unfinalized calendar group) on this page.
Navigation:
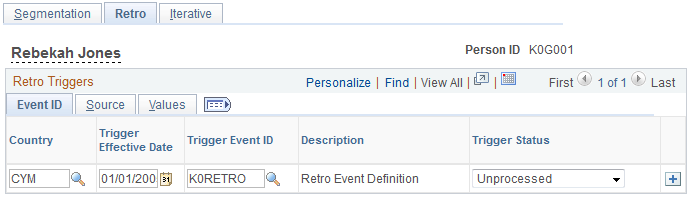
This example illustrates the fields and controls on the Retro page - Event ID tab.
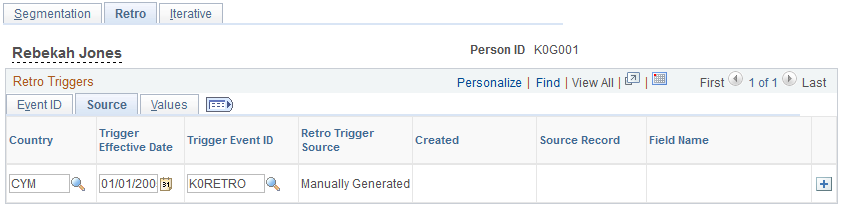
This example illustrates the fields and controls on the Retro page - Source tab.
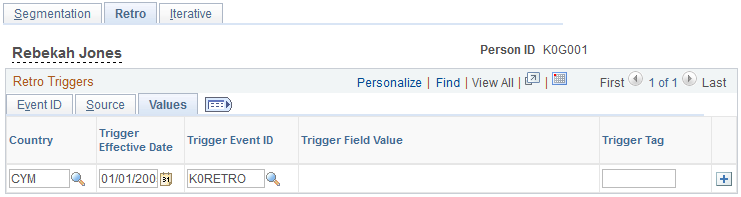
This example illustrates the fields and controls on the Retro page - Values tab.
Event ID
Select the Event ID Tab.
Use the fields on the Event ID tab to view basic data such as the trigger effective date and trigger event ID for an automatically generated retro trigger, or add this data to define a trigger manually.
|
Field or Control |
Description |
|---|---|
|
Country |
Displays the country to which the trigger applies. Enter a country code if you are creating a trigger manually. |
|
Trigger Effective Date |
Displays the trigger effective date. The system uses this date to determine which pay periods to recalculate. Enter a trigger effective date if you are defining a trigger manually. |
|
Event ID |
Displays the event ID, which tells the system what retro event definition to use to process the retroactive data. The event IDs displayed here are those that you defined on the Retro Event Definition page. Enter an event ID if you are creating a trigger manually. |
|
Description |
Displays a description of the trigger event ID that you defined on the Retro Event Definition page. |
|
Trigger Status |
Select a trigger status. Options are: Unprocessed: By default, the value of this field is Unprocessed. Cancelled: Select to cancel a retro trigger. When you select Canceled, the trigger disappears when you click Save and reenter the page. In Process: This value is assigned automatically by the system. You cannot update the trigger status when it is set to In Process. In addition, you cannot manually set the Trigger Status to In Process. The system issues an error if you attempt to do so. Note: Payroll administrators can view processed retro triggers for unfinalized calendar groups. Once the calendar is finalized, the row will disappear. |
Source
Select the Source tab.
Use the Source tab to view the source record and field for a retro trigger.
The system displays either the source record, or both the source record and field for a trigger, depending on the trigger level:
|
Trigger Level |
Information Displayed |
|---|---|
|
Record |
Record Information |
|
Field, Non-Value Based |
Record and Field Information |
|
Field, Value-Based |
Record and Field Information |
Field or Control |
Description |
|---|---|
Country |
Same as the Country field on the Event ID tab. |
Effective Date |
Same as the Effective Date field on the Event ID tab. |
Event ID |
Same as the Event ID field on the Event ID tab. |
Trigger Source |
Displays one of the following values:
|
Trigger Tag |
If a trigger is utility-generated, this field displays the source of the trigger. |
Source Record |
View the record that is the source of a trigger. For manually defined triggers, this field is blank. |
Field Name |
View the field that is the source of the trigger. For manually defined triggers, this field is blank. |
Values
Select the Values tab.
Use the Values tab to determine what field value change caused the system to generate a retro trigger.
The system displays field values (character, date, or numeric values) only for triggers at the following trigger levels:
Field, Non-Value Based.
Field, Value-Based.
Field or Control |
Description |
|---|---|
Country |
Same as the Country field on the Event ID and Source tabs. |
Trigger Effective Date |
Same as the Trigger Effective Date field on the Event ID and Source tabs. |
Event ID |
Same as the Event ID field on the Event ID and Source tabs. |
Character Value |
Displays the character value that generates a trigger. |
Numeric Value |
Displays the numeric value that generates a trigger. |
Date Value |
Displays the date value that generates a trigger. |
Timestamp |
Displays the day and time the trigger was created. For manually defined triggers, this field is blank. |
Adding Manual Retroactive Triggers
To manually insert a retro trigger:
Enter the country and an effective date on the Retro page.
The system uses the effective date to determine which periods to recalculate, as in standard retroactivity.
Connect the trigger to an event ID.
The system uses the event ID that you specify to determine how retroactivity should be processed.
The system sets the trigger source to Manual and the trigger status to Unprocessed.
Note: Unlike automatically generated triggers, manual triggers are independent of any database changes to a record or a record and field combination. It's important to understand the potential consequences of creating manual triggers. Because they aren't linked to a specific data change, you might process retroactivity in periods where nothing has changed.
Warning! If you add or cancel a retroactive trigger, you should adjust the corresponding retroactive data in the database.
Updating and Canceling Retroactive Triggers
For automatically and manually generated rows of trigger data:
You can change the event ID.
You can change the trigger status from Unprocessed to Canceled.
After a trigger is processed, you cannot alter the trigger status, because it's no longer unprocessed and therefore doesn't appear on the Retro page.
You cannot reinstate a canceled trigger.
You must add a new manual trigger.
For the trigger effective date on generated rows of trigger data:
The trigger effective date on the Retro page is the date the system uses to determine what periods to process.
You can change the trigger effective date of a manually generated trigger (trigger source = Manual).
You cannot alter the trigger effective date of a trigger that has been generated by the system based on predefined setup rules.
Warning! Canceling a trigger does not undo the database change that created the trigger. If there's retroactivity for another reason, this change can be picked up when prior periods are recalculated.
Use the Iterative page (GP_TRIGGER_ITER) to view iterative triggers by payee.
An iterative trigger must be unprocessed to be viewed on this page.
Navigation:
This example illustrates the fields and controls on the Iterative page - Calendar Group tab.

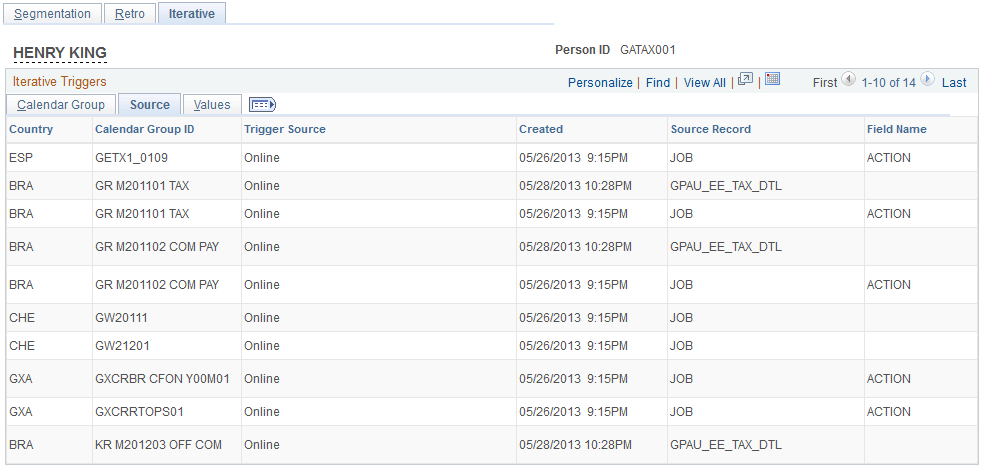
This example illustrates the fields and controls on the Iterative page - Source tab.
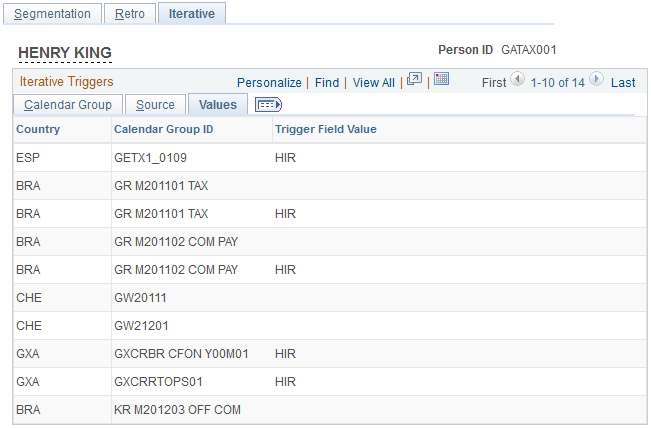
This example illustrates the fields and controls on the Iterative page - Values tab.
Calendar Group
Select the Calendar Group tab.
Use the fields on the Calendar Group tab to view basic data such as the trigger effective date and calendar group ID for an automatically generated iterative trigger.
Field or Control |
Description |
|---|---|
Country |
Displays the country to which the trigger applies. |
Calendar Group ID |
Identifies the calendar group in which the iterative trigger is processed. |
Trigger Status |
Select a trigger status. Options are: Unprocessed: By default, the value of this field is Unprocessed. Canceled: Select to cancel an iterative trigger. When you select Canceled, the trigger disappears when you click Save and reenter the page. |
Source
Select the Source tab.
Use the Source tab to view the source record and field for an iterative trigger.
The system displays either the source record, or both the source record and field for a trigger, depending on the trigger level:
|
Trigger Level |
Information Displayed |
|---|---|
|
Record |
Record Information |
|
Field, Non-Value Based |
Record and Field Information |
|
Field, Value-Based |
Record and Field Information |
Field or Control |
Description |
|---|---|
Country |
Same as the Country field on the Calendar Group tab. |
Calendar Group ID |
Same as the Calendar Group ID field on the Calendar Group tab. |
Trigger Source |
Displays one of the following values:
|
Source Record |
View the record that is the source of a trigger. |
Field Name |
View the field that is the source of a trigger. |
Values
Select the Values tab.
Use the Values tab to determine what field value change caused the system to generate an iterative trigger.
The system displays field values (character, date, or numeric values) only for triggers at the following trigger levels:
Field, Non-Value Based.
Field, Value-Based.
Field or Control |
Description |
|---|---|
Country |
Same as the Country field on the Source tab. |
Calendar Group ID |
Same as the Calendar Group ID field on the Source tab. |
Character Value |
Displays the character value that generates a trigger. |
Numeric Value |
Displays the numeric value that generates a trigger. |
Date Value |
Displays the date value that generates a trigger. |
Timestamp |
Displays the day and time the trigger was created. |
Adding Manual Iterative Triggers
You cannot manually insert a row of trigger data on this page.
Updating and Canceling Iterative Triggers
For automatically generated rows of trigger data, you can change the trigger status from Unprocessed to Canceled. After a trigger is processed, you cannot alter the trigger status, because it's no longer unprocessed and therefore doesn't appear on the Iterative page.
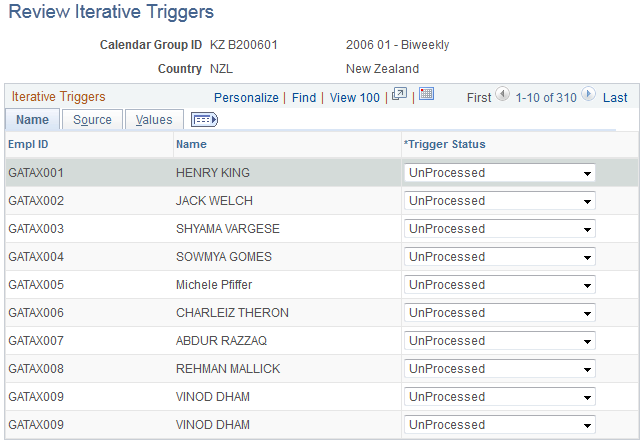
Use the Review Iterative Triggers page (GP_TRGRITER_CALRUN) to view iterative triggers by calendar group ID.
An iterative trigger must be unprocessed to be viewed on this page.
Navigation:
This example illustrates the fields and controls on the Review Iterative Triggers page - Name tab.
This example illustrates the fields and controls on the Review Iterative Triggers page - Source tab.
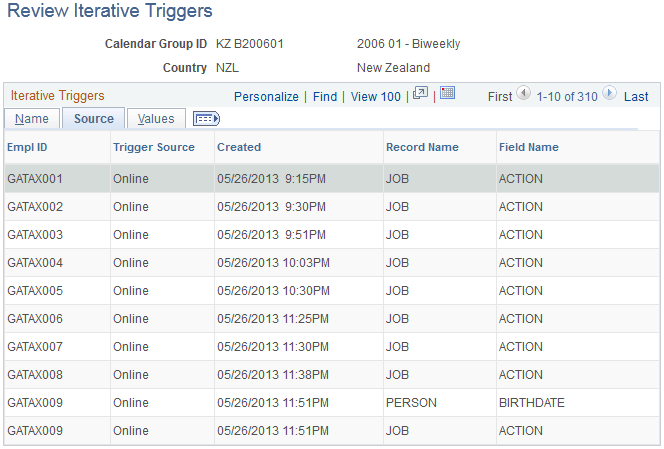
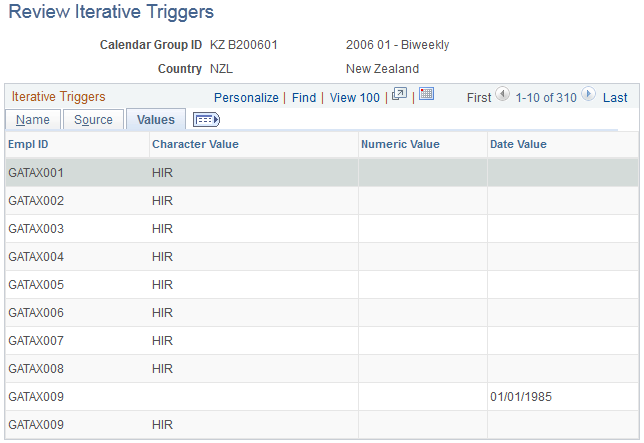
This example illustrates the fields and controls on the Review Iterative Triggers page - Values tab.
Name
Select the Name tab.
Use the fields on the Name tab to view basic data such as the EmplID, employee name, and status associated with an automatically generated trigger.
Field or Control |
Description |
|---|---|
EmplID |
Displays the EmplID of the payee associated with the iterative trigger. |
Name |
Displays the name of the payee associated with the iterative trigger. |
Trigger Status |
Select a trigger status. Options are: Unprocessed: By default, the value of this field is Unprocessed. Canceled: Select to cancel an iterative trigger. When you select Canceled, the trigger disappears when you click Save and reenter the page. |
Source
Select the Source tab.
Use the Source tab to view the source record and field for an iterative trigger.
The system displays either the source record, or both the source record and field for a trigger, depending on the trigger level:
|
Trigger Level |
Information Displayed |
|---|---|
|
Record |
Record Information |
|
Field, Non-Value Based |
Record and Field Information |
|
Field, Value-Based |
Record and Field Information |
Field or Control |
Description |
|---|---|
EmplID |
Same as the EmplID field on the Name tab. |
Name |
Same as the Name field on the Name tab. |
Trigger Source |
Displays one of the following values:
|
Record Name |
View the record that is the source of a trigger. |
Field Name |
View the field that is the source of a trigger. |
Values
Select the Values tab.
Use the Values tab to determine what field value change caused the system to generate an iterative trigger.
The system displays field values (character, date, or numeric values) only for triggers at the following trigger levels:
Field, Non-Value Based.
Field, Value-Based.
Field or Control |
Description |
|---|---|
EmplID |
Same as the EmplID field on the Source tab. |
Name |
Same as the Name field on the Source tab. |
Character Value |
Displays the character value that generates a trigger. |
Numeric Value |
Displays the numeric value that generates a trigger. |
Date Value |
Displays the date value that generates a trigger. |
Timestamp |
Displays the day and time the trigger was created. |