Entering Maintaining and Approving Absence Events
|
Page Name |
Definition Name |
Usage |
|---|---|---|
|
HGA_MANAGE |
Create, maintain, and approve absences for one or more payees. |
|
|
HR_ATT_DD_HDR |
Maintain absence attachments. |
|
|
GP_ABS_SS_REQUEST |
Enter and update details for an absence request. |
|
|
HGA_MANAGE |
Approve multiple absence requests. |
|
|
GP_ABS_EVENT |
Enter, update, and void absences. Start the Absence Forecasting process. |
|
|
GP_ABS_EVENT_SEC |
Enter detailed information for an absence, including the reason, processing action, manager approval, user-defined data, entitlement adjustment, and partial hours. |
Use the Create and Maintain Absence Requests page (HGA_MANAGE) to create, maintain, and approve absences for one or more payees.
Video: Creating and Maintaining Absences
Navigation:
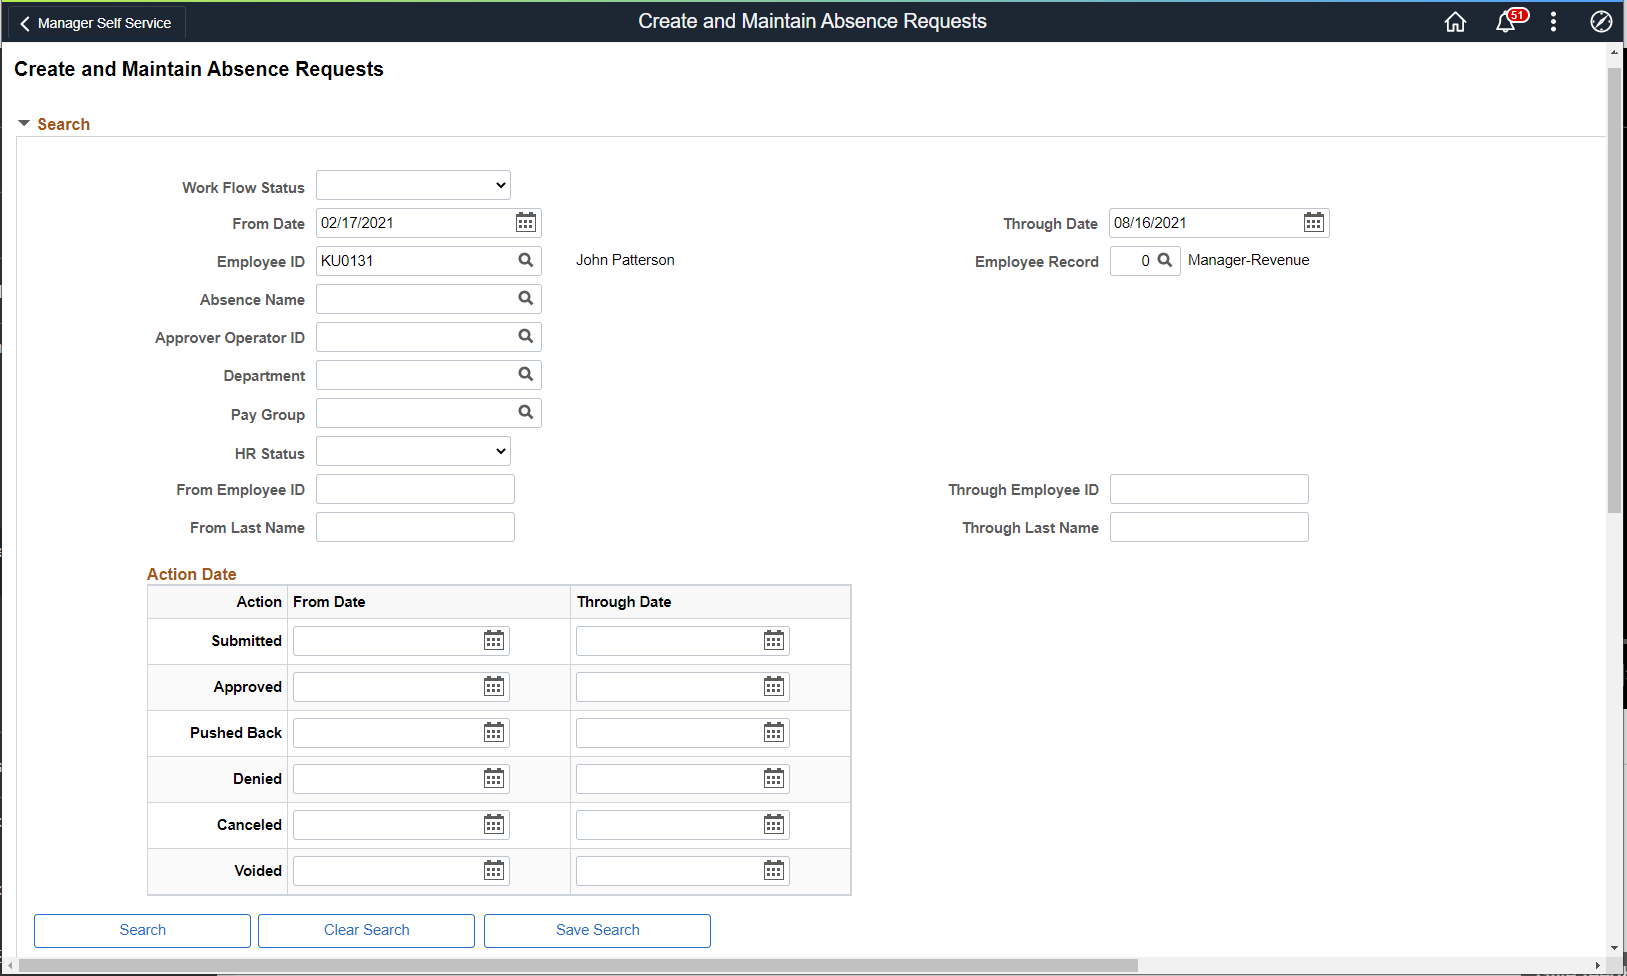
This example illustrates the fields and controls on the Create and Maintain Absence Requests page.
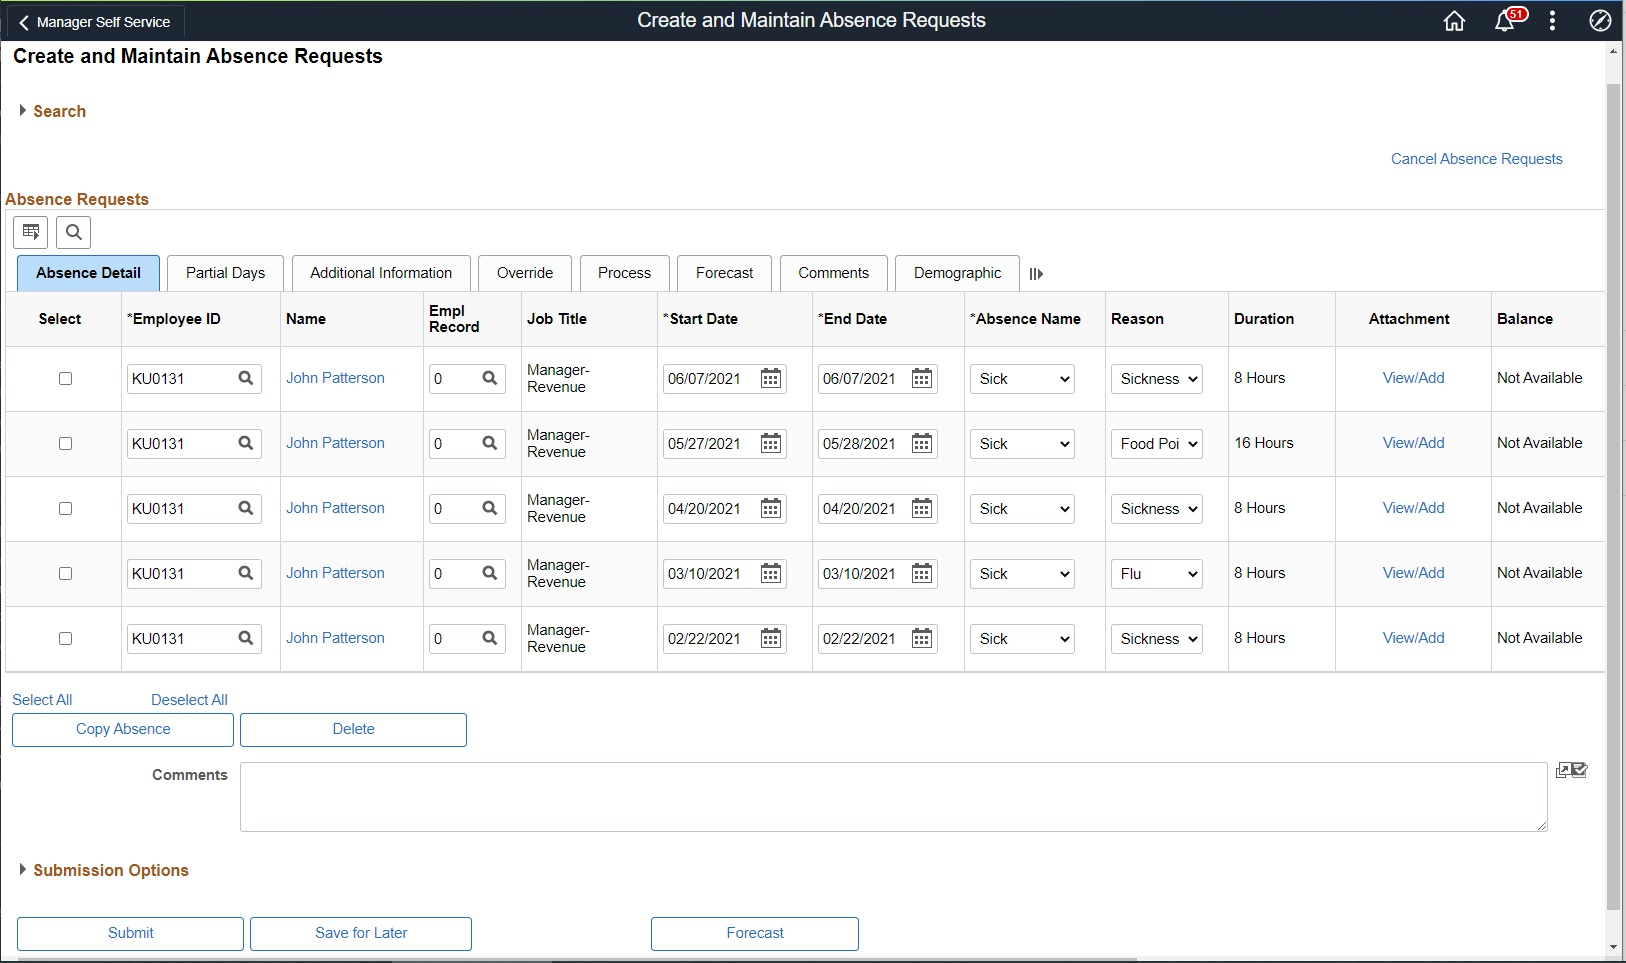
This example illustrates the fields and controls on the Create and Maintain Absence Requests page.
This example illustrates the fields and controls on the Create and Maintain Absence Requests page (3 of 3). You can find definitions for the fields and controls later on this page.
Search
Use this group box to search for absence requests based on specific criteria.
Field or Control |
Description |
|---|---|
Work Flow Status |
Enter a value to search for absence requests with a specific work flow status. Values are: Saved, Submitted, Approved, Denied, Push Back, Cancelled, and Voided. Leave this field blank to search for absence requests of all statuses. |
From Date and Through Date |
Enter a date range for which you want to search for absence requests. The system returns absence requests with start dates and end dates that fall within the date range that you enter. You can leave either field blank to create an open ended date range. For example, if you leave the From Date field blank and enter 12/31/2014 in the Through Date field, the system searches for all absences requested on or before 12/31/2014. The default dates are based on the values entered in the Days Before Current Date and Days After Current Date fields on the Installation Settings Page. |
Employee ID and Employee Record |
Enter values in these fields to search for absence requests for specific employee IDs and employee record numbers. |
Absence Name |
Enter a value to search for absence requests associated with a specific absence name. |
Approver’s Operator ID |
Enter a value to search for absence requests associated with a specific approver. |
Department |
Enter a value to search for absence requests associated with a specific department. |
Pay Group |
Enter a value to search for absence requests associated with a specific pay group. |
HR Status |
Enter a value to search for absence requests associated with a specific HR status. |
From Employee ID and Through Employee ID |
Enter values in these fields to search for absence requests associated with a range of employee IDs. |
From Last Name and To Last Name |
Enter values in these fields to search for absence requests associated with a range of last names. |
Action Date |
Use the fields in this group box to search for absence requests using a combination of absence action and date range. For example, if you enter a From Date of 01/01/2013 and a Through Date of 12/31/2013 for the Submitted action, the system searches for all absence requests that were submitted between 01/01/2013 and 12/31/2013. |
Absence Detail Tab
Use this tab to enter or update basic details for an absence request.
Field or Control |
Description |
|---|---|
Employee ID |
Enter the ID of the employee for which you are adding an absence request. You can use the prompt to search for the employee. |
Name |
The system displays the name of the employee you select in the Employee ID field. Once you all of the required fields for the absence request, the Name field becomes a link. Click the link to access the Absence Details Page, where you can enter additional details for the absence request. |
Empl Record |
Enter the employee record for the employee. |
Start Date and End Date |
Enter the date range for the absence request. |
Absence Name |
Select the type of absence being requested. Only absence types for which the selected employee is eligible are available for selection. |
Absence Reason |
Select a reason for the absence request. The values available for selection depend on the value you select in the Absence Name field. |
Duration |
The system calculates and displays the duration depending on the values you enter in the Start Date and End Date fields. |
Attachment |
Shows the View/Add link to open Maintain Attachments Page. The following video provides an overview of Attachment Uptake for Administrators. |
Balance |
The system calculates and displays the balance depending on the values you enter in the Start Date and End Date fields. |
Original Begin Date |
Enter a date in this field if your absence take rules allow you to link this absence to a previous absence that was taken for the same reason. (The Link Absence and By Original Begin Date options are selected on the take element’s Period page.) If this absence is related to another absence, enter the begin date of the original absence. Example: A payee is out sick for the following periods of time: |
|
Absence Type |
Reason (not entered online) |
Absence Begin Date |
Absence End Date |
Original Begin Date |
|---|---|---|---|---|
|
Sick |
Sprained wrist |
May 15 |
May 16 |
May 15 |
|
Sick |
Flu |
June 1 |
June 5 |
June 1 |
|
Sick |
Wrist didn’t heal properly |
June 10 |
June 10 |
May 15 |
Entering the same original begin date for the first and third absence events tells the system that the absences are related. If you defined the take element to link absences, the system checks to see if the current absence occurred within the time frame allowed for linking. If it did, the two events are linked.
The default value for Original Begin Date is the begin date. Changing the begin date here does not update the original begin date.
Field or Control |
Description |
|---|---|
Status |
Displays the current status of the absence request. Click to view the Approval Monitor where you can view additional details regarding the approval of the request, and add additional approvers. |
Void |
Select to void the absence request. When this check box is selected and you click Save for Later for the absence request, the system changes its Status to Voided. In addition, the system generates an email notification informing the employee that the absence request has been withdrawn. Deselect to remove the Voided status from the absence request. When this check box is deselected and you click Save for Later for the absence request, the system changes its Status to Saved. In addition, the system generates an email notification informing the employee that the absence request has been reinstated. Both notifications include a link to the Absence Request History Page where the employee can view the status of the request. Note: If the specific absence take is setup (on the Country Take page) such that it may be cancelled via self service, then the void box is not usable/editable. This means that if there are cancellation rules and approval definitions setup on the Country Take, the void check box will be greyed out. |
Copy Absence |
Select an absence request and click this button to insert one or more absence requests with identical information. When you click this button, the system prompts you to enter the number of copies you want to insert. |
Delete |
Select one or more absence requests and click this button to delete them from the grid. Note: If Generate Absence Payable Time is enabled for your system and you delete an absence request for which payable time has been loaded into Payroll for North America, you receive a warning message. If you confirm the deletion, the next time the TL_GENPT PS Job runs, the Time Administration process deletes the generated payable time associated with the deleted absence request. For more information, see Generate Absence Payable Time Page |
Comments |
Any comments you enter in this field are added to the selected absence requests when you click the Submit or Save for Later buttons. |
Submission Options
Field or Control |
Description |
|---|---|
Override Forecast Eligibility |
Select to make the system ignore forecasting requirements when you submit absence requests. |
Submit Option |
Specify how the system uses the Approval Framework to route the approval of the absence requests that you submit. Values are:
|
Submit |
Click to submit the absence requests that you select in the grid. The system submits the absences for approval according to the Submit Option you selected. |
Save for Later |
Click to save and validate all of the absence requests that you select in the grid without submitting them for approval. Note: If you select the Hide Save For Later Button check box on the Installation Settings page, this field does not appear. |
Forecast |
Click to execute the forecasting process for the absence requests that you select in the grid. Note: If you select the Hide Forecast Button check box on the Installation Settings page, this field does not appear. |
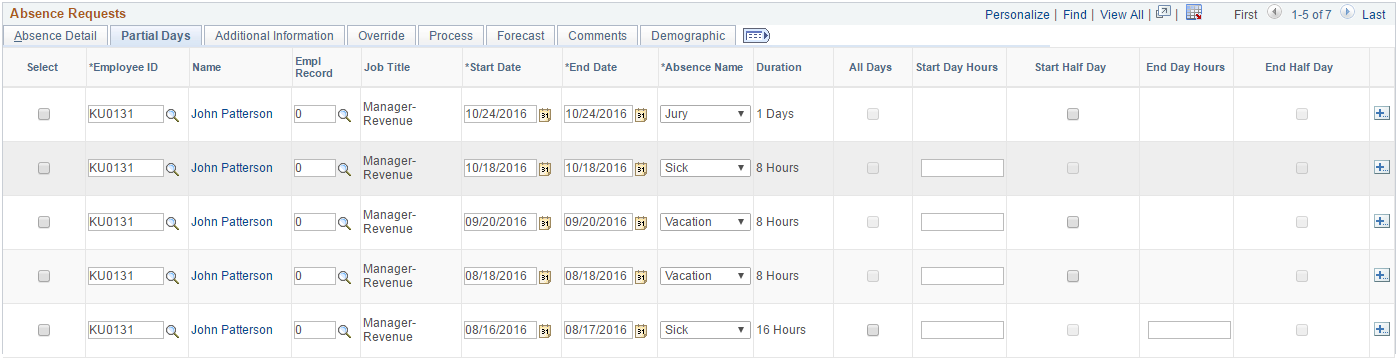
Partial Days Tab
Use this tab to enter partial day information for an absence request.
Note: The fields that are available on this tab for an absence request depend on the selections you make for the Allow Partial Days and Partial Days Option fields on the Country Take - Absences page for the associated absence take.
Field or Control |
Description |
|---|---|
All Days |
Select to indicate that all of the days in the date range of the absence request are partial days. Enter the number of partial day hours in the Start Day Hours field, or select the Start Half Day check box to indicate that all of the days were half days. |
Start Day Hours |
Enter the number of hours of the partial day absence for the first day in the date range for the absence request. When you enter a value in this field, the Start Half Day field becomes unavailable. |
Start Half Day |
Select to indicate that the first day of the date range of the absence request is a half day. When you select this check box, the Start Day Hours field becomes unavailable. |
End Day Hours |
Enter the number of hours of the partial day absence for the last day in the date range for the absence request. When you enter a value in this field, the End Half Day field becomes unavailable. |
End Half Day |
Select to indicate that the last day of the date range of the absence request is a half day. When you select this check box, the End Day Hours field becomes unavailable. |
This example illustrates the fields and controls on the Create and Maintain Absence Requests page: Partial Days tab.
Additional Information Tab
Use this tab to enter user field data for absence requests.
Note: You can also enter this information using the Absence Details Page, where the additional fields are labeled according to the setup on the Configure Country Take Setup - User Fields Page.
This example illustrates the fields and controls on the Create and Maintain Absence Requests page: Additional Information tab.

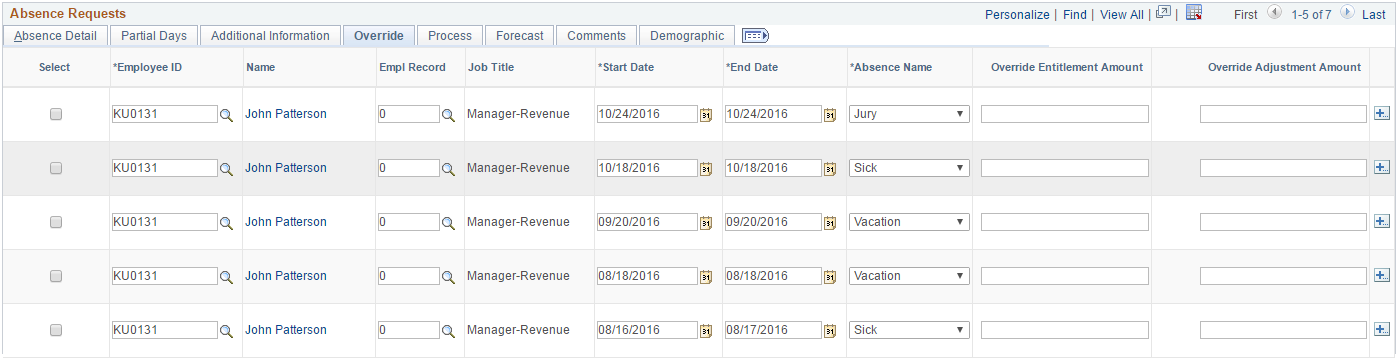
Override Tab
Use the tab to override the entitlement or adjustment amounts of absence requests.
You can also enter this information using the Absence Details Page.
This example illustrates the fields and controls on the Create and Maintain Absence Requests page: Override tab.
Process Tab
Use this tab to view processing data for absence requests.
|
Field or Control |
Description |
|---|---|
|
Process Status |
Displays the status of the absence event as it relates to processing in payroll. Valid values are Not Processed, Processed, and Partially Processed. The processing status is displayed by default for administrators. |
|
Calendar Group ID |
Displays the calendar group for which the absence take was processed. |
|
Process Date |
This field displays the most recent processing date for this absence event. |
|
First Processed Date |
The value in this field represents the original processing date for the absence event. The Process Date and First Processed Date fields show different processing dates, in the case of retroactive processing. |
This example illustrates the fields and controls on the Create and Maintain Absence Requests page: Process tab.
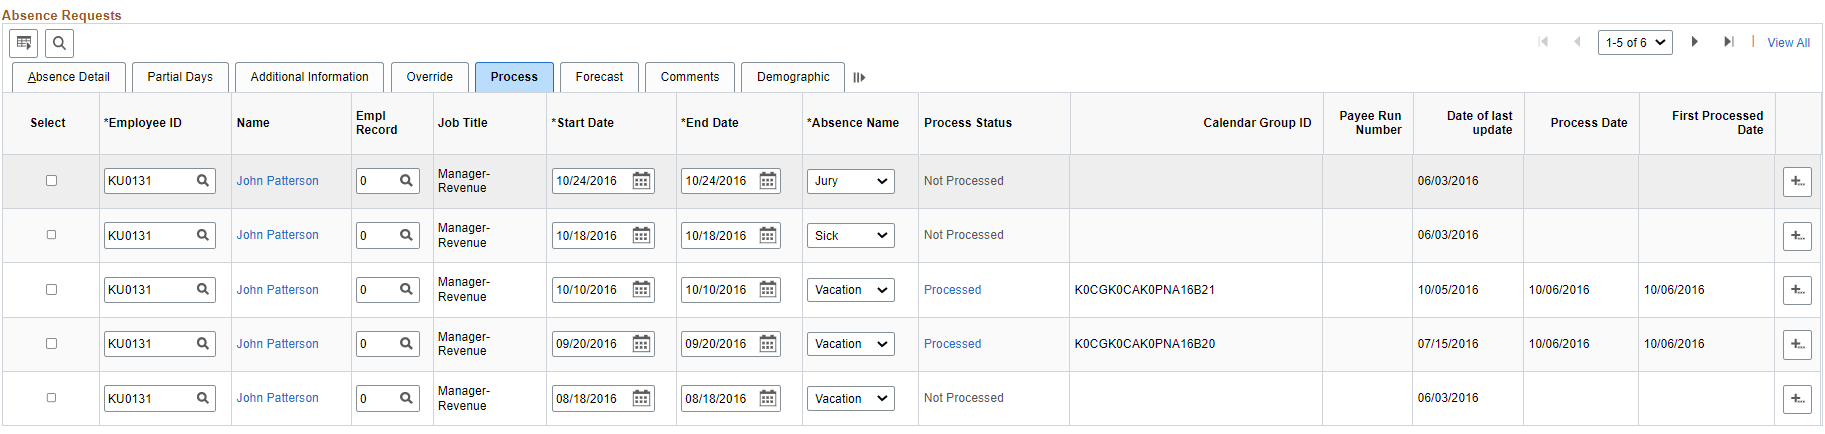
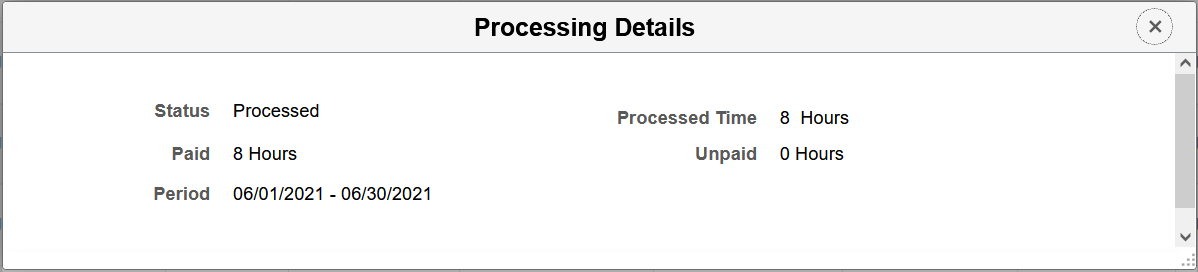
Use the Processed hyperlink to view the complete processing details.
This example illustrates the fields and controls on the Processing Details Modal.
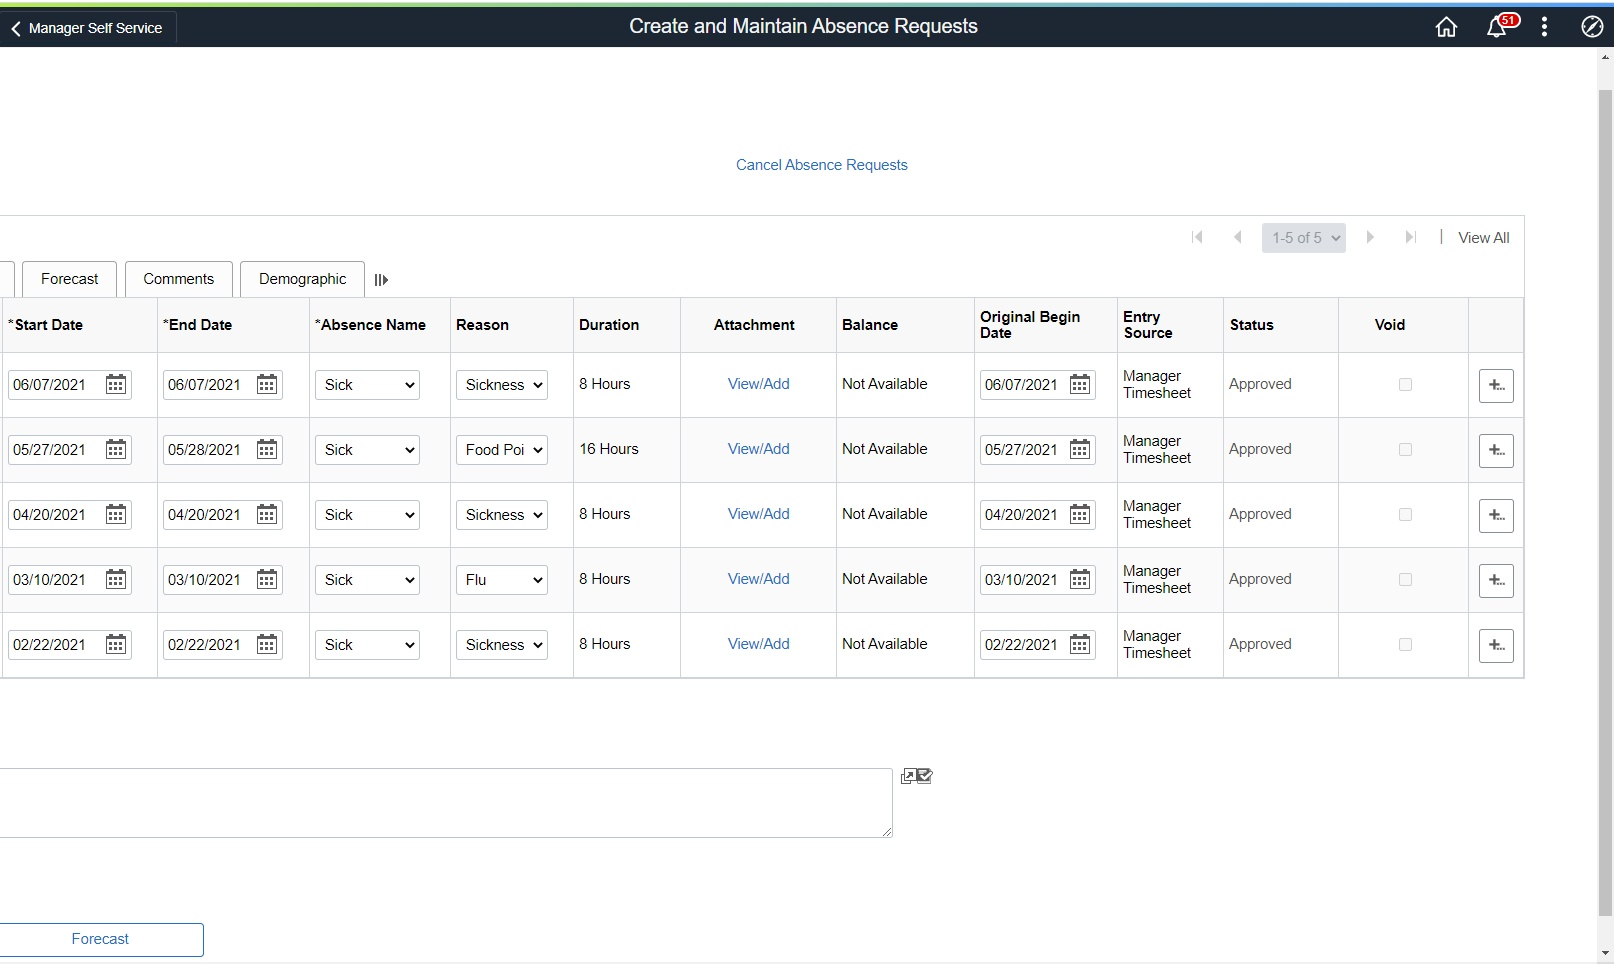
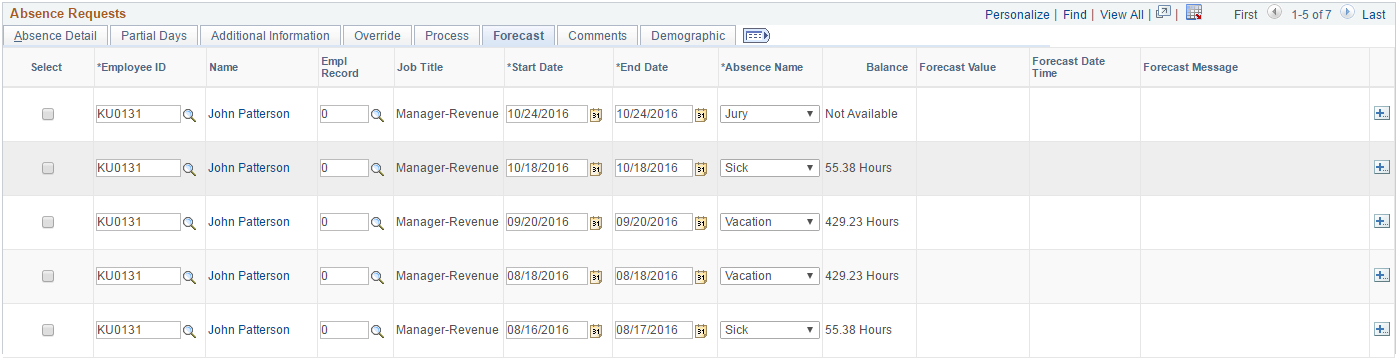
Forecast Tab
Use this tab to view forecasting data.
This example illustrates the fields and controls on the Create and Maintain Absence Requests page: Forecast tab.
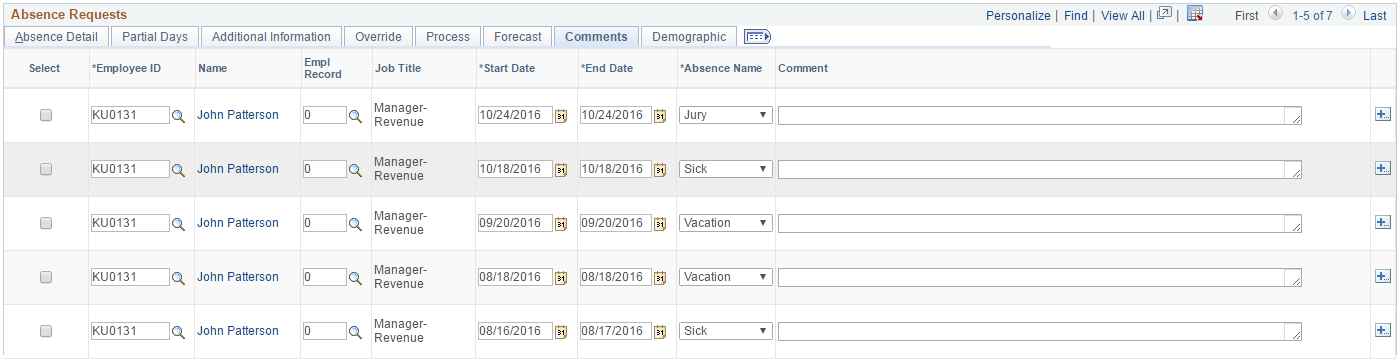
Comments Tab
Use the Comments tab to enter comments for absence requests. When you enter a comment, it applies only to the absence request on the same row.
This example illustrates the fields and controls on the Create and Maintain Absence Requests page: Comments tab.
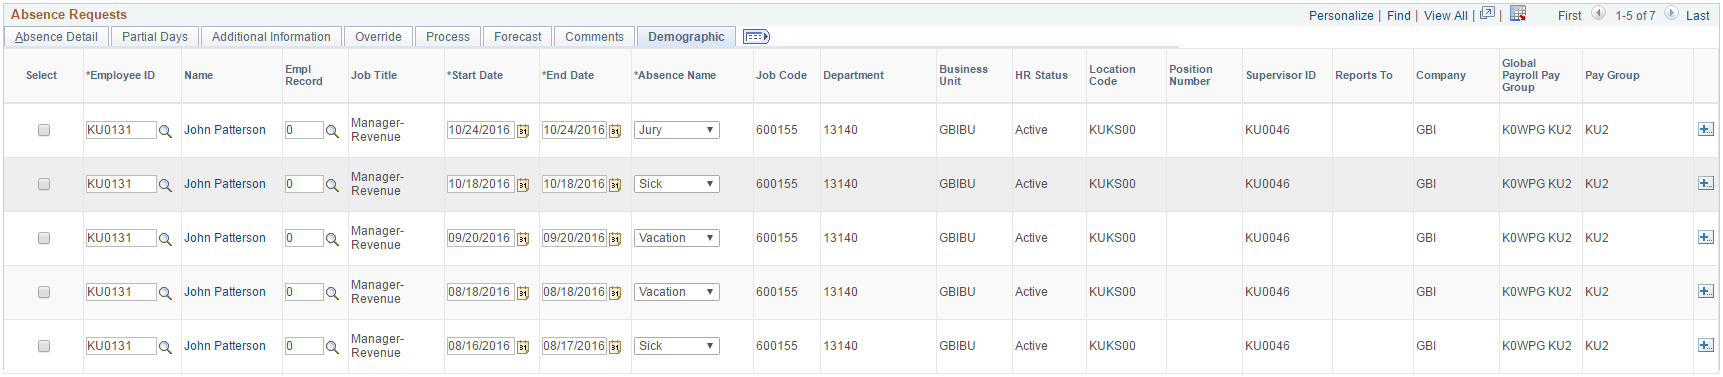
Demographic Tab
Use the Demographic tab to view demographic data for absence requests.
This example illustrates the fields and controls on the Create and Maintain Absence Requests page: Demographic tab.
Canceling Absences
Field or Control |
Description |
|---|---|
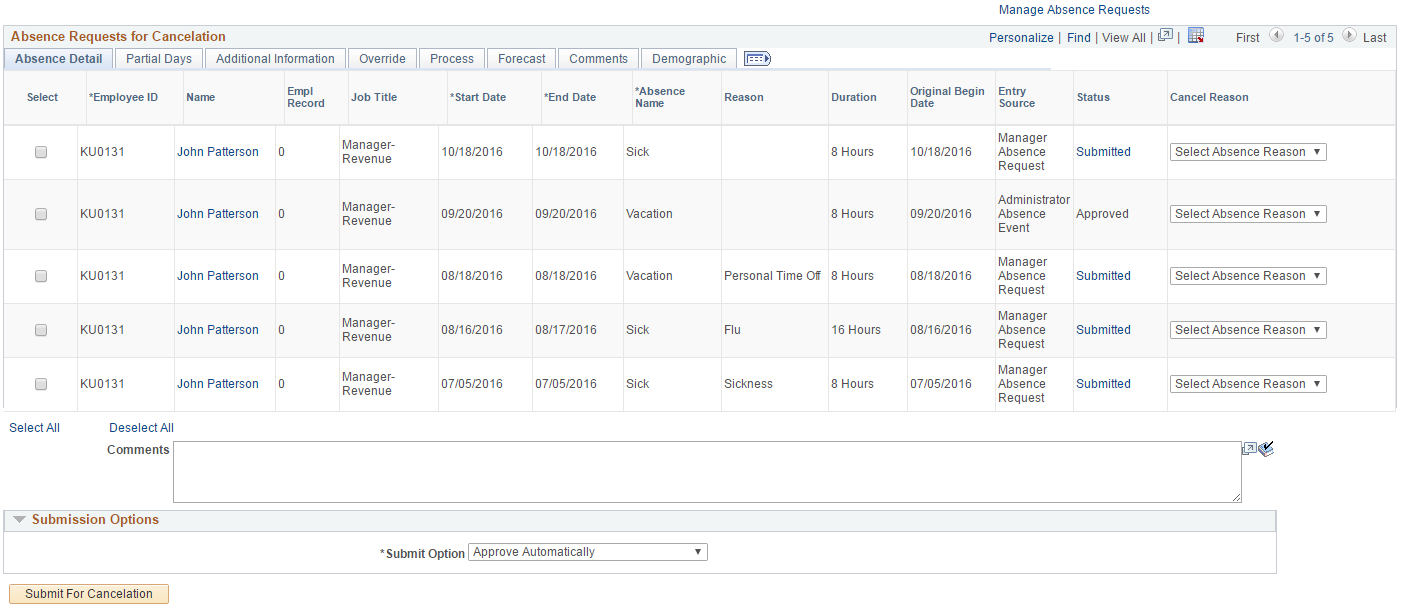
Cancel Absence Requests |
Click to replace the Absence Requests grid with the Absence Requests for Cancelation grid. This grid displays the same list of absences, but includes fields that enable you to cancel them. |
This example illustrates the fields and controls for the Absence Requests for Cancelation grid.
Field or Control |
Description |
|---|---|
Cancel Reason |
Select a reason for canceling the absence request. |
Submit for Cancelation |
Click to submit the cancellation of the absence requests that you select in the grid. The system submits the cancellations for approval according to the Submit Option you selected. |
This page is used to maintain absence documents.
Navigation:
Select View/Add link under Attachment in Create and Maintain Absence Requests Page
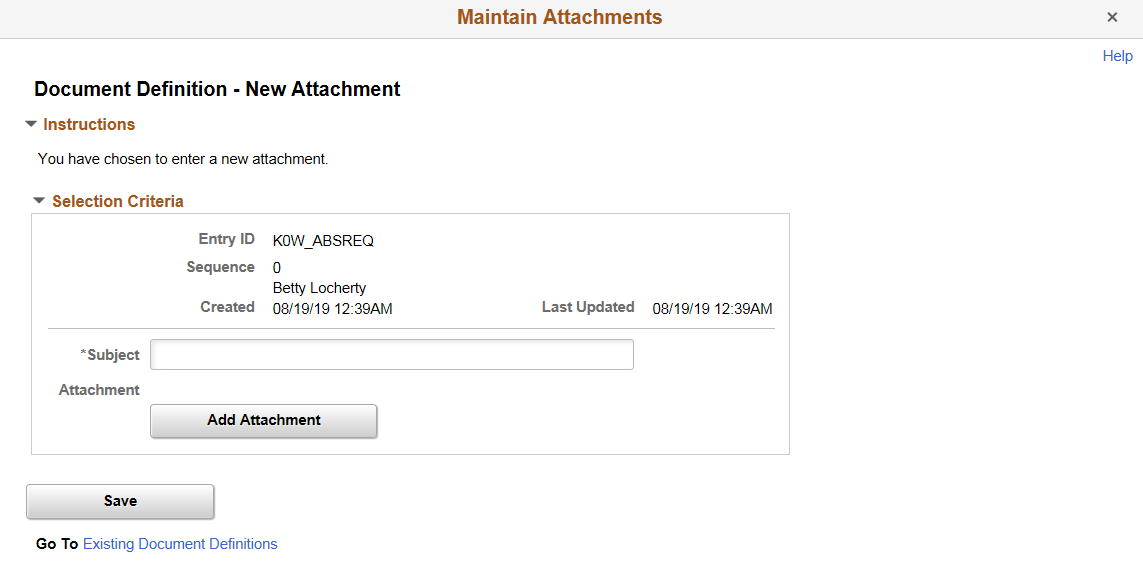
This example illustrates the Maintain Attachments Modal.
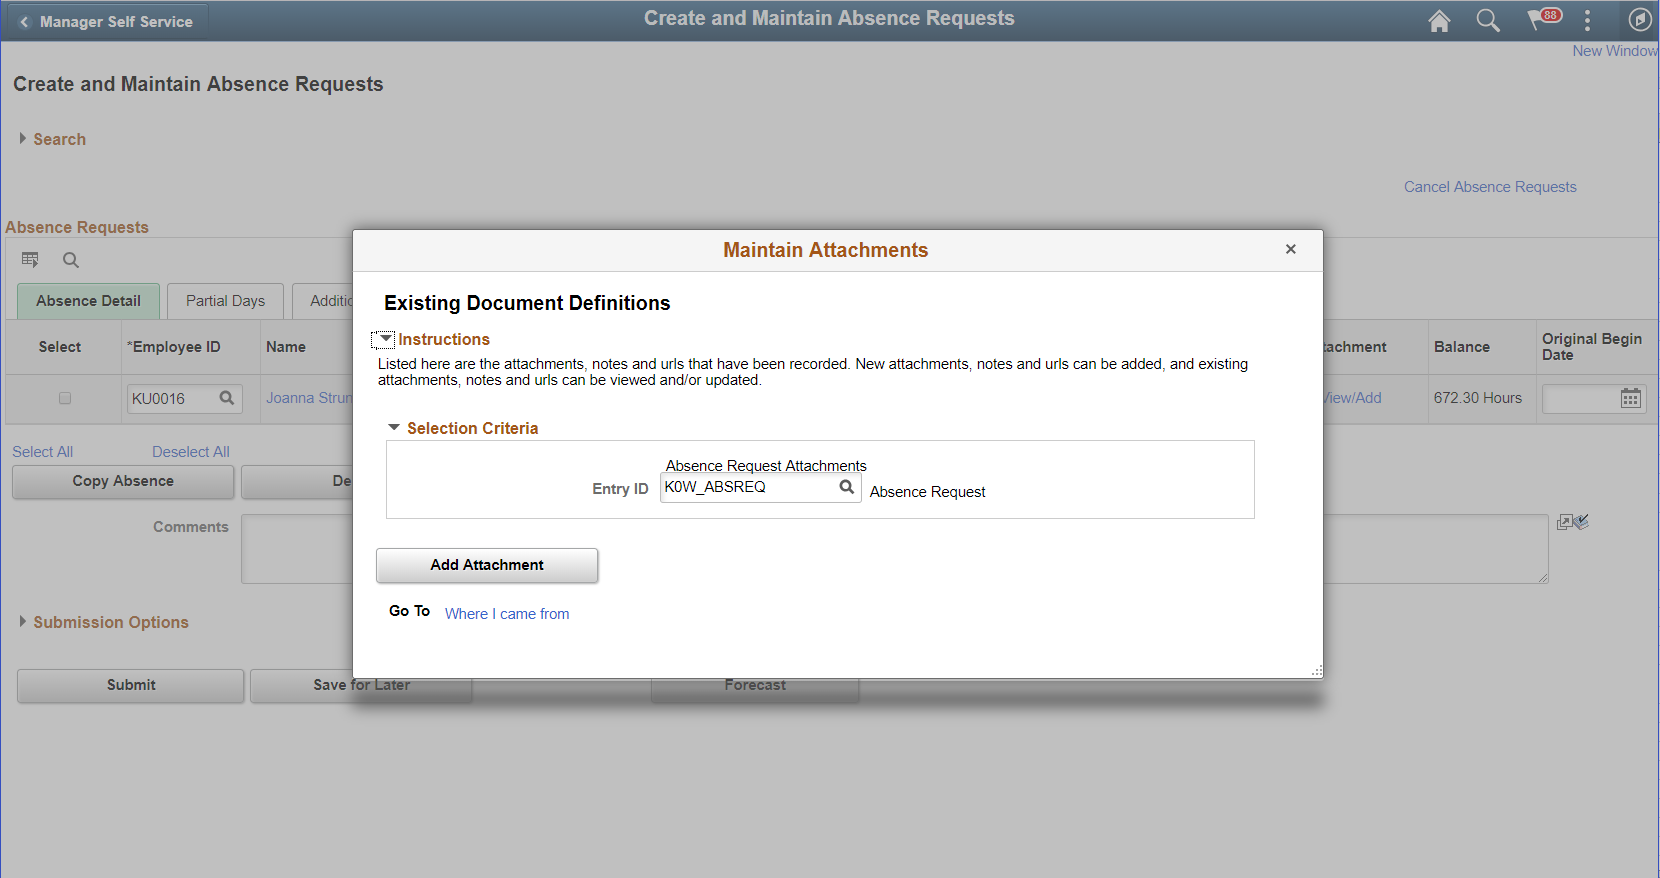
Click Add Attachment button.
This example illustrates the fields and controls of Maintain Attachments Modal.
Field or Control |
Description |
|---|---|
Subject |
Enter a subject name before adding the attachment. |
Add Attachment |
Click the Add Attachment button to browse and upload the required file. |
Use the Absence Details page (GP_ABS_SS_REQUEST) to enter and update details for an absence request.
Navigation:
Click the Name link on the Create and Maintain Absence Requests page.
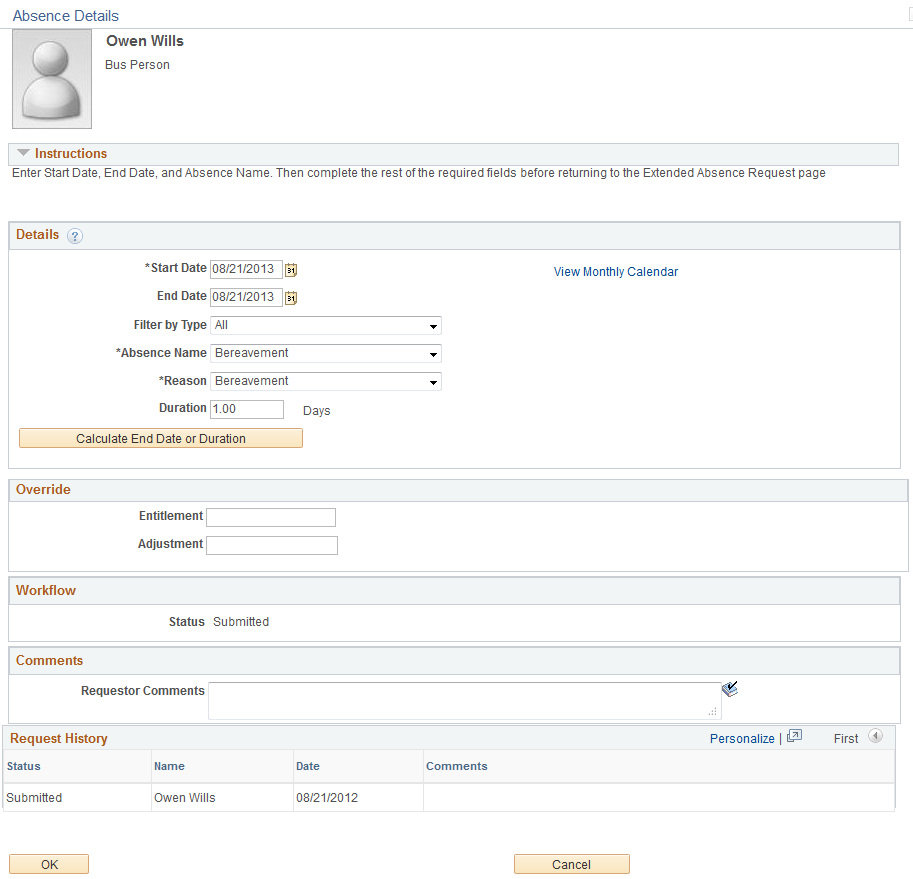
This example illustrates the fields and controls on the Absence Details page.
Absence Detail
Field or Control |
Description |
|---|---|
Start Date |
Select the first day of the absence event. The field option defaults to the current date. If there's a break in the absence, enter each event separately. For example, if you're out sick for two days, return to work for three days, and are out sick again, enter two absence events. If the absence includes a weekend (say, Thursday to Monday), enter one absence event. |
End Date |
Select the last day of the absence event. If you leave this field empty and the Calculate End Date option on the Configure Country Take Setup - Date Rules Page is selected, the system automatically determines the end date based on the begin date, duration, and partial days options. |
Original Start Date |
Select the original start date of the absence event. Enter a date if the absence has legal or payment implications based on the original start date of the absence. This field is visible when Display Original Begin Date is selected on the Configure Country Take Setup - Absences Page. For example, an employee has a leg injury. He reports an absence from January 3, 2005 to January 7, 2005. The employee starts to feel better and returns to work. Later, he has a relapse and has to take two more days of absence starting on January 17, 2005 to January 18, 2005. The original begin date for the second absence should be January 3, 2005. The system can link the two events and treat the event as a single one in terms of eligibility or a minimum waiting period. Note: Careful consideration is needed when enabling this field in self-service. Incorrect data entered in this field might lead to incorrect eligibility calculations and payment for one or more events. |
Filter by Type |
Select the absence type. The selection you make in this field will limit or filter the selections available in the Absence Name field. |
Absence Name |
Select the absence name from the available options. The options available depend on the selection in the Filter by Type field, the absence takes that are enabled in the Country Take setup, and the elements for which the employee is eligible. After you select entries in the above fields, the system refreshes the page with additional fields. Note: If you decide to change the Absence Name previously selected, the system will display a warning that all your existing absence data will be lost. |
Reason |
Select a reason from the available options. The reasons available depend on your selections in the previous fields. Absence reasons are linked to the Absence Name (Take) through the Absence Take Type. |
Partial Days |
Specify which days of the absence event are partial days. If the Calculate End Date or Duration option is enabled on the Absence (setup) page, and the Unit Type is Hours, the system does consider any partial hours or half-day entries that are entered in this group box when it calculates the end date or duration. For example, an employee has a work schedule of 8 hours per day from Monday through Friday. The employee reports an absence from Monday, January 8, 2007 through Wednesday, January 10, 2007. Then employee takes a half day off on Monday and full days off for the rest of the absence. Example 1: The Country Take set up is defined as follows:
With these settings, to correctly enter the absence data the employee should report:
Example 2: The Country Take set up is defined as follows:
With these settings, to correctly enter the absence data the employee should report:
Note: Data that you enter in the following fields is used in the absence calculation process only if the data is referenced by your absence formulas. The available options in the Partial Days field when the absence is calculated in days include:
|
Start Day Hours, End Day Hours, and All Day Hours |
Enter the number of hours the payee was absent for the first day of the absence, the last day of the absence, or all days of the absence, respectively. |
All Days are Half Days, Start Day is Half Day, and End Day is Half Day |
Select to specify which days of the absence event are half days. Important! These fields are not available unless the Country Take enables you to specify partial days on the Request Absence page. |
Duration |
Enter Duration by days or hours. You do not have to enter Duration if the Calculate Duration is enabled on the Absence (setup) page). The system calculates the duration of the absence in hours or days when you click the Calculate Duration button. The behavior of this field depends on the settings on the Absence (setup) page. The value is automatically calculated if the Calculate End Date option is selected.
|
Calculate End Date or Duration |
Click this button to have the system calculate the end date of an absence event based on the entries in the Start Date and Duration fields, or to calculate the Duration based on entries in the Start Date and End Date fields. Note: If you selected to calculate end date and duration in the Country Take - Date Rules page, then you had to indicate which field to recalculate when both fields contain values. Hence if the user entered values for duration and end date and clicks Calculate End Date or Duration button, one of the fields will be recalculated. |
Forecast Balance |
Click this button to run the online absence forecasting process for the type of absence take selected for this absence request. This button will appear only for those absence names that require forecasting. After the forecasting process is completed, the page will display the Forecast Returned Value and Status and a link View Forecast Details to access the list of the forecast balance details. Note: The system does not automatically save your absence request before initiating the Forecasting process. Although the system prompts you to save before leaving the page, it is not necessary to save your forecast information before or after the Forecasting process. |
Save for Later |
This option allows the employee to save the absence event information for later review and editing, and does not generate workflow for the approvals process. |
Submit |
This option saves the information and generates the workflow approval process that routes the request to one or more managers whose roles are defined in workflow to enable them to approve, deny, or push back the absence request to the previous approval level with comments. The push back is often used by approvers to suggest absence request revision or to obtain additional information. |
Cancel |
This option is available only for requests that have been saved for later or that were pushed back from the approver. Depending on the Country Take setup, when you click Cancel the application either physically deletes the request from request and workflow records, or sets the status of the request to cancelled. |
Additional Information
Use these fields to enter user field data for the absence request. The fields that appear in this group box depend on how Absence Management is configured during the implementation process.
Override
Use these fields override the entitlement or adjustment amounts for the absence request.
Workflow
This group box displays the current approval status of the absence request.
Comments
The Requestor Comments field enables the employee to enter free form text related to the absence request that becomes part of the record and is visible throughout the approval process. Comments display on the Absence Details page.
Request History
This group box displays the history of all actions taken for the absence request.
Use the Approve Absence Requests page (HGA_MANAGE) to approve multiple absence requests.
Navigation:
Search
The search criteria for this page are identical to the criteria that you use for the Create and Maintain Absence Requests Page, with one exception: Work Flow Status.
Field or Control |
Description |
|---|---|
Work Flow Status |
Enter a value to search for absence requests based on work flow status. Values are:
|
Absence Requests
The tabs in this section of the page display the same information as the tabs in the Absence Request section of the Create and Maintain Absence Requests Page, but you cannot edit the fields.
Field or Control |
Description |
|---|---|
Approver Comments |
Any comments you enter in this field are added to the selected absence requests when you click the Approve, Deny, or Push Back buttons. |
Approval Options
Field or Control |
Description |
|---|---|
Override Forecast Eligibility |
Select to make the system ignore forecasting requirements when you approve, deny, or push back absence requests. |
Approve |
Click to approve the selected absence requests. |
Deny |
Click to deny the selected absence requests. |
Push Back |
Click to push back the selected absence requests. |
Forecast |
Click to initiate the forecasting process for the selected absence requests. |
Note: As an administrator, you can view any document uploaded along with an Absence Request in the Approve Absence Requests page.
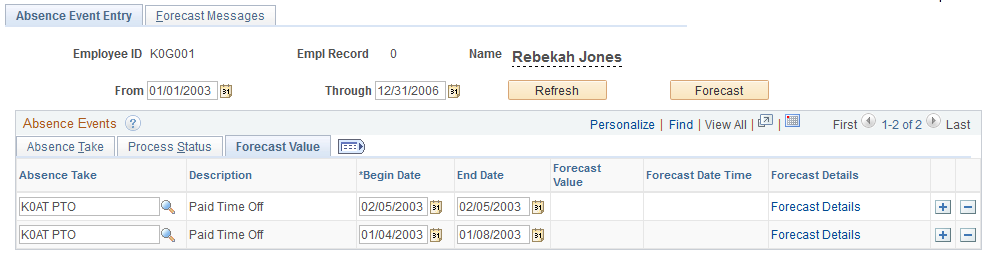
Use the Absence Event Entry page (GP_ABS_EVENT) to enter, update, and void absences.
Start the Absence Forecasting process.
Navigation:
This example illustrates the fields and controls on the Absence Event Entry page.
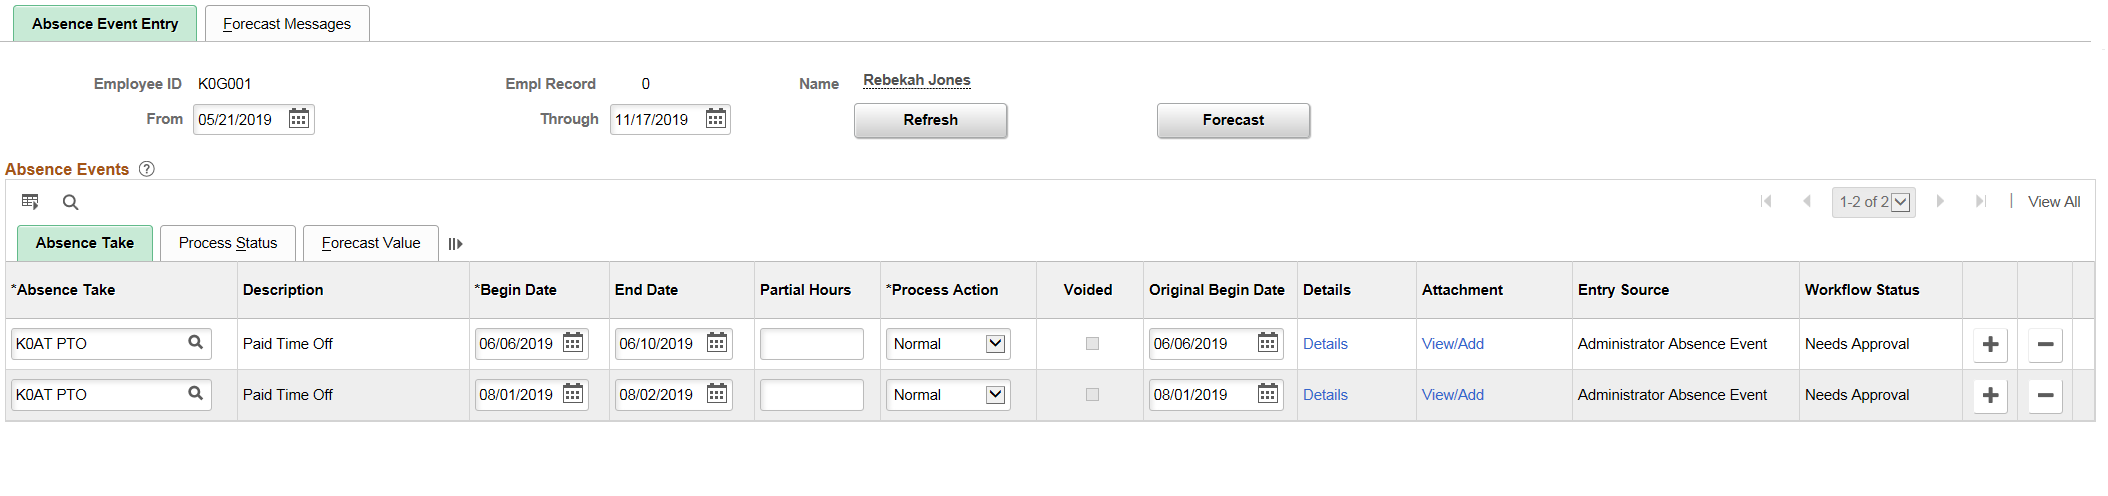
To enter a new absence, insert a row and complete the fields described below. To make changes to a row, delete the row and add a new one.
Note: If you enter absences with overlapping dates, and your absence rules do not allow you to enter more than one absence for the same day, an error message appears when you try to save the events. If you’ve elected to use the automatic priority processing feature and have assigned a priority number to your absence take elements, the system determines which take element has priority for the date in question and offers the option of executing priority processing. You define absence priority rules on the Absence Take - Priority page.
Absence Take
Field or Control |
Description |
|---|---|
From and Through |
The user can display absence request that fall within a specified date range by entering dates in the From: and Through: fields. If the From, Through or both dates is left blank, the system will initialize the search based on the default dates. The From and Through date range is determined by the Default History Date Range values entered on the History Grid page of the Country component. If the Default History Date Range has not been set up the system uses the current date minus 90 days for the From field and the current date plus 90 days for the Through field. |
Refresh |
Click the Refresh button after entering, changing, or removing dates in the From: and Through: fields. Note: If you do not click Refresh after changing the From or Through fields you will get an error message that tells you that you must click the Refresh button. You are able to proceed with absence entries once the Refresh button has been clicked. |
Absence Take Element |
Select the Absence Take element that corresponds to the payee’s absence. (You can select from all absence take elements that are defined by your organization, not just those for which the payee is eligible.) |
Begin Date and End Date |
Enter the begin and end dates of the absence. If there's a break in the absence, enter each event separately. For example, if a payee is out sick for two days, returns to work for three days, and then is out sick again, enter two absence events. If the absence includes a weekend (say, Thursday to Monday), enter one absence event. The system uses the Take definition that is in effect on the begin date that you specify. |
Partial Hours |
For absences of less than a full day, enter the number of hours that the payee was absent. If the payee was absent for more than one day (the begin and end dates are different), the system assumes that the partial hours apply only to the first day of the absence. To specify otherwise, click the Details link to access the Absence Event Input Detail page. |
Process Action |
For a new absence event, the default is Normal. Select Void to void an absence that has already gone through the Take process. The event is not processed in subsequent runs. Instead, the Process Action is reset to Normal and the Voided check box is automatically selected during the next Take process. During retroactive processing, a new version of the results is calculated without the voided event. Positive input is not generated from the voided event, and the results for earning/deduction have deltas. |
Voided |
Selected if you voided the event and ran the take process. This field can also be selected if you’re using the automatic priority processing feature and have assigned a priority number to your absence take elements. If you save absence entries with overlapping dates, the system voids the event with the lower priority and creates a new event for the days that do not overlap. |
Original Begin Date |
Enter a date in this field if your absence take rules allow you to link this absence to a previous absence that was taken for the same reason. (The Link Absence and By Original Begin Date options are selected on the take element’s Period page.) If this absence is related to another absence, enter the begin date of the original absence. Example: A payee is out sick for the following periods of time: |
|
Absence Type |
Reason (not entered online) |
Absence Begin Date |
Absence End Date |
Original Begin Date |
|---|---|---|---|---|
|
Sick |
Sprained wrist |
May 15 |
May 16 |
May 15 |
|
Sick |
Flu |
June 1 |
June 5 |
June 1 |
|
Sick |
Wrist didn’t heal properly |
June 10 |
June 10 |
May 15 |
Field or Control |
Description |
|---|---|
|
Entering the same original begin date for the first and third absence events tells the system that the absences are related. If you defined the take element to link absences, the system checks to see if the current absence occurred within the time frame allowed for linking. If it did, the two events are linked. The default value for Original Begin Date is the begin date. Changing the begin date here does not update the original begin date. |
Details |
Click to display the Absence Event Input Detail page, where you can enter additional information about the absence. |
Attachment |
Shows the View/Add link to open Maintain Attachments Page. The following video provides an overview of Attachment Uptake for Administrators. |
Entry Source |
Displays the origin of absence event. The values are: Administrator, Time & Labor, Third Party, Employee Self Service, Manager Self Service, Employee Timesheet, and Manager Timesheet. |
Work Flow Status |
Displays the current workflow status of the employee extended absence, manager extended absence, administrator extended absence, and absence event. The values are: Saved, Needs Approval, Pushed Back, Denied, Approved, and Cancelled. |
Forecast |
After entering absence events, click this button to start the Forecasting process. To use this button, absence forecasting must be enabled for one or more take elements. |
Process Status
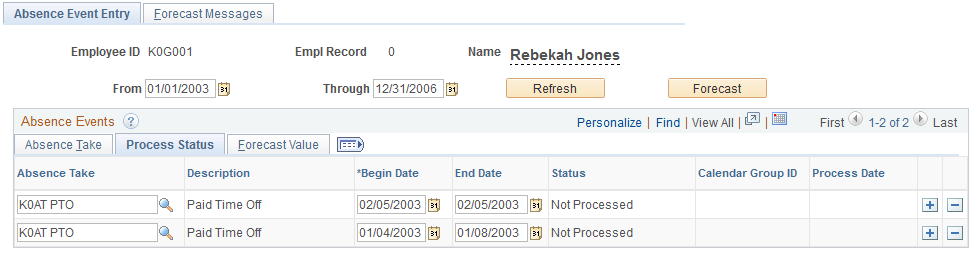
Select the Process Status tab.
This tab displays information on the status of the absence event process and is meant for use by administrators.
This example illustrates the fields and controls on the Absence Event Entry page - Process Status tab.
Field or Control |
Description |
|---|---|
Status |
Displays the status of the absence event as it relates to processing in payroll. Valid values are Not Proc. (Not Processed), Processed, and Finalized. Note: Absence events with a status of Finalized will be set to Processed if the absence event has been retroactively processed during an on cycle or off cycle calculation |
Forecast Value
Select the Forecast Value tab.
This example illustrates the fields and controls on the Absence Event Entry page - Forecast Value tab.
Field or Control |
Description |
|---|---|
Forecast Value |
The alphanumeric value resolved by the forecasting element. You associate a forecasting formula with a take element on the Take − Forecasting page. (For example, your forecast element might return a value of Eligible or Not Eligible. |
Forecast Date Time |
The last date and time that the Forecasting process was run for the take element. |
Forecast Details |
Select the link to display the Absence Forecast Results page. |
Deleting Absence Event Rows
The Delete row button will be available or grayed out based on the Payroll Status and the Delete Option selected on the Event Entry page. When the Delete Option selected is All Events Except Processed the Delete row button is disabled on all processed rows and finalized rows. When the Delete Option selected is All Event Except Finalized the Delete row button is disabled on all finalized rows.
A warning is issued when you select to delete an absence event and you have selected the Delete Option of All Events Except Finalized. The warning message states, ”Are you sure you want to delete the Event %1 Begin Date %2 End Date %3?” The explanation attached to this message states, “This absence event has already been processed. If you delete this event you might have to reprocess the absence to correct the results.”
See Defining Self Service Absence Rules by Country.
Note: If Generate Absence Payable Time is enabled for your system and you delete an absence event for which payable time has been loaded into Payroll for North America, you receive a warning message. If you confirm the deletion, the next time the TL_GENPT PS Job runs, the Time Administration process deletes the generated payable time associated with the deleted absence event.
For more information, see Generate Absence Payable Time Page
Use the Absence Event Input Detail page (GP_ABS_EVENT_SEC) to enter detailed information for an absence, including the reason, processing action, manager approval, user-defined data, entitlement adjustment, and partial hours.
Navigation:
Click the Details link on the Absence Event Entry page.
This example illustrates the fields and controls on the Absence Event Input Detail page (1 of 2).
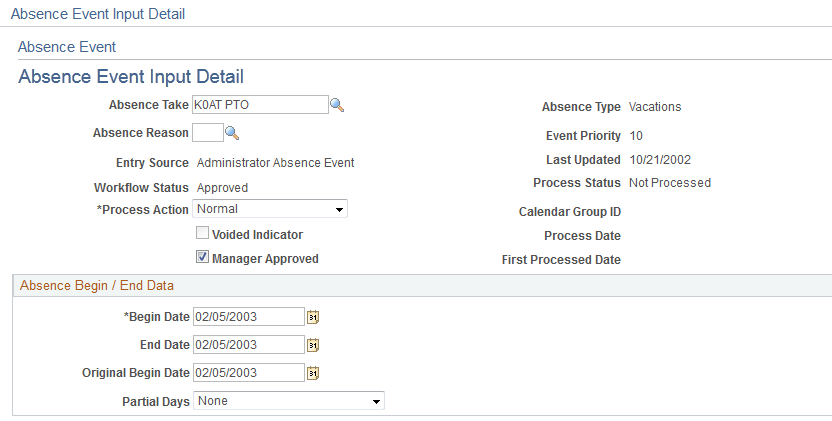
This example illustrates the fields and controls on the Absence Event Input Detail page (2 of 2).

Field or Control |
Description |
|---|---|
Absence Take |
Displays the take element that you selected on the Absence Event Entry page. |
Absence Type |
The absence type for the Take element is displayed. |
Absence Reason |
You can select an absence reason from those that were in effect as of the absence begin date. You define absence reasons on the Absence Types page and link an absence type to a take element on the Take - Calculation page. |
Event Priority |
Displays the priority number of the take element if one was assigned on the Absence Take - Priority page. If you enter more than one absence for the same date, you can use the automatic priority processing feature when you save your entries. The system compares the priority numbers of the overlapping absences to determine which take rule to apply for the date in conflict. The lower the number, the higher the priority. |
Entry Source |
Identifies the source of the absence, employee extended absence, manager extended absence, and administrator extended absence data. Values are: Admin: The absence event entry was created using the Absence Event Entry page. This is the default for new entries using the Absence Event Entry page. Third Party Time and Labor: The absence event entry was created using a third-party interface. Employee Self Service: The absence event entry was created using the Absence Self Service Employee request page. Manager Self Service: The absence event entry was created using the Absence Self Service Manager request page. Employee Timesheet: The absence event entry was created using Employee Timesheet page Manager Timesheet: The absence event entry was created using Manager Timesheet page. |
Manager Approved |
Select to have the absence processed when you run the take process. This check box is selected, by default, if you defined the absence take element (on the Absence Take - Calculation page) as not requiring manager approval. |
Last Updated |
This date appears after you save your entry. |
Workflow Status |
Displays the current workflow status of the absence take. |
Process Status |
Displays the status of the absence event as it relates to processing in payroll. Valid values are Not Processed, Processed, and Finalized. |
Calendar Group ID |
Displays the calendar group for which the absence take was processed. |
Process Date |
This field displays the most recent processing date for this absence event. |
First Processed Date |
The value in this field represents the original processing date for the absence event. The Process Date and First Processed Date fields show different processing dates, in the case of retroactive processing. |
Absence Begin / End Data
Field or Control |
Description |
|---|---|
Begin Date, End Date, and Original Begin Date |
These fields display the dates that you entered for the absence event on the main page. Any changes that you make here update the main page. |
Data that you enter in the following fields is used in absence calculations only if the data is referenced by your absence formulas.
Field or Control |
Description |
|---|---|
Partial Days |
Specify which days of the absence event are partial days. If the Calculate End Date or Duration option is enabled on the Absence (setup) page, and the Unit Type is Hours, the system does consider any partial hours or half-day entries that are entered in this group box when it calculates the end date or duration. For example, an employee has a work schedule of 8 hours per day from Monday through Friday. The employee reports an absence from Monday, January 8, 2007 through Wednesday, January 10, 2007. Then employee takes a half day off on Monday and full days off for the rest of the absence. Example 1: The Country Take set up is defined as follows:
With these settings, to correctly enter the absence data the employee should report:
Example 2: The Country Take set up is defined as follows:
With these settings, to correctly enter the absence data the employee should report:
Warning! If the absence unit type is defined in days in the Country Take setup, we do not recommend using partial days options. Note: Data that you enter in the following fields is used in the absence calculation process only if the data is referenced by your absence formulas. The available options in the Partial Days field when the absence is calculated in days include:
|
Start Day Hours, End Day Hours, and All Day Hours |
Enter the number of hours the payee was absent for the first day of the absence, the last day of the absence, or all days of the absence, respectively. |
Start Day is Half Day, End Day is Half Day, and All Days are Half Days |
Select if the payee was absent exactly half a day. |
User Defined Fields
You can enter data in up to 16 user-defined fields. When you run the Take process, the system writes the data to the daily records, so that it’s available to the count formulas.
A system element in the GP_ABS_EVENT record corresponds to each user-defined field. The naming conventions are:
EVT CONFIG1(2, 3, 4) DT for date values.
EVT CONFIG1(2, 3, 4) DC for decimal values.
EVT CONFIG1(2, 3, 4) CH for character values.
EVT CONFIG1(2, 3, 4) MN for monetary values.
Definition of abbreviations: Event configurable 1(2,3,4) date/decimal/character/monetary
For example, employees take 100 percent or 80 percent pay for sick time. If they take 100 percent, they lose a day of vacation for each set of five sick days that they take. You enter 100 or 80 in one of the decimal fields to specify the employee's choice and use a formula that counts the number of vacation days that the employee loses in each case.
Note: Values entered in the user defined fields can be overwritten during the Take process, depending on your take rules.
Note: The user-defined fields on this page are not related to the user-defined fields that appear on the Absence Take - Calculation page.
Override
If the absence take element is associated with a per-absence entitlement element, use this group box to override the standard entitlement amount or adjust the payee's entitlement balance. To override the entitlement amount or adjust the entitlement balance for a frequency-based entitlement, use the Absence Adjustment page.
Important! Use the same type of units as those that are used to define the entitlement element.
Field or Control |
Description |
|---|---|
Entitlement |
To override the entitlement for this event, enter the number of units in this field. If the take is linked to more than one entitlement element, the number overrides the entitlement for the first linked element only. |
Adjustment |
To adjust the entitlement balance, enter the number of units in this field. (That number populates the automatically assigned adjustment element.) Enter a negative number to reduce the entitlement balance. |