Managing FIE
This section gives you an overview of FIE (Fichero INSS empresas) and how the data in the file is loaded and displayed in the application.
As a Payroll Administrator, you can load the content of the FIE file into the application, review the data and verify if the data in the application is matching with the data from Social Security.
FIE is a flat file sent by Social Security to the employer organization to inform about the subsidies that are paid to employees. Companies can download information on the variations experienced by the Social Security benefits recognized to their workers, both subsidies and others that affect employment contracts or to business obligations with Social Security.
Starting from December 2019, FIE files are sent on a daily basis through SILTRA/Winsuite to the main authorized person in the company for SILTRA, with the changes affecting employees’ subsides. The file contains the information for all the CCC (SSN Employer) managed by the Authorization key.
|
Page Name |
Definition Name |
Usage |
|---|---|---|
|
GPES_FLT_FILE_DEFN |
To define the text file (FIE). |
|
|
GPES_RC_FIE |
To load the content of the file in the application. |
|
|
GPES_FIE_REVIEW |
To review the information present in the loaded FIE file. |
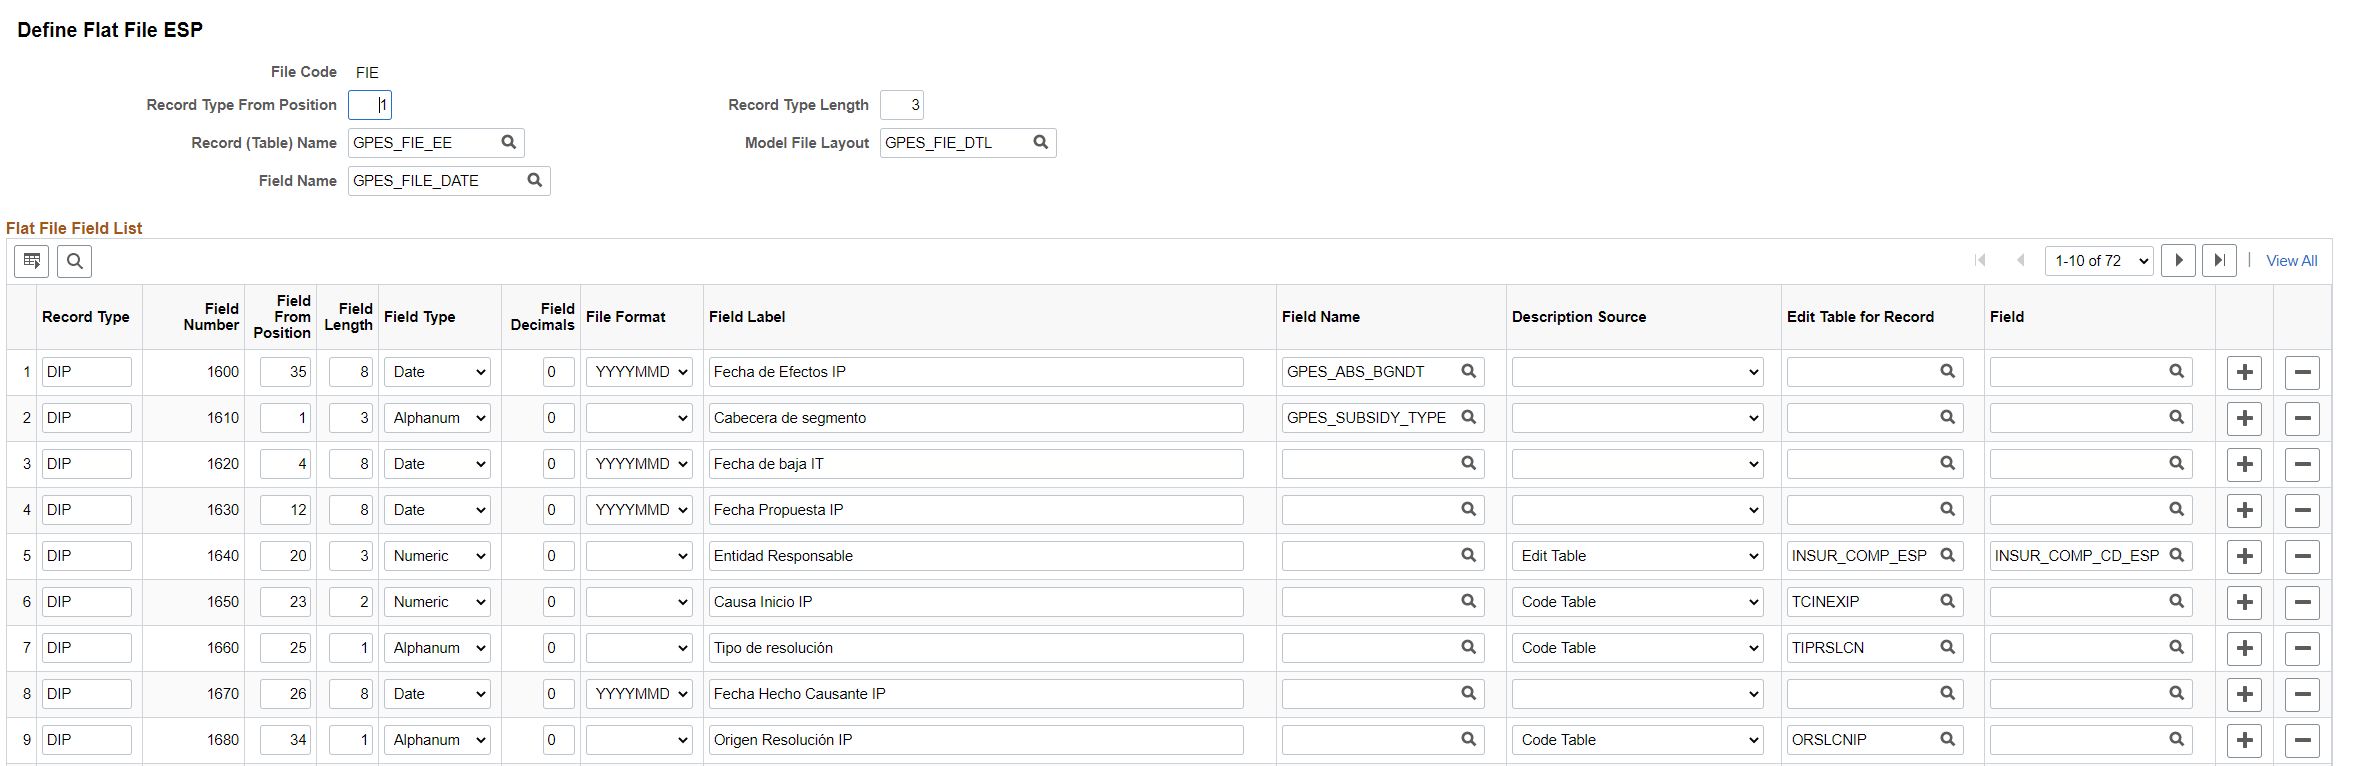
Use the Define Flat File ESP page (GPES_FLT_FILE_DEFN) to:
Define the primary record that will be filled during the loading process and will contain one row per employee and record type.
Define the secondary record that will contain whole information of the file, in the format of one row per employee/label in the input file.
Define the positions in the file that will identify the type of the record.
Navigation:
This example illustrates the fields and controls on the Define Flat File ESP page. You can find definitions for the fields and controls later on this page.
Field or Control |
Description |
|---|---|
Record Type From Position and Record Type Length |
Enter the position and length to identify the type of the record. |
Record (Table) Name |
Select the record table name. This is the primary record that will be filled during the loading process. |
Field Name |
Select the field in the primary record that will be mapped with that piece of information in the file. Note: Key field name used to delete previously loaded data. Before starting to load data for a new value, the data is deleted for such a new value from both the primary and secondary table |
Model File Layout |
Select the model file. This is the secondary record that will contain whole information of the file. |
Flat File Field List
Field or Control |
Description |
|---|---|
Record Type, Field Number, Field From position, Field Length, Field Decimals |
Enter the file details such as Record Type, Field Number, Field From Position, Field Length and Field Decimals. |
Field Type |
Select the field type. Available options are:
|
Field Format |
Specify the format if you have selected ‘Date’ as the Field Type. |
Field Label |
Enter the label of the field. |
Field Name |
Select the field name. |
Description Source |
Select the description source from the list. Available options are:
|
Edit Table for Record |
Select the record if you have selected Edit table or Code Table in the ‘Description Source’ field. |
Field |
Select the field if you have selected Edit table or Translate Value in the ‘Description Source’ field. |
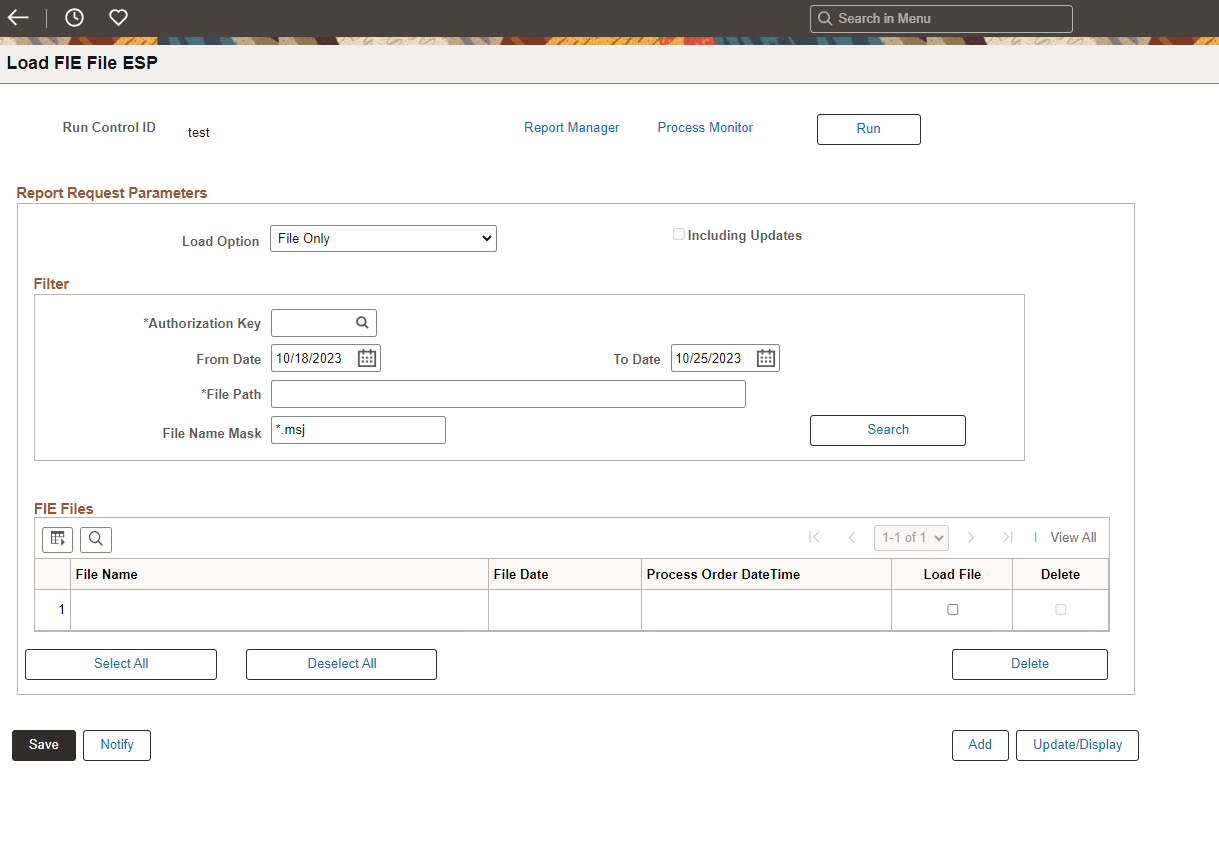
Use the Load FIE File ESP page (GPES_RC_FIE) to load the data from the FIE file. This page enables the user to load the content of multiple FIE files at once without the need to upload the files themselves. You can also delete the data previously loaded as part of clean-up process.
Navigation:
This example illustrates the fields and controls on the Load FIE File ESP page. You can find definitions for the fields and controls later on this page.
Field or Control |
Description |
|---|---|
|
Load Option |
Select the required value from the drop-down list. Values in the list are:
When the user selects ‘File and Absences’, then the field Including Updates becomes available. When 'File Only' is selected, only FIE records are populated. |
|
Including Updates |
Select this check box if you want the system to update existing absence events, with the latest information coming in the FIE file. |
Authorization Key, File Name Mask, From Date and To Date |
Select Authorization Key, Date Range and File Name Mask. |
File Path |
Enter the path to the folder that contains FIE files. Note: Ensure to copy the received FIE files in a folder that is visible from the Process Schedule. |
Search |
When you click the Search button, the system will look for the files matching the File Name Mask placed in the specified path with modified date within the range of dates that has been entered. Then for those files the system verifies that authorization key match with the one in the filter and that file date falls also in the range on dates. |
Load File |
FIE Files section lists all the files, either loaded or pending to be loaded. For the files still not loaded into the system the Load File check box will be editable. |
Delete |
Select this check box if you want to delete the content of the tables in the application that contained the data from the specific file. Delete option can be used to clean-up data that is not useful anymore, or to be able to re-load a file. |
Run |
Use the Run button to load the content of the FIE files. |
While creating or updating absences automatically during the loading process, the system generates a log file with the information about the actions performed.
Log file can be found under View Log/Trace, in the Process Monitor.
Validations
During the loading process, system performs the following validations:
For those absences supported by the standard (DIT, DOP, ITD), system checks if there is an entry in the Absence Event ESP Component for the absence type with the same begin date.
In case of absence end date informed in the FIE file, the value is compared with the absence end date in the system.
You can view the result of this validation in the Review FIE File ESP page.
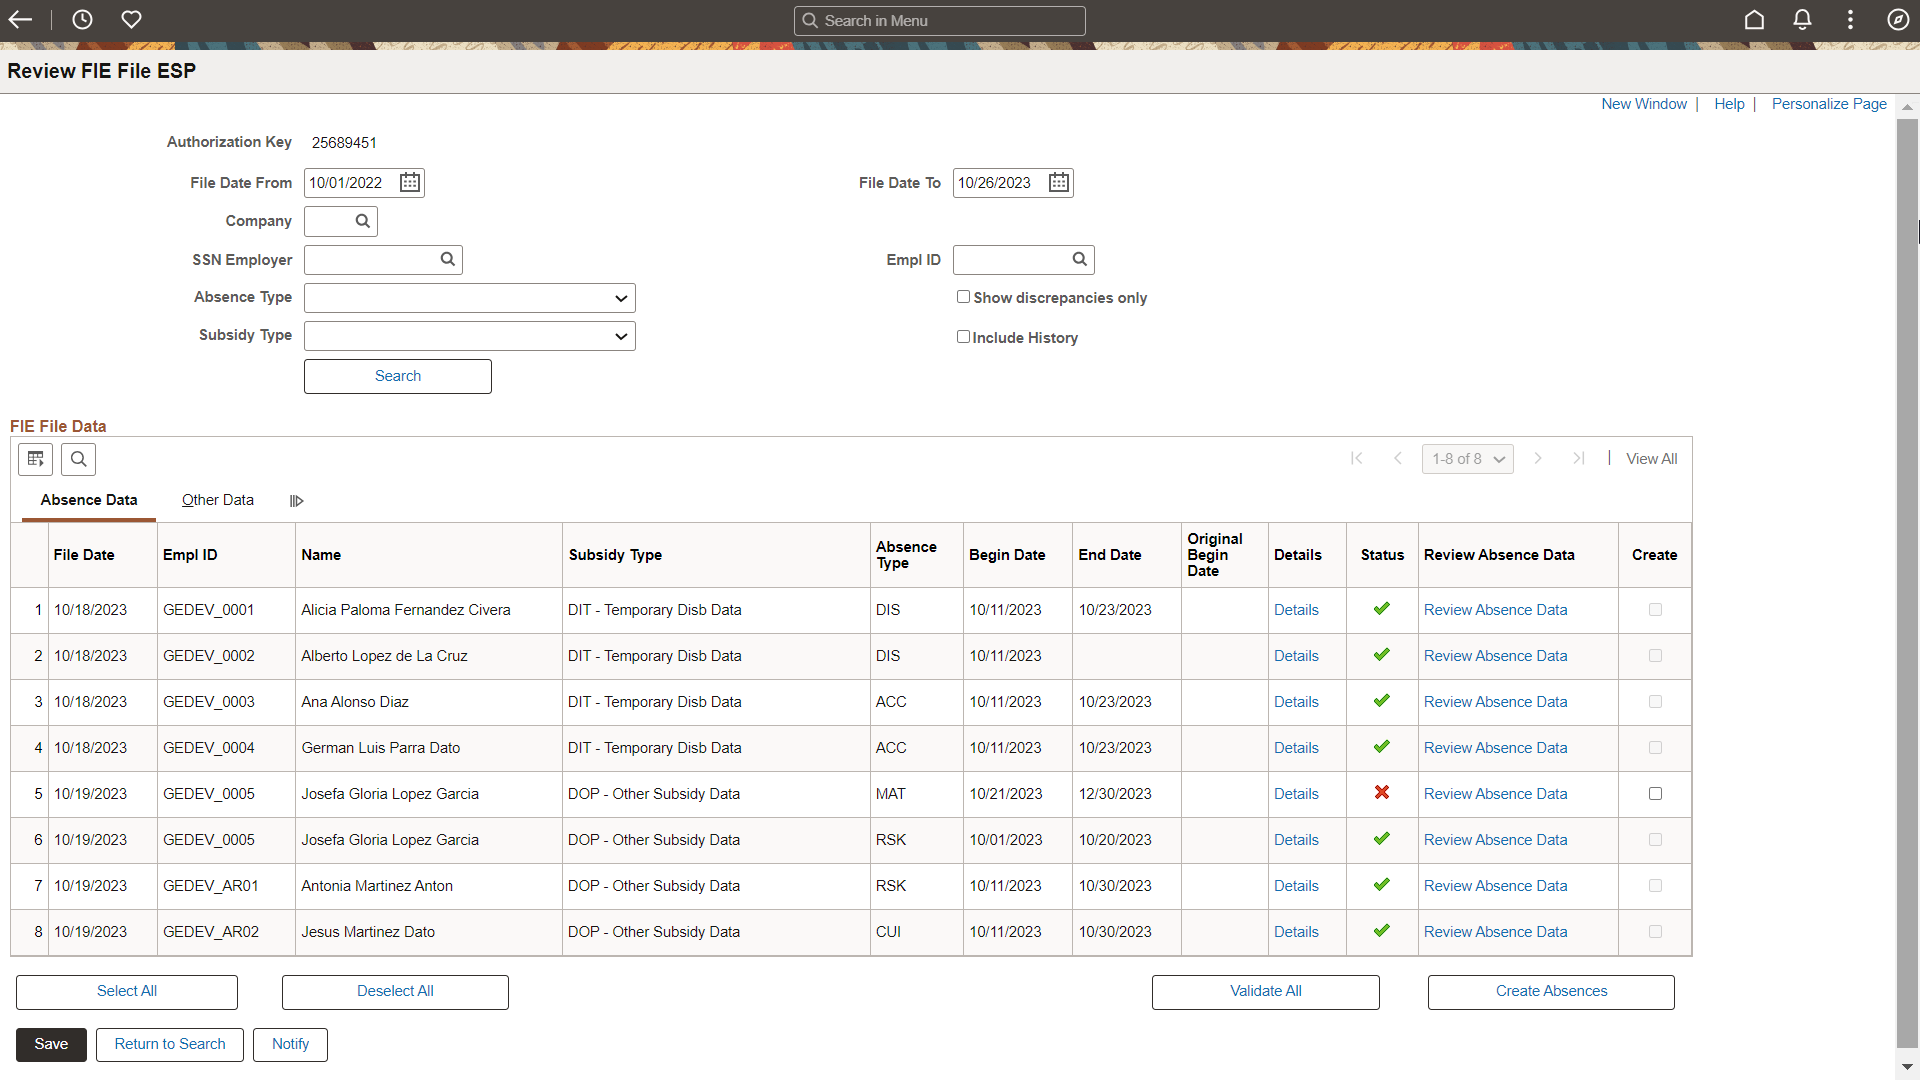
Use the Review FIE File ESP page (GPES_FIE_REVIEW) to view the content of the FIE files that are loaded into the system.
This example illustrates the fields and controls on the Review FIE File ESP page. You can find definitions for the fields and controls later on this page.
Field or Control |
Description |
|---|---|
File Date From and File Date To |
Enter the date range. |
Company, SSN Employer, Employee, Absence Type, Subsidy Type |
You can filter the data based on Company, SSN Employer, Employee, Absence Type, Subsidy Type or any data present in the file. |
Filter By Field |
Select the field based on which you want to filter the data. Note: The displayed list depends on the Subsidy type being selected. |
Filter By Field options
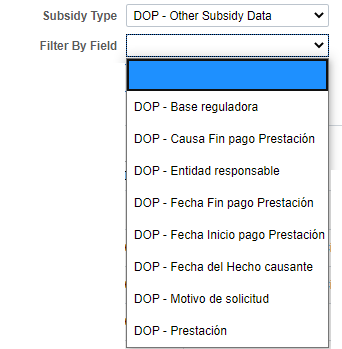
Field or Control |
Description |
|---|---|
Show discrepancies only |
You can also view those rows corresponding to absences that are not matching with the ones in the system (Absence Event ESP). To list the rows that are not matching, select the Show Discrepancies only check box. |
|
Include History |
The system will display old instances of the absence when you select Include History. |
After filtering the data, the system displays the content of primary record (GPES_FIE_EE) in the FIE File Data section.
FIE File Data
Field or Control |
Description |
|---|---|
File Date, Empl ID, Name, Subsidy Type, Absence Type, Begin Date and Subsidy |
The values in these fields are displayed based on the filters applied. Note: Absence Type identifies the type of the absence per the classification existing in PeopleSoft. Field Begin Date contains the Begin date of the absence corresponding to each subsidy as reported by Social Security. |
Details |
Use the Details link in each row to view the complete content of the corresponding FIE file record type. Click the link to open the Review Employee FIE Data page. It is also possible to review the messages populated during validation process or while creating/update absences. |
|
Status |
Validation status.
|
|
Review Absence Data |
Click this link to access the Absence Event ESP page. |
|
Validate All |
Click this button to check whether the rows displayed in the page correspond to absence events existing in the system. |
|
Create |
Select this check box to select those rows corresponding to absences not existing in the system or not matching that you want to be created. |
|
Create Absence |
Click this button to create/update the absences selected with the flag 'Create' turned on. |
 .
. .
. .
.
This example illustrates the Review Employee FIE Data page.
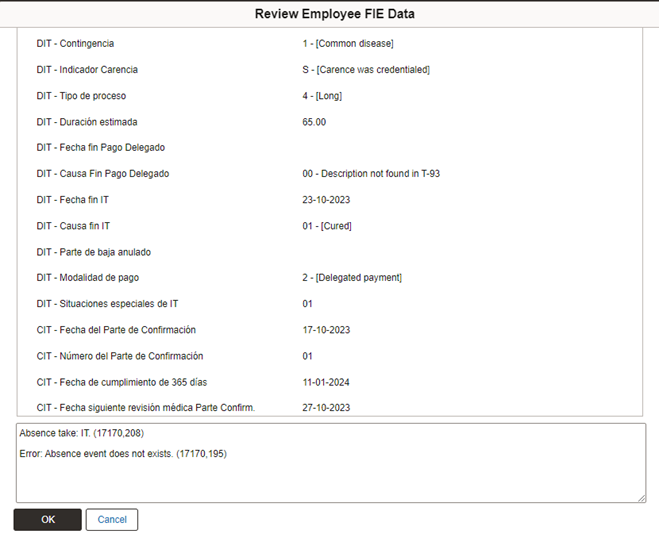
If there are any anomalies during the validation process, the system displays an error message section.