Reporting on Social Insurance
This topic discusses how to view and run social insurance reports.
The Element Contribution report defines all contributions and deductions, and the SI Company Setup report lists all employee contributions for AHV, ALV, ALVZ, and UV and other company setting.
|
Page Name |
Definition Name |
Usage |
|---|---|---|
|
GPCH_RC_AL07 |
Create a report that documents the calculation process by defining all contributions and deductions. A plus sign (+) in the report indicates that the amount is added. A minus sign (-) indicates that the amount is deducted. When there is no symbol, the value is not included in the calculation. |
|
|
GPCH_RC_SI06 |
Lists the company ID and all it's payroll relevant attributes. |
|
|
GPCH_RC_TX04_1 |
Monitors the associated accumulators and displays the payroll register. |
|
|
GPCH_RC_TX04_2 |
View payroll register elements. |
|
|
GPCH_RC_TX03 |
Lists the employee ID, date of birth, hire and termination dates, and AHV number for each employee. |
|
|
GPCH_RC_SI03 |
Lists the employee ID and all it's payroll relevant attributes. |
Use the Element Contribution List CHE page (GPCH_RC_AL07) to create a report that documents the calculation process by defining all contributions and deductions.
A plus sign (+) in the report indicates that the amount is added. A minus sign (-) indicates that the amount is deducted. When there is no symbol, the value is not included in the calculation.
Navigation:
Element Contribution List CHE page (Detail Mode)
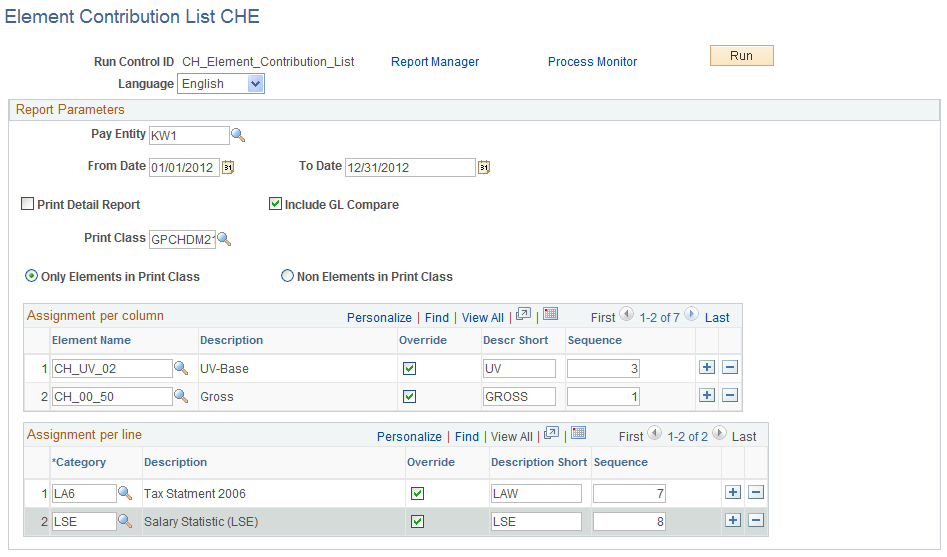
You can run the report in 2 modes:
Overview
Based on the print class and accumulators that you select on the run control page, the Overview mode displays a list of elements vertically and the list of accumulators horizontally.
Detail
If running in Detail mode, the system displays one page for each earning and deduction that was selected. The report provides information about the fixed set of accumulators (CH_AH_02, ~UV_02, ~BV_02, ~TX_02, ~NE_02, ~00_80, ~00_50, ~00_52, ~00_54, ~NE_02 ) 1), accumulators that were specified on the run control page, and accumulators identified by the entries in the Category field (LAW or LA6 / BS for release 8.9 and up)
Field or Control |
Description |
|---|---|
From Date and To Date |
Lists all contribution changes between the dates specified. |
Print Detail Report |
Select this check if you want to enter specific pay entity, print class and language information. If you select this check box, the system displays the Pay Entity, Details and Language group boxes to the right. |
Print Class |
Select a print class. The PeopleSoft system delivers two standard print classes, but you can create your own. The print class determines the set of selected contributing elements. |
Only Elements in Print Class |
Select to report only elements specified in the selected print class. |
Non Elements in Print Class |
Select to report on all existing elements. |
Assignment per column
Field or Control |
Description |
|---|---|
Element Name |
Select accumulators whose contributing components should be reported. The element name determines the set of elements contributed to and is mandatory. |
Override |
Select to optionally override the description of the selected element. You can display up to ten columns in your report and can configure the level of detail that you want to display. |
Sequence |
Enter a mandatory sequence number for the selected element's column. If you want to have the AHV/ALV contributions as the second column in your report, for example, enter sequence number2. |
Assignment per line
Field or Control |
Description |
|---|---|
Category |
Select the categories that you want the system to display on the report. |
Override |
Select to optionally override the description of the selected category. |
Sequence |
Enter a mandatory sequence number for the selected category. If you want to have the LAW category as the second line in your report, for example, enter sequence number2. |
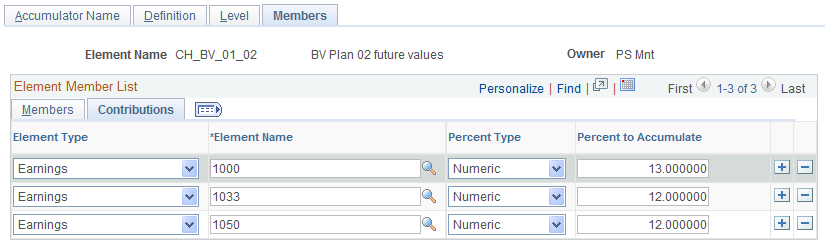
Note: Special feature for BVG_LPP
Assign accumulators in Provider Page under Insurance Plans.
Navigation:
Assign Accumulators in Provider page

Assign contributing earnings / deductions with %.
Navigation:
For example, if the earning gets paid 13 times per year, then % = 13. If payment gets paid 12 times per year then % = 12.
Assign contributing earnings / deductions with %
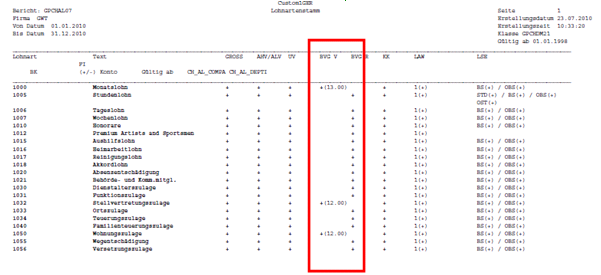
This will trigger the following specific presentation in Element contribution list.
Presentation in Element contribution list
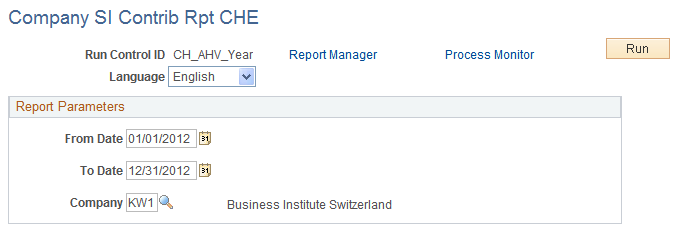
Use the Company Setup Information CHE page (GPCH_RC_SI06) to lists the company ID and all it's payroll relevant attributes.
Navigation:
Company SI Contrib Rpt CHE page
Field or Control |
Description |
|---|---|
From Date and To Date |
Enter the dates for which you want to run the report. Note: If there is any change between the From Date and To Date, the report creates a version for each period of data. |
Company |
Select the company for which you want to view payroll relevant attributes. |
Use the Payr. Reg. Options (payroll register options) page (GPCH_RC_TX04_1) to monitors the associated accumulators and displays the payroll register.
Navigation:
Payr. Reg. Options (payroll registration options) page
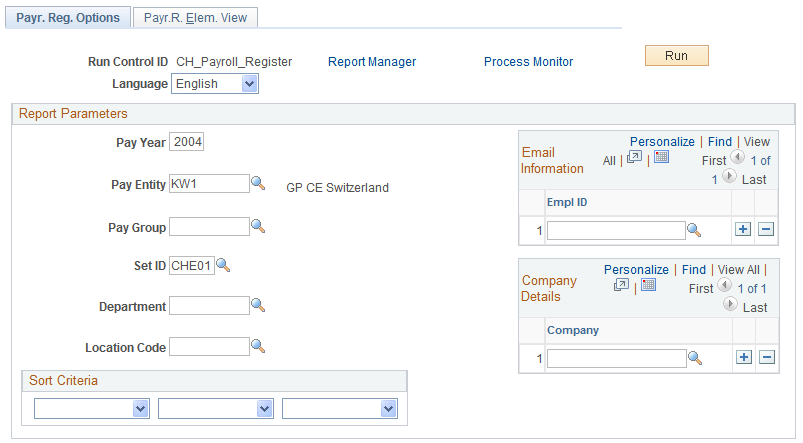
The run control for the payroll register is a two-page component, consisting of the Report Options page and the Pay Element View page. In addition to gross pay, the columns of the report might provide information about base amounts (calculation bases) for UV pay, UV base, AHV gross, AHV base, amount not subject to AHV, ALV pay and ALVZ pay, as well as the resulting payment. You define the required information on the Payroll Register Element View page.
Field or Control |
Description |
|---|---|
Pay Year |
Enter the reporting year. |
Pay Entity |
Select the pay entity that you want the system to use to run the report. |
Pay Group |
Select the pay group that you want the system to use to run the report. |
Set ID |
Select a set ID only if you want to select a department or location. |
Department |
Select the department that you want the system to use to run the report. |
Location Code |
Select the location that you want the system to use to run the report. |
Use the Payr.R. Elem. View (payroll register element view) page (GPCH_RC_TX04_2) to view payroll register elements.
Navigation:
Payr. R. Elem. View (payroll register elements view) page

Field or Control |
Description |
|---|---|
Element Name |
Select the year-to-date accumulator to report. |
Override Indicator |
Select to override the description of the selected element. You can display up to ten columns in your report. |
Element Heading |
Enter a new heading name (a new description of the element) if you select the Override Indicator for an element. |
Sequence |
Enter a sequence number for the selected element's column. If you want to have the AHV/ALV contributions as the second column in your report, for example, enter sequence number 2. |
Use the Pay Balance CHE page (GPCH_RC_TX03) to lists the employee ID, date of birth, hire and termination dates, and AHV number for each employee.
Navigation:
Balance CHE page (Print Yearly Report Selected)
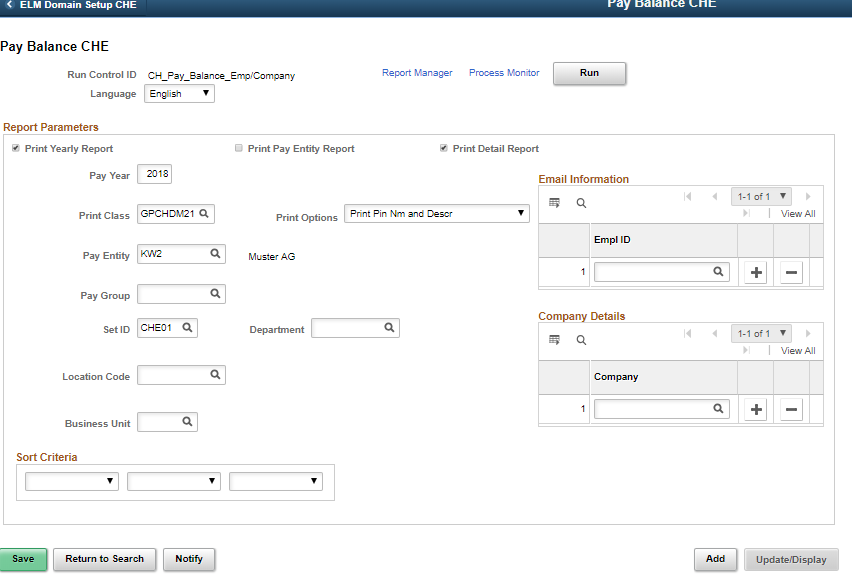
This report:
Summarizes employee contributions, which are grouped and sorted according to the specified calendar month.
Summarizes employee data for the employer on the final page.
Can be printed in two versions, one that shows all retro pay in detail and one that shows only accumulated amounts, including retro.
Field or Control |
Description |
|---|---|
Print Yearly Report |
If you select this check box, the system displays the Pay Year field. Use this to create the report for the selected year. If you deselect this check box, the system displays the From Date and To Date fields. Use these fields to run reports for a quarter or fiscal year if the dates are different from the calendar year. The from date and to date can span a maximum of 12 months, but it can also report across years (for example, from 06/01/2008 to 05/31/2009). |
Print Pay Entity Report |
Select to print only those pages that display the annual and monthly totals for a pay entity, and not all of the retro pay data for all employees that the report lists. |
Print Detail Report |
Select to print a detailed presentation of the retro results. |
Print Class |
Select the print class you require. The PeopleSoft system delivers two standard print classes, although you can create your own. Print classes for this report must not assign more than one component per selected element. Otherwise the report will have duplicates and fail. To show amounts and units of an earning, do the following on the Print Classes page: Enter the earning and select the Print Sum Amounts check box for that earning and then enter the Auto Assign element (xx_unit) and select the Print Units check box. |
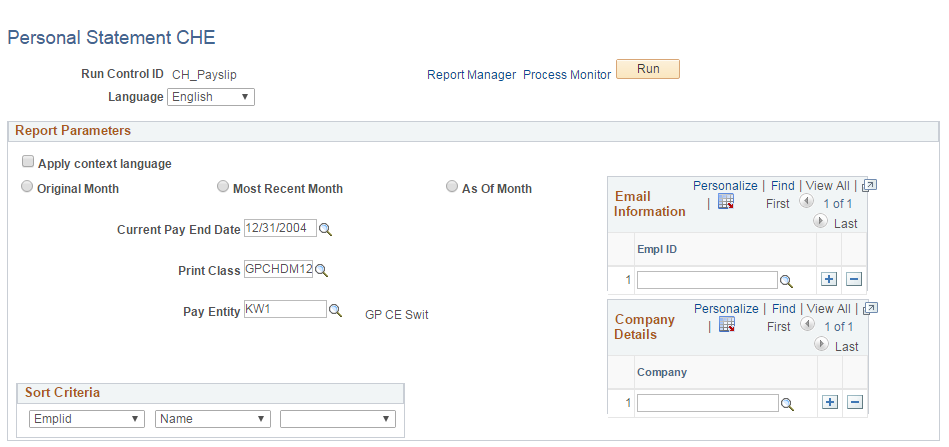
Use the Personal Statement CHE page (GPCH_RC_SI03) to list the employee ID and all it's payroll relevant attributes.
Navigation:
Personal Statement CHE page
Field or Control |
Description |
|---|---|
Language |
The Personal Statement supports the these languages: English, French, German and Italian. For languages that are not supported, the system uses the base language. |
Report Parameters
Field or Control |
Description |
|---|---|
Apply Context Language |
The statement is printed in the language of the employee. |
Original Month, Most Recent Month, and As Of Month |
Select one of these radio buttons to indicate the month you want the system to use to run the report. If you select As of Month, the system displays a second date field that you can use to indicate the required calculation month. The system displays data as of the selected generation period. The personal attributes get saved for each payroll run in case there were changes in the past. By selecting one of these options, you can track the history of data changes. For example: The date is October 2008 and you want to see data from June. There was a retro calculation in July and September for the person you selected. Their work location in June was BE originally. In July it was changed to ZH in reto with a June date. In October it was changed again in retro mode to TG. If you select June as the original month, you will see BE. If you select the most recent month, you will see TG. If you select July, August, or September as the As of Month you will see ZH. |
Current Pay End Date |
Period for the which data get retrieved |
Print Class |
Selects the earnings and deductions that display under insurance payments and base salary. |