Defining Objective Structures
This topic discusses how to define objective structures.
|
Page Name |
Definition Name |
Usage |
|---|---|---|
|
EPO_OBJ_PLAN |
Define at a high level a year or the name of a plan to which you want to link objective pages. |
|
|
EPO_SECTN_DEFN |
Define the sections that you want to include on the Objective Template Definition page. |
|
|
EPO_TMPL_DEFN |
Define the layout of the Objective pages. |
|
|
EPO_TMPL_SECTION |
Specify which sections to be included in the Objective pages and what the sections look like. |
Use the Objective Plan page (EPO_OBJ_PLAN) to define at a high level a year or the name of a plan to which you want to link objective pages.
Navigation:
This example illustrates the fields and controls on the Objective Plan page.

The Objective Plan also identifies the hierarchy method. For department hierarchies, the objective plan identifies the tree that is needed to link organizational objectives pages for a particular period to a predefined hierarchy that is created in Tree Manager.
Objective Plan Detail
Field or Control |
Description |
|---|---|
Status |
Select the status of the objective plan. The values are Active and Inactive. The default is Active. |
Description |
Enter a detailed description of the plan. |
Short Description |
Enter a short description of the plan. The systems enables you to enter a maximum of 10 characters. |
Begin Date and End Date |
Enter the beginning and ending dates of the plan. |
Hierarchy Method |
Select either Department or Position. If you select Department, the system displays a group box that allows you to enter setIDs and tree names that are associated with the department. |
Department Hierarchy SetIDs
Field or Control |
Description |
|---|---|
Set ID |
Select the set ID that is associated with the department that you want to add to the objective plan. |
Tree Name |
Select the name of the tree that is defined for that set ID. |
Use the Objective Section Definition page (EPO_SECTN_DEFN) to define the sections that you want to include on the Objective Template Definition page.
Navigation:
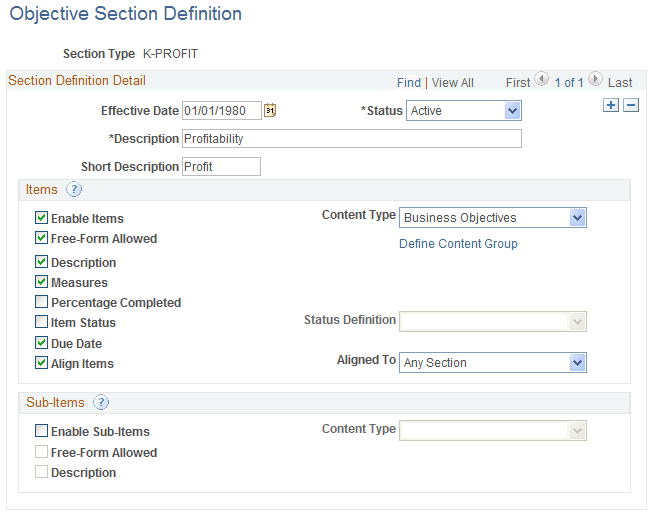
This example illustrates the fields and controls on the Objective Section Definition page.
Field or Control |
Description |
|---|---|
Effective Date |
The system defaults this field to the current date. You can, however, change the date to one that suits your business needs. |
Status |
Select the status of the objective section. The values are Active and Inactive. The default is Active. |
Description |
Enter the name of the section. The system uses this name as the default section label on the objective pages. |
Short Description |
Enter a short description of the section. The systems enables you to enter a maximum of 10 characters. |
Items
Field or Control |
Description |
|---|---|
Enable Items |
Select this check box if the section can contain items. When you select this check box, the other fields in this page region are enabled. |
Content Type |
Select the content type from which content items are pulled when defining the business objectives. Valid options are any content types defined in the content catalog in the Manage Profiles business process. |
Free-Form Allowed |
Select to enable users to add items that are not stored in the content catalog to the section when displayed on an objective page. The system assigns a unique identifier to each free-form item that is added. These items are not stored for reuse. |
Define Content Group |
Click this link to display an additional page where you can enter a content group type and content group. |
Description |
Select to enable the description that is defined for the item to appear on objective pages. |
Measures |
Select to enable the Measurement field to be displayed as an item on objective pages. |
Percentage Completed |
Select to enable the Percent Complete field to be displayed as an item on objective pages. |
Item Status and Status Definition |
Select to enable the Status field to be displayed on objective pages. When you select this check box, the system activates the Status Definition field. The system displays the prompt list names from the custom list values associated with the Item Status (EP_ITEM _STATUS) field. You can set up additional prompt lists for this field on the Custom Prompt page in Profile Management (). |
Due Date |
Select to enable users to enter a due date for items that are displayed on objective pages. |
Align Items and Aligned To |
Select to enable the Alignment functionality. If you select the Align Items check box, the system makes the Aligned To field active. Select a section from the drop down list box, or Any Section to align items to any section on objective pages. |
Sub-Items
Field or Control |
Description |
|---|---|
Enable Sub-Items |
Select to enable sub-items on the objective pages. When you select this check box, the other fields in this page region are also enabled. |
Content Type |
Select the content type (Profile Management) that will be used to obtain the sub-items. The system only displays sub-items that have a child relationship to the item content type in the content catalog. |
Free-Form Allowed |
Select to enable users to add free-form (non-coded) sub-items to this section. |
Description |
Select to enable users to have the description for the sub-item appear on objectives pages. |
Use the Objective Template Definition - General page (EPO_TMPL_DEFN) to define the layout of the Objective pages.
Navigation:
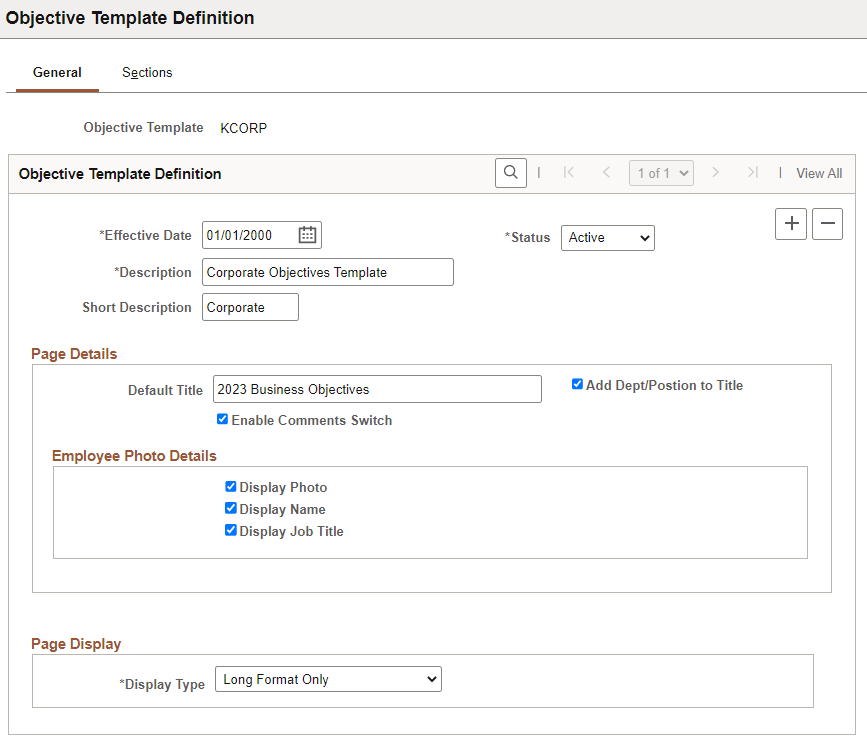
This example illustrates the fields and controls on the Objective Template Definition - General page.
Field or Control |
Description |
|---|---|
Effective Date |
The system defaults this field to the current date. You can, however, change the date to one that suits your business needs. |
Status |
Select the status of the objective template. The values are Active and Inactive. The default is Active. |
Description |
Enter the full name of the template. |
Short Description |
Enter a short description of the template. The systems enables you to enter a maximum of 10 characters. |
Page Details
Field or Control |
Description |
|---|---|
Default Title |
Select to enable a default page title to be entered on the template. When selected, the system enables the Page Title field. |
Add Dept/Position to Title (add department/position to title) |
Select this check box to append the department or position name to the title entered in the Page Title field. In the example here the page name for Corporate Accounting would be 2023 Business Objectives for Corporate Accounting. |
Enable Comments Switch |
Select to make a comments section available in the header section on objective pages. The administrator or page owner can then enter the information into this field when they are updating an objectives page. |
Employee Photo Details
Field or Control |
Description |
|---|---|
Display Photo |
Select to enable a space for a picture on objective pages. When the system renders an objective page in view-mode only, it inserts a picture of the objective page owner. Note: The setting selected for the Display Photo option on the HCM Options Page overrides the display photo setting for business objectives, which is specified here. |
Display Name |
Select to enable a space for the name of the person in the picture. The system uses the picture stored on the Employee Photo Page. |
Display Job Title |
Select to enable a space for the title of the person in the picture. |
Page Display
Field or Control |
Description |
|---|---|
Display Type |
Select how the Business Objectives page should be displayed. Values are: Note: Fluid Business Objectives only supports the Long Format Only option. Long Format Only: (default value) Page is displayed as one long document in sections and users need to scroll down to view the last section of the document. Tabs Format Only: Page is displayed in sections as represented by tabs. Toggle - Default Long: Page is displayed in long format by default and users can toggle between long and tabbed format. Toggle - Default Tabs: Page is displayed in tabbed format by default and users can toggle between long and tabbed format. If the selected display type is not Long Format Only, make sure to define tabs for use in displaying documents in the tabbed format on the Tabs page, and then specify a tab label for each section of the document on the Structure page. |
Tabs Detail
This section appears if the selected display type is not Long Format Only.
Use this section to define tab labels and display order for use when the Business Objectives page is displayed in tabbed format. You associate each section with a tab label on the Sections page. When business objectives are displayed in tabbed format, the tab with the lowest number appears first, followed by the second lowest, and so on.
Use the Objective Template Definition - Sections page (EPO_TMPL_SECTION) to specify which sections to be included in the Objective pages and what the sections look like.
Navigation:
This example illustrates the fields and controls on the Objective Template Definition - Sections page.
Sections
Field or Control |
Description |
|---|---|
Section |
Select the sections that will be used in objective pages. This drop-down list box includes all the objective sections that have been defined as of the effective date on the Objective Template page. Once you select a section, the system refreshes the page and defaults the section definition parameters into the template. The administrator can modify the parameters as needed on the template. The system does not modify the section definition when changes are made on the template. These changes affect that template only. |
Display Order |
For each section, use a number to indicate the order in which the section should be displayed on objective pages. The system displays the sections in ascending order. Therefore, the lowest number section is displayed first on the page. The default value for the first section entered should be 10. Each time you enter a new section, the system defaults the next value by incriminating the highest value by tens. |
Tab Label |
Select the tab in which this section displays on the Business Objectives page. This field appears if the selected display type is not Long Format Only. |
Items
Field or Control |
Description |
|---|---|
Enable Items |
Select this check box if the section can contain items. When you select this check box, the other fields in this page region are enabled. |
Content Type |
Select the content type from which content items are retrieved when defining business objectives. Valid options are any content types defined in the content catalog in the Manage Profiles business process. |
Free-Form Allowed |
Select to enable users to add items that are not stored in the content catalog to this section of objective pages. The system assigns a unique identifier to each free-form item that is added. These items are not stored for reuse. |
Define Content Group |
Click this link to display an additional page where you can enter a content group type and content group. |
Description |
Select to enable the description that is defined for the item to appear on objective pages. |
Measures |
Select to enable the Measurement field to be displayed as an item on objective pages. |
Percentage Completed |
Select to enable the Percent Complete field to be displayed as an item on objective pages. |
Item Status and Status Definition |
Select to enable the Status field to be displayed on objective pages. When you select this check box, the system activates the Status Definition field. The system displays the prompt list names from the custom list values associated with the Item Status (EP_ITEM _STATUS) field. You can set up additional prompt lists for this field in Profile Management (). |
Due Date |
Select to enable users to enter a due date on objective pages. |
Align Items and Aligned To |
Select to enable the Alignment functionality. If you select the Align Items check box, the system makes the Aligned To field active. Select a section from the drop down list box, or Any Section to align items to any section on objective pages. |
Sub-Items
Field or Control |
Description |
|---|---|
|
Enable Sub-Items |
When you select this check box, the other fields in this page region are enabled. |
|
Sub-Item Label |
Specify the label used to name sub-items in this section, if applicable. Note: This field applies to Fluid Business Objectives only. It becomes editable when the Enable Sub-Items field is selected. |
|
Content Type |
Select the content type (Profile Management) that will be used to obtain the sub-items. The system only displays sub-items that have a child relationship to the item content type in the content catalog. |
|
Free-Form Allowed |
Select to enable users to add free-form (non-coded) sub-items to this section. |
|
Description |
Select to enable users to have the description for the sub-item appear on the objective pages. |