Setting Up Suppliers
This section provides an overview of how to set up suppliers.
|
Page Name |
Definition Name |
Usage |
|---|---|---|
|
MERCHANTID |
Activate the supplier. |
|
|
BN_M_SUPPLIER_FTP |
Define supplier FTP parameters, such as FTP address and password, that the system needs to communicate with the supplier. |
|
|
BN_M_SCHEDULE |
Define carrier reporting schedule information that the system needs to send the correct information to the supplier. |
eBenefits integrates with eBenX, which enables companies to use eBenX benefits data management and distribution services to distribute benefit enrollment data to their benefit providers.
To set up eBenX as a supplier:
Activate eBenX as a supplier using the Merchant Profile page.
Enter the supplier's FTP information on the Define Supplier FTP Parameters page.
Create a schedule for sending data to the supplier using the Define Carrier Rpt Schedule page.
Use the Merchant Profile page (MERCHANTID) to activate the supplier.
Navigation:
Select the Merchant Enabled check box.
If this check box is deselected, you won't be able to transmit data to the supplier.
See product documentation for PeopleTools: System and Server Administration for more information.
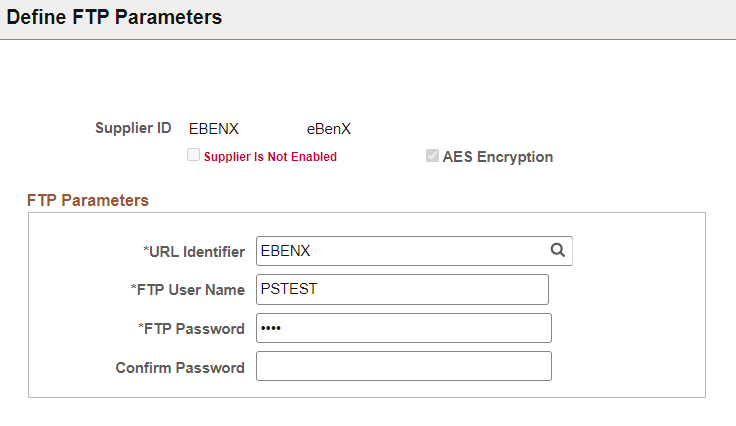
Use the Define FTP Parameters page (BN_M_SUPPLIER_FTP) to define supplier FTP parameters, such as FTP address and password, that the system needs to communicate with the supplier.
Navigation:
This example illustrates the fields and controls on the Define FTP Parameters page.
Field or Control |
Description |
|---|---|
Supplier ID |
Displays the identification number that the system assigned to the supplier when the supplier was entered in the Merchant Profile page. |
Supplier Enabled |
Select to indicate whether you can transmit data to the supplier. If you deselect this check box, you must access to the Merchant Profile page and select the Merchant Enabled check box. |
|
AES Encryption |
Select to enable AES Encryption when you transmit the eBenX interface file to the supplier. AES Encryption uses the AES 128 encryption algorithm to encrypt the FTP password. When user selects this check box, the system prompts to enter the FTP password and the Confirm Password. On save, the AES Encryption check box becomes read only. There is no option to switch to old encryption. Note: This option is available from PeopleTools 8.60 and above. |
FTP Address |
Enter the supplier's FTP address. |
FTP User Name |
Enter your logon name. The eBenX representative will provide this information. |
FTP Password |
Enter the password that is assigned to you to access the supplier's site. The eBenX representative will provide this information. |
Use the Define Carrier Rpt Schedule page (BN_M_SCHEDULE) to define carrier reporting schedule information that the system needs to send the correct information to the supplier.
Navigation:
This example illustrates the fields and controls on the Define Carrier Rpt Schedule page.

Field or Control |
Description |
|---|---|
Schedule ID |
Displays the unique identification code that is assigned to this schedule. It can be up to six characters long. |
Company |
Enter the name of your company. This information is included in the header section of the files that are sent to the supplier. |
Supplier ID |
Select the supplier ID from the list of valid options. |
File Name |
The name of the file sent to the supplier. You can create your own name or have the system generate a name for you. When creating your own name, make sure that it is a name that helps you easily identify the contents. If you run the Carrier Interface Schedule process more than once using the same name and directory, a sequence number is placed in front of the file name. For example, if you send a file with the name eBenX twice, the first and second file names will be eBenX.txt and 2eBenX.txt, respectively. To have the system generate a name, leave File Name blank and select Auto Generate File Name. |
Auto Generate File Name |
Select to create a file name for yourself. When you select this check box, the File Name field becomes unavailable for entry. The system creates the name using the following format: <Schedule ID name>_YYYY-MM-DD-HH.MM.SS.txt. |
Resend a file created from this schedule |
This link appears only if a file was created by this schedule. Click it to display the Resend File page. |
File Directory |
Enter the name of the directory located on the application server where the extract file is to be stored. |
Extract Parameters |
This group box enables you to select only the information that you want to extract from the BN_SNAP files for this supplier. You can enter more than one row of parameters. |
Set ID |
If you want enrollment information for a specific setID, select a setID from the list of available options. You must enter at least one setID. |
Vendor ID |
If you want enrollment information for a specific benefit provider, select a vendor ID from the list of available options. If you want information for all benefit providers, leave this field blank. |
Plan Type |
If you want enrollment information for a specific benefit plan type, select a plan type from the list of available options. If you want information for all plan types, leave this field blank. |