Setting Up the Transaction Registry
Use the Register Transactions component to register an approval transaction. The transaction definition is the metadata that describes the transaction setup to the Approval Framework.
Note: Oracle PeopleSoft delivers Notification Composer framework to manage the setup and administration of all notifications in one central location. Once you have adopted the Notification Composer feature, you must use it to create new notifications and manage your existing notifications. For more information about Notification Composer, see Understanding Notification Composer.
|
Page Name |
Definition Name |
Usage |
|---|---|---|
|
EOAW_TXN |
Register the approval transaction. |
Use the Register Transactions page (EOAW_TXN) to register the approval transaction.
Navigation:
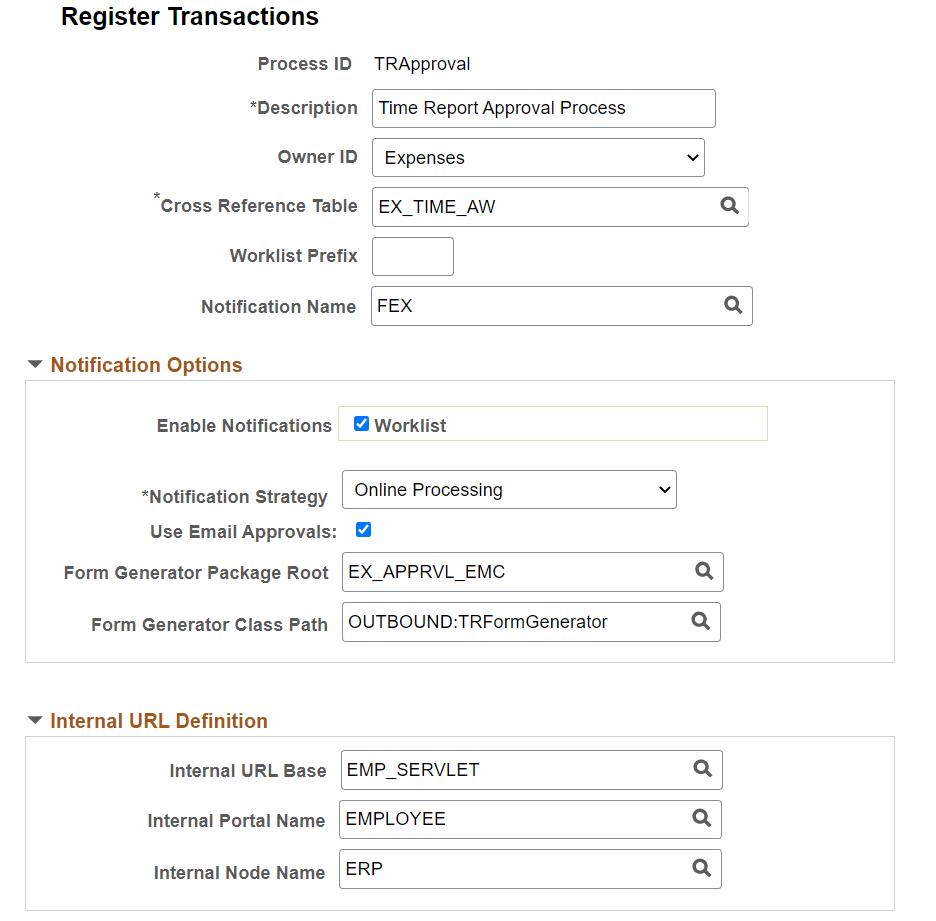
This example illustrates the fields and controls on the Register Transactions page (1 of 3). You can find definitions for the fields and controls later on this page.
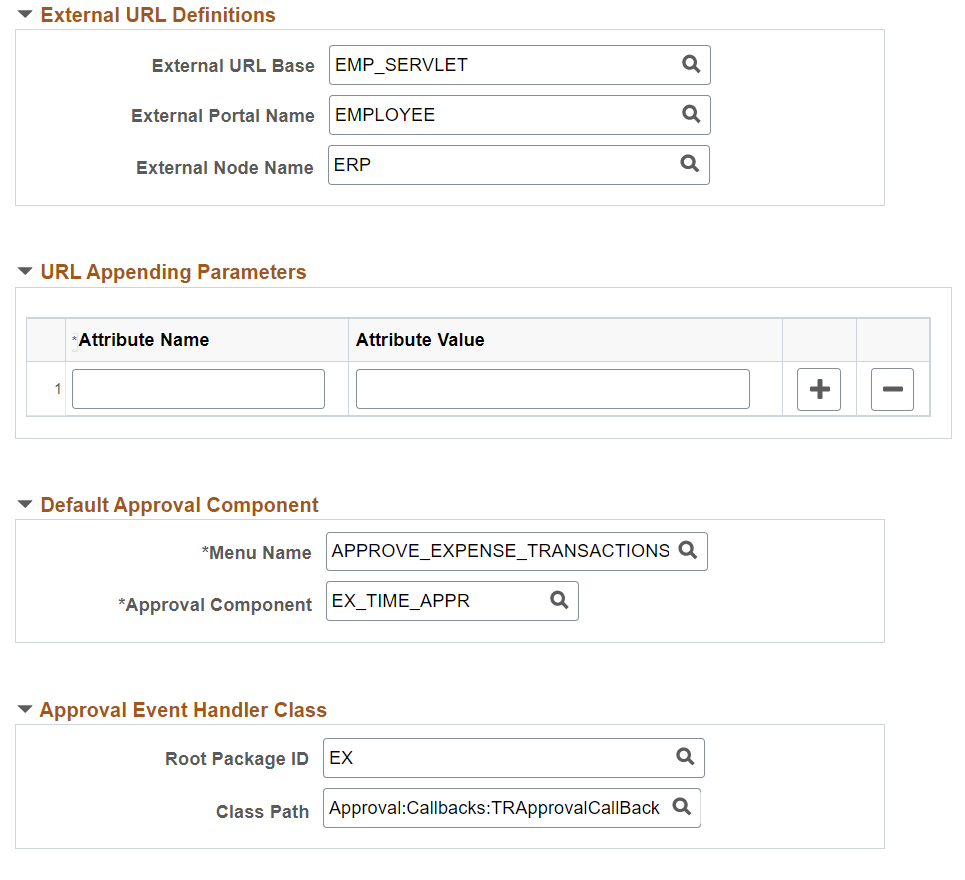
This example illustrates the fields and controls on the Register Transactions page (2 of 3). You can find definitions for the fields and controls later on this page.
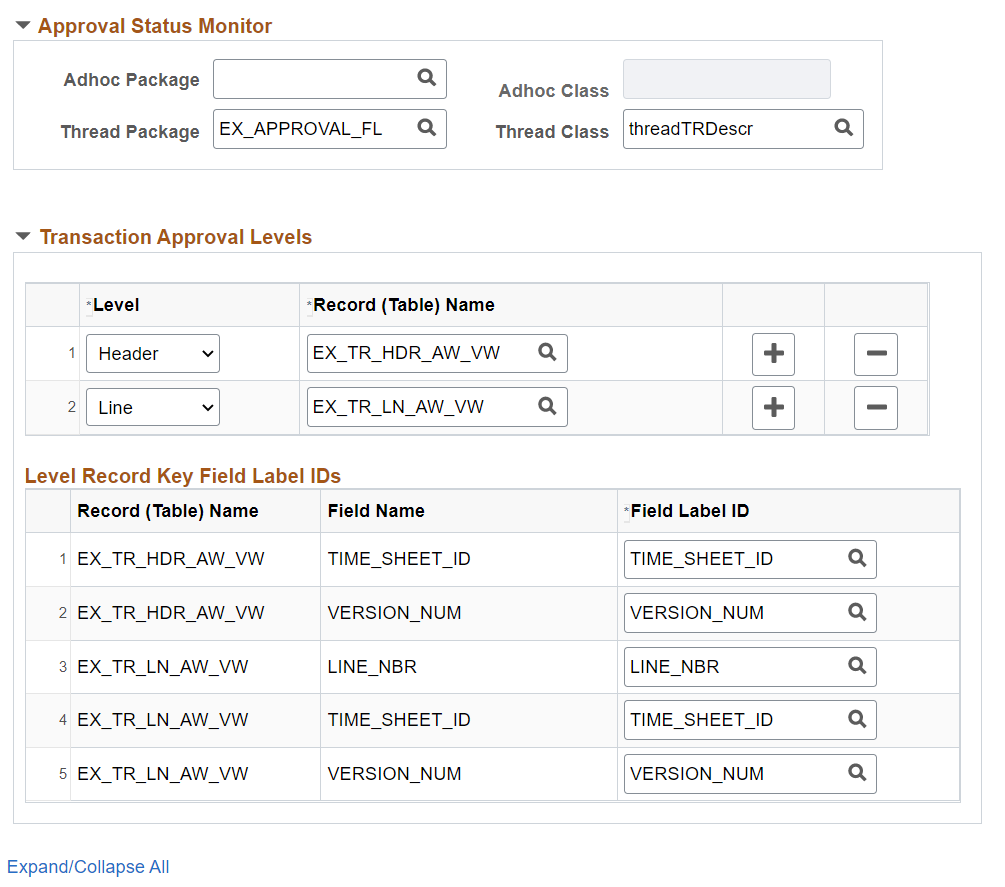
This example illustrates the fields and controls on the Register Transactions page (3 of 3). You can find definitions for the fields and controls later on this page.
Application developers use this page to register a PeopleSoft application, such as eProcurement or job offer, with the Approval Framework. Using this page, you can define how the system interacts with portions of the application that you have defined for approvals. The transaction definition is the metadata which describes the transaction make up to the approval framework. In some cases, you might add a transaction to enhance an existing transaction or make changes to a transaction.
Use this page to define:
Worklist approvals.
Approval event handler class.
Transaction approval levels.
Email notifications.
Ad hoc approver class logic.
Field or Control |
Description |
|---|---|
Process ID |
Enter a name the system uses to track this Approval Framework process for a transaction. You can also enter a description for the approval process. |
Object Owner ID |
Select the PeopleSoft application to which this object belongs. |
Cross Reference Table |
Select the table used to manage application specific transaction records and associate them with the approval process run time instances. Each time a request launches an approval process, the system tracks the process by the header and line-level records of the application. To relate the approval process instance to the transaction instance, the cross-reference table holds the correspondence. For a given application transaction record, this cross-reference information helps you determine the pending Approval Framework process and to define to the application which transaction is being approved or denied. Application developers must create a record containing the applications keys, and include the Approval Framework-supplied subrecord EOAW_XREF_SBR. Developers must also build the underlying table. |
Worklist Prefix |
Enter a prefix to identify the worklist to a specific application. Every application using the Approval Framework shares the same business process and activities, which can cause a problem identifying specific worklist instances. This prefix will allow worklists to be sorted by application. The prefix should be used:
|
|
Notification Name |
Select the Notification Name from the available options. The Notification Name maps the notification preferences like the notification channels and personalization configured at the PeopleTools level. For more information on configuring notification names, see product documentation for PeopleTools: Creating Push Notification Events Note: The notification name defined in the event level overrides the PeopleTools notification name given in the approval transaction level. Note: This field is not visible when you adopt the Notification Composer feature. For more information on Notification Composer, see Understanding Notification Composer |
Notification Options
Identify the notification option or the combination of notification options you will be using.
Field or Control |
Description |
|---|---|
Enable Notifications |
Select the Worklist check box to use the worklist notification. |
Notification Strategy |
It allows the email to be processed immediately (Online Processing) or offline (Offline Processing) through NEM (Notification and Escalation Manager). Note: Offline Processing does not work for Email approvals. |
Use Email Approvals |
Defines that you are going to use email approvals with workflow. |
Form Generator Package Root |
This package root reads the threads provided by the Form Generator Class, and creates a form from an existing email collaboration definition. |
Form Generator Class Path |
Calls the From Generator Class which receives a list of threads to be approved and a language code. This class returns a runtime class, which will add the appropriate recipients and send the emails. |
Internal URL Definition
Use this section to define the internal URL to identify the URL base, portal and node. Internal URL is used to send email to a user either in batch or Integration Broker process. When the process is run online, the built-in properties %Portal and %Node are used.
External URL Definition
Use this section to define the external URL to identify the URL base, portal and node. External URL is used to notify any step that has a been set to External.
Default Approval Component
Identifies the default component that users should go to when selecting a worklist entry.
Field or Control |
Description |
|---|---|
Menu Name |
Select the menu name that contains the component you want to register for the Worklist. |
Approval Component |
Select the component on which the approval is going to be based. |
Approval Event Handler Class
Use this section to define the application class used to monitor events for this transaction. Each time an event occurs, the Approval Framework notifies the application. For applications to receive the notifications, application developers must extend the event handler class, ApprovalEventHandler.
When a transaction results in an action from the Approval Framework, the event handler class you specify how to proceed with the transaction.
The event handler base class defines the handler methods that you can override by extending classes. The extending class must have a no-argument constructor, since the system instantiates the class with no arguments.
This table explains some of the various event handler methods for which the system passes arguments to provide the specific context for each event, and gives examples of how an application, in this case PeopleSoft eProcurement, may act:
|
Event |
Parameters |
Possible Application Actions |
|---|---|---|
|
PROCESS_LAUNCHED |
|
|
|
HEADER_DENIED |
Header record |
|
|
LINE_DENIED |
Line-level record |
Deduct the line amount from the header, and delete or otherwise deactivate the line item. |
|
HEADER_APPROVED |
Header record |
|
|
LINE_APPROVED |
Line level record |
Source the line item if it's configured for sourcing. |
|
PROCESS_TERMINATED |
Header record |
Log the event on the application, possibly highlighting changes since the previous submission. This might be useful for approvers who acted on the previous submission of this request. |
|
ALL_LINES_PROCESSED |
Header record |
Note: The system calls this method only if the last stage is at the line-level, and the analyst has configured the process to trigger LINE_APPROVED end calls as individual lines are approved. The action the system takes depends on how the application developer defines the line sourcing. If the lines are sourced as they are approved, then nothing has to be done when all the lines are processed. This event is distinct from HEADER_APPROVED, and having a distinct notification simplifies the process. |
Field or Control |
Description |
|---|---|
Root Package ID |
Select the parent application class through which events are exposed. This defines the action to take based on events. |
Path |
Select a path that uses a specific class within the root package. |
See PeopleTools: PeopleCode Developer's Guide
Approval Status Monitor
Use this section to control how the system processes ad hoc approvers. Any approver can add or remove ad hoc approvers.
Field or Control |
Description |
|---|---|
Adhoc Package |
Select the ad hoc application class package that you want to use for ad hoc approvals. |
Adhoc Class |
Select the ad hoc application class path. Adding approvers and reviewers is handled by the class you define here. If no class is specified, then the system default class is used. If the transaction has further restrictions an application developer needs to create a class that will be defined here. |
Thread Package |
The package here defines how the transaction details are displayed in the system in the status monitor. Behind the scene approvals are defined with a sequence number, this allows for a user friends display. Important! Leave this field blank if the transaction is set up on the Configure Transactions page to send notifications to participants with a URL pointing to an alternate page other than the default destination (as specified in the Events section). For example, you might configure the transaction to generate a URL within each notification that takes an approver to the default component page to approve or deny any given request, and generate another URL for other participants to access a separate page (as specified for that group of users in the Notifications section) and perform other actions pertaining to the request. To ensure that the URLs are created correctly for all approval participants, do not enter a thread package. |
Thread Class |
Enter the specific class within the thread description package and the worklist description that sets the display details. |
Transaction Approval Levels
Use this section to define if the transaction is to be approved at the header or line level and what level the application supports.
Field or Control |
Description |
|---|---|
Level |
Select Header or Line, which determines the levels that are enabled by the application for approvals. The first row will always be the header level. |
Record (Table) Name |
Select the database table that represents this transaction level. |
Level Record Key Field Label IDs |
Use this section to identify the label IDs that are used when viewing the Monitor Approvals page. All key field names appear for each record (table) name that is listed. |