 Understanding Extended Absences
This chapter provides an overview of extended absences and discusses how to:
Set up configurable sections for extended absences
Set up extended absences
Request extended absences
Manage extended absences
Enter extended absences
Understanding Extended Absences
This section provides an overview of:
Attachments in extended absences
Configurable sections in extended absences
The Absence Management self service framework supports extended leave requests, such as FMLA (Family Medical Leave Act) and Canadian Leave requests, as well as other extended absences such as Statutory Sick Pay and Statutory Maternity Pay, and so on. The framework for extended absences contains elements that enable you to attach supporting documents and notes to extended absence requests. In addition, the framework provides a mechanism to enable you to implement eligibility validations rules at different levels, for example country, state, customer, and so on, without having to customize PeopleSoft components.
 Understanding Attachments in Extended Absences
The attachment feature enables you to attach files to a PeopleSoft Enterprise application. An administrator can add URLs or common files to a component or page. Attachments include PDF files, spreadsheet files, document files, URLs, and so on. You can also define the types of attachments that users can add to a specific row of application data, such as medical or adoption certificates, fitness for duty forms, and so on.
Although the types of attachments you can add to a page are essentially unlimited, attachments are categorized as one of the following:
Attachments are any previously created electronic file that the administrator wants users to be able to download.
URLs are links to dynamic files or web sites.
Notes are free-form text that the user can enter through the attachment framework page in the PeopleSoft application.
Note. Only attachments and URLS are defined on the Define Attachments page. Notes are created by the user through the attachment pages of the PeopleSoft application.
Note. The Define Attachments page enables an administrator to create document definitions, as well as attachments and URLs. Document definitions are types of files that users can upload to the system. For example various medical certificates or evidence of class completion.
Adding Attachments to Extended Absences Process Flow
Here are the steps for defining attachments within the attachment framework for PeopleSoft Absence Management:
Define Authorization ID
These IDs provide users with security authorizations for accessing attachments, such as the ability to create, update and delete attachments.
Define Authorization Entry ID
The Authorization Entry IDs enable you to attach Authorization IDs to planned attachments, notes, or URLs.
Note. The description you enter in for an Authorization Entry ID defines the name of the link as it appears to users on the Extended Absence Request page.
Define Configuration ID
The Configuration ID links Authorization Entry IDs and defines whether an attachment is a downloadable file, a document the user uploads, or a link to a URL.
Define Object Owner ID
Object Owner IDs define where links appear on the Extended Absence component. For extended absences, use the HGA Object Owner ID for Absence Management, and associate your Configuration ID's with the Absence Element Context Key.
The following graphic shows the process flow for adding attachments to extended absences:
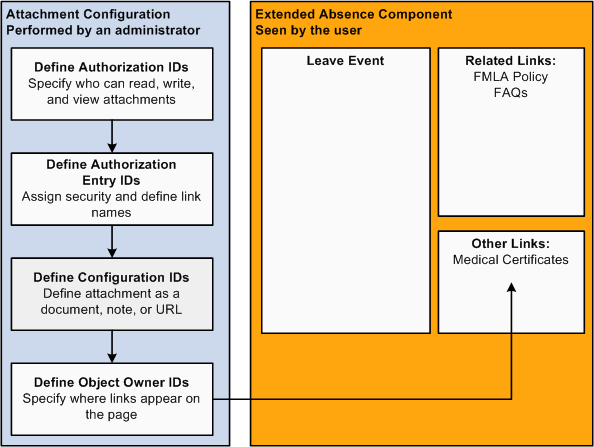
Adding attachments to extended absences process flow
Example: Defining Authorization IDs
Use the Authorization ID to provide a variety of security authorizations to users regarding the ability to read, write, or view attachments.
For example, the authorization ID K0W_EDITALL has the Edit Attachments, Edit Notes, and Edit URLs check boxes selected. This means that roles with the K0W_EDITALL authorization ID can edit all attachments, notes, and URLS.
The following graphic displays the Define Authorization page (Set Up HRMS, Common Definitions, Attachments, Define Authorization, Define Authorization), with the K0W_EDITALL Authorization ID.
See Defining Attachment Authorizations.
Example: Defining Authorization Entry IDs
Use the Authorization Entry IDs to attach Authorization IDs to each of the planned types of attachments, notes, and URLs.
For example, in the following graphic, the K0W_EDITALL Authorization ID on the Define Authorization Entries page (Set Up HRMS, Common Definitions, Attachments, Define Authorization Entries, Define Authorization Entries) is associated with two roles in the Medical Certificate Authorization Entry ID. This allows the manager to view attachments or notes, and the AM EA Administrator and the employee can add, edit, or delete attachments or notes related to the medical certificate.
See Defining Authorization Entries.
Example: Defining Configuration IDs
The Configuration ID defines whether an attachment is a downloadable file, a document the user uploads, or a link to a URL.
On the displayed Define Attachments page (Set Up HRMS, Common Definitions, Attachments, Define Attachments, Define Attachments), the K0W_MEDCERT_LINK Configuration ID describes the Medical Certificate attachment. This attachment uses the Document Definition attachment type, which enables the user to upload word processing documents, PDF files, spreadsheets, and so on.
Note. The contents of the Description field define the title of the link that appears in the Extended Absence component.
See Defining Attachment Configuration IDs.
Example: Defining Object Owner IDs
The Maintain Definitions page (Set Up HRMS, Common Definitions, Attachments, Maintain Definitions, Maintain Definitions) defines where the links to attachments appear in the Extended Absence component. In the following graphic, the Attachments region of the page indicates that the K0W_MEDCERT_LNK Configuration ID is set up to appear in the Other Links region of the Extended Absence component.
Example: Reviewing Extended Absence History
The Extended Absence Request Details page (click the link in Absence Name field on the Extended Absence Request History page) shows the user details about an extended absence request. Any defined attachments appear in the Related Links or the Other Documents regions. The bottom of the Extended Absence Request Details region displays any links to configurable sections.
See Managing Extended Absences.
See Also
Enterprise PeopleTools PeopleBook: PeopleCode Developer's Guide
Enterprise PeopleTools PeopleBook: PeopleCode API Reference
Understanding Configurable Sections in Extended Absences
The configurable sections functionality in extended absences is a template-based process. The templates are created and configured by a template administrator. The template administrator determines the sections, or logical groupings of fields, that are included in the template and the sequence of sections and fields within sections. The administrator also sets default values for fields, determine which fields can be edited, and which fields are hidden or display-only.
A configurable section is a set of additional fields and controls that enables you to customize data tracking. You can create your own customized pages and link those pages to the core self service pages. You can create your own customized code using the Absence Management Event Handler technology. Configurable Sections enable you to associate user defined records to an extended absence.
Note. The record should have the same key-structure as the main record GP_ABS_EA having EMPLID, EMPL_RCD and TRANSACTION_NBR as key.
Process Flow for Setting up Configurable Sections
Setting up configurable sections in extended absences consists of the following steps:
(Optional) Create rules using Global Payroll to store elements that involve extended absence eligibility.
For example, brackets store information for Federal and State rules, such as the number of weeks allowed for FMLA, or a rollover transaction method versus a fixed transaction method.
(Optional) Create an application class.
The application class must contain the necessary PeopleCode, SQL, and so on, to check for extended absence eligibility. For example, balance and availability is calculated using SQL.
Set up the record definition.
Record definitions identify the necessary records and fields.
Set up the section definition.
The identified records and fields are combined into a section.
Define the template.
The template combines each of the previously defined components into the configurable section seen by the user.
The following graphic illustrates the process flow for setting up configurable sections in extended absences:
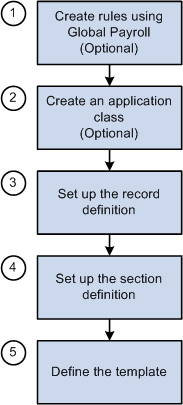
Process flow for setting up configurable sections
Example: Setting Up a Record Definition
The following examples guide you through the process of setting up a configurable section. The examples demonstrate the set up using the delivered FMLA eligibility configurable section.
The configurable section in this example is based on the GP_ABS_FMLA_ELG Setup Record Definition. The Setup Record Definition page enables you to specify the necessary record and fields in your configurable section.
Example: Setting Up Section Definitions
Records and fields are combined into the section using Setup Section Definition page.
Note. In order for the application class code to work, the value in the Method Name field must be checkEligibility
Example: Defining the Template
The template combines each of the previously defined components into the configurable section seen by the user.
The Template Definition - Sections page enables you to combine the defined sections into an application page that users can access.
Warning! Clicking the Load/Reload Sections button after the section has already been loaded wipes out any existing section fields. You must then manually reenter the section field information.
The Template Section Configuration page enables you to specify the section label, the alignment of field labels, and the default value of each field in the configurable section.
Example: Viewing the Configurable Section
Access the Request Extended Absence page and locate the link to the configurable section, which is labeled as FMLA Eligibility in the following screenshot.
The configurable section page displays the fields and information specified on the pages specified in the configurable section set up process flow.
Setting Up Configurable Sections for Extended Absences
This section discusses how to:
Set up record definitions.
Set up section definitions.
Configure fields in template sections.
Enter template identification information.
Define template sections.
Configure template sections.
Define section field default values.
Pages Used to Set Up Configurable Sections|
Page Name |
Definition Name |
Navigation |
Usage |
|
Setup Record Definition |
GP_ABS_RECDEFN |
Set Up HRMS, Product Related, Global Payroll & Absence Management, Absence Management, Setup Record Definition, Setup Record Definition |
Identify the records and fields used in the extended absence template. |
|
Setup Section Definition |
GP_ABS_SECDEFN |
Set Up HRMS, Product Related, Global Payroll & Absence Management, Absence Management, Setup Section Definition, Setup Section Definition |
Combine records and fields into sections for use in the extended absence template. Select the fields and the order in which fields appear in a section. |
|
Template Section Field Configuration |
GP_ABS_SECDTL` |
Click the Field Configuration link on the Setup Section Definition page. |
Define the display and edit options per field. |
|
Template Definition - Template |
GP_ABS_TEMPL_DEF |
Set Up HRMS, Product Related, Global Payroll & Absence Management, Absence Management, Template Definition, Template |
Enter template identification information. |
|
Template Definition - Sections |
GP_ABS_TEMPL_DEF |
Set Up HRMS, Product Related, Global Payroll & Absence Management, Absence Management, Template Definition, Sections |
Combine sections into a page in the extended absence feature. |
|
Template Section Configuration |
GP_ABS_TMPL_FLDS |
Click the Section Configuration link on the Template Definition - Sections page. |
Define the section field properties. Specify whether certain fields are required, display-only or hidden. You can also enter default values. |
|
Section Field Default Value |
GP_ABS_TMPL_FLDC |
click the Edit button on the Template Section Configuration page. |
Specify the default value of record fields in a section. |
Setting Up Record Definitions
Access the Setup Record Definition page (Set Up HRMS, Product Related, Global Payroll & Absence Management, Absence Management, Setup Record Definition, Setup Record Definition).
|
Record Alias |
Enter an alternate name for the table, the default value is the record name. Using an alternate name enables you to differentiate between different instances of the same record. |
|
Key Field |
This field displays the status of the selected field as a key field at the system level. |
|
Required |
Select to indicate that the selected field is required for your business process. You cannot change the setting here for fields that are defined as required fields at the system level. |
|
Add Field |
Click to add a new row to the group box. You can only select fields that are valid for the specified record. |
|
Add All Fields |
Click to add all of the available fields from the specified record. |
Setting Up Section Definitions
Access the Setup Section Definition page (Set Up HRMS, Product Related, Global Payroll & Absence Management, Absence Management, Setup Section Definition, Setup Section Definition).
|
Sequence Number |
Enter a number to determine the order of sections on the data entry page |
|
Application Class Path |
Select an Application Class Path based on the Application Packages defined within the Application Designer. |
|
App Class ID(Application Class ID) |
Select an Application Class from the selected Application Class Path. |
|
Method Name |
Enter the executable method defined in the Application Class to trigger the validation of the configurable section. |
Section Fields
|
Record Alias |
This refers to the field defined in the Record Definition. An alternate name for the table, the default value is the record name. |
|
Field |
The Record Field included on the page as part of the section. |
|
Field Configuration |
Click to access the Template Section Field Configuration page |
Configuring Fields in Template Sections
Access the Template Section Field Configuration page (Click the Field Configuration link on the Setup Section Definition page.
|
Display Type |
Select to choose the display type of the field. Values are: Short Edit Box, Long Edit Box, Long DropDown, Short DropDown, Short Prompt, Long Prompt, CheckBox, Date. |
|
Prompt Table |
Displays the name of the prompt table or substitution variable from the PeopleTools Record Definition table. This value can be modified. |
|
Prompt Field |
Enter the field used on the prompt table to select the value. |
Entering Template Identification Information
Access the Template Definition - Template page (Set Up HRMS, Product Related, Global Payroll & Absence Management, Absence Management, Template Definition, Template).
|
Show Comments On All Pages |
Select to show the comments as additional information on the Configurable Sections page within an extended absence. |
Defining Template Sections
Access the Template Definition - Sections page (Set Up HRMS, Product Related, Global Payroll & Absence Management, Absence Management, Template Definition, Sections).
|
Section Configuration |
Click to access the Template Section Configuration page for the specified section. |
|
Load/Reload Sections |
Click to load the template sections from the template section setup table. |
Configuring Template Sections
Access the Template Section Configuration page (Click the Section Configuration link on the Template Definition - Sections page)
|
Section Label Type |
Select the method used to choose the content of the section label in the specified template. Different fields in the Section Label region are available for entry depending upon the chosen Label Type. The following list describes the effect of choosing each Label Type on the Section Label region:
|
|
Message Set Number and Message Number |
Message sets and number settings come from the PeopleTools message set catalog. Select the message set and message number that you want to appear as the section label. You can select from the messages defined in the database. These fields are only available if you select the Use Message Catalog option in the Section Label Type region. |
|
Sub ID and Text ID |
Select the Text ID and Sub ID for the text catalog message you want to display as the section label. These fields are only available if you select the Use Text Catalog option in the Section Label Type region. |
|
Label |
Enter the text you want to appear as the section label. This field is only available if you select the Use Static Text option in the Section Label Type region. |
|
Hide Entire Section |
Select to specify that this section is hidden from the user. For example, if certain information needs to be loaded into the buffer to support the validation, but does not need to be displayed. |
|
Field |
The Record Field selected in the section. |
|
Alignment |
Select the desired location of the field on the extended absence pages. You can specify that the field appears on the left or right side of the page, or indicate that the system should select the location, based on the available space. Values are: Left, Right, and Auto. |
|
Field Label |
Displays the field label used on the configurable page. |
|
Default Value |
The value that initially populates the record field. |
|
Required |
Defaulted from the Template Section Field Setup Table; can be overridden by the Template Administrator, but only if the default is No. A field required by definition of PeopleTools must remain required. However, a field that is not required by definition, can be made required on the template. |
|
Override |
Select to specify that the end user can enter or override the value of the specified field. |
|
Hide |
Select this field to hide the specified field from the end user. |
|
Edit |
Click to access the Section Field Default Value page. |
Defining Section Field Default Values
Access the Section Field Default Value page (click the Edit button on the Template Section Configuration page).
|
Default Value |
Enter the value that initially populates the record field. |
Setting Up Extended Absences
This section provides an overview of the high-level setup tasks for self service extended absence transactions.
Setup Tasks for Extended AbsencesThe setup tasks for extended absences are as follows:
Specify that the absence take is allowed as an extended absence in the Country Take (GP_ABS_BAL_SS_DEF) component.
Link an attachment configuration to an extended absence on the Maintain Definitions page.
On the Maintain Definitions page, you specify the attachment configuration associated with the extended absence element.
Link any configurable section templates to each of the extended absence components you are using. Then specify the desired type of user access to the displayed configurable section page.
Register the approval transaction in the Approval Framework through the Register Transactions page.
Note. The Approval Transaction Registry is already populated for the PeopleSoft delivered AM_Extended_Abs approval process ID.
Requesting Extended AbsencesThis section discusses how to request extended absences.
Pages Used to Request Extended Absences|
Page Name |
Definition Name |
Navigation |
Usage |
|
Request Extended Absence |
GP_ABS_EA_REQ |
|
Request an extended absence using the defined extended absence types. Review the status of an extended leave |
|
Extended Absence Request Details |
GP_ABS_EA_REQ |
Click the Submit button on the Request Extended Absence page. |
View the details of the current extended absence request |
Requesting Extended Absences
Access the Extended Absence Request Details page
The system does not display the entire page until the user enters values for the Start Date, Expected Returned Date, and Absence Take.
|
Start Date |
Select the first day of the extended absence event. The field option defaults to the current date. |
|
End Date |
Enter the expected return date. |
|
Absence Type |
Select the absence type. The selection you make in this field will limit or filter the selections available in the Absence Name field. |
|
Absence Name |
Select the absence name from the available options. The options available depend on the selection in the Absence Type field, the extended absence takes that are enabled in the Country Take setup, and the elements for which the employee is eligible. After you select entries in the above fields, the system refreshes the page with additional fields. |
|
Absence Reason |
Select the absence reason from the available options. The options available depend on the selection in the Absence Type field. |
Managing Extended AbsencesThis section discusses how to:
View extended absence history.
Administer extended absence requests.
Pages Used to Manage Extended Absences|
Page Name |
Definition Name |
Navigation |
Usage |
|
Extended Absence Request History |
GP_ABS_EA_EEHIST |
Time Reporting, View Time, Extended Absence History |
View the history of extended absence requests for a specific time period. Review the approval status, and edit existing requests. A link for each extended absence request accesses the Extended Absence Request Details page for the specified request. |
|
Administer Extended Absence |
GP_ABS_EA_ADM |
Global Payroll & Absence Mgmt, Payee Data, Maintain Absences, Administer Extended Absence |
The extended absence administrator can edit, approve, deny or push back extended leave requests. The extended absence administrator can also check the extended absence history and view details for an extended absence. |
Viewing Extended Absence History
Access the Extended Absence Request History page (Time Reporting, View Time, Extended Absence History).
|
Absence Name |
Click the link in this field to access the Extended Absence Request Details page for the specified extended absence. |
|
Edit |
Click to access the Extended Absence Request page. |
Administering Extended Absence RequestsAccess the Administer Extended Absence page (Global Payroll & Absence Mgmt, Payee Data, Maintain Absences, Administer Extended Absence).
When an extended absence has been approved, individual absence requests can be submitted within that extended absence.
Note. After an extended absence request has been saved, the user can upload attachments.
|
Show Requests by Status |
Select the status the system uses to filter the results displayed in the Extended Absence Requests region. Values are: All, Approved, Denied, Pending, and Pushback. |
|
Search |
Click to populate the Extended Absence Requests region based on the selections made in the Search Criteria region. |
|
Name |
Click the employee name to view the Extended Absence Requests Details page. |
|
Absence Request Exists |
Indicates the presence of one or more absence events beneath the extended absence request. |
|
Edit |
Click to edit the information on the Extended Absence Request page for this extended absence. |
|
Approve |
Click to view the Extended Absence Request page, and approve, deny, or pushback the extended absence request |