
 Prerequisites
This chapter discusses how to:
Set up loan participants.
Set up loan types.
Set up loan validation edits.
Select equations for the hold and release process.
Create loan destinations.
Specify loan processes.
Set up loan origination.
Set up process demographic data.
Set up electronic data interchange (EDI).
Review loan action codes.
Prerequisites
Before you can set up CommonLine loans, you must define general financial aid processing defaults. On the Financial Aid Defaults page (INSTALLATION_FA), select the FFELP Serial MPN Activation (federal family educational loan program serial master promissory note activation) check box in the Activation Indicators group box if your school participates in serial MPN processing.
See Also
Setting Up Loan ParticipantsTo set up loan participants, use the Maintain Lender Codes component (LENDER_LOAD_MAINT), Define School Lenders component (LOAN_LENDER_TABLE), Maintain Guarantor Codes component (GUAR_LOAD_MAINT), Define School Guarantors component (LOAN_GUAR_TABLE), Maintain Loan Servicer Codes component (SRVCR_LOAD_MAINT), and Define School Servicers component (LOAN_SERVICE_TABLE).
This section provides an overview and discusses how to:
Add or update lender information.
Identify lenders as loan participants.
Update guarantor information.
Identify guarantors as loan participants.
Add or update servicer information.
Identify servicers as loan participants.
Understanding Loan Participants
Participants in the loan process include lenders, guarantors, and loan servicers. To streamline the loan process, identify all loan participants and understand their electronic loan processing requirements and agreements with your institution. The loan participants tables are not institution or aid-year specific.
Pages Used to Set Up Loan Participants
|
Page Name |
Object Name |
Navigation |
Usage |
|
LENDER_LOAD_MAINT |
Set Up SACR, Product Related, Financial Aid, Loans, CommonLine 4, Maintain Lender Codes, Lender Load Maintenance |
View, update, or add lender information for your institution. This page is the main repository of lender information maintained by the institution. |
|
|
(search) |
Click the Electronic Address link on the Lender Load Maintenance page. |
View or enter the mailbox type (internet or private communication network) and mailbox ID (internet address). |
|
|
LNDR_LD_CNT_SEC |
Click the Contact Address link on the Lender Load Maintenance page. |
View or update additional information about lender contacts. |
|
|
OE_ADDR_USA_SEC |
Click the Edit Address link on the Lender Load Maintenance page. |
Edit or update address information. |
|
|
LOAN_LENDER_TABLE |
Set Up SACR, Product Related, Financial Aid, Loans, CommonLine 4, Define School Lenders, Loan Lender Table |
Add lenders by copying them from the Lender Load Maintenance table. This page contains all lenders from the Lender Load Maintenance table that will process loans for your institution. |
|
|
(search) |
Click the Electronic Address link on the Loan Lender Table page. |
Edit or update electronic addresses. |
|
|
LEND_ADDR_SEC |
Click the Contact Information link on the Loan Lender Table page. |
Edit or update lender contact information. |
|
|
LOAN_LENDER_INQ |
Financial Aid, Loans, CommonLine Management, View CL4 Lenders, Lender Information |
Review lender information. |
|
|
GUAR_LOAD_MAINT |
Set Up SACR, Product Related, Financial Aid, Loans, CommonLine 4, Maintain Guarantor Codes, Guarantor Load Maintenance |
View, update, or add guarantor information for your institution. This page is the main repository of guarantor information maintained by the institution. |
|
|
LOAN_GUAR_TABLE |
Set Up SACR, Product Related, Financial Aid, Loans, CommonLine 4, Define School Guarantors, Loan Guarantor Table |
Identify the guarantors that your institution uses for processing loans. You can add guarantors by copying them from the Guarantor Load Maintenance table. |
|
|
GUAR_ADDR_SEC |
Click the Contact Address link on the Loan Guarantor Table page. |
View or enter additional information about guarantor contacts. |
|
|
(search) |
Click the Electronic Address link on the Loan Guarantor Table page. |
Edit or update electronic addresses. |
|
|
GUAR_ADDR_SEC |
Click the Contact Address link on the Loan Guarantor Table page. |
Edit or update guarantor contact information. |
|
|
SRVCR_LOAD_MAINT |
Set Up SACR, Product Related, Financial Aid, Loans, CommonLine 4, Maintain Loan Servicer Codes, Servicer Loan Maintenance |
View, update, or add servicer information for your institution. This page is the main repository of servicer information maintained by the institution. |
|
|
LOAN_SERVICE_TABLE |
Set Up SACR, Product Related, Financial Aid, Loans, CommonLine 4, Define School Servicers, Loan Servicer Table |
Identify the servicers that your institution uses for processing loans and add new servicers. You can add servicers by copying them from the Servicer Load Maintenance table. |
|
|
(search) |
Click the Electronic Address link on the Loan Servicer Table page. |
Edit or update electronic addresses. |
|
|
SERV_ADDR_SEC |
Click the Contact Information link on the Loan Servicer Table page. |
Edit or update servicer contact information. |
|
|
LOAN_SERVICE_INQ |
Financial Aid, Loans, CommonLine Management, View CL4 Loan Servicers, Servicer Information |
Review information about the loan servicers that you set up on the Loan Servicer Table page. |
Adding or Updating Lender InformationAccess the Lender Load Maintenance page.
|
Edit Address |
Click to edit or update an address. |
|
Electronic Address |
Click to edit or update an electronic address. |
|
Contact Address |
Click to edit or update a contact address. |
Identifying Lenders as Loan ParticipantsAccess the Loan Lender Table page.
|
Lender ID |
Displays the ID assigned by the system to the lender associated with the loan. |
|
Lender OE Code (lender office of education code) |
Select a lender office of education code. When you select a lender office of education code, the system uses data from the lender load maintenance database and automatically populates the rest of the information. |
To add a lender to the Lender Load Maintenance table, complete the fields manually.
Updating Guarantor InformationAccess the Guarantor Load Maintenance page.
|
Mailbox ID |
Enter mailbox identification. The mailbox ID is the address where data files are sent when the files are transmitted using the internet or a private communication network. |
|
Mailbox Type |
Select an internet provider or communication network. |
Identifying Guarantors as Loan ParticipantsAccess the Loan Guarantor Table page.
To add new guarantors, you must first define them on the Guarantor Load Maintenance page.
|
Guar ID (guarantor identification) |
Displays the number assigned by the system to identify the guarantor for loan processing. The system delivers the majority of guarantor codes. |
|
OE Cd (office of education code) |
Select an office of education code. When you select an office of education code, the system automatically populates the rest of the fields with information from the Guarantor Load Maintenance table. |
|
Edit Address |
Click to update or review address information. |
|
Electronic Address |
Click to update or review electronic address information. |
|
Contact Address |
Click to update or review contact address information. |
Adding or Updating Servicer InformationAccess the Servicer Load Maintenance page.
|
Destination OE Code (destination office of education code) |
Select an office of education code. When you select an office of education code, the system automatically populates the rest of the fields with information from the Guarantor Load Maintenance table. |
|
Lead Time |
Enter the number of days prior to the first disbursement date that changes can still be made to the student's loan before the data is sent to the school. This is for information purposes only. |
|
Edit Address |
Click to update or review address information. |
Identifying Servicers as Loan ParticipantsAccess the Loan Servicer Table page.
|
Servicer ID (servicer identification) |
Displays the number used to identify the servicer associated with the requested loan. |
|
OE Cd (office of education code) |
Select an office of education code. When you select an office of education code, the system automatically populates the rest of the fields with information from the Servicer Load Maintenance table. |
|
Proc Lead Time (process lead time) |
Enter the number of days that a loan destination needs to freeze its data to prepare for a transfer to the school. For example, if the lead time is five days, changes can be made to the student's loan only five days prior to the first disbursement. |
|
Edit Address |
Click to update or review address information. |
|
Electronic Address |
Click to update or review electronic address information. |
|
Contact Address |
Click to update or review contact address information. |
To add a servicer that is not included on the Servicer Load Maintenance table, complete the fields manually.
Setting Up Loan TypesTo set up loan types, use the Create Loan Types component (LOAN_TYPE).
This section discusses how to:
Define loan types.
Link CommonLine loan types with National Student Loan Data System (NSLDS) loan history information.
Assign loan checklists.
Pages Used to Set Up Loan Types
|
Page Name |
Object Name |
Navigation |
Usage |
|
LOAN_TYPE_TABLE |
Set Up SACR, Product Related, Financial Aid, Loans, Create Loan Types, Loan Type Table |
Define the types of loans that your institution uses in the loan origination processes. |
|
|
LOAN_TYPE_TABLE2 |
Set Up SACR, Product Related, Financial Aid, Loans, Create Loan Types, CommonLine/NSLDS Xref |
Link loan types defined for CommonLine processing with the borrower's loans reported by the NSLDS. |
|
|
LOAN_TYPE_DOCUMENT |
Set Up SACR, Product Related, Financial Aid, Loans, Create Loan Types, Checklist Setup |
Assign a checklist to be generated when a loan is originated. |
Defining Loan TypesAccess the Loan Type Table page.
When you set up a loan financial aid item type, you include specific conditions for processing the loan. You must complete the Loan Type Table page to complete the setup.
Processing
|
Loan Category |
Select from: Alt Loan (alternative loan) PLUS Sub/Unsub (subsidized/unsubsidized) Subsidized Unsubsidized |
|
Loan Program |
Select from: Alternative Direct FFELP Health Perkins State University For example, to set up Stafford loans processed through CommonLine, you might specify the loan category as Sub/Unsub and the loan program as FFELP. To set up an alternative loan program processed through CommonLine, specify the loan category as Alt Loan (alternative loan), and the loan program as Alternative. |
|
Loan Refund Indicator |
Select from: Borrower: Select to have the borrower of the loan receive any refunds or overage. For example, the borrower would be a parent or guardian for a PLUS loan. Student: Select to have the student to receive any refunds from the loan. You can override this field at the loan application level. Note that additional setup is required in Student Financials to generate refunds to the proper recipient. |
Requirements
The system enforces the selected requirements during loan validation when utilizing the corresponding loan edit.
|
Loan References Required |
Enter reference information on the Promissory Note Plus and Promissory Note Alt pages and Loan Origination components (SFA_CRC_ORIG). Enter the number of references required in the Nbr Ref Rq (number of references required) field. |
|
Loan Cosigner Required |
If you select this check box, enter the number of cosigners required in the Nbr Csg Rq (number cosigners required) field. |
|
Cosigner Required Amount |
Enter the minimum loan amount that requires a cosigner. Enter cosigner information on the Promissory Note Plus and Promissory Note Alt pages and Loan Origination components (SFA_CRC_ORIG). Note that this requirement is enforced by the loan servicer and not the loan validation process. |
|
Loan Fee Rate |
Enter the loan fee rate to print on the promissory note for this loan type. Ensure that the loan fee rate matches the loan fee setup for the item type that you associate with this loan type. |
Loan Item Types
|
SetID |
Select a setID and an item type. You can associate multiple item types with the same loan type. You cannot share item types across multiple loan types. For example, to define FFELP Stafford loans, enter the subsidized and unsubsidized item types. |
Note. Based on the business processes defined by your institution, you might need to create multiple loan types for the same loan program.
The system displays the loan fee, description, loan fee amount, loan fee type, and loan fee percent for the item type selected. These values are associated with the item type when you set up the financial aid item type on the Loan Fee Table page.
See Also
Linking CommonLine Loan Types to NSLDS Loan History InformationAccess the CommonLine/NSLDS Xref page.
When you originate a CommonLine loan, the system uses the information set up on this page to search for similar loans in the borrower's NSLDS history. If a prior loan is found, the system uses the prior loan information to derive the new loan's destination. This optional feature can be set up in the Loan Institution setup page.
|
Alternative Loan Type Cd (alternative loan type code) |
The system uses this code to notify loan agencies about the type of alternative loan. Alternative loan codes are assigned by NCHELP. |
|
NSLDS Loan Type |
Select a loan type to translate the NSLDS loan type that is defined in the NSLDS tables. |
See Also
http://www.nchelp.org/committees/index.cfm
Assigning Loan ChecklistsAccess the Checklist Setup page.
The values for the Loan Type, Loan Program, and Loan Ctgry (loan category) fields are based on the aid year and academic institution that you selected to access the page.
|
Checklist |
Select a checklist to be generated at the time the loan is originated. Note. The system does not generate checklists for direct loans during origination. It generates checklists after you run the promissory note process. |
Setting Up Loan Validation EditsTo set up loan validation edits, use the Maintain Loan Edits component (LN_EDITS) and Create Loan Edit Set component (LN_EDIT_DFLTS).
This section provides an overview and discusses how to:
Define validation edit messages.
Create loan validation edit sets.
See Also
Equation Engine Programmer’s Guide
Understanding Loan Validation Edits
Loan edits verify that the loan origination data is valid for transmission to the receiving loan agency. All CommonLine 4 loan validation edits must be defined in the Loan Edits/Message Table page. Financial Aid delivers a core set of edits to be used during loan validation. All CommonLine 4 loan edits are equations written using the Equation Engine. You can use the Equation Engine to create or modify equations to support loan agencies that are not defined as a CommonLine standard.
Pages Used to Set Up Loan Validation Edits
|
Page Name |
Object Name |
Navigation |
Usage |
|
LN_EDIT_TBL |
Set Up SACR, Product Related, Financial Aid, Loans, CommonLine 4, Maintain Loan Edits Loan Edits/Messages, |
View delivered edits and error messages used in loan validation. You must correct all loan errors before loan data can be selected for outbound processing. You can modify the message text. |
|
|
LN_EDIT_DFLTS |
Set Up SACR, Product Related, Financial Aid, Loans,CommonLine 4, Create Loan Edit Sets, Loan Edit Defaults |
Create loan validation edit sets that are used when constructing loan destination profile records. Loan edit default sets are logical sets of edits that can be carried out based on aid year, loan program, loan category and process level. After they are added to a loan destination, you can further modify the edit sets to function according to the loan destination’s business rules. |
Defining Validation Edit MessagesAccess the Loan Edits/Messages page.
This page comes preloaded with updated edit error messages as needed. New loan edits created with the Equation Engine must be added to this page for the loan validation process to use them. Use the Equation field to select an Equation Engine equation.
The Loan Orig Edit Errors (loan origination edit errors) page in the Originate Loan component displays any edit errors encountered during the loan origination process.
This table describes the predefined errors:
|
Equation |
Description |
Cause |
Resolution |
|
FAEDADDR01 |
Permanent address missing. |
Used for alternative/PLUS loans. A valid permanent address cannot be found for the student. The address type is based on the FA Process Demographic Use page permanent address usage setting. |
Add a valid address that can be used as the permanent address on the Addresses page or modify the permanent address usage setting to select one of the student's existing addresses. |
|
FAEDADDR02 |
Mailing address missing. |
Used for alternative/PLUS loans. A valid mailing address cannot be found for the student. The address type is based on the FA Process Demographic Use page mail address usage setting. |
Add a valid address that can be used as the mailing address on the Addresses page or modify the mailing address usage setting to select one of the student's existing addresses. |
|
FAEDADDR03 |
Borrower perm address missing. |
A valid permanent address cannot be found for the borrower. The address type is based on the FA Process Demographic Use page permanent address usage setting. |
Add a valid address to the borrow ID that can be used as the permanent address on the Addresses page or modify the permanent address usage setting to select one of the student's existing addresses. |
|
FAEDADDR04 |
Borrower mail address missing. |
A valid mailing address cannot be found. The address type is based on the FA Process Demographic Use page mail address usage setting. |
Add a valid address that can be used as the mailing address on the Addresses page or modify the mailing address usage setting to select one of the student's existing addresses. |
|
FAEDBORROW01 |
Loan borrower not defined. |
Used for alternative/PLUS loans. The Borrower ID field in the Maintain Originated Loans component (SFA_CRC_ORIG) is blank. |
Enter the correct borrower ID. |
|
FAEDCHNG01 |
Loan increase with undisbursed check. |
Used for change transactions. A post-disbursement change transaction is generated and an undisbursed check exists for the loan. |
Disburse the funds to the student account or return the funds to the lender. |
|
FAEDCOSIGN01 |
No cosigners - cosigners required. |
Used primarily for alternative loans. If cosigners are required for the loan type, the edit verifies that the required number of cosigners exist in the Relationships page for the student and are assigned to the loan. |
Add the missing cosigners in the Relationships page and Maintain Originated Loans component. |
|
FAEDCOSIGN02 |
Cosigner signature required. |
Used primarily for alternative loans. Co-signer signatures have not been entered in the Promissory Note Alt and Promissory Note Plus tracking pages. |
Revise the data on the Promissory Note Plus page or the Promissory Note Alt page. |
|
FAEDDEBT01 |
Total student loan debt required. |
Used for alternative loans. The total loan debt on the Originate Loan component is zero, and there is NSLDS loan history. |
Update the total loan debt in the Originate Loan component using the Loan Demographic Data page. |
|
FAEDDEPSTAT1 |
Dependency Status missing. |
The student’s federal dependency status was missing when the loan was originated. |
Use the Loan Demographic Data page to update the dependency status in the Originate Loan component. |
|
FAEDDEST01 |
Loan destination is zero (missing). |
The loan destination is not assigned after the loan has been originated. This edit is always carried out by the loan validation process and cannot be deactivated. |
Assign a loan destination in the Loan Origination 1page. |
|
FAEDDISBDT01 |
Disbursement more than 90 days after loan period end. |
A disbursement date is set for greater than 90 days beyond the loan period end date. |
Change the date on the Loan Origination 2 page. |
|
FAEDDISBDT02 |
Disbursement date earlier than 13 days of loan period start. |
The first disbursement precedes the loan period begin date by more than 13 days. This may only be replicated by originating a new loan. An online edit prevents manually creating this situation. |
Revise the disbursement date or loan period start date in the Loan Origination 2 page. |
|
FAEDDISBDT03 |
Disbursement dates must be in chronological order. |
Disbursement dates are not in order. |
Revise disbursement dates in the Loan Origination 2 page. |
|
FAEDDRVLIC01 |
Borr DL Number or state missing. |
The borrower’s driver's license information was incomplete when the loan was originated. |
Update the driver’s license data in the Driver’s License page, and then use the Loan Demographic Data page to update this information in the Originate Loan component. |
|
FAEDGRADDT01 |
Grad date before loan end date. |
The graduation date viewed in the Originate Loan component is before the end of the loan period. |
Update the FA Term graduation date (if required), and then use the Loan Demographic Data page to update this graduation date in the Originate Loan component. |
|
FAEDNAME01 |
Student name missing. |
A valid name type cannot be found. The name type should be based on the FA Process Demographic Use page name usage setting. |
Add a valid name type that can be used as the student’s name on the Names page or modify the name usage setting to select one of the student's existing names. |
|
FAEDNAME02 |
Borrower name missing. |
A valid name type cannot be found. The name type should be based on the FA Process Demographic Use page name usage setting. |
Add a valid name type that can be used as the borrower’s name on the Names page or modify the name usage setting to select one of the borrower's existing names. |
|
FAEDPER01 |
Loan period greater than 1 year. |
The loan period defined in the Originate Loan 3 page is more than one year. |
Change the loan period dates so that the loan period is less than one year. on the Loan Origination 2 page |
|
FAEDPLUS01 |
PLUS borrower and student SSN are the same. |
A PLUS borrower cannot be the student. |
Correct possible invalid relationship defined for the student. Assign a new borrower for the PLUS loan. |
|
FAEDPLUS02 |
No PLUS for grad students allowed. |
The student has a graduate NSLDS level in the FA Term record when the loan is originated. |
Cancel the loan if appropriate, or change the student’s grade level to an undergraduate in the correct FA Term record. If you change the student’s grade level, then you also need to use the Loan Demographic Data page to update it in the Maintain Originated Loans component. |
|
FAEDPLUSMPN |
Serial PLUS MPN check. |
For PLUS loans. Confirms a prior PLUS loan with the same EmplID, borrower EmplID, and lender in the CommonLine MPN Usage page with the current PLUS loan. |
To process serially, modify the loan record by changing the borrower or loan destination so that the borrower and lender match the information in the CommonLine MPN Use page. If the loan should be processed as a new MPN, set the Serial Loan Code field on the Loan Origination 3 page from S to N. |
|
FAEDREFS01 |
References missing. |
The required number of references have not been defined for the student in the Relationships page and have not been assigned to the loan. |
Add the missing references in the Relationships page and Maintain Originated Loans component. |
|
FAEDSRVCIN01 |
Service indicator exists. |
An active negative service indicator is assigned to the student. |
Remove the service indicator. |
|
FAEDSSN01 |
Borrower SSN is blank (PLUS and Alt Loans only). |
When the loan was originated, either the borrower was not assigned, or the borrower ID did not have a valid Social Security Number (SSN). A valid SSN has the appropriate country code and a NID type of PR. |
Verify that the borrower is assigned in the Originate Loan component. If appropriate, fix the SSN on the Demographic and Address Data component and then import the SSN into the originated loan record using the Loan Demographic Data page. |
|
FAEDSSN02 |
Student SSN is blank. |
When the loan was originated, the student did not have a valid SSN. A valid SSN has the appropriate country code and a NID type of PR. |
Revise the SSN on the Demographic and Address Data component and then import the SSN into the originated loan record using the Loan Demographic Data page. |
Creating Loan Validation Edit SetsAccess the Loan Edit Defaults page.
The system uses the edit sets defined on this page when you define loan destination profiles.
|
Loan Program |
Values are: Alternative Direct Lending FFELP Health Professions State University |
|
Loan Category |
Indicates a subsidized, unsubsidized, alternative, or PLUS loan . |
|
Loan Dest Processing Level (loan destination processing levels) |
Values are: Direct Guarantee and Print Appl (application) Print and Guarantee Guarantee Only School Certification Request Manual |
Default Profile Edits
Define loan edits to use during validation for the selected loan program, category, and destination processing level. In addition to creating new edit sets, you can also add or delete edits, or activate or deactivate existing edits.
|
Equation Name |
Select a predefined edit equation. Edit equations are defined in the Equation Engine and are set up on the Loan Edits/Messages page for use by the loan validation process. |
|
Loan Requirement Status |
For each section, indicate one of the following: Optional: The selected section is not a requirement for the loan. Recommended: The selected section is not a requirement for the loan. Required: The selected section is a requirement for the loan. Note. The field value does not affect current loan functionality, but is intended to support future business processes. |
|
Loan Edit Activated |
Select to activate an edit. |
Selecting Equations for the Hold and Release ProcessTo set up equations for the hold and release process, use the Hold and Release Equations component (LN_CLHR_EQ_NAME).
This section describes how to select equations for the hold and release process.
Page Used to Set Equations for Hold and Release
|
Page Name |
Object Name |
Navigation |
Usage |
|
LN_HR_EQ_NAME_PNL |
Set Up SACR, Product Related, Financial Aid, Loans, Hold and Release Equations, Hold/Release Equations |
Select the equations that you require the hold and release process to use. |
Selecting Equations for Hold and ReleaseAccess the Hold/Release Equations page.
The equations that you select on this page form an equation set unique to the specified process name.
On the Set Hold/Release Flag process page, you can specify the set of equations that the CommonLine disbursement hold and release process should use.
|
Description |
Displays the process for which you are selecting equations. |
|
Equation Name |
Select an equation. The list contains all equations created for the selected institution; select only those equations created specifically for hold and release processing. |
If you use the hold and release process at your institution without modifications, create at least one hold and release equation set with the two provided hold and release equations: FAHDLOADLVL (Load Level edit) and FAHDSAPSTAT (Satisfactory Academic Progress check).
Note. When creating equations, follow the equation naming conventions described in the Equation Engine chapter.
Creating Loan DestinationsTo set up loan destinations, use the Create Loan Destinations component (LN_DEST_PROFILE).
This section provides an overview and discusses how to:
Define loan destination profiles.
Define CommonLine options.
Define loan destination edits.
Understanding Creating Loan Destinations
Consolidate the loan participants—the lender, guarantor, and servicer—into one entity, the loan destination. The loan destination defines the business characteristics and protocols between a lender, guarantor, and servicer, which enables them to process loans for the school. You must create a loan destination profile for each lender in the FFELP loan program or alternative loan program, and for the direct lending servicer for direct loans.
Pages Used to Create Loan Destinations
|
Page Name |
Object Name |
Navigation |
Usage |
|
LN_DEST_PROFILE |
Set Up SACR, Product Related, Financial Aid, Loans, CommonLine 4, Create Loan Destinations, Loan Dest Profile |
Define participants that your institution uses to exchange loan application data. You can designate multiple destinations for a specific loan program. |
|
|
LN_DEST_PROFILE2 |
Set Up SACR, Product Related, Financial Aid, Loans, CommonLine 4, Create Loan Destinations, CommonLine Options |
Designate CommonLine options for a loan destination. |
|
|
LN_DEST_EDITS |
Set Up SACR, Product Related, Financial Aid, Loans, CommonLine 4, Create Loan Destinations, Loan Dest Edits |
Select loan validation edits to be used for the loan destination. |
Defining Loan Destination ProfilesAccess the Loan Dest Profile page.
Normally, a loan destination includes a lender, a guarantor, and a servicer. CommonLine requires that you define at a minimum a guarantor for the destination.
Loan Destination Profile
|
Loan Program |
Create a loan destination profile for each participant that receives the physical loan origination files. Select from: Alternative FFELP Health Perkins State University |
|
Tolerance |
Used for CommonLine 96 loans processing. This field is no longer used for current loan processing. |
|
Description |
For a FFELP loan, enter a description that best describes the destination. |
Destination Components
|
Guarantor ID, Lender ID, and Servicer ID |
Select any combination of the guarantor, lender, and servicer, but note that one of them must be the guarantor. This is a CommonLine requirement. Select the Ovrd (override) check box to save the page without designating all three components. After you select an ID and press TAB to move to the next field. The system displays the office of education code and branch. If you are defining a loan destination for the direct lending loan program, you should only select a servicer ID. |
|
Ovrd (override) |
Select this check box to be able to save the page without having to designate all three components. |
|
Physical Destination |
Select the destination to receive the loan application. Values are: Lender Servicer Guarantor |
Contact Order
|
Pre-Guarantee Contact, Pre-Disbursement Contact, and Post Disbursement Contact |
Identifies the loan agency that should be contacted based on the state of the student’s loan application. Select a guarantor, lender, or servicer. These fields are for information only and are not used by the loan processes. |
Valid Category Process Level
Assign the process level when you originate a loan.
|
Loan Category |
Identify the loan category that the loan destination will process. Values are: Alt Loan (alternative loan) PLUS Subsidized Unsub |
|
Track PN (track promissory note) |
Select to indicate how the presence of an application or promissory note determines the process level. The loan origination process checks for an application or promissory note in the Promissory Note Alt, Promissory Note Plus, and CommonLine PNote – Stafford pages.components. For example, if you are originating a combination Stafford loan (subsidized or unsubsidized) and you have received the promissory note prior to originating the loan, you would select the check box to originate the loan with the process level of Guarantee Only. However, if you are originating without an application or promissory note, you can set Print and Guarantee as your process level. |
|
Proc Level (process level) |
Select the loan processing level that the loan destination performs for the corresponding loan category. Select from: Direct: Select for direct loans. Guarantee Only: Select to have the service provider guarantee the loans only. Guarantee and Print Appl: Select to have the service provider guarantee the loan and print and mail a promissory note to the borrower. Manual: Select if the borrower wants to use a lender unable to take electronic applications using CommonLine. Print and Guarantee: Select to have the service provider print and mail a promissory note to the borrower and guarantee the resulting loan after receipt of the promissory note. School Cert request: Select if the loan destination participates in school certification request processing. |
Defining CommonLine OptionsAccess the CommonLine Options page.
|
Pre Disbursement Destination and Post Disbursement Destination |
Designate the loan agency to receive change transaction records when a loan adjustment occurs before or after the receipt of loan funds by the school. |
|
Use CommonLine Version |
Select the CommonLine version to indicate the CommonLine application send and change transaction file format to use when creating files for the loan destination. CommonLine version 4 (CL4) is the only valid option for this component. |
|
Accept Change Records |
Select to indicate whether the loan destination can receive CommonLine 4 change transaction records. If this check box is clear, the loan origination process adjusts loan eligibility as appropriate, but the system does not generate a CommonLine 4 change transaction record for electronic transmission. Note. Your school must notify the appropriate lending agency of changes in loan eligibility if a change transaction record cannot be sent using CommonLine procedures. |
|
Create CL Alt @ 4 (create CommonLine alternative), Create CL Ref @ 5 (create CommonLine reference), and Create CL Ref Sup @ 7 (create CommonLine reference supplemental) |
These check boxes identify optional CommonLine 4 application subrecords. Select to have the CommonLine outbound process build the selected records for all loans of the loan destination. You set up these file build options based on the business processes established between your school and your loan destinations. |
|
Stafford App Form Default (Stafford application form default) |
Select the type of Stafford application to use when originating a Stafford loan and when no unused tracked Stafford applications exist. Values are MPN (master promissory note) or Common App (common application). Note that the Stafford MPN is the current acceptable form for Stafford loan processing. |
|
Serial MPN Process Default (serial master promissory note process default) |
Select the serial default master promissory note process. Use New MPN for a new master promissory note or Serial MPN for serial loan processing. The default value of this field is set in the Financial Aid Installation Defaults page. You can override the value here. When you originate a Stafford loan for this destination, the system uses this default value. You can also override this setting at the loan origination level by updating the record in the Maintain Originated Loans component prior to the transmission of the loan. You can also control whether individual students can qualify for serial loan processing by updating the student's settings in the Maintain Student MPN Usage component. Note. Originating a loan as a serial loan does not result in the loan's rejection if the borrower does not qualify. Refer to the CommonLine 4 version of the NCHELP CommonLine Network for FFELP and Alternative Loans Reference Manual for information about the serial loan process. |
|
Prom Note Delivery Default (promissory note delivery default) |
Select how you want promissory notes to be delivered to the borrower. Values are: Paper Web Note. The promissory note delivery method is agreed upon between the school and the loan destination. |
|
Disb Hold/Release Default (disbursement hold/release default) |
The system sets this field when a loan is originated. Use this field if you participate in disbursement hold and release processing with your loan destination. The default value is No Support,which means that the hold and release process is not supported by the loan destination. Override the default by selecting Hold or Release. A disbursement hold and release status is set for every disbursement of an originated loan. You can automatically place all disbursements on hold or release status when the loan is originated. As you approach the disbursement date, you can request the disbursements on hold to be released to your school for students who are eligible to be paid. Conversely, you can request disbursements set for release to be placed on hold for students who are not eligible to be paid. Do this by updating the student's hold or release status in the Loan Origination component. Changes to disbursement hold and release status are then communicated to the loan agency through the CommonLine V.4 Change Transaction record. |
|
Funds Return Method Code |
Select a code to indicate methods for disbursement of funds. Select from: Borr Check (borrower check): Individual borrower checks. EFT (electronic funds transfer): Funds moved electronically from one account to another. Master Chk (master check): A single check to the school containing the sum of funds for all borrowers that are being disbursed to the same institution on the same day. Netting: Funds that have been sent to the school electronically are reallocated for disbursement to another eligible borrower instead of being returned. The disbursing agent then deducts the adjusted amount from the total dollar amount on the next transmission of funds to the school. |
See Also
NCHELP CommonLine Network for FFELP and Alternative Loans Reference Manual, CommonLine 4 Version
Defining Loan Destination EditsAccess the Loan Dest Edits page.
When you define a valid loan category and processing level on the Loan Dest Profile page, it matches those parameters to a default edit profile defined in the Loan Edits Default page and automatically attaches them to the loan destination. Use this page to add, delete, or adjust the default values.
The upper portions of this page display profile information from the Loan Dest Profile page.
|
Equation Name |
Select an equation name for the edit statement. Edit statements are set up on the Loan Edits/Messages page. |
|
Loan Requirement Status |
DisplaysOptional, Recommended, or Required. |
|
Loan Edit Activated |
Select to enforce an edit. For example, a loan destination might require a signed promissory note for all loans before the start of the loan period, but might not require one after the loan period begins. If you clear this check box, the system does not look for a signed promissory note in validation. |
Specifying Loan ProcessesTo set up loan institutions, use the Define Loan Institutions component (LOAN_INST_TABLE)
This section discusses how to set up your loan institution by specifying processes and contact information.
Pages Used to Specify Loan Processes
|
Page Name |
Object Name |
Navigation |
Usage |
|
LOAN_INST_TABLE |
Set Up SACR, Product Related, Financial Aid, Loans, Define Loan Institutions, Loan Institution Table |
Define how your school processes loans for the academic year. You can define loan processes for each academic career of your institution. |
|
|
LN_INST_ADDR_SEC |
Click the Institution Address link on the Loan Institution Table page. |
Enter address information for each loan institution. |
|
|
LN_INST_CNTCT_SEC |
Click the Loan Institution Contact link on the Loan Institution Table page. |
Update the address, mailbox type, and mailbox identification. |
Specifying Loan ProcessesAccess the Loan Institution Table page.
|
FFELP/Direct Participant |
Select if the loan institution can originate FFELP or direct loans, or both. Alternative loans are not affected by this setting. |
|
DL Disclosure Print (direct lending disclosure print) |
For direct lending. |
|
DL SchCd (direct lending school code) |
If your institution processes direct loans, enter your direct lending school code. This field is hidden if your school does not participate in the direct lending program. |
|
SSN Source (social security number source) |
For direct loan and COD processing. Select the source of the student's Social Security Number, such as from PeopleSoft Enterprise Campus Community Fundamentals. |
|
COD Full Participant |
Select if your institution is a full participant for common origination and disbursement. |
|
DL Serial MPN Activation (direct loan serial master promissory note activation) |
Select if the loan institution that you are defining uses the direct loan serial master promissory note. This field is hidden if your school does not participate in the direct lending program. |
|
EDE Special School (electronic data express special school) |
For direct loans. Select to set an identification prompt on the origination file. This is for schools approved by the Department of Education for special consideration for direct loan processing by the Loan Origination Center (LOC). Usually the default rate for the school must be lower than 10%. |
|
Cntact Nbr (contact number) |
Enter contact information for each financial aid administrator in charge of loan processing. Assign a contact number for each entry. |
|
Institution Address |
Click to access the Loan Institution Address Information page. |
|
Loan Institution Contact |
Click to access the Loan Institution Contact Information page and update the address, mailbox type, and mailbox identification. |
Setting Up Loan OriginationTo set up a default loan agency, use the Reassign Loan Agencies component (LN_AGENCY_DFLT) and Define Loan Institutions component (LOAN_INST_TABLE).
This section provides an overview of loan origination and discusses how to:
Specify a default loan agency.
Set up loan destination defaults.
Understanding Loan OriginationBecause CommonLine 4 process levels only require a guarantor to originate a loan, the loan destination that you use to originate the loan might not be the same loan destination that you use to guarantee the loan.
Loan origination follows a seven-step process to determine the lender and guarantor and then determine the loan destination. You determine which steps to follow when you set destination defaults.
|
Step |
What Happens |
Possible Information Selected |
|
1 |
If an active, unused promissory note is tracked, the process selects the designated lender and guarantor from the form used for origination. The process skips steps 2 through 5. |
Lender only Guarantor only Lender and guarantor No information |
|
2 |
If a matching loan is originated and guaranteed in the current aid year for the borrower, the system uses lender and guarantor from the earlier origination record, and the process skips steps 3 through 5. |
Lender and guarantor No information |
|
3 |
The origination process searches back one year for a prior year originated loan of the same loan type; if a prior loan is found, the process skips steps 4 and 5. |
Lender and guarantor No information |
|
4 |
The origination process searches the current NSLDS history to find a previously originated loan of the same loan type. A new NSLDS loan type cross reference section is available in the Loan Type Table component to facilitate this step. If a prior loan is found, the process skips step 5. Note. Only the guarantor is used from the NSLDS loan history. |
Guarantor only No information |
|
5 |
The process assigns a default destination |
Lender only Guarantor only Lender and guarantor No information |
|
6 |
The process checks the validity of the selected lender and guarantor values and reassigns lender and guarantor IDs as defined in the Agency Default page. |
Lender only Guarantor only Lender and guarantor No information |
|
7 |
Based on the lender and guarantor information selected in the prior six steps, the loan origination process searches for a matching loan destination profile record. If one is not found, the loan is still originated, but it cannot be transmitted until a loan destination is assigned. |
Loan destination No destination |
The following chart illustrates the process.
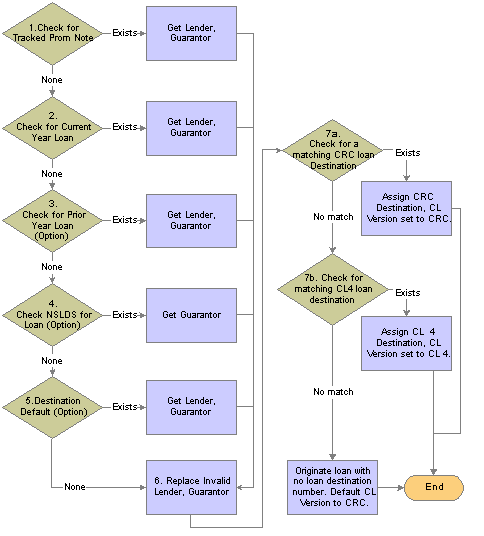
Process flow to determine loan destination
Pages Used to Set Up Loan Origination
|
Page Name |
Object Name |
Navigation |
Usage |
|
LN_AGENCY_DFLT |
Set Up SACR, Product Related, Financial Aid, Loans, Reassign Loan Agencies, Agency Default Setup |
Identify a default agency if the borrower does not select a lender, guarantor, or servicer. Identify lenders, guarantors, or servicers that are no longer in service and have them replaced automatically with a new agency when a loan is originated. |
|
|
LOAN_INST_TABLE2 |
Set Up SACR, Product Related, Financial Aid, Loans, Define Loan Institutions, Loan Destination Default |
Set up default parameters for loan destination. |
Specifying a Default Loan AgencyAccess the Agency Default Setup page.
|
Agency Type |
Select from: Guar/Ins (guarantor/insurer Lender Servicer |
|
OPEID (office of postsecondary education identifier) |
Select the office of postsecondary education identifier. To assign a default loan agency, leave this field blank. |
|
New OPEID |
Enter the agency to replace the previous agency, or the default agency if you left the OPEID field blank. Note. The source of valid values for the OPEID and New OPEID field are defined in the Create CRC Loan Participant component. |
|
CL4 Agency ID |
Displays the ID and agency name. |
|
CL4 New Agency |
Displays the ID and name for the new agency. |
Setting Up Loan Destination DefaultsAccess the Loan Destination Default page.
The order in which the system chooses the loan destination for the student is as follows: Current Promissory Note, Current Year Originations, Check Prior Year Originations, Check NSLDS for Guarantor, Default Destination.
|
Loan Program |
Values are: Alternative Direct FFELP Health Perkins State University |
|
Current Prom Note (current promissory note) and Current Year Originations |
The loan origination process always performs these steps. |
|
Check Prior Year's Origination and Check NSLDS for Guarantor |
Select to have the system perform these steps. |
|
Default Destination |
If nothing results from the first four search methods, the system uses this default destination. The field allows you to select from the CommonLine 4 loan destination profile numbers. Selecting the Use CRC Destination (common record commonline destination) check box allows the selection of CRC loan destination profile numbers. |
|
Use CRC Destination |
Select to use CRC destination. |
Setting Up Process Demographic DataTo set up process demographic data, use the Define Demographic Data Use component (FA_PRCSDEMO_TBL), Address Usage Table component (FA_PRCSDEMO_TBL), and Name Usage Table component (NAME_USAGE_TABLE).
This section discusses how to set up process demographic data.
Pages Used to Set Up Process Demographic Data
|
Page Name |
Object Name |
Navigation |
Usage |
|
FA_PRCSDEMO_TBL |
Set Up SACR, Product Related, Financial Aid, Define Demographic Data Use, FA Process Demographic Use |
Indicate where to retrieve the student demographic information for loan processing. The loan origination process extracts borrowers' demographic information from Campus Community. |
|
|
ADDR_USAGE_TABLE |
|
Define or review address and email usages by specifying hierarchies of address types to search for and use in a specific usage. |
|
|
NAME_USAGE_TABLE |
|
Define name usages to specify the hierarchies of name types that you want to use in a specific usage. |
|
|
PHONE_USAGE_TABLE |
|
Define phone usages to specify the hierarchies of telephone types to search for and use in a specific usage. |
Setting Up Process Demographic DataAccess the FA Process Demographic Use page.
The system displays settings defined in Campus Community setup.
|
Address Usage |
Use to select the address usage table setting defined in Campus Community for use by the associated process. Not used for loans. |
|
Perm Addr Usage (permanent address usage) |
Used to select the address usage table settings defined in Campus Community setup to determine the address type. |
|
Mail Addr Usage (mail address usage) |
Used to select the address usage table settings defined in Campus Community setup to determine the address type. |
|
Name Usage |
Used to select the name usage table settings defined in Campus Community setup to determine the name for the associated process. For loans, this is used to select the student and borrower names. |
|
Phone Usage |
. Used to select the phone usage table settings defined in Campus Community setup to determine the phone number for the associated process. |
|
Email Usage |
Indicates the type of email address, such as home, business, dorm, or campus. Used to select email usage table settings defined in Campus Community setup for use by the associated process. |
|
Address Usage Table |
Click to access the Address Usage page to define or review address usages. |
|
Name Usage Table |
Click to access the Name Usage page to define or review name usages. |
|
Phone Usage Table |
Click to access the Phone Usage page to define or review phone usages. |
Note. Email address usages are defined in the Address Usage Table.
See Also
PeopleSoft Enterprise Campus Community Fundamentals 8.9 PeopleBook
Setting Up Electronic Data InterchangeTo set up electronic data interchange, use the Entity Codes component (EC_ENTITY_CODE_TBL), Define EDI Business Unit component (FA_EDI_DEST), Internal Partners component (EC_INT_PARTNER_DEF), External Partners component (EC_EXT_PARTNER_DEF), Maintain Loan Transfer ID component (LN_XFER_FILE_ID)
This section provides an overview of EDI Manager and describes how to:
Create electronic data interchange (EDI) entity codes.
Set up Financial Aid EDI destinations.
Set up EDI partner profiles.
Set up profile defaults.
Set up EDI internal partners.
Set up EDI external partners.
Set up loan transfer IDs.
Understanding EDI Manager
You use EDI Manager to set up and maintain data about trading partners and to define data mapping between transaction files and the tables in your database. EDI is a standard means of exchanging data electronically. When you initiate a transaction, the system extracts the transaction data from your database and translates it into a common EDI format. Financial Aid uses EDI Manager to generate files formatted for CommonLine 4 and federal direct lending.
To send records to your trading partners:
Run a process to gather the data files that are ready to be transmitted.
The process moves all applicable data to EDI outbound staging tables.
Run an EDI Manager process to convert the data to flat files.
To receive records from your trading partners, run an EDI process to deposit the files into EDI inbound staging tables and then run a separate process to move the files into the database.
Pages Used to Set Up Electronic Data Interchange
Creating EDI Entity CodesAccess the EC Entity Code Tbl page.
Entity codes define the internal and external entities that are involved in the EDI process. For loan processing, external trading partners are the loan destinations, and internal trading partners are the schools.
To create an entity code, enter the page in Add mode.
|
PeopleSoft Entity Code |
Enter a code to identify external or internal trading partners. |
|
Record (Table) Name |
Select the table where data for loan participants in the process are located. For loan processing, indicate where the loan destination profile and loan institution information are located. You must create your own database record or view with the appropriate loan trading partners. |
|
External Entity |
Select if this entity controls external partners. |
PeopleSoft provides predefined entity codes. Use FABU for school loan offices and LDST for loan destinations. The following illustration shows internal and external entities and codes.
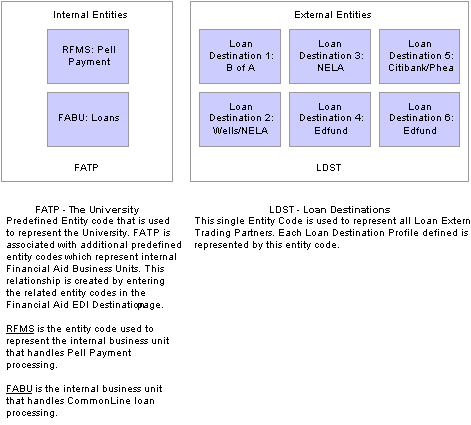
EDI Entity Codes for CommonLine 4
Setting Up Financial Aid EDI DestinationsAccess the Financial Aid EDI Destination page.
Enter the Description, Short Description, and Internet Address to set up your FA EDI destinations.
Note. To restrict your outbound files using a setID, enter your setID value as the destination instead of the FABU entity code.
Setting Up EDI Partner ProfilesAccess the Profile Definition page.
Financial Aid uses the EDI partner profile to control the location of created EDI files. A list of all created files can also be generated. PeopleSoft provides a predefined EDI partner profile: CL_DESTIN.
You might want to create an EDI partner profile for each loan destination. For example, you might place files from each bank in a separate directory.
|
EC Profile ID (electronic commerce profile identification) |
Identifies the electronic commerce profile. The EDI Partner Profile component creates profile ID records. |
|
Source TPID |
Copy information from an existing EC profile ID. Select the source TPID and click the Copy button. |
|
EC Outbound File List Path |
Specify the directory to which you want EDI Manager to write outbound files. |
|
EC Outbound File List Name |
Specify the name of the file that lists all outbound files. |
|
New List File Per Run |
Select to refresh the file list each time that you run the EC outbound agent. |
|
Message |
Click to access the Output Message Header/Footer page and designate a message header and footer. |
Setting Up Profile DefaultsAccess the Profile Defaults page.
|
EC Transaction ID (electronic commerce transaction identification) |
Select an EDI transaction set ID to create the outbound or inbound file. |
|
In/Out |
Indicate whether the process is inbound (I) or outbound (O). |
|
Pri Event (primary event) |
Indicate the status of the transaction, such as new transaction, cancellation, duplicate, status request, and so on. The system assigns the primary event code. These codes are also called purpose codes. |
|
Sec Event (secondary event) |
Indicate the type of transaction. Not all transaction types include secondary event codes. These codes are also called transaction codes. |
Setting Up EDI Internal PartnersAccess the EC Int Partner Def page.
PeopleSoft provides a predefined internal trading partner for CommonLine processing: CL4_INT_TP. You can use this record to complete your EDI Manager setup or you can create your own internal trading partner record.
|
Int TPID (internal trading partner identification) |
Displays the internal trading partner ID. |
|
PS Code (PeopleSoft code) |
Indicates the EDI entity code that identifies the financial aid-related business units at the school, FATP. |
|
Unit |
Select the internal financial aid EDI destinations that you set up in the FA EDI Destination page. Use the default value FABU or select the unit value that you created for your institution. |
|
Ext TPID (external trading partner identification) |
Indicate the external trading partner ID with whom this internal partner exchanges data. This field cannot be completed until the EC Ext Partner Def page is set up. The system populates the corresponding section on the EC Ext Partner Def page with the EDI internal partner values. Note. If you are creating the internal trading partner for the first time, leave this section blank until you have created external trading partners. When you create external trading partners, the system populates this section with external trading partner information. |
|
Alias TPID (alias trading partner identification) |
Enter an alias code or the name used for your external trading partner. In the example page, an alias trading partner ID called FFELP_ALIAS has been created. |
Setting Up EDI External PartnersAccess the EC Ext Partner Def page.
An external trading partner record must exist for each loan destination that receives CommonLine application send files. To better organize external trading partners, include the loan program and destination number as part of the external trading partner ID.
Trading Partner Definition
|
Map ID |
Select the EDI data map set to use. Use the following value to create CommonLine 4 files: COMMONLN_4: Contains data maps formatted for CommonLine 4. |
|
Profile ID |
Select an ID to define EDI outbound file creation parameters for the external trading partner. Profile ID records are created with the EDI Partner Profile page. For CommonLine, the predefined value, CL_DESTIN ID defines where loan files generated by running the EDI outbound file build process should be deposited. Be sure to assign the correct profile ID value if you have created additional partner profiles for external trading partners. |
|
Cvt Pro Ids (conversion data profile IDs) |
Select a conversion data profile ID to assign data conversion rules for different EDI transactions. You should always use the delivered CommonLine ID. Select: COMMONLINE: CommonLine data conversion. |
Customer/Vendor Assignment
|
PS Code |
Select the EDI entity code that represents your external trading partners. You should use the predefined code LDST. |
|
SetID |
Leave this field blank if you are not using a setID to control EDI outbound files. If you use a setID, it must match the financial aid business unit entity code defined in the FA EDI Destination page. |
|
PS Customer/Vendor Number |
Select a loan destination. The destination only works if you use LDST for your PS Code value. |
|
Int TPID (internal trading partner identification) |
Select the internal trading partner ID that you have set up on the EDI Internal Trading Partner page. |
|
Alias TPID (alias trading partner identification) |
This field forms part of a link between external and internal EDI trading partners. Note. For CommonLine loan processing, you must use the designated alias trading partner ID at your institution consistently for all CommonLine external trading partners. For example, the example page shown uses an ID of FFELP_ALIAS. This value is used for all CommonLine external trading partners. |
After you complete the setup of an external trading partner record, the system updates the internal trading partner record with the external trading partner information. You can view this in the TP ID Alias Definition section of the EC Int Partner Def page.
This setup creates the linkage between the internal trading partner (the school), external trading partners (the loan destinations), and the EDI transaction sets (EDI data maps) to run when you create CommonLine application and change files.
Setting Up Loan Transfer IDsAccess the Loan Transfer IDs page.
The following table lists the outbound EC transaction IDs for CommonLine FFELP and alternative loan programs.
|
EC Transaction ID |
Description |
Direction |
|
A004P |
CommonLine 4 App Send |
Outbound |
|
C004P |
CommonLine 4 Change Send |
Outbound |
|
EC Transaction ID (electronic commerce transaction identification) |
Select the electronic commerce transaction identification from the available options. |
|
Loan Action Type |
This field is not used for CommonLine. |
|
In/Out |
Indicates whether the file is inbound or outbound. |
|
Batch Yr (batch year) |
Enter the last digit of the appropriate aid year. |
|
Batch ID |
Always enter 4P This is a CommonLine 4 requirement. |
|
FA EDI Source Entity Cd (FA EDI source entity code) |
Identify the appropriate code for your institution. For most institutions, the source entity code is FATP. |
|
FA EDI Source Business Unit |
The system populates this field after you select an EDI source entity code. The default value should be FABU. This field enables EDI Manager to retrieve and generate the appropriate file structure. |
|
FA EDI Destination Entity Cd (FA EDI destination entity code) |
Identify the appropriate code for the loan destination. For most institutions, the source destination code is LDST. |
Reviewing Loan Action CodesThis section discusses how to view loan action codes.
Pages Used to Review Loan Action Codes
|
Page Name |
Object Name |
Navigation |
Usage |
|
PS_LOAN_ACTNCD_WK00 |
Set Up SACR, Product Related, Financial Aid, Loans, Maintain Loan Action Codes, Loan Action Code Table |
View loan action codes and messages for a specific aid year and loan program. |
|
|
LOAN_ACTNCD_TBL |
Financial Aid, Loans, View Loan Action Codes, Loan Action Codes |
View loan action codes and descriptions. |
Viewing Loan Action CodesAccess the Loan Action Code Table page.
You can modify their descriptions, but do not add or delete loan action codes and messages. The four loan action types are:
Disbursement
Origination
Promissory Note
Reconciliation
|
Loan Message Codes |
Loan message codes are received by the school from the sending loan agency and are not generated by PeopleSoft loan processes. |
|
Message Set Number and Message Number |
These fields are used only by direct lending processes. |