
 Understanding Plan Eligibility
This chapter provides an overview of plan eligibility and discusses how to:
Use plan eligibility.
Set up plan eligibility requirements.
Understanding Plan EligibilityThe plan eligibility function determines which employees are allowed to participate in a particular plan. Plan eligibility is almost always based on job-related information, such as company, job, location, department, union code, active or inactive status, and salaried or hourly status.
The Plan Eligibility process is always the first process in your calculation job stream. This keeps you from processing ineligible employees.
This process establishes an effective-dated timeline of eligible and ineligible periods. Processing plan eligibility first ensures that this timeline is available to the functions that process employees differently during periods of eligibility and ineligibility. For example, if an employee changes jobs and becomes ineligible for a particular plan, that plan probably excludes hours, earnings, and service from the period of ineligibility.
Eligibility and participation are not the same thing. Eligibility is based on job criteria, such as company, union affiliation, and job classification. Eligibility establishes that the job an employee performs entitles the employee to participate in a pension plan. However, an eligible employee isn’t necessarily a plan participant. For example, there may be age and service requirements that an eligible employee hasn’t yet met. These requirements are handled by the participation function.
See Also
Using Plan EligibilityThe plan eligibility function establishes which of your employees can participate in a plan. The eligibility criteria are based on job data that your PeopleSoft Enterprise Human Resources system tracks, such as salaried or hourly status, full-time or part-time status, and location. Eligibility status can change as, for example, employees change jobs, unions, and full-time or part-time status.
Plan eligibility provides two critical pieces of information for an employee:
Eligibility status.
This status indicates whether or not the employee has ever been eligible for the plan. The system assumes that an ineligible employee does not accrue any benefits. Therefore, a calculation does not finish when the eligibility status (or participation status) is negative.
Timeline of eligible and ineligible periods.
This is complex because certain functions—for example, consolidations, service, and cash balance accounts—use different rules during periods of eligibility and ineligibility. Most benefits accrue only during eligible periods. You reference the eligibility timeline when you create the function results for those functions. You do this using options that indicate whether the rules apply during periods of eligibility, ineligibility, or both.
Using Plan Eligibility for Employees with Multiple Jobs
For employees with only one job, the plan eligibility function creates one timeline of eligible and ineligible periods. For employees with multiple jobs, the function uses a blending process to create a summary timeline of all eligible and ineligible periods from all of an employee’s jobs. First the system creates a timeline for each job, then it combines them into one summary timeline. If an employee was eligible in any of his jobs during a time period, the system considers him to have been eligible for that period, even if the employee was ineligible in all of his other jobs at that time.
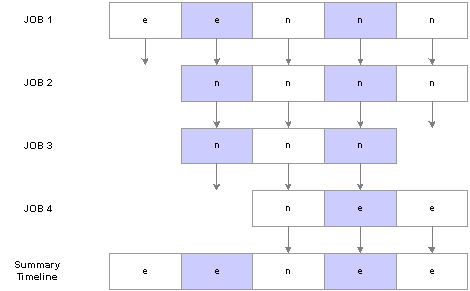
Employee eligibility timeline
This diagram illustrates how the system blends an employee’s job eligibility timelines to form one summary timeline. In this example, an employee has had four jobs at Company A. The summary timeline demonstrates that the system considers the employee eligible (e) for any period in which he has at least one eligible job, even if his other three jobs do not fulfill eligibility standards (n).
Periodic Processing and the Plan Eligibility Process
Periodic processing runs the Plan Eligibility process every time you run any process and saves this history so you can view it online. You cannot turn this off. When you run a calculation, the system uses the existing timeline created during periodic processing and brings the timeline up to the event date if necessary.
Note. Plan Eligibility should always be the first process you run for a plan. Even users of a standalone system, who may only load data for eligible employees, need to run Plan Eligibility in order to build a timeline of eligible and ineligible periods (this type of timeline can affect service and cash balance accruals).
Setting Up Plan Eligibility RequirementsSet up your plan requirements on the Custom Statement page, using the non-editable statement type P (plan eligibility).
Note. Before setting up eligibility parameters, be sure you understand the proper syntax for Boolean clauses. This information is in the chapter “Using Custom Statements and Spouse Eligibility Statements.”
The remainder of this section summarizes the information that you are most likely to need while building eligibility formulas.
See Also
Using Custom Statements and Spouse Eligibility Statements
Setting Eligibility RequirementsWhen you set up plan eligibility, you enter the conditions for eligibility in an IF or IN clause. If you use an IF statement, the system assumes that employees are eligible when the condition is true. For this reason, IF clauses don’t use a final assignment (or THEN) clause. This also means you can’t have more than one IF in the definition. IN clauses, on the other hand, do require assignments, and you can have as many as you like in the statement.
Using IN Clauses
Use a clauses with the keyword IN to check for several different values for a single field. For example, you can check whether the employee status is in the set of values active, deceased, leave, and leave with pay. When you use IN clauses, you assign a temporary variable to the result. You can then reference that variable from within an IF clause.
|
Key |
Operand1 |
Op1 |
Operand2 |
Op2 |
Operand3 |
Type |
|
IN |
UNION_CD |
|
“81” |
|
|
FUNCTION |
|
|
“82” |
|
“83” |
= |
TEMPC01 |
FUNCTION |
|
IF |
TEMPC01 |
== |
“Y” |
AND |
|
BOOLEAN |
|
|
EMPL_TYPE |
== |
“S” |
|
|
BOOLEAN |
This is a useful technique when you’re checking a large set of valid values because the IN statement uses an implied OR condition. It separates all the OR clauses from the AND clauses of the final IF statement.
You can use an IN clause as your eligibility criteria as long as you make a final assignment to the definition name, as illustrated in this table:
|
Key |
Operand1 |
Op1 |
Operand2 |
Op2 |
Operand3 |
Type |
|
IN |
UNION_CD |
|
“81” |
|
|
FUNCTION |
|
|
“82” |
|
“83” |
= |
ELIG_DEF |
FUNCTION |
Using the Equation and Description FieldsOn the Custom Statement page, use the EQU (equation) button to toggle the long text field at the bottom of the page between:
A description field, where you can enter information about the formula.
An equation field that translates your statement into an equation, using parentheses to show the precedence among the operations. Always check the parentheses in an equation.
Note. You can use the EQU button to refresh an equation.
Using HistoryWhen you calculate plan eligibility, a custom statement evaluates the eligibility requirements over time and builds a timeline of eligible and ineligible periods. This feature is key to implementing your plan rules. To use it, select the History check box under any effective-dated variable.
For example, suppose you are setting up a group for full-time employees:
Because History is selected under the alias FORP_TIME, the system looks at an employee’s full- or part-time status over time when determining eligibility. If Julius Jones works part-time for three months, the plan eligibility function produces the following three work history segments:
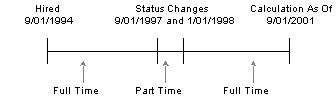
Work history segments
Formatting Date ConstantsYou can enter an unformatted date in most PeopleSoft pages. For example, in most pages the system automatically reformats 01011004 (January 1, 2004) as 01/01/2004. However, if you enter an unformatted date in one of the Operand fields, the system treats it as a number. To tell the system that the eight digits represent a date and not a number, either:
Include a separator (a slash, dash, or space) when you enter a date, or
Select the Date check box under the operand.
Note. The Custom Statement page requires you to enter eight-digit dates that include the century in the year. This is different from most PeopleSoft pages, which accept six-digit dates. For example, in the Custom Statement page, enter January 1, 2005 as 01/01/2005, not as 01/01/05.
When you use a date alias, there’s no reason to select the Date check box. The system already knows the value is a date and formats it appropriately.