
 Understanding Organization Charts
This chapter provides an overview of organization charts, lists prerequisites, and discusses how to create organization charts.
Understanding Organization ChartsPeopleSoft Enterprise Human Resources enables you to produce detailed organization charts with PeopleSoft Human Resources data and the Visio Organization Charting Wizard. Building organization charts is easy—all you do is choose to map your organization based on positions or on departments, using one of your PeopleSoft Human Resources Position or Department trees; and run the Organization Chart SQR from PeopleSoft Process Scheduler. Visio does the rest. Once you select formatting options using the Visio Organization Charting Wizard, creating detailed charts of only one department or your entire organization is as simple as clicking a button.
PrerequisitesBefore you can create organization charts, you must:
Make sure that Visio is installed on your client.
Visio is not delivered with PeopleSoft Human Resources; you must purchase and install Visio on the client computers separately. For more information about installing Visio, see your Visio documentation.
Make sure that organization and person data exists in PeopleSoft Human Resources before you start working with the Organization Charting Interface pages.
Creating Organization ChartsThis section provides an overview of the process and discusses how to:
Create an organization chart.
Copy the organization chart file to the client.
Review the organization chart.
Use the Visio Organization Chart Wizard.
Understanding the Process
To create organization charts that are based on your human resources data:
Run the Organization Chart SQR from the Organization Chart page.
Copy the resulting file to the client.
Review the organization chart information gathered by the Organization Chart SQR.
Start Visio and run the Vision Chart Wizard.
Page Used to Create an Organization Chart
|
Page Name |
Object Name |
Navigation |
Usage |
|
ORGCHART_PNL |
Organizational Development, Position Management, Create Organization Structure, Build Organization Chart, Organization Chart |
Create an organization chart based on PeopleSoft Human Resources system trees. |
Creating an Organization ChartAccess the Organization Chart page.
First, set up organization and person data in PeopleSoft Human Resources, and then set up your Organization Charting Interface on the Third-Party/System page in the Installation Table component (INSTALLATION_TBL).
To build your chart using one of the PeopleSoft Human Resources system trees, you provide the system with department and/or tree information.
|
Report Type |
Select a report type. Options are:
|
Note. You can build your organization chart from active department and position trees only. You must also have security access to the trees and departments that you want to include in your organization chart.
Building Your Chart Using Departments
If you select Department in the Report Type field, then the SetID and Department fields appear.
|
Department |
Enter the department that you want to include in your organization chart from the list of department IDs in the setID. You build your organization chart one department at a time. (You create the department codes when you define departments in the Department Table.) |
|
Run |
Click Run if you’re building your chart using the Department report type. PeopleSoft Process Scheduler runs the Organization Chart SQR. |
Building Your Chart Using Trees
If you selected a report type of Tree, the SetID, Tree Name, Tree Node, and #Levels (number of levels) fields appear:
Select a setID from the list of values.
Select a tree name from the list of trees.
Selecting Tree Nodes and Levels to Include in Your Chart
The Tree Node and #Levels fields tell the system where to start the organization chart at the Tree Node level and the next x number of levels to include in the chart. For example, if you begin the chart at tree level 5 and you leave #Levels at 3, the organization chart includes levels 5 though 7 of your tree.
The system displays the tree level that you selected. For example, if you selected Department 10100, the Office of the President, from the Department Security tree, the system indicates that you are using tree level 5. Click the Run button to have PeopleSoft Process Scheduler run the Organization Chart SQR.
See Also
Creating and Modifying Security Trees
Copying the Organization Chart File to the ClientThe Organization Chart SQR creates the ORGCHART.TXT file and stores it in the application server. To create an organization chart using Visio, you need to copy the ORGCHART.TXT file to a client computer. You will run Visio and create the organization chart on the client.
To copy the ORGCHART.TXT file:
Access the Process Monitor – Process List page (PMN_PRCSLIST) (PeopleTools, Process Scheduler, Process Monitor).
Locate the organization chart process and click the associated Details link.
Click the View Log/Trace link.
Click the ORGCHART.TXT link to open the file.
Select File, Save As and save to the client.
Reviewing the Organization ChartTo review the results of your Organization Chart SQR process in the ORGCHART.TXT file, use a text editor to open and review the file. The file contains the following data:
Unique ID
Name
Reports To
Position
Department
Telephone
Following is an example of the ORCHART.TXT file:
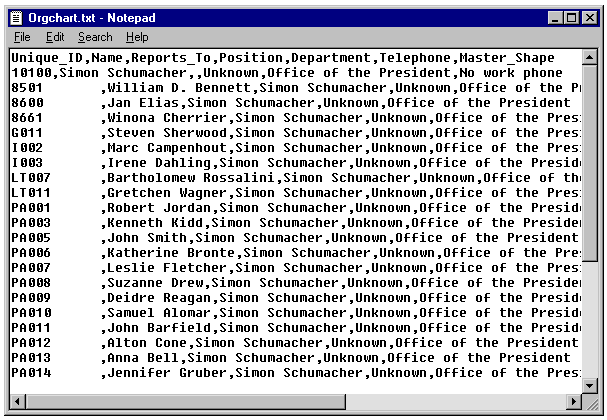
Example of ORGCHART.TXT file
Using the Visio Organization Chart WizardOpen Visio and use the Organization Chart Wizard to create your organization chart automatically.
Note. These instructions are for Visio 2000. The Organization Chart Wizard may operate slightly differently for Visio 2002.
To run the Organization Chart Wizard:
In Visio, select File, New, Organization Chart, Organization Chart Wizard.
In the window that appears, select the option Information that's already stored in a file or database and click Next.
On the next window select the option A text, Org Plus (*.txt), or Microsoft Excel file and click Next.
On the next window enter the location on the client that contains your organization information (where you saved the ORGCHART.TXT file), for example C:\TEMP\ORGCHART.TXT and click Next.
Select Name for the Name field, Reports_To for the Reports to field, and <none> for the First Name (optional) field and click Next.
Select the data that you want displayed in the chart shapes (for example Name for the First Line and Position for the Second line) and click Next.
Add other fields contained in the ORGCHART.TXT file to the Org Chart by selecting them from the Data file columns and adding them to the Custom Property fields column. Click Next.
Select I want the wizard to automatically break my organization chart across pages and click Finish.
Following is an example of the Visio page that you see when your organization chart is complete:
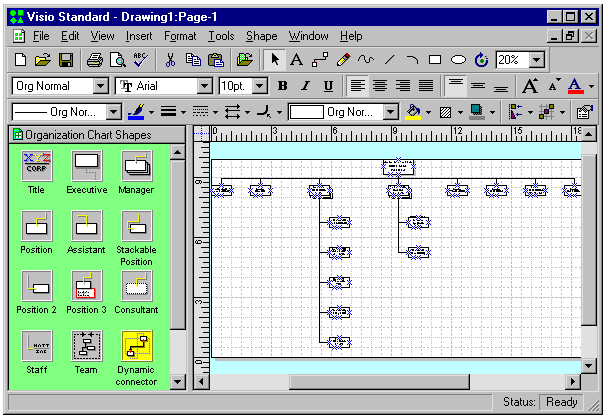
Example of a department organization chart in Visio
Note. For more information about editing and printing your organization chart in Visio, see your Visio documentation.