Creating Expense Reports by Expense Type
This topic discusses the fields and controls that appear on the Expense Entry page, based on the expense type selected.
The Expense Entry page changes dynamically based on the expense type selected. Most fields and controls are self-explanatory. Some require explanation.
These expense types are discussed:
Setting Up Expense Types
Some expense type options are determined at the business unit level, and some are determined at the expense type level. See Configuring Business Units for PeopleSoft Expenses and Setting Up Expense Types.
These fields appear when Air Travel or Hotel/Lodging is selected as the expense type.
|
Field or Control |
Description |
|---|---|
|
Ticket # |
Enter the unique airline ticket number. PeopleSoft Expenses verifies that the ticket number is unique and prompts you if the system detects that the ticket number was used previously. |
|
Merchant |
Select whether the merchant that was used for the expense type is a preferred or not a preferred merchant. |
|
Number of Nights |
Enter the number of nights that the expense covers. |
|
|
Select the Itemize Hotel Bill button to access the Itemize Hotel Bill Page and itemize the hotel receipt into more specific charges, such as room and telephone charges. Once itemized, PeopleSoft Expenses populates the main expense grid with each itemized charge. You may itemize the entire bill or only part of it if some expenses are non-reimbursable. PeopleSoft Expenses supports the ability to itemize lodgings with different room rates. |
Use Automobile Mileage to track the miles driven from one location to another location, or to track a round trip.
Mileage Section - Display Distance Calculator
When Display Distance Calculator is selected on the Expenses Definition - Business Unit 2 Page, these fields appear.
Note: The Location and Originating Location check boxes are deselected on the Expense Types 1 Page for the Automobile Mileage expense type. This removes the Originating Location and Destination Location fields that appear in the Additional Information section.
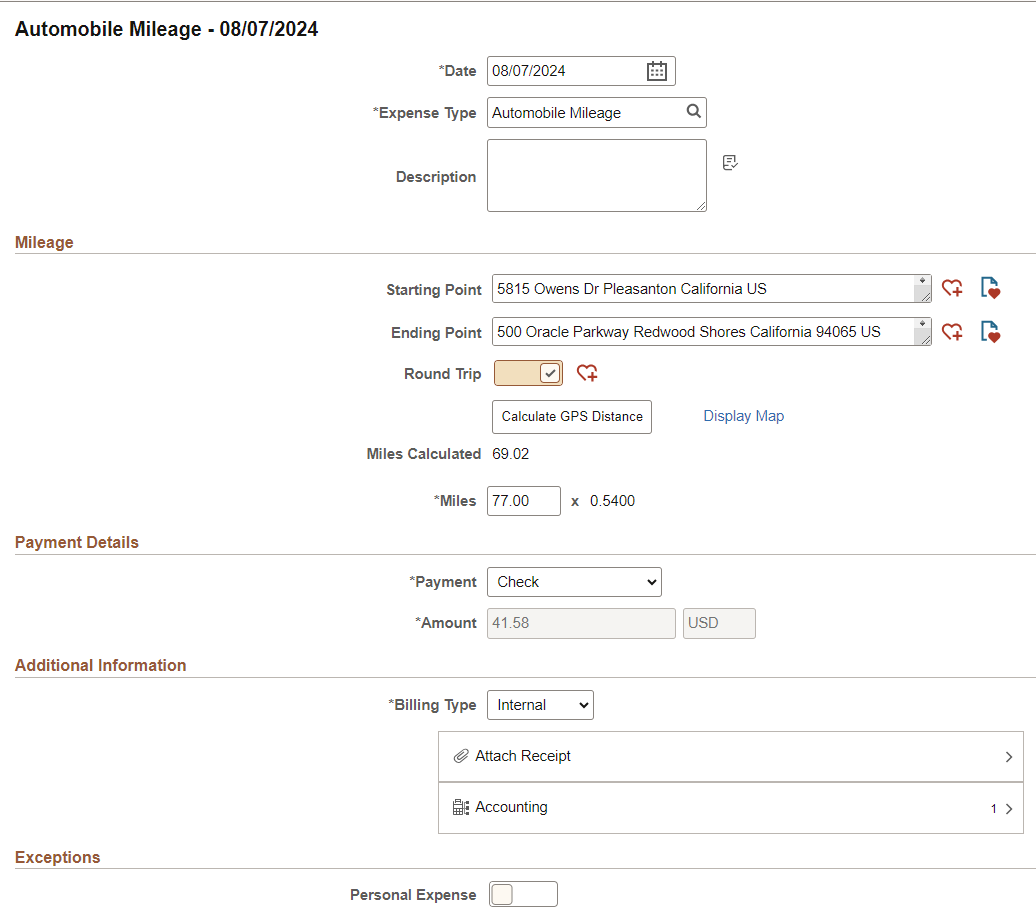
This example illustrates the fields and controls on the Expense Entry page when Automobile Mileage is selected, and the Display Distance Calculator is on.

|
Field or Control |
Description |
|---|---|
|
Staring Point and Ending Point |
Enter an address that matches your starting and ending locations. Because you have selected Display Distance Calculator on the Expenses Definition - Business Unit 2 Page: The system automatically searches for a match and only displays a maximum of four options based on real-world data. You must select one of the options as opposed to entering the entire address manually. The address options come from Oracle eLocation Services. Note: When using these two fields, you may want to remove the Originating Location and Destination Location fields that appear in the Additional Information section. To do this, access the Expense Types 1 Page for Automobile Mileage and deselect the Location and Originating Location check boxes. |
 (Add to Favorite List) |
Select to access the Add to Favorite List window, which allows you to add a new favorite location. |
 (View Favorites) |
Select to access the View Favorites window, which lists favorite locations. |
|
Round Trip |
Select to indicate that the trip is not one-way, but a round trip. You can then select the Calculate GPS button to calculate the distance, which is then doubled for the round trip. |
|
Calculate GPS |
Select to calculate and display the GPS distance after entering the starting and ending point of a trip. The system automatically enters the distance in the Miles Calculated field. If you also selected Round Trip, the distance is doubled. This field is only available when the Expense Type is Automobile Mileage, and if you have selected Display Distance Calculator on the Expenses Definition - Business Unit 2 Page. |
|
Display Map (link) |
Select to access a map showing the starting and ending points. This field is only available when the Expense Type is Automobile Mileage, and if you have selected Display Distance Calculator on the Expenses Definition - Business Unit 2 Page. |
|
Miles Calculated |
Displays the distance as calculated by the GPS calculator using Starting Point and Ending Point fields. If the Round Trip option is selected, the distance is doubled. This field is only available when the Expense Type is Automobile Mileage, and if you have selected Display Distance Calculator on the Expenses Definition - Business Unit 2 Page. If Oracle Maps or the eLocation is not being used, you must manually enter the distance in the Miles field. |
|
Miles / Kilometers and (rate) |
Displays the distance (in miles or kilometers) as calculated by the GPS calculator. You can override this value, and you may be required to enter exception comments if the Require Comments to Override check box is selected in the Expenses Definition - Business Unit 2 Page. Enter the actual distance for the trip if the system does not calculate it automatically. If the Display Distance Calculator check box is not selected on the Expenses Definition - Business Unit 2 Page, then this is the only field displayed in the Additional Information section. The mileage (or kilometer) rate is displayed to the right of the Miles / Kilometers field and is used to calculate the reimbursement amount for the distance traveled. |
Mileage Section - Do Not Display Distance Calculator
When Display Distance Calculator is not selected on the Expenses Definition - Business Unit 2 Page, these fields appear.
Note: The Location and Originating Location check boxes are deselected on the Expense Types 1 Page for the Automobile Mileage expense type. This removes the Originating Location and Destination Location fields that appear in the Additional Information section.
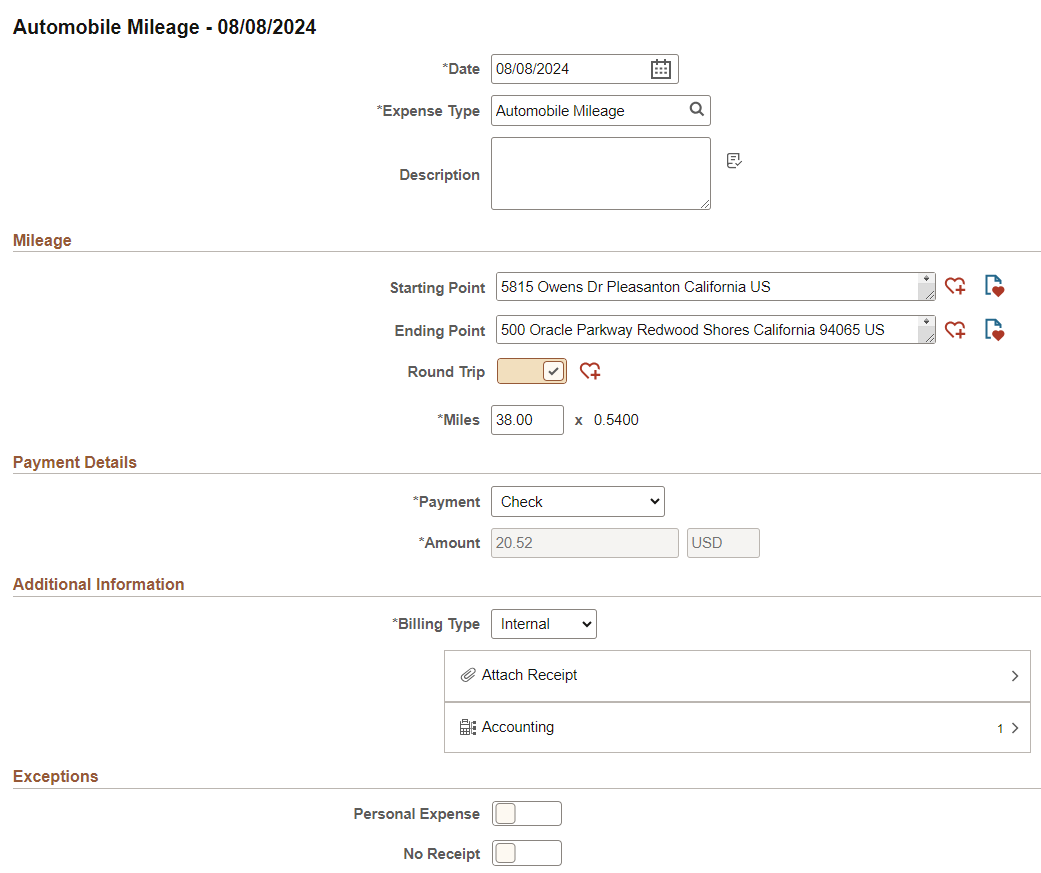
This example illustrates the fields and controls on the Expense Entry page when Automobile Mileage is selected, and the Display Distance Calculator is off.

|
Field or Control |
Description |
|---|---|
|
Staring Point and Ending Point |
Enter an address that matches your starting and ending locations. Because you have not selected Display Distance Calculator on the Expenses Definition - Business Unit 2 Page then there is no key ahead prompting in these fields. Note: When using these two fields, you may want to remove the Originating Location and Destination Location fields that appear in the Additional Information section. To do this, access the Expense Types 1 Page for Automobile Mileage and deselect the Location and Originating Location check boxes. |
 (Add to Favorite List) |
Select to access the Add to Favorite List window, which allows you to add a new favorite location. |
 (View Favorites) |
Select to access the View Favorites window, which lists favorite locations. |
|
Round Trip |
Select to indicate that the trip is not one-way, but a round trip. |
|
Transportation ID |
Select a transportation ID. This field only displays when Varied Rate is selected as the Distance Rate Type for the Auto Mileage expense type on the Distance Rates Page. This field does not display when Standard Rate is selected as the Distance Rate Type. |
|
Miles and (mileage rate) |
Enter the miles from the originating to the destination locations. When you exit this field, the system calculates the Amount field using the mileage rate. The mileage rate is displayed to the right of the Miles field and is used to calculate the reimbursement amount for the distance traveled. |
Add to Favorite List
Use the Add to Favorite List window to add a Starting or Ending point to your Favorites List.
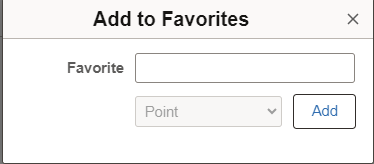
This example illustrates the fields and controls on the Add to Favorites window.

When adding a favorite, you can use the Add to Favorites button next to the Starting Point field, the Ending Point field, or the Round Trip field.
It is recommended that you first enter the location in the Starting or Ending point fields and allow the system to find the best address match. Select the suggested address and then select the Add to Favorites icon.
|
Field or Control |
Description |
|---|---|
|
Favorite |
Enter a description for the address or location. This is a free-form, open field. These values display as the Favorite Type:
|
View Favorites
Use the View Favorites window to select a favorite location and populate the Starting Point or Ending Point fields.
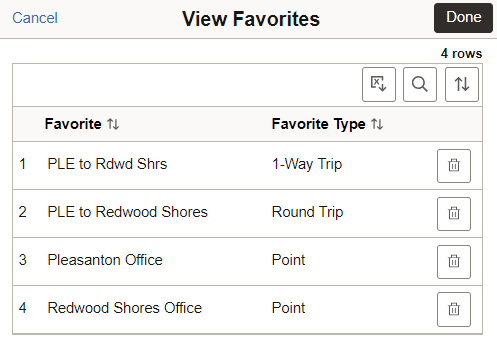
This example illustrates the fields and controls on the View Favorites window.

When selecting a Round Trip option from this window, the system automatically selects the Round Trip toggle by default when returning to the Expense Entry page.
These fields appear when Per Diem is selected as the expense type.
|
Field or Control |
Description |
|---|---|
|
Per Diem Range |
Select a per diem range that defines the number of days at a specific location. PeopleSoft Fluid Expenses uses this information for per diem calculations. The system looks at the employee's base country to determine whether to display the Per Diem Range field or the Start Time and End Time fields. |
|
Start Time and End Time |
Enter the start and end times for the day. The system looks at the employee's base country to determine whether to display the Per Diem Range field or the Start Time and End Time fields. |
|
Amount |
Displays the calculated per diem amount based on the location and other per diem setup rules. You can override the Amount field if you are authorized to do so. |
|
|
Select the Refresh Per Diem Amounts button next to Per Diem Range or End Time field to recalculate the amount. |
|
|
Select the Per Diem Deductions section to access the Per Diem Deductions page and select the qualified deduction percent, amount, or calculation code for the expense type. The option selected is applied to the per diem amount. If a deduction percent or amount results in an amount greater than the original per diem amount, then the per diem amount is set to 0.00 (zero) and a message is displayed by the system. |


