Creating and Maintaining Expense Reports
This topic discusses how to create and manage expense reports.
|
Page Name |
Definition Name |
Usage |
|---|---|---|
|
SPA_EXP_ROSTER |
Manage expenses to include creating new expenses, managing the expenses, and viewing the expense history. |
|
|
SPA_SHEET_MAIN2 |
Enter general expense report information including the description, business purpose, and other comments. |
|
|
SPA_SHEET_LINES2 |
Add expense lines. |
|
|
SPA_SHEET_EXPENSE2 |
Enter expense line information. |
|
|
Exchange Rate Detail Page |
EXCH_RT_DTL |
View exchange rate information. |
|
Expense Attachments Page |
SPA_EXP_ATTACH |
Add attachments to expense reports. Reviewers and approvers can open and view the attachments during the approval process. |
|
Expense Report Line Adjustment |
SPA_SHT_LN_ADJ |
View adjusted expense lines. |
|
Expense Report Line Entry Adjustment |
SPA_SHT_EXP_ADJ |
View adjusted expense line detail information. |
|
Services Expense Report Details |
SPA_SHEET_LINES2 |
Maintain services expense report details. |
|
Manage Expenses (as proxy) |
SPA_EXP_SUP_ROST |
Manage expenses on behalf of another user. |
Use the Manage Expenses page (SPA_EXP_ROSTER) to manage expenses to include creating new expenses, managing the expenses, and viewing the expense history.
Navigation:
This example illustrates the fields and controls on the Manage Expenses page. You can find definitions for the fields and controls later on this page.
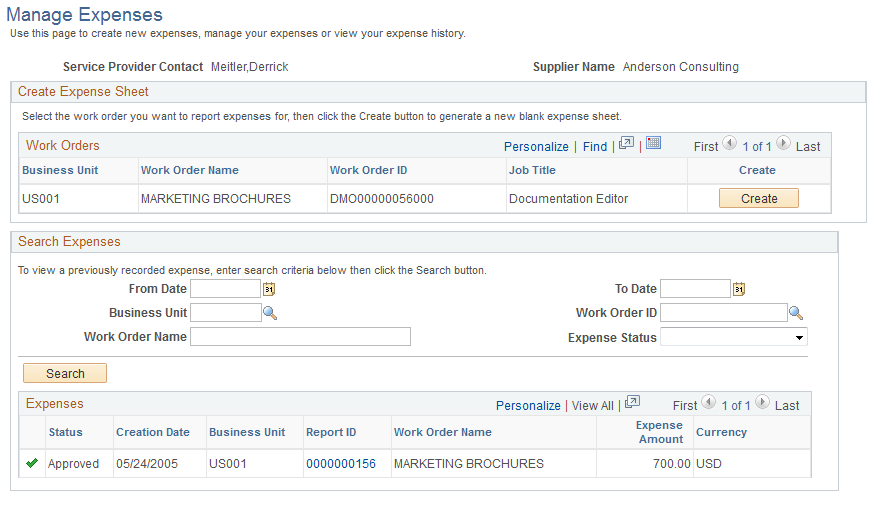
You use this page to manage expenses against work orders. This includes reviewing information about a work order and creating new expense reports for it. You can also limit the search results for existing expense reports that appear on the page and review active reports and their statuses.
Note: To add expense reports, you must be defined as the service provider or service provider contact for a work order. The available work orders appear on this page when you access it.
Create Expense Sheets
Use this section to add expenses to an existing work order. When work orders are associated with a multi-resource order, this page includes the lower-level individual child service resource-based work orders and displays the Job Title field so that you can select the work order to which you want to associate the expenses.
Click the Create button to access the General Information page where you can add a new expense report.
Search Expenses
The system displays all expenses if search criteria has not been specified. To limit the displayed results, enter search criteria and click Search.The search results appear in the Expenses grid.
Expenses
Field or Control |
Description |
|---|---|
Report ID |
Click the link to access the Service Expense Report Details page, where you can view the details of previously created expense reports. |
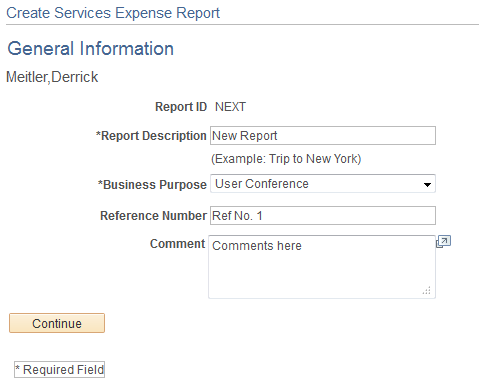
Use the General Information page (SPA_SHEET_MAIN2) to enter general expense report information including the description, business purpose, and other comments.
Navigation:
Click the Create button on the Manage Expenses page.
This example illustrates the fields and controls on the General Information page. You can find definitions for the fields and controls later on this page.
Field or Control |
Description |
|---|---|
Report Description |
Enter a description of this report (30-character limit). |
Business Purpose |
Select the business purpose of this trip or activity. |
Reference |
Enter text (10-character limit.) |
Comment |
Enter general comments regarding the expense sheet. |
Continue |
Click to access the Services Expense Report Details page and add expense lines. |
Use the Services Expense Report Details page (SPA_SHEET_LINES2) to add expense lines.
Navigation:
Click Continue on the General Information page.
This example illustrates the fields and controls on the Services Expense Report Details page. You can find definitions for the fields and controls later on this page.
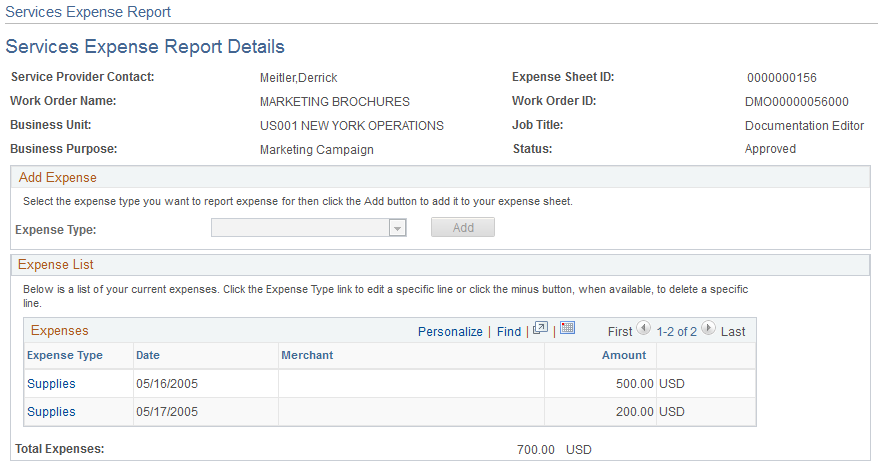
Select an expense type and click Add to access the Add Expense page.
Use the Add Expense page (SPA_SHEET_EXPENSE2) to enter expense line information.
Navigation:
Click the Add button on the Services Expense Report Details page.
This example illustrates the fields and controls on the Add Expense page. You can find definitions for the fields and controls later on this page.
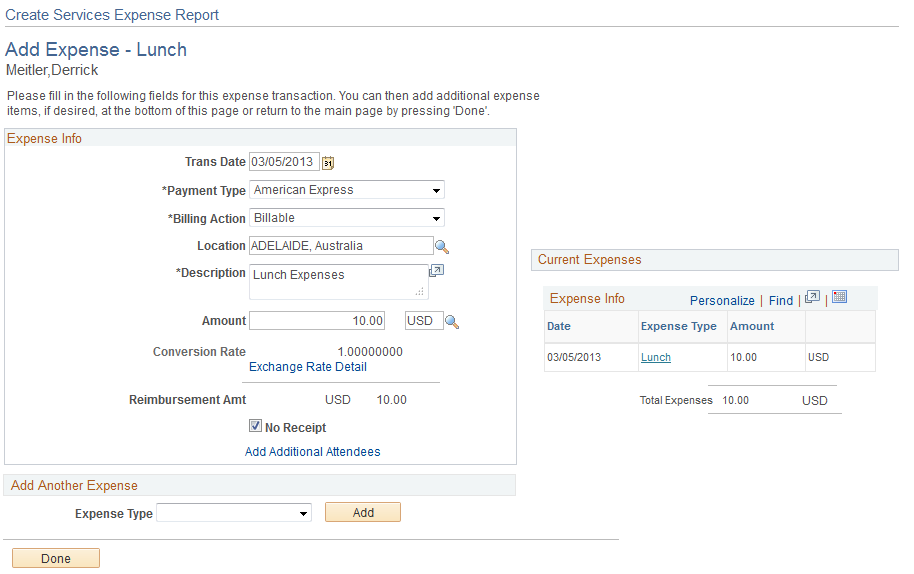
Depending on how the organization defines the expense type, you access the Add Expense page to enter more details such as merchant, mileage, or number of nights pertaining to the line item. When you complete the necessary information, the expense appears as a line item on the Services Expense Report Details page.
Generic Fields Included on Several Add Expense Pages
Field or Control |
Description |
|---|---|
Trans Date (transaction date) |
Enter the transaction date for this expense. |
Payment Type |
Select the payment type for this expense. |
Billing Code |
Select Billable or Nonbillable. |
Merchant: Preferred or Non-preferred |
Depending on how the expense type is defined during setup, this field may be required. |
Location |
Enter where the transaction occurs. |
Description |
Depending on how expense type is defined during setup, this field may be required. |
Amount |
Enter the expense amount and the currency in which it was purchased. The currency code is available for edit only if the PeopleSoft Purchasing business unit allows multicurrency purchase orders. |
Conversion Rate |
Appears automatically and cannot be modified. |
Reimbursement Amount |
Appears in supplier location currency. The supplier location currency appears by default in the Work Order Supplier Location field. You can change this value by choosing a different currency in the Amount field if the PeopleSoft Purchasing business unit allows multicurrency purchase orders. |
Rate Detail |
Click to view rate calculation information. |
No Receipt |
Select this check box if no receipt exists to substantiate an expense item that normally requires a receipt. If a receipt is required, you may need to provide an explanation for this expense. |
Done |
Click when you have completed the line item details. This returns you to the Services Expense Report Details page. |
Specific Fields Included on Some Add Expense Pages
Field or Control |
Description |
|---|---|
Ticket Number |
Enter a reference number for the airline ticket. |
Miles |
Enter the number of miles used to calculate automobile mileage reimbursement. |
Add Additional Attendees |
For meals, click to add a guest or business associate name, company, and title. |
Number of Nights |
Enter the number of nights included in the hotel stay. |
Start Time and End Time |
Enter the start and end of the business day. |
Retrieve Per Diem Amounts |
Click for the system to populate the Amount field with the allowed per diem reimbursement. |
Per Diem Information |
Click to navigate to the Per Diem Information page to select meals that were provided by another party such as a lodging establishment. Depending on how the system is set up, the appropriate amount may be deducted from the per diem for that day. |
Distribution |
Select from the available list of options which includes the description of all the expense distribution lines from the associated work order. If only one expense distribution line is associated, then the value for this field defaults to that particular line. Note: Select from the available list of options which includes the description of all the expense distribution lines from the associated work order. If only one expense distribution line is associated, then the value for this field defaults to that particular line. |
View Expense Distribution ChartField |
Click to access the View/Select Work Order Distribution For: page. Use this page to view the actual ChartField values if the description does not provide enough information to make a selection in the Distribution field. Note: This icon is available only when the expense reporting option is “Actual Allocation” for the associated work order. |
View/Select Work Order Distribution for Expense Report
Navigation:
From the Manage Expenses page, click the Create button to access the General Information page. From the General Information page, click the Continue button to access the Services Expense Report Details page. From the Services Expense Report Details page, select an expense type and click the Add button to access the Add Expense - <Expense Type> page. Click the View Expense Distribution ChartField button to access the View/Select Work Order Distribution For: page.
Use this page to select the appropriate distribution line for the Distribution field on the Add Expense page. The system only displays the ChartFields that are selected for display on the business unit.
Select the distribution line and click the OK button to bring the description into the Distribution field on the Add Expense page.
Use the Services Expense Report Details page (SPA_SHEET_LINES2) to maintain services expense report details.
Navigation:
Click a Report ID link on the Manage Expenses page.
This example illustrates the fields and controls on the Services Expense Report Details page. You can find definitions for the fields and controls later on this page.
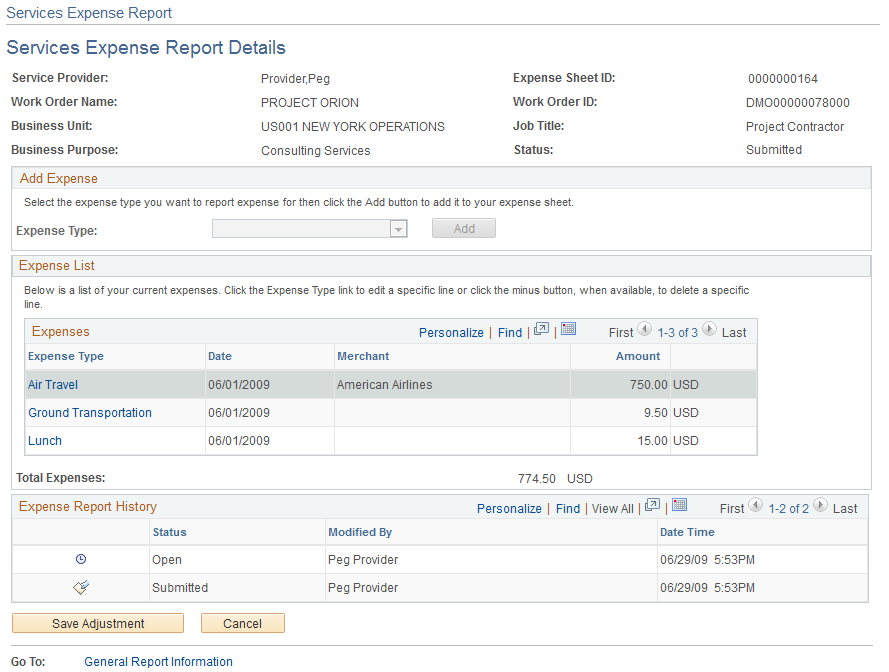
After you create an expense report, you can use this page to view and update the report. You can also create new expenses for the work order using the Add Expense grid. Select a type of expense and click the Add button.
Field or Control |
Description |
|---|---|
Save |
Click to save updates to an expense report. |
Submit |
Click to submit the expense to the expense approver. |
Add Attachment |
Click to upload an attachment to the expense report. |
Preview Expense Approver(s) |
Click to view approvers and reviewers for the expense report. This link is available when the business unit is set to use approval workflow for expenses. |
General Report Information |
Click to access the General Information page where you can view the basic information about the expense. |
Expense List
This grid box displays the current expenses for a service provider. Click the Expense Type link to update an expense. The total amount of the expenses appears in the Total Expenses field.
Expense Report History
This grid box displays the history of expense reports for a service provider along with the status of the expense report. Click the Expense Type link to update an expense. The total amount of the expenses appears in the Total Expenses field.