Performing Inspections
This section discusses how to perform inspections:
|
Page Name |
Definition Name |
Usage |
|---|---|---|
|
Select Receipt Page(search criteria) |
PO_PICK_ORDERS |
Select receipt lines to put through the inspection process. |
|
Supplier Search Page |
SUPPLIER_LOOKUP_SEC |
Search for suppliers. |
|
Item Description Page |
PO_PICK_IT_DESCR |
Enter and view descriptions for a specific item. |
|
RECV_INSPECT |
Put receipt line items through the inspection process. The Inspection Required check box must be selected for the item on the receipt line. |
|
|
RECV_WPO |
To view or update the asset-related information in a receipt. |
|
|
Item Description Page |
RECV_INSP_IT_DESCR |
Enter and view descriptions for a specific item. |
|
RECV_INSP_INSTRUCT |
View inspection instructions associated with the item on the receipt line and enter batch sequence, run time, and inspect ID information. |
|
|
Inspection & Putaway Information Page |
RECV_INSP_PUTAWAY |
Specify a putaway location override for an item. This page is available only if the receipt line is targeted for inventory. |
|
Storage Location Search Page |
RECV_STOR_LOC_SRCH |
Perform a search on available storage locations for the material that you are receiving. |
|
Putaway Locations Page |
IN_PTWY_LOC_SP |
Define directed putaway values for receipt items. |
|
Line Details Page |
RECV_INSP_DETAILS |
View details about the item at the receipt line level. |
|
RTV Setup Page |
RECV_INSPECT_RTV |
Enter RTV details for inspected items. This information is used to generate an RTV transaction automatically. |
|
Quality Data Entry - Subgroup Method or Quality Data Entry - Sample Method Page |
QS_DE_GUI_S |
Enter quality inspection detail results for the item on the purchase order line. |
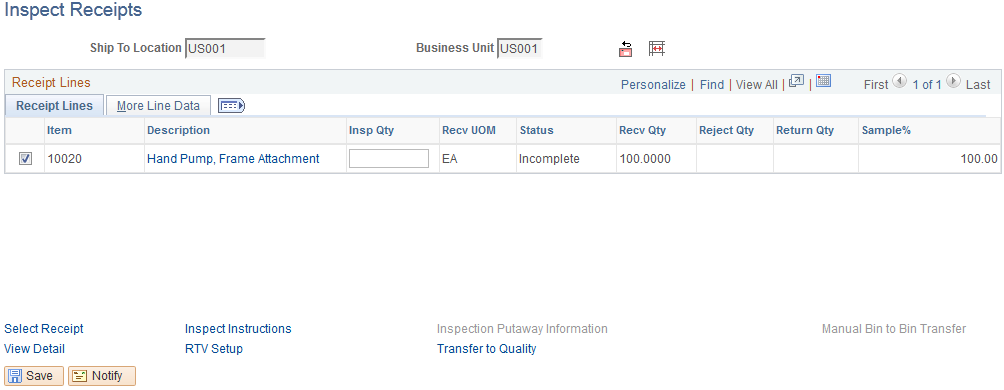
Use the Inspection page (RECV_INSPECT) to put receipt line items through the inspection process.
The Inspection Required check box must be selected for the item on the receipt line.
Navigation:
Enter search criteria on the Select Receipt page and click the Search button.
Click the Sel check box next to a receipt line and click the OK button.
This example illustrates the fields and controls on the Inspect Receipts page. You can find definitions for the fields and controls later on this page.
Field or Control |
Description |
|---|---|
|
Click the RTV Create button to create an RTV transaction, and update the Return Qty field with RTV data that you entered on the RTV Setup page. The RTV transaction is now accessible on the Return to Vendor - RTV page, where you can view and modify detailed information for the RTV transaction. |
|
Click the Automatic Bin to Bin Transfer button to move items from their inspection locations to their putaway locations. The transaction to move items from inspection to putaway locations is written to the electronic data collection log files, where it is picked up by a background process, enabling the move to be completed automatically. This function is available only if you are using an electronic data collection batch update process. The Auto Bin to Bin check box on the Inspection & Putaway Information page is selected for items that are available for use with this function. |


Receipt Lines
Select the Receipt Lines tab.
Field or Control |
Description |
|---|---|
Insp Qty (inspected quantity) |
Enter the quantity of items inspected. |
Status |
The status of the inspection process appears. Values are Complete and Incomplete. When the quantity inspected for the receipt line is equal to or greater than the Sample% of the receipt quantity (Recv Qty) the status is set to Complete. Otherwise, the status is set to Incomplete. |
More Line Data
Select the More Line Data tab.
Field or Control |
Description |
|---|---|
IN Unit (inventory business unit) |
Displays the inventory business unit. If the item is an inventory item, this is the inventory business unit associated with the item. If the receipt line is targeted for Manufacturing (subcontract), this is the inventory business unit associated with the production ID and operation sequence displayed. |
Production ID |
If the item is associated with a PeopleSoft Manufacturing production kit, this field displays the item associated production ID. |
Operation Sequence |
Displays the number designating the order in which this material is used in the production sequence. |
INV Stat (inventory status) |
Designates if the receipt line item is an inventory item, along with its status. Values are:
|
AM Status |
Displays the asset information review status – Pending or Moved. This link is displayed only if the asset details are specified on the Distribution for Schedule page at the time of purchase order creation. Click the Pending link of a receipt line to access the Maintain Asset Receipt Details page, where you can enter asset details for the selected receipt line. If you access the Maintain Asset Receipt Details page using the AM Status link, the Interface Receipt check box and the Interface Asset Information link are hidden. For more information, see Maintain Receipt Asset Details Page. Note: If you navigate to the Maintain Asset Receipt Details page without saving your modifications, an error message displays indicating that there are unsaved changes and you must save them. |
Transfer to Quality |
Click to create a quality data entry session and transfer to the PeopleSoft Quality Data Entry - Subgroup Method page or Data Entry - Sample Method page, depending on the data entry method that you specified when you created the quality control plan. Use this page to pass applicable receipt items on to PeopleSoft Quality for in-depth inspection. Prior to transferring to PeopleSoft Quality, the receipt inspection function updates the hierarchy and trace field values that are passed to PeopleSoft Quality, as well as the inspection quantity, which is passed on to Quality as SGRP size. The inspection quantity to be passed on to PeopleSoft Quality is determined by multiplying the receipt quantity for the line by the sample inspection percent for the item, less the current inspection quantity. Upon returning to receipt inspection on the Inspection page, if the SGRP size was updated by PeopleSoft Quality, it is retrieved and added to the current inspection quantity field value. If the inspection quantity is large enough to satisfy the inspection sample percent for the item, the inspection status is set to Complete. Upon returning to receipt inspection on the Inspection page, if the PeopleSoft Quality fail count is greater than zero, the count is moved to the receipt inspection's return quantity. The reject action is set to Replacement and the reject reason is set to Failed Inspection by default. Note: If the reject reason of Failed Inspection is not set up for the SetID, the system will issue an error message at save time. To correct this error situation access the RTV Setup page for the line and correct the error. At save time, you have the option to generate an RTV transaction automatically for the returned quantity. |
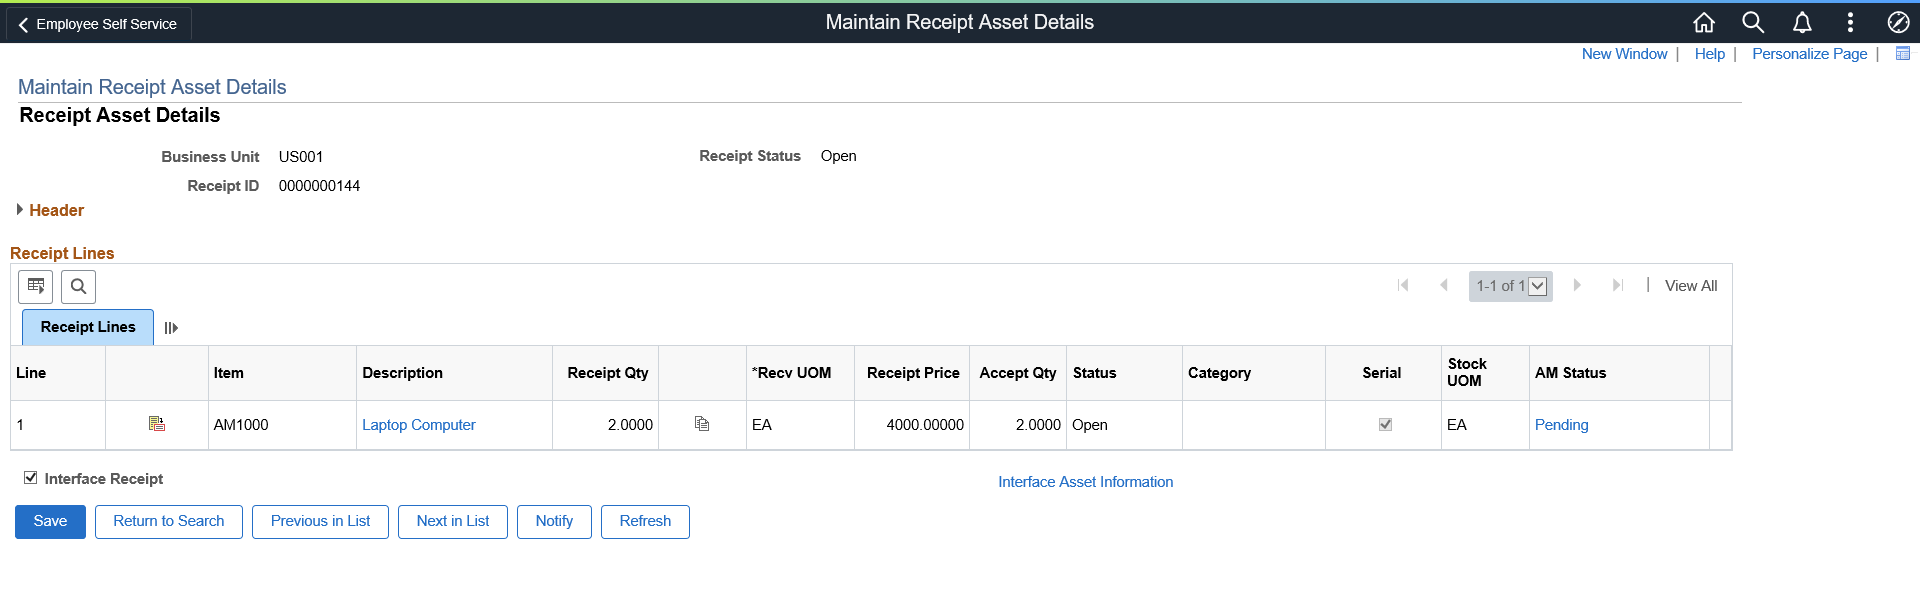
Use the Maintain Receipt Asset Details page (RECV_WPO) to view or update the asset-related information in a receipt. The page displays all the receipts, which contain asset information.
Navigation:
Or
Click the AM Status link from the Inspection page.
This example illustrates the fields and controls on the Maintain Receipt Asset Details page. You can find definitions for the fields and controls later on this page.
Field or Control |
Description |
|---|---|
AM Status link |
Displays the status of the item data in relation to PeopleSoft Asset Management. Values are:
If the receipt line is not asset-related, this field does not display. |
Interface Receipt |
Select this check box to automate the passing of asset information through the receiving process. If you access the Maintain Receipt Asset Details page from the inspection page, this check box does not display. |
Interface Asset Information |
Click this link to access the Pre-AM1 page, where you can preview and correct data that is being sent to PeopleSoft Asset Management. If you access the Maintain Receipt Asset Details page from the inspection page, this link does not display. |
Use the Select Receipt (search criteria) page (PO_PICK_ORDERS) to select receipt lines to put through the inspection process.
Navigation:
Click the Select Receipt link on the Inspection page.
Field or Control |
Description |
|---|---|
Search |
Click to retrieve information to the lower portion of the page based on your selection criteria. |
More Details
Field or Control |
Description |
|---|---|
Price |
Displays the unit price of the item on the purchase order line. |
Use the Inspect Instructions page (RECV_INSP_INSTRUCT) to view inspection instructions associated with the item on the receipt line and enter batch sequence, run time, and inspect ID information.
Navigation:
Click the Inspect Instructions link on the Inspection page.
You define inspection instructions at the item level on the Inspection Routing page. This inspection instruction information is captured upon receipt and can be modified or overridden at the time of inspection.
Field or Control |
Description |
|---|---|
Batch Seq (batch sequence) |
Designates when in the inspection routing sequence this inspection occurs. This field is set to 1 by default for the first inspection operation defined, and it increments with each subsequent operation added for the inspection routing. |
Inspect ID (inspection ID) |
Displays the inspection ID for the items that you are inspecting. |
Run Time |
Displays the estimated time required for each inspection. |
Time Type |
Select the type of inspection on which the runtime is based. Values are:
|
Total Std (total standard) |
Displays the estimated time required for the inspection of all items, based on the Run Time value and the number of items that are being inspected. |
Total Act (total actual) |
Enter the actual time required for the inspection of all items. |
Instructions |
Displays detailed instructions for the inspection of the items. |
Use the Inspection & Putaway Information page (RECV_INSP_PUTAWAY) to specify a putaway location override for an item.
This page is available only if the receipt line is targeted for inventory.
Navigation:
Click the Inspection Putaway Information link on the Inspection page.
After the receiving department receives items, the system moves them to the inspection department to be inspected, if required. At this time, the item has been put away to an inspection location. Once the items pass inspection, they need to be transferred from the inspection location to a location where they can be used for order fulfillment.
If the item original inspection location was used, and if the item's default putaway location will be used, then entering data on this page is optional. The purpose of this page is to specify an override putaway location.
Field or Control |
Description |
|---|---|
Serial |
Indicates whether or not the item is serial controlled. The item serial-controlled status also appears. Values are:
|
Std UOM (standard unit of measurement) |
Displays the UOM assigned to the item that reflects the most common unit of management for the item. |
Putaway Location
Field or Control |
Description |
|---|---|
Area |
Identifies the segment of the warehouse in which to store this item. This location depends on the inspection status of the receipt line. If the inspection status is Incomplete, this location must be an inspection location. If the inspection status is Complete, then it must be a noninspection location. |
Lev 1 - 4 (levels 1−4) |
Identifies the next levels of storage within the area location. This level number may represent aisles, shelves, bins, and so on. Enter as much or as little information that is needed depending on the different storage configurations available. |
Status |
Displays the receipt status. Values are:
|
Auto Bin to Bin (automatic bin to bin) |
If you are using an automated electronic data collection system and this check box is selected, the move from inspection to putaway transaction can be moved by using the electronic data collection log files, where it is picked up by a background process. The move is completed automatically. If this field is selected and you clear it, the check box becomes unavailable for entry and the line is not eligible for automove. After clicking the Automatic Bin to Bin Transfer button on the Inspection page, this check box is cleared and no longer available for entry. |
Putaway Information
Field or Control |
Description |
|---|---|
Serial ID |
Displays the serial number for the material being received. This is required for a serial-controlled item. |
Lot ID |
Displays the lot ID number for the material being received. This is required for a lot-controlled item. |
Cntr ID (container ID) |
Displays the container ID associated with the item. |
Consigned |
If selected, designates that items being put away are consignment items. |
Non-Owned |
If selected, the item has been designated as a non-owned item. |
Line Inv Qty (line inventory quantity) |
Inventory quantity of the item on the original receipt line. Displays the quantity originally passed to inventory. |
Total Inv Qty (total inventory quantity) |
Displays the total inventory item quantity on the receipt. This is a sum of all the current distribution quantities for the receipt line. The value reflects any adjustments that have been made to the receipt distributions, such as RTVs. If the item has an associated RTV transaction, your business unit options are set to adjust for RTV, and the RTV action is return for replacement, this field displays the inventory item quantity less the return quantity. |
Use the Line Details page (RECV_INSP_DETAILS) to view details about the item at the receipt line level.
Navigation:
Click the View Detail link on the Inspection page.
Field or Control |
Description |
|---|---|
Status |
Displays the status of the selected receipt line. |
Inventory |
Indicates whether the item has already been passed on to PeopleSoft Inventory. Values are:
|
Insp DTTM (inspection date and time) |
Indicates the date and time of the item's inspection. |
Use the RTV Setup page (RECV_INSPECT_RTV) to enter RTV details for inspected items.
This information is used to generate an RTV transaction automatically.
Navigation:
Click the RTV Setup link on the Inspection page.
You cannot create an RTV transaction for a receipt that has inventory or asset management interface requirements until it has a moved status.
When you enter RTV information on this page, you must create your RTV before saving your inspection transaction on the Inspection page. To create an RTV, click the RTV Create button on the Inspection page.
If you do not create your RTV before saving your inspection transaction, the system prompts you to create the RTV. Select Yes to create the RTV automatically and return to the Inspection page. The Return Qty field on the Inspection page is now populated with the RTV quantity.
If you select No, the system returns you to the Inspection page to enable you to modify your RTV information. RTV data that you enter is lost if you do not create the RTV before exiting the Inspection page.
Field or Control |
Description |
|---|---|
Vndr Returned Qty (supplier returned quantity) |
Displays the quantity returned based on the UOM assigned to the item by the supplier. |
Std Returned Qty (standard returned quantity) |
Displays the quantity returned based on the standard UOM for the item. |
Vndr UOM (supplier unit of measurement) |
Displays the UOM assigned to the item by the supplier. |
Std UOM (standard unit of measurement) |
Displays the UOM assigned to the item that reflects the most common unit of management for the item. |
Reason Code |
Select a reason for returning the product to the supplier. These values are defined on the Reason Codes page. |
Rej Action (rejection action) |
Select one of the following return action values for the rejected item:
|