Entering Self-Service Orders
This topic discusses how to enter self-service orders.
The PeopleSoft Order Management self-service features enable customers to enter and track orders. Although the pages are designed for external people who access the system, customer service representatives (CSRs) can also use the self-service Sales Order Entry component by clicking the Express Order Entry link in the left-hand navigation or on the CSR Desktop page. Self-service order tracking uses the same pages as the CSR version, but the functionality is limited. These components are simplified versions of the Order Entry Form component and the Order Tracking component.
You must set up customers as external contacts before they can use the self-service features. Establish self-service contact information in the Contact Information component.
Note: The Self-Service Sales Order permission list (EPOM1100), which is attached to the Customer role, is delivered in sample data.
To set up customers as external contacts:
On the Contact page in the Contact Information component, set the Contact Flag field to External.
On the Contact User Profile page, create a user profile:
Enter a user ID and a password, and then confirm the password.
Select the EPOM1100 process profile and EPOM1100 permission list tables.
Select the Customer (case-sensitive) role.
Note: Entering the user profile information here automatically inserts appropriate data into the PeopleSoft security tables.
On the Contact Customer page, assign the contact to appropriate customers.
On the Self Service Security tab, establish customer-level security options.
If you are creating a new user profile, define the default PeopleSoft Order Management business unit and default order group for the user ID.
On the Common Definitions User Preferences page, select Orders - Sales and then enter the default business unit value.
|
Page Name |
Definition Name |
Usage |
|---|---|---|
|
ORDENT_FORM_LN_SS |
Enter self-service sales orders, including header and line information. |
|
|
Sales Order Entry - Shipment Information Page |
ORDENT_SHIPMENT_SS |
View shipping information for all lines on the sales order. |
|
ORDENT_PAYMENT_SS |
View payment information for an order. If the order is new, you can change the payment option. |
|
|
ORDENT_HDR_NOTE |
Associate predefined standard notes or add custom notes to the order header. You can print these notes on the order acknowledgement, invoice, bill of lading, and packing list. |
|
|
ORDENT_LINE_DTL_SS |
View and enter information for an order line. |
|
|
Sales Order Entry - Ship To Address Override Page |
ORDENT_ADDRSHP_LN |
Override the ship to customer address for an order line. |
|
ORDENT_CPYPH_SS |
Copy order lines from previous orders by selecting one or more lines and clicking Copy. Click the Purchase History Search link to search for orders by order number, order date, or product. |
|
|
Sales Order Entry - Order Change Confirmation Page |
ORDENT_CHANGES_SS |
View and confirm any changes made to an existing order. |
|
ORDENT_CONFIRM_SS |
Confirm that the new order is correct. |
|
|
ORDENT_CONFIRM_SS |
Submit the order for fulfillment processing, print a copy of the order, send an email notification with the order information attached, update the order, or add a new order. |
|
|
Send Notification Page |
OM_WF_NOTIFY_SS |
Create an email and send it with the order. |
The Self-Service Sales Order Entry component resembles the Order Entry Form component, but it is less complicated. This component is designed for brokers and other salespeople who are comfortable with sales order entry.
Header, line, and summary information appear on the Sales Order Entry page. Links on this page enable users to access shipping information, update payment information, and print notes on the order acknowledgement, picking plan, packing slip, bill of lading, and invoice. Once all the necessary information is complete, users can view an order confirmation page where they can either modify the order or submit it. After a user submits the order, the order status changes to Open. Users can also cancel or change an order after it has been submitted. When a user cancels an order or order line, PeopleSoft Order Management first checks with PeopleSoft Inventory to ensure the order is eligible for cancellation before the system cancels the line. For partial-shipped order lines, the quantity is adjusted to match the shipped quantity, but the line is not canceled.
Most order processing (defaulting, pricing, freight, deliveries, tax, buying agreements, reservations, automatic sales order processing, and so forth) is the same as for the Order Entry Form component. The component enables the self-service customer to:
Create, view, and update orders only for customers associated with the contact ID associated with their user ID.
Change the unit price for an order line only if these conditions are met:
The contact associated with the user ID is tied to a broker customer ID (the Broker Customer option on the customer General Info page must be selected).
The broker customer is associated with the sold to customer that appears on the sales order (the broker customer acts as a broker for the sold to customer).
Edit only order lines, not schedules.
Override the ship to address but not the sold to address.
Enter payment and credit card information.
Create order header and order line notes.
Copy orders or order lines from purchase history.
Print a copy of the sales order or send an email notification.
Note: The self-service customer must enter a reason code when changing the unit price.
Edit only these fields:
On the order header: Sold To, Requested Arrival Date, Requested Arrival Time, Customer PO (customer purchase order), and Payment Method.
On the order line: Product ID, UOM (unit of measure), Quantity, Requested Ship Date, Requested Ship Time, Requested Arrival Date, Requested Arrival Time, Customer PO, Customer PO Line, Ship-to Customer Ship-to Location, Ship-To Address, Carrier ID, Ship Via, Freight Terms, Partials, Ship Prior, Cancel Backorder.
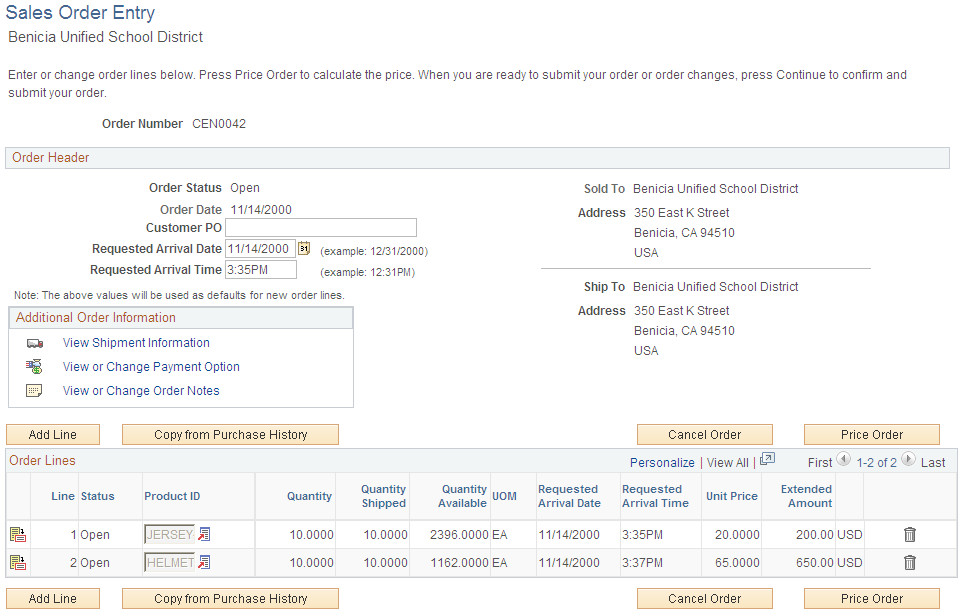
Use the Sales Order Entry page (ORDENT_FORM_LN_SS) to enter self-service sales orders, including header and line information.
Navigation:
Click the Go To Express Order Add/Edit link on the CSR Desktop page.
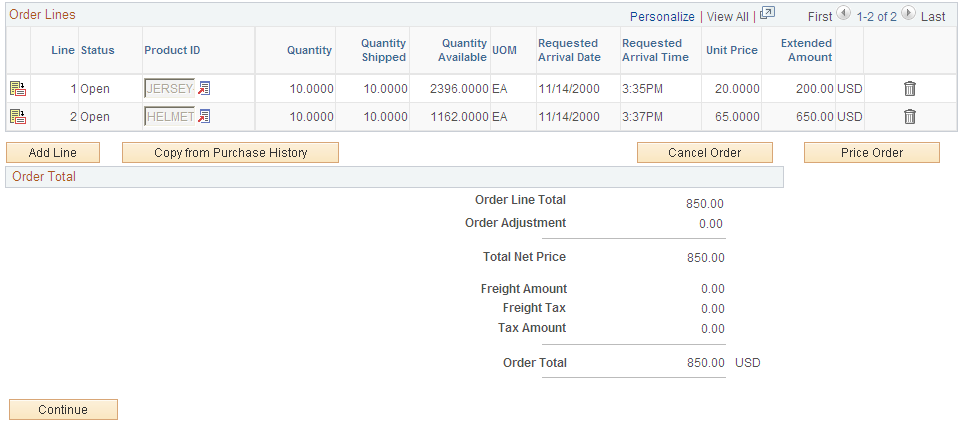
This example illustrates the fields and controls on the Sales Order Entry page (1 of 2). You can find definitions for the fields and controls later on this page.
This example illustrates the fields and controls on the Sales Order Entry page (2 of 2). You can find definitions for the fields and controls later on this page.
Common Information
Field or Control |
Description |
|---|---|
Cancel Order |
Appears only if the order already exists. |
Copy from Purchase History |
Click to access the Select/Copy from Purchase History page. |
Order Header
Field or Control |
Description |
|---|---|
Order Status |
The default value is Pending. When the order is submitted, the status changes to Open. |
View Shipment Information |
Click to access the Shipment Information page. |
View or Change Payment Option |
Click to access the Payment Option page. |
View or Change Order Notes |
Click to access the Order Header Notes page. |
Order Lines
Field or Control |
Description |
|---|---|
Quantity Shipped |
If the product has shipped, the quantity appears. |
Quantity Available |
Displays the quantity available in the ship from PeopleSoft Inventory business unit. |
|
Click the Configure button to select product options. The button appears only if the product is configured. |
|
Click the View Configuration Results button to view the details of the configured product. The button appears only if the product is configured. |
|
Click the Cancel Line button. The status changes from Pending to Canceled. |
Price Order |
Click the button to price the order. |


Order Total
Order amounts appear for the entire order, including adjustments, freight charges and freight tax, and other tax.
Field or Control |
Description |
|---|---|
Continue |
Click to access the Order Confirmation page. |
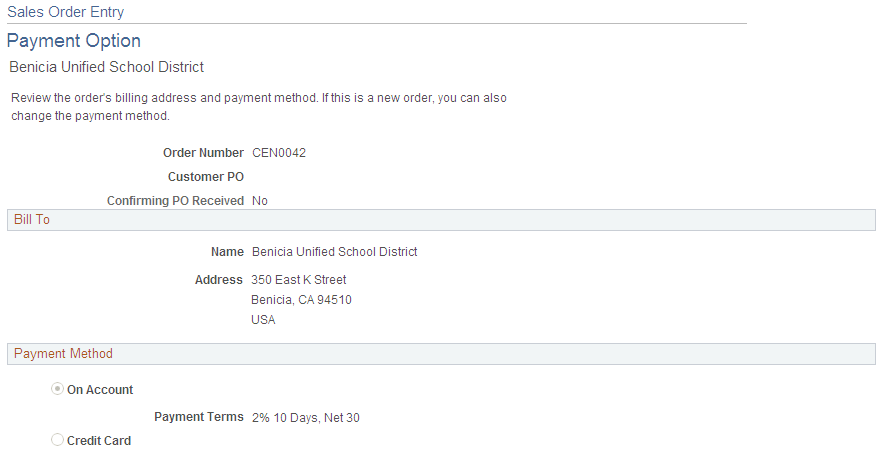
Use the Sales Order Entry - Payment Option page (ORDENT_PAYMENT_SS) to view payment information for an order.
If the order is new, you can change the payment option.
Navigation:
Click the View or Change Payment Option link on the Sales Order Entry page.
This example illustrates the fields and controls on the Payment Option page. You can find definitions for the fields and controls later on this page.
Field or Control |
Description |
|---|---|
Customer PO (customer purchase order) |
Automatically populated from the Sales Order Entry page. You can enter a value for a new order. |
Confirming PO Received (confirming purchase order received) |
Selected if you have received a copy of the purchase order. |
Bill To
Field or Control |
Description |
|---|---|
Name and Address |
Displays information about the bill-to customer. This information cannot be changed. |
Payment Method
The fields in this region differ depending on whether the payment method is on account or credit card. The fields also behave differently for new and existing orders. If the order is new, the customer can change the payment method and also change the credit cards used to pay for the order. For existing orders, the payment method is unavailable.
Field or Control |
Description |
|---|---|
On Account |
Automatically populated from the bill-to customer. If this option is selected, the payment terms appear. They cannot be changed. |
Credit Card |
The option to use a credit card is populated from the bill-to customer. Credit card information must also be established in the Contact Information component. |
Use Stored Credit Card and Edit Credit Card |
The Used Stored Credit Card button appears if the customer has changed the credit card information and wants to use the default credit card. The Edit Credit Card button appears if the customer wants to change the information for the stored credit card. After clicking the button, the customer can enter a new credit card or edit the existing credit card by using the rest of the fields. |
Use the Sales Order Entry - Order Header Notes page (ORDENT_HDR_NOTE) to associate predefined standard notes or add custom notes to the order header.
You can print these notes on the order acknowledgement, invoice, bill of lading, and packing list.
Navigation:
Click the View or Change Order Notes link on the Sales Order Entry page.
This example illustrates the fields and controls on the Order Header Notes page. You can find definitions for the fields and controls later on this page.
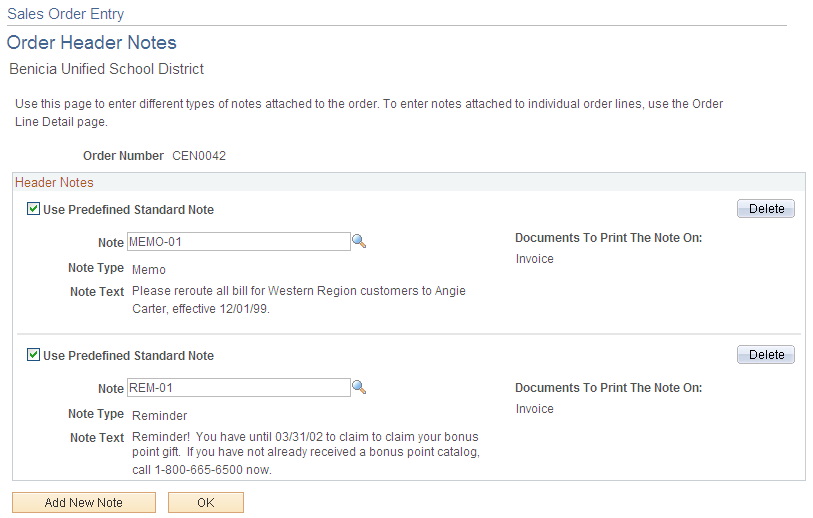
Notes can be predefined or custom.
Field or Control |
Description |
|---|---|
Use Predefined Standard Note |
Select to choose from predefined notes in the Note field. These notes are established on the Standard Notes page. The Note Type, Note Text, and Documents to Print The Note On fields are populated by the system and cannot be changed. |
Note Type |
For custom notes, select from a list of values defined on the Note Types page. For predefined notes, the value appears automatically. |
Note Text |
Enter up to 254 characters for the note. For predefined notes, the note text appears automatically. |
Documents To Print the Note On: |
For custom notes, select the print locations from the available options. You can print notes on invoices, bills of lading, order acknowledgements, picking plans, and quotations without additional customization. |
Add New Note |
Click to add a new predefined note or a custom note. |
Use the Sales Order Entry - Select/Copy From Purchase History page (ORDENT_CPYPH_SS) to copy order lines from previous orders by selecting one or more lines and clicking Copy.
Navigation:
Click the Copy From Purchase History button on the Sales Order Entry page.
Field or Control |
Description |
|---|---|
Select |
Select the lines that you want copied to the order. |
Copy |
Click to add the lines that are selected to the order. |
Cancel |
Click to cancel the search page. |
Purchase History Search |
Click to search for orders by order number, order date, or product. |
Use the Sales Order Entry - Order Line Detail page (ORDENT_LINE_DTL_SS) to view and enter information for an order line.
Navigation:
Click the Show Details button for a line on the Sales Order Entry page.
Note: If the line has been shipped, only the quantity can be updated.
Requested Dates
Field or Control |
Description |
|---|---|
Requested Dates |
Changing these values updates the Scheduled Dates fields. |
Ship To
Field or Control |
Description |
|---|---|
Address Override |
Click to change the ship-to address for the line on the Ship To Address Override page. |
Ship Options
The same restrictions apply as in the Order Entry Form component.
Line Notes
The fields are the same as those on the Order Header page. The line notes apply to individual lines.
Use the Sales Order Entry - Order Confirmation page (ORDENT_CONFIRM_SS) to confirm that the new order is correct.
Navigation:
Click the Continue button on the Sales Order Entry page.
Review the order before submitting it.
Field or Control |
Description |
|---|---|
|
Click the Print button to print a copy of the order. The order can be printed in Web Friendly Page or Print Friendly Page format. |
Status |
The status changes from Pending to Open after the order is submitted. |
Submit Order |
Click to access the Order Submitted page. |
Return to Sales Order Entry |
Click to return to the order and make changes. |

Use the Order Submitted page (ORDENT_CONFIRM_SS) to submit the order for fulfillment processing, print a copy of the order, send an email notification with the order information attached, update the order, or add a new order.
Navigation:
Click the Submit Order button on the Sales Order Entry - Order Confirmation page or the Sales Order Entry - Order Change Confirmation page.
Field or Control |
Description |
|---|---|
|
Click the Print button to print a copy of the order. The order can be printed in Web Friendly Page or Print Friendly Page format. |
Send Notification |
Click to access the Send Notification page and to create and send an email to the person defined as the contact. The system sends a link to the sales order and also sends a copy of the sales order in text format. |
Status |
After the order is submitted, the status changes to Open. |
Change this Order |
Click to access the Sales Order Entry page and make changes to the order. |
Add Order, Same Customer |
Click to access the Sales Order Entry page and enter a new order. |
Add Order, New Customer |
Click to select a customer for a new order. |

Use the Sales Order Entry - Order Change Confirmation page (ORDENT_CHANGES_SS) to view and confirm any changes made to an existing order.
Navigation:
Click the Continue button on the Sales Order Entry page, if you changed the order.
The page displays the changes to the order.
Field or Control |
Description |
|---|---|
Submit Order |
Click to submit changes and access the Order Submitted page. |