Setting Up the Fulfillment Engine Processing Options
There are several processing options to be defined for the fulfillment engine. These options are defined in a default hierarchy. At each level, you can define processing options for the run control pages, the online pages, and the external interfaces. When the fulfillment engine needs to process transactions, it finds the necessary processing options by using the following default hierarchy:
Transaction level
The system looks to the run control page or online pages for overrides to the fulfillment engine default options. If overrides are not allowed or no entries are made, then the system looks to the business unit level.
Business unit level
The system looks to the Setup Fulfillment - Fulfillment Engine Options component defined for the PeopleSoft Inventory business unit. If a default is not defined at this level for a particular option, then the system looks to the SetID level.
SetID level
The system looks to the Fulfillment Engine Options component defined by SetID. This is linked to one or more PeopleSoft Inventory business units on the TableSet Control - Record Group page using the record group, IN_17, Fulfillment Engine Options. If a default is not defined at this level for a particular option, then the system uses the system-defined options.
System level
If any of the processing options are not found, then the system-defined options are used.
The default options for the fulfillment engine are:
Field or Control |
Description |
|---|---|
Auto Schedule Processing |
Select to immediately process the requests. The Fulfillment Requests process is launched when the requests are posted to the staging tables. This option is used when processing EIP messages and Fulfillment Workbench requests. |
Release Additional Locks |
Select to instruct the fulfillment engine to release any locks not identified by the first processing group of data determined at run time. If this option is cleared, then all fulfillment transaction requests and demand lines meeting those requests are soft locked until they are finished processing. When the locks are released using this option, both fulfillment transaction requests and demand lines that were not included in the initial processing group are released to be processed by concurrent fulfillment engine processes. |
Perform Validation |
Select to have the fulfillment engine validate data loaded into the demand table (IN_DEMAND) by external applications. |
Log Errors Option |
There are two options:
|
Allow Processing Overrides |
Select to enable the user to override the Processing Level, Processing Count, Commit Level, and Commit Count fields where provided on the Fulfillment Workbench, fulfillment process pages, and external messages. |
Processing Count |
Enter the number of lines that can be processed together by the fulfillment engine; in other words, define the size of the processing group. The processing count is used to tune an inventory environment that is running into database contention issues. A processing group should be defined to be smaller than the large fulfillment transaction requests of your environment. If the Processing Count field is blank or zero, then all the data identified by the transaction request is included in one processing group. A processing group breaks up the request into smaller chunks for processing, consequently reducing table locks and contention issues. For example, with a processing count of 500, the system processes rows in groups of 500. If the transaction request includes 1,050 rows of data, the system process the data in 3 processing groups, 2 groups of 500 rows, and 1 group of 50 rows at the end of the process. Note: If the fulfillment engine receives a commit count greater than the specified processing count and the processing level is the same as the commit level, then the processing count is set to the commit count. Also, if the pass through level field is greater than the value specified in the Processing Level field, then the processing group is expanded to include all data at the pass through level. |
Processing Level |
Determines how the system counts rows to reach the number entered in the Processing Count field. For example, with a processing count of 500 and a processing level of Order, the process would create a processing group per every 500 order numbers. You can create processing groups based on:
Note: When the Processing Count field is not blank or zero, the Processing Level must be greater than or equal to the Commit Level field. |
Commit Count |
Enter the number of lines that can be committed to the database together by the fulfillment engine; in other words, define the size of the commit group. The commit count is used to tune an inventory environment that is running into database contention issues. A commit group is a subset of the processing group; therefore, the Commit Count field should be the same as or smaller than the value in the Processing Count field. If the Commit Count field is blank or zero, then all the data rows identified in the processing group are committed to the database together. A commit group should break up the processing group into smaller chunks for committing to the database. For example, if you use a processing count of 500 and a commit count of 100, the system breaks up the transaction request of 1,050 data rows into 3 processing groups: 2 groups of 500 rows and 1 group of 50 rows. Each processing group is then broken up into commit groups of 100 rows each. The first 2 processing groups are divided into 5 commit groups each and the last processing group of 50 rows is 1 commit group. The system then commits the data to the database using 11 commit groups in total. Note: If the fulfillment engine receives a pass through level field that is greater than the value specified in the Commit Level field, then the commit group is expanded to include all data at the pass through level. |
Commit Level |
Determines how the system counts rows to reach the number entered in the Commit Count field. For example, with a commit count of 100 and a commit level of Item, the system issues a commit to the database for every 100 item IDs. You can issue commits based on:
Note: When the Commit Count field is not blank or zero, the commit level must be less than or equal to the processing level. |
Allow Pass-through Overrides |
Select to enable the user to override the pass through level on the Fulfillment Workbench, fulfillment process pages, and the fulfillment engine EIPs. |
Pass-through Level |
Provides the ability to pass good transactions through the system while holding up transactions that need additional review. On the request pages and on the transactions, the pass through level can have these values:
From a processing standpoint, the pass through level must be less than or equal to the processing level and commit level. If the fulfillment engine receives a pass through level greater than the specified commit level or processing level, the commit group or processing group is expanded to include all data at the pass through level. Note: The Reserve Materials process has restrictions based on lead times and item availability that determine whether demand lines are reserved. Demand lines that do not pass these restrictions are not considered errors for pass through purposes. Note: For the Order Release Request process page and the Fulfillment Workbench, the Pass-through Level does not impact the picking portion of the process. |
Allow State Overrides |
Select to enable the user to override the from fulfillment status of the orders in the group. This applies to the Order Release Request process, Front-end Shipping Requests process, Shipping Requests process, and the fulfillment engine EIPs for front-end shipping and shipping. |
Allow Auto-Processing Override |
Select to enable the user to override the auto-processing option on process page, Fulfillment Workbench, or request transactions from an EIP. |
Auto Processing Option |
Select the auto processing option to move your orders downstream to the desired state. Options include:
|
Auto Release User ID |
Enter any user IDs that has created a run control for the Order Release Request process page. |
Auto Release Run Control |
Select any run control for the Order Release Request process page defined by the user entered in the Auto Release User ID field to the left. This run control contains the parameters to be used when auto-processing orders from an unfulfilled state to another downstream state. The Auto-Processing Option field on the Order Release Request determines how far downstream the orders will be sent. To find the correct value for this field and the Auto Release User ID field, the system first looks for a value on:
|
Auto Process at Save |
Select this check box to launch the auto-processing option when the online page is saved. The online pages include Create/Update Stock Request component, Material Picking Feedback page, Express Issue page, and the Shipping/Issues page. |
Complete Flag |
Choose a Complete Flag option to automatically performing picking functionality on demand lines that have no previous picking activity reported against them. The LLS segment and the override location are applied prior to implementing the complete flag logic. Using the Complete Flag, the line can be moved to different sub-states within the Released state, or, with auto-processing, moved downstream to the shipped or depleted states. The complete flag is used for run control pages, fulfillment engine transaction requests, the Fulfillment Workbench, and the Inventory Picking EIP. The Complete Flag options are:
Note: For fulfillment engine transaction requests, the level (header, group or detail) where the Complete Flag is located determines what level to apply the complete flag logic. |
Allow Kit Re-Explode Overrides |
Select to enable the user to override the default settings for the Execution Mode and the Kit Effective Date on the Kit Re-Explode process page. |
Execution Mode |
Choose the action to be performed by the Kit Re-Explode process. The option are:
|
Kit Effective Date |
Select the date of the component kit demand lines to be compared to the date range (effective date and obsolete date) on the Product Kit Summary page. The demand line dates are:
|
Fulfillment engine processing options can be set at different locations to default into the fulfillment transaction requests.
|
Fulfillment Engine Options |
System Defined Options (1) |
SetID Level (2) |
Unit Level (3) |
Transaction Level (4) |
|---|---|---|---|---|
|
Auto Schedule Processing |
Yes |
Yes |
Yes |
|
|
Release Additional Locks |
Yes |
Yes |
||
|
Perform Validation |
Yes |
|||
|
Log Errors Option |
Yes |
|||
|
Allow Processing Overrides |
Yes |
Yes |
Yes |
No |
|
Processing Count |
Yes |
Yes |
Yes |
Yes |
|
Processing Level |
Yes |
Yes |
Yes |
Yes |
|
Commit Count |
Yes |
Yes |
Yes |
Yes |
|
Commit Level |
Yes |
Yes |
Yes |
Yes |
|
Allow Pass through Overrides |
Yes |
Yes |
Yes |
No |
|
Pass through Level |
Yes |
Yes |
Yes |
Yes |
|
Allow State Overrides |
Yes |
Yes |
Yes |
No |
|
Allow Auto-Processing Override |
Yes |
Yes |
Yes |
No |
|
Auto Processing Option |
Yes |
Yes |
Yes |
Yes |
|
Auto Release User ID |
No |
Yes |
Yes |
No |
|
Auto Release Run Control |
No |
Yes |
Yes |
Yes |
|
Auto Process at Save |
Yes |
Yes |
Yes |
No |
|
Allow Kit Re-Explode Overrides |
Yes |
Yes |
Yes |
|
|
Execution Mode |
Yes |
Yes |
Yes |
Yes |
|
Kit Effective Date |
Yes |
Yes |
Yes |
Yes |
(1) System-defined options are used if no options are defined at the SetID, business unit, or transaction level.
(2) SetID level options are defined on the Fulfillment Engine Options page.
(3) Business unit level options are defined on the Setup Fulfillment - Fulfillment Engine Options page.
(4) Transaction level options are defined on the Fulfillment Workbench, fulfillment engine EIPs, and the fulfillment process pages. Not all options are available on each transaction type.
The system-defined fulfillment engine processing options are set as follows:
Field or Control |
Description |
|---|---|
Auto Schedule Processing |
The system-defined value is No. |
Release Additional Locks |
The system-defined value is No. |
Allow Processing Overrides |
The system-defined value is No. |
Processing Count |
The system-defined value is zero. |
Processing Level |
The system-defined value is Line. |
Commit Count |
The system-defined value is zero. |
Commit Level |
The system-defined value is Line. |
Allow Pass-through Overrides |
The system-defined value is No. |
Pass-through Level |
The system-defined value is Demand Line for reserve transactions and Request for shipping transactions. |
Allow State Overrides |
The system-defined value is No. The following states are set:
|
Allow Auto-Processing Override |
The system-defined value is No. |
Auto Processing Option |
The system-defined value is No Auto-Processing. |
Auto Process at Save |
The system-defined value is No. |
|
Page Name |
Definition Name |
Usage |
|---|---|---|
|
INV_FUL_DFLT |
Define the fulfillment engine processing options for the SetID level. This is linked to one or more PeopleSoft Inventory business units on the TableSet Control - Record Group page using the record group, IN_17, Fulfillment Engine Options. |
|
|
TableSet Control - Record Group Page |
SET_CNTRL_TABLE1 |
Select the SetID for the record group, IN_17, Fulfillment Engine Options to link the fulfillment engine processing options for the SetID level to the business unit (set control value).
|
|
OF_SETUP1_INV |
Define fulfillment engine defaults at the business unit level. |
|
|
INV_FUL_DFLT_BU |
Define fulfillment engine processing options for the business unit level. |
Use the Fulfillment Engine Options page (INV_FUL_DFLT) to define the fulfillment engine processing options for the SetID level.
This is linked to one or more PeopleSoft Inventory business units on the TableSet Control - Record Group page using the record group, IN_17, Fulfillment Engine Options.
Navigation:
This example illustrates the fields and controls on the Fulfillment Engine Options page (page 1 of 2). You can find definitions for the fields and controls later on this page.

This example illustrates the fields and controls on the Fulfillment Engine Options page (page 2 of 2). You can find definitions for the fields and controls later on this page.
Processing Options
The columns on this page are defined at the beginning of this section.
This page defines default values to be used when the fulfillment engine processes fulfillment transaction requests.
Field or Control |
Description |
|---|---|
Page/Process and Transaction |
Displays the type of interface that uses the processing options:
|
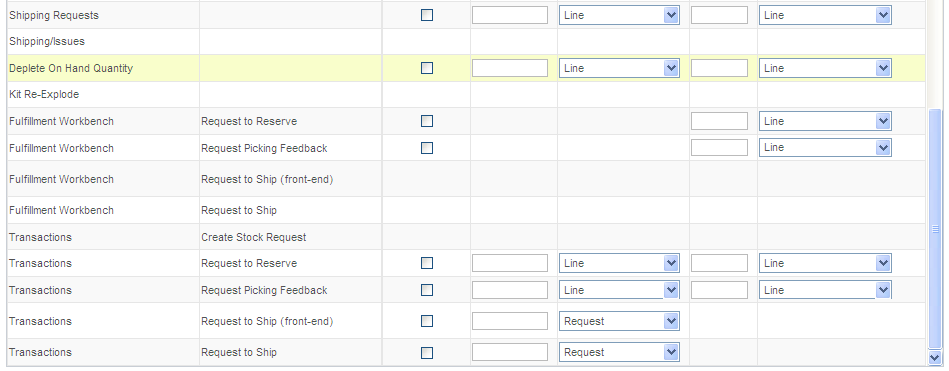
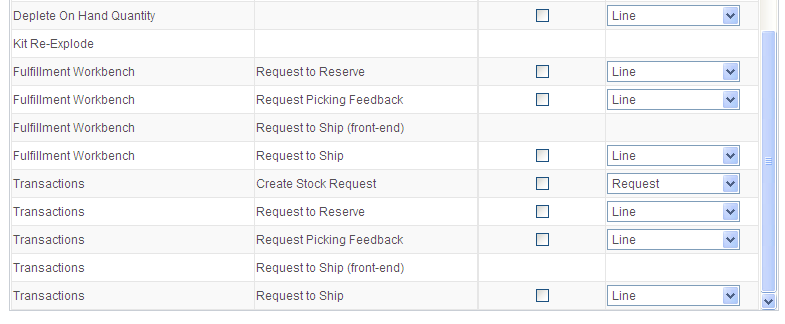
Passthrough Options
The columns on this page are defined at the beginning of this section.
This example illustrates the fields and controls on the The Passthrough Options tab of the Fulfillment Engine Options page (page 1 of 2). You can find definitions for the fields and controls later on this page.
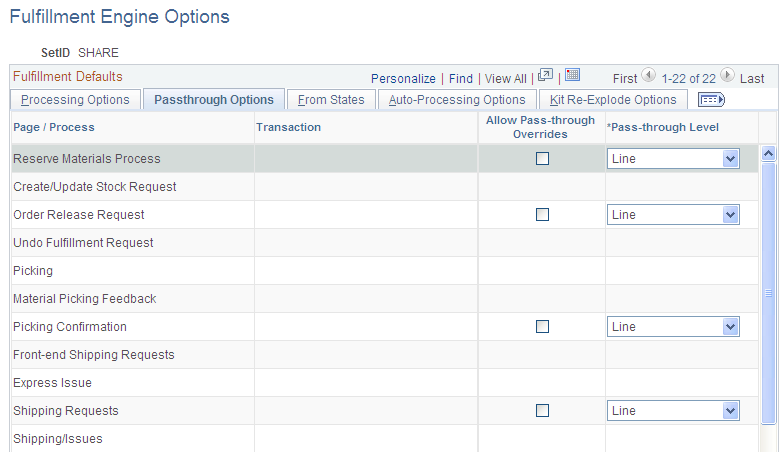
This example illustrates the fields and controls on the The Passthrough Options tab of the Fulfillment Engine Options page (page 2 of 2). You can find definitions for the fields and controls later on this page.
From States
Select the From States tab.
This example illustrates the fields and controls on the The From States tab of the Fulfillment Engine Options page (page 1 of 2). You can find definitions for the fields and controls later on this page.
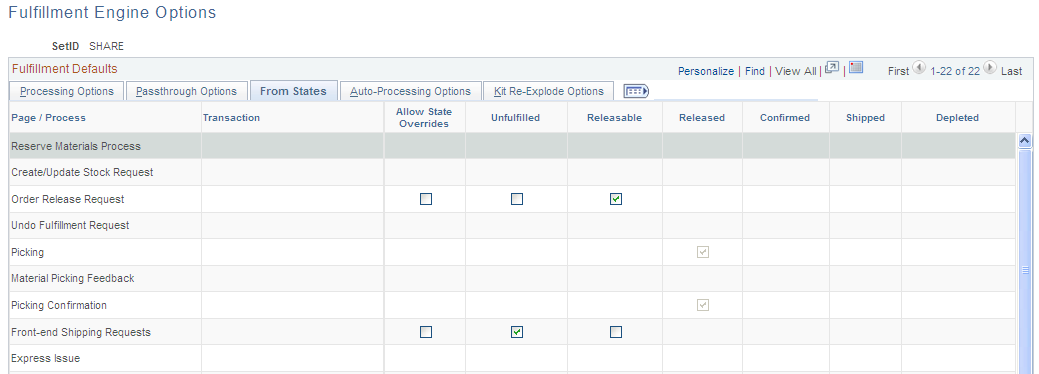
This example illustrates the fields and controls on the The From States tab of the Fulfillment Engine Options page (page 2 of 2). You can find definitions for the fields and controls later on this page.
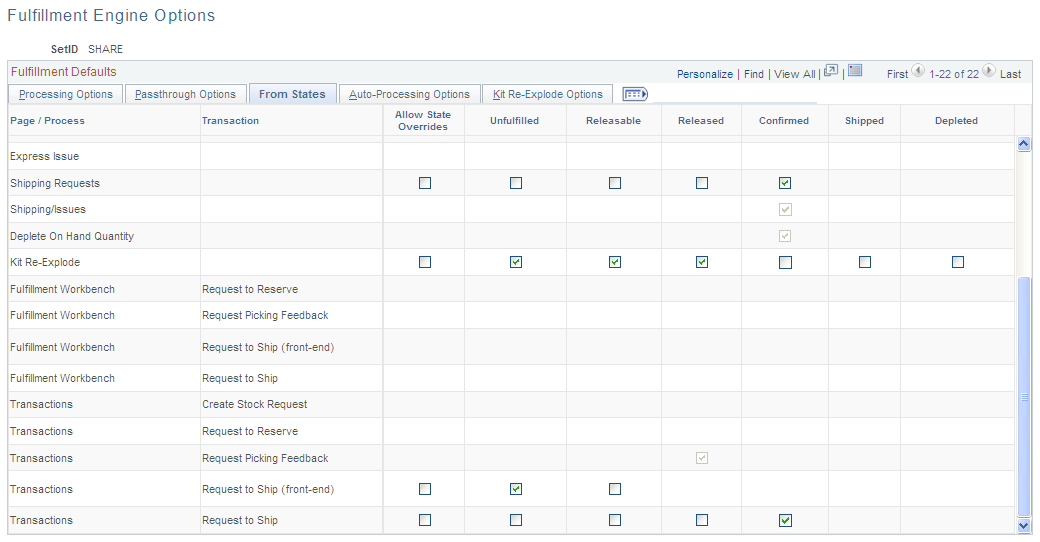
The From States page identifies the fulfillment status of the orders that users can select for processing by the fulfillment engine. For example, if the From States of Unfulfilled is selected, then users can select unfulfilled orders for processing.
Field or Control |
Description |
|---|---|
Allow State Overrides |
Select to enable the user to select a different From State in the fulfillment transaction request. |
Unfulfilled, Releasable, Released, Confirmed, Shipped, and Depleted |
Select the from state (or starting fulfillment status) of the orders to be moved to another status by the fulfillment engine. |
Note: The From States for the Fulfillment Workbench page are defined in the template ID for the workbench, not on this page.
Auto Processing Options
The columns on this page are defined at the beginning of this section.
This example illustrates the fields and controls on the The Auto-Processing Options tab of the Fulfillment Engine Options page (page 1 of 2). You can find definitions for the fields and controls later on this page.
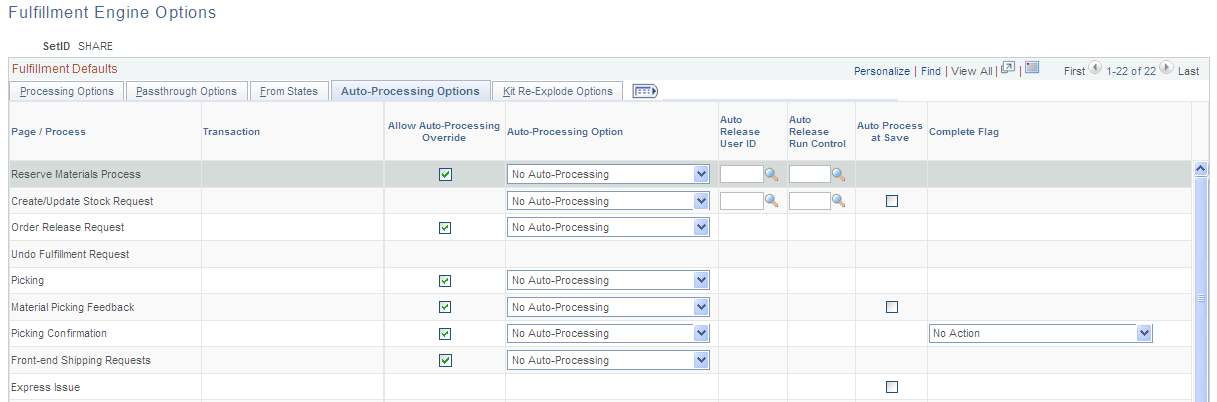
This example illustrates the fields and controls on the The Auto-Processing Options tab of the Fulfillment Engine Options page (page 2 of 2). You can find definitions for the fields and controls later on this page.

Kit Re-Explode Options
Select the Kit Re-Explode Options tab.
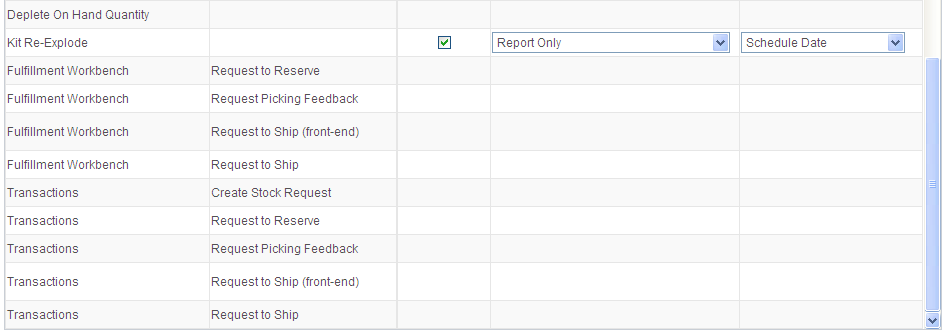
This example illustrates the fields and controls on the The Kit Re-Explode Options tab of the Fulfillment Engine Options page (page 1 of 2). You can find definitions for the fields and controls later on this page.
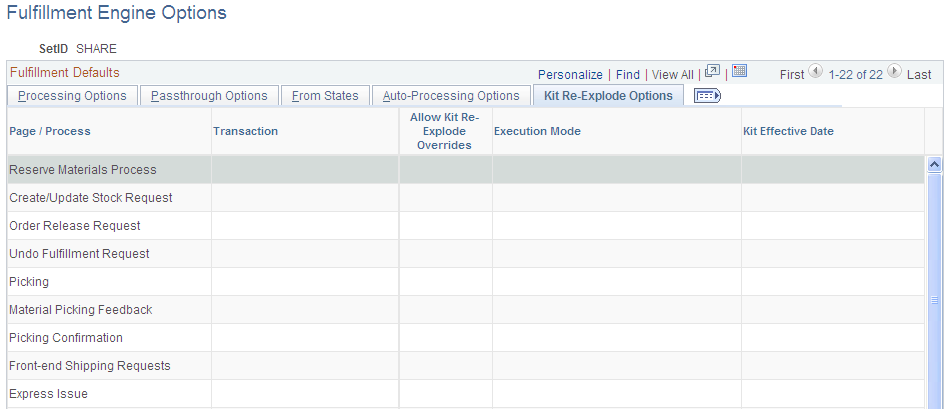
This example illustrates the fields and controls on the The Kit Re-Explode Options tab of the Fulfillment Engine Options page (page 2 of 2). You can find definitions for the fields and controls later on this page.
Field or Control |
Description |
|---|---|
Allow Kit Re-Explode Overrides |
Select to enable the user to override the default settings for the Execution Mode and the Kit Effective Date on the Kit Re-Explode process page. |
Execution Mode |
Choose the action to be performed by the Kit Re-Explode process. The option are:
|
Kit Effective Date |
Select the date of the component kit demand lines to be compared to the date range (effective date and obsolete date) on the Product Kit Summary page. The demand line dates are:
|