Setting Up User Options (Fluid)
This topic discusses how to set up user options for Fluid eBill Payment, including general, currency, and alert options.
|
Page Name |
Definition Name |
Usage |
|---|---|---|
|
EB_USER_PREF_SCF |
Select default customer, payment and invoice delivery methods, and user currency settings. Select options to activate alerts, if enabled by the biller. |
|
|
EB_ACDET_CUST_SCF |
Change the customer that is currently represented. Available only if the user has access to multiple Bill To customers. |
Use the My Preferences - eBill Payment page to select default customer, payment and invoice delivery methods, and user currency settings. Select options to activate alerts, if enabled by the biller.
Navigation:
Note: You must be on a Fluid eBill Payment page by selecting a tile on My Homepage before accessing My Preferences for Fluid eBill Payment.
If enabled by the biller, select My Preferences from the Actions List button on the Fluid eBill Payment homepage to change advanced user options, such as regional settings and navigation personalizations.
This example illustrates the fields and controls on the My Preferences eBill Payment page (1 of 2).

This example illustrates the fields and controls on the My Preferences eBill Payment page (2 of 2).
General Options
Field or Control |
Description |
|---|---|
Default Customer |
Select the default customer account for tile and page data. Available only if the user has access to multiple Bill-To customers. Changing the default customer will not change the current customer. Use the Customer page or restart Fluid eBill Payment. |
Default Payment Method |
Select from the available payment methods:
Only payment methods enabled by the biller are available. In addition, your account must be set up to use the different available payment methods. To use PayPal, you must establish a PayPal customer account. |
Invoice Delivery Option |
Select Email Notification or Print Copy. |
Currency Options
Field or Control |
Description |
|---|---|
Preferred Currency |
Select a preferred display currency. The system converts multi-currency balances to the preferred currency for display, such as on the Account Summary and Make a Payment pages. The preferred currency is also used for the threshold amounts specified in the Alerts section on this page. |
Display Currency Option |
Select an option that determines the currency used to calculate display amounts. Select from these options:
|
Quick Pay
|
Field or Control |
Description |
|---|---|
|
Confirm Quick Pay Payments |
Select Yes to confirm payments made through the Quick Pay tile before submitting them for payment. |
Alerts - Email Notification
Alerts appear when enabled by the biller on Fluid eBill Payment installation pages.
Field or Control |
Description |
|---|---|
|
Delivery Method |
Select Alert Notification to receive alerts in the notifications window accessed from the Notifications (flag) button on the My Homepage banner. |
|
Payment Processed Successfully |
Select Yes to receive an alert when a payment has been processed successfully and applied to the customer’s account. |
|
New Statement Available |
Select Yes to receive an alert when a new statement is available. |
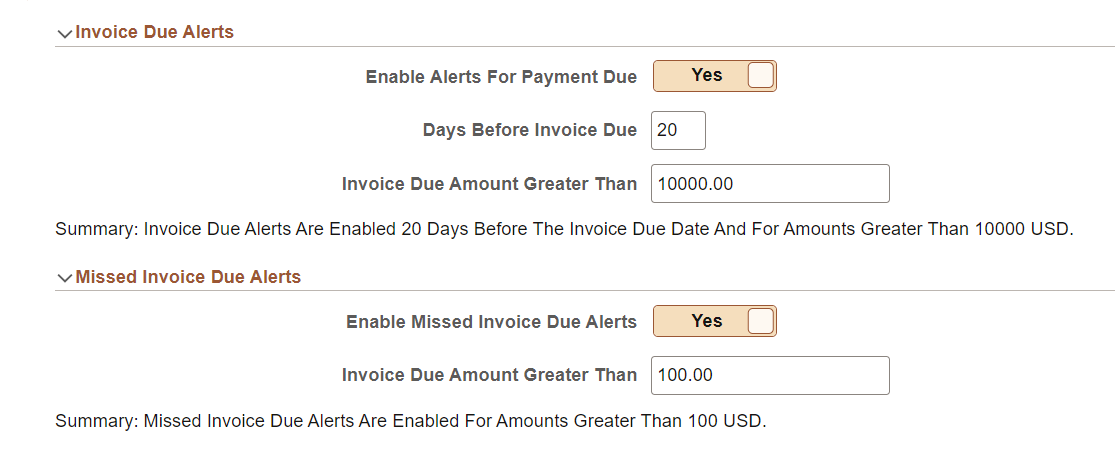
Invoice Due Alerts & Missed Invoice Due Alerts
|
Field or Control |
Description |
|---|---|
|
Enable Alerts for Payment Due and Enable Missed Invoice Due Dates |
Select Yes to enable the alert. |
|
Days before Invoice due and Invoices greater than |
Filter invoices by entering the minimum invoice amount that activates the alert. The currency represents the Preferred Currency defined on this page. |
|
Missed Invoice Due Date and Invoices greater than |
Filter invoices by entering the minimum invoice amount that activates the alert. The currency represents the Preferred Currency defined on this page. |
Use the Customer page to change the customer that is currently represented. Available only if the user has access to multiple Bill To customers.
To change the default customer, use the My Preferences page.
Navigation:
Select any tile except Payment Cart and Quick Pay on My Homepage in the customer portal. Click the Actions List button in the banner, then select Customers.
This example illustrates the fields and controls on the Customers page as displayed on a laptop. The fields are the same on smartphones; only the formatting is different. You can find definitions for the fields and controls later on this page.
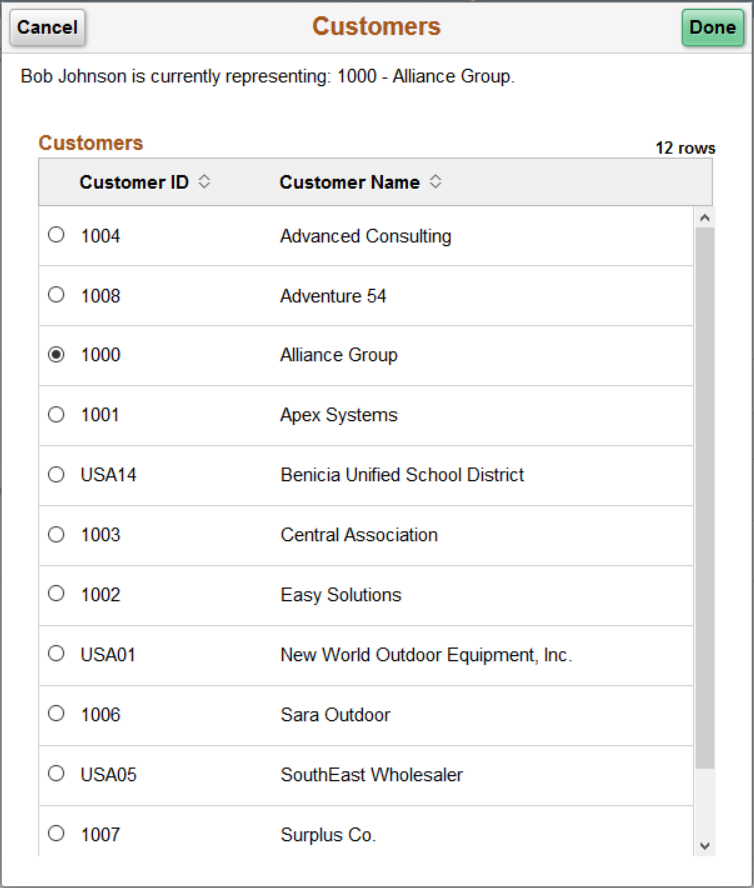
The user only sees customers to which they have access. Customers are displayed regardless of their account balance.