Using the Fluid Group and Special Purpose Contracts
Use the Procurement Operations Home page to access PeopleSoft Fluid pages related to procurement processing.
Navigation:
Working with the Procurement Operations Home Page
Understanding Group Contracts and Special Purpose Contract Process Options
Note: The fluid component can also be added and maintained on the classic component.
|
Page Name |
Definition |
|---|---|
|
Contract Agreement Page |
CNT_AGREE_FL |
|
Contract Agreement Secondary Page |
CNT_AGREE_SCF |
|
Contract Agreement Clause Text Secondary Page |
CNT_AG_TXT_SCF |
|
Contract Agreement Notification Recipient Secondary Page |
CNT_AG_WFRCP_SCF |
|
Contract Amount Notification Page |
CNT_AMTNOTIFY_FL |
|
Related Contracts Search Secondary Page |
CNT_CHD_ADD_SCF |
|
Change Tracking Reason Secondary page |
CNT_CHG_REASON_SCF |
|
Related Contracts Page |
CNT_CHILD_FL |
|
Contract Comments Page |
CNT_COMMENT_FL |
|
Contract Date Notification |
CNT_DATENOTIFY_FL |
|
Contract Date History Page |
CNT_DAT_HIS_FL |
|
Contract Document Maintenance Page |
CNT_DOCMAINT_FL |
|
Contract Main Page |
CNT_GRPCNT0_FL |
|
Contract Supplier Location Page |
CNT_SUPLOC_FL |
|
Fluid Contract Left Panel Side Page |
CNT_TAB_SIDE1_SFL |
|
Related Contract Detail View Secondary Page |
CNT_VIEW_DET_SCF |
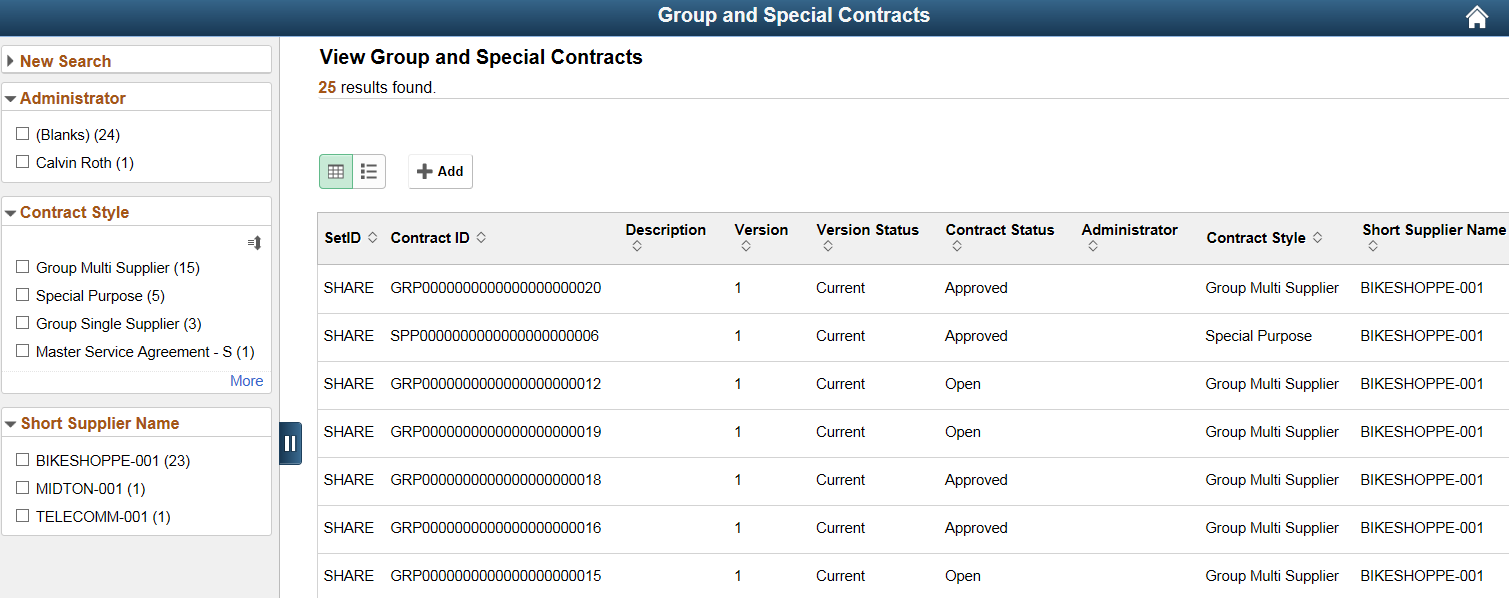
Click the Group Contracts tile to use the Group and Special Purpose contracts search page.
The Group and Special Purpose contracts search page lists existing contracts, with the most recently worked contracts at the top of the list. You can further use the search criteria or the facets to filter the search results. You can also choose to add a new contract by using the Add button on the top of the list.
This example illustrates the fields and controls on the Group and Special Purpose Contracts page.
On clicking the New Search link in the left panel, the search fields are displayed.
You can enter any of the search fields such as SetID, Contract ID, Supplier or Contract style to filter the search results.
This example illustrates the fields and controls on the New Search page. You can find definitions for the fields and controls later on this page.
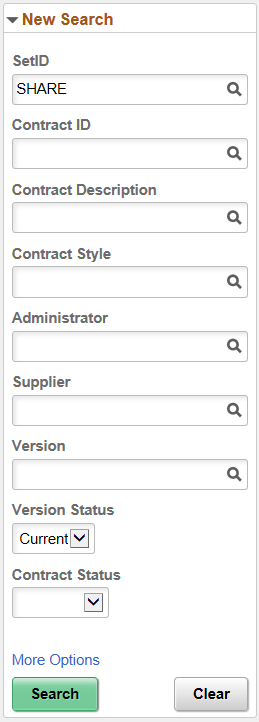
Click the More Options link to use the Show Operators field, where you will be able to enter criteria related to the Last Date Worked.
Click the Search button after entering your search criteria. The system will refresh the display result in the right panel showing only those contracts that meet the specified search criteria. Alternatively, use the Clear button to erase all entered search criteria and you can begin your search again.
Note: The Pre Approved status in the Contract Style is only available on a draft version of the contract. Based on the settings for the user on the User Preferences - Contracts page.
For more details See Contract Entry - Contract Page fields and definition.
Use the Group and Special Purpose Contracts Contract page to add Contract information.
Select the‘+’ button to add a new Group or Special Purpose contract. You will be prompted to select a Contract Style for the new contract as well as the SetID and Contract ID to be used for the new contract. Select Add to access the Add page, where you can create your new contract. This page supports adding the Group Multi Supplier, Group Single Supplier and the Special Purpose contracts.
This example illustrates the fields and controls on the Group and Special Purpose Contract (Add) page. You can find definitions for the fields and controls later on this page.

Field or Control |
Description |
|---|---|
Contract Style |
Select to search for a contract style. This field defaults from User Preferences. In cases such as this, the Style ID and Contract Style description are used interchangeably. |
SetID |
Enter a SetID. This field defaults from User Preferences. |
Contract ID |
Enter a Contract ID .This field defaults to NEXT if auto assign is on. |
Depending on the Contract Style chosen, the user will be taken to one of the following 3 contract formats:
Group Single Supplier
Group Multi Supplier
Special Purpose
For any of the Group or Special Purpose Contract styles, the user can use the left panel navigation to access additional entry pages for the contract. The navigation options are similar to the tabs on Classic pages.
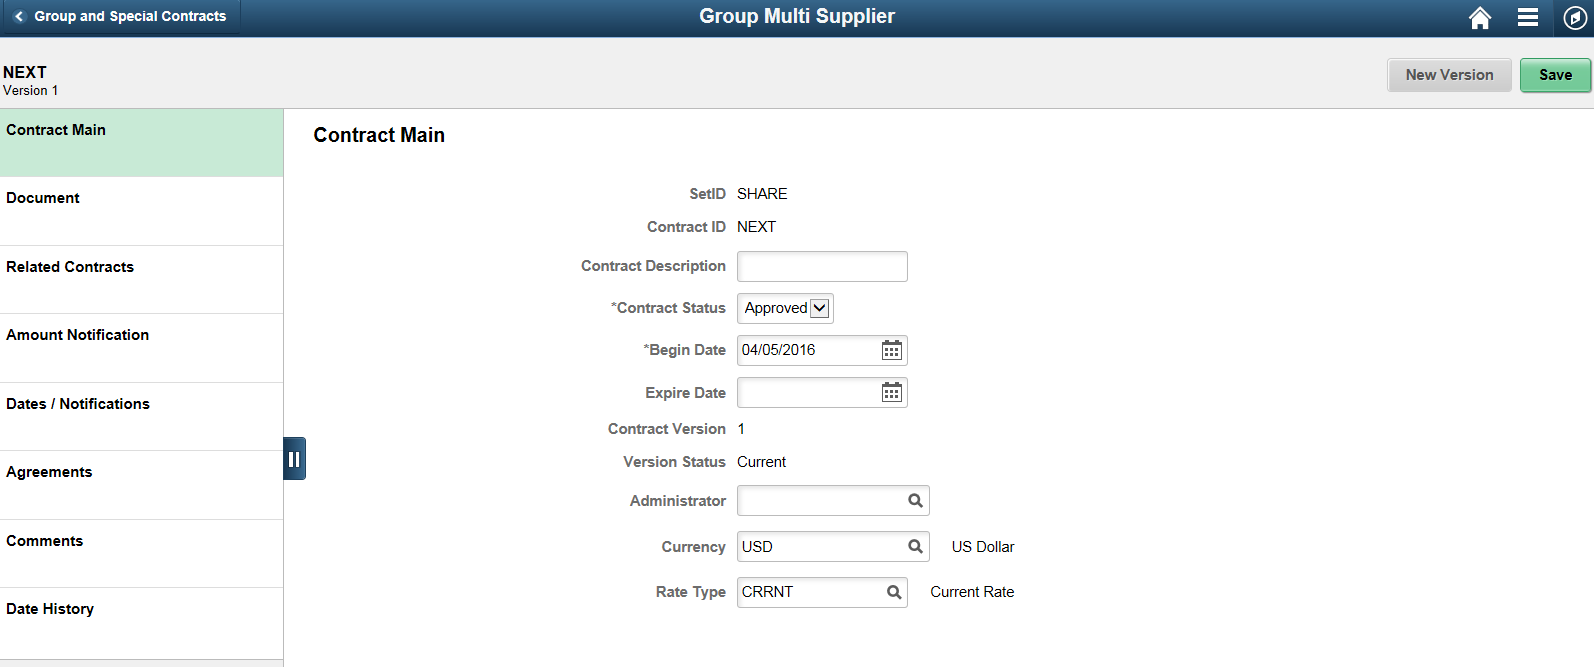
Click the Contract Main tab from the left panel to access the Contract Main page. You can enter basic header level information on Contract Main page. If you are adding or modifying a contract in Contract Main, the Contract Main page must be saved before proceeding to other pages.
This example illustrates the fields and controls on the Group Single Supplier page.
This example illustrates the fields and controls on the Group Multi Supplier page.
This example illustrates the fields and controls on the Special Purpose Contract page.

To accommodate each installations unique contract naming terminology, the Contract Style will be used as the title displayed in the banner at the top of the page.
Below the banner you will see contract identification on the left including the Description, SetID, Contract ID, and Contract Version. A Save button appears on each page to allow the user to save their work before proceeding to the next page. When viewing the Contract Main page only, a New Version or Delete Draft button will appear in the header.
The Pre Approved status in the Contract Style is only available on a draft version of the contract. Based on the settings for the user on the User Preferences - Contracts page.
The New Version/Delete Draft buttons are available only if version control is enabled. When you click the New Version button, a draft version of the contract is created and upon approval the draft version is made the current version and the current version is made the history version. These functionality remain the same as in classic. Similarly, if change tracking is enabled then the changes are tracked with the change reason based on classic pages set up options.
The left panel allows access to the various pages within the component. This left panel varies based on the Contract Style. As information is captured for the contract, indicators will appear on the left panel showing the existence of that data. For example, the Agreements tab will show the number of agreements that have been established.
|
Contract Process |
Group Single Supplier |
Group Multi Supplier |
Special Purpose |
|---|---|---|---|
|
Contract Main |
X |
X |
X |
|
Document |
X |
X |
X |
|
Related Contracts |
X |
X |
|
|
Supplier Locations |
X |
||
|
Amount Notification |
X |
X |
|
|
Dates / Notifications |
X |
X |
X |
|
Agreements |
X |
X |
X |
|
Comments |
X |
X |
X |
|
Date History |
X |
X |
X |
The right panel displays information for the selected contract and can vary as well. For example on the Contract Main page, the Group Multi Supplier contracts will not show a Supplier.
Note: You can only make modifications to the contract when the contract status is Open.
All information available to this component can be viewed and maintained using the classic pages.
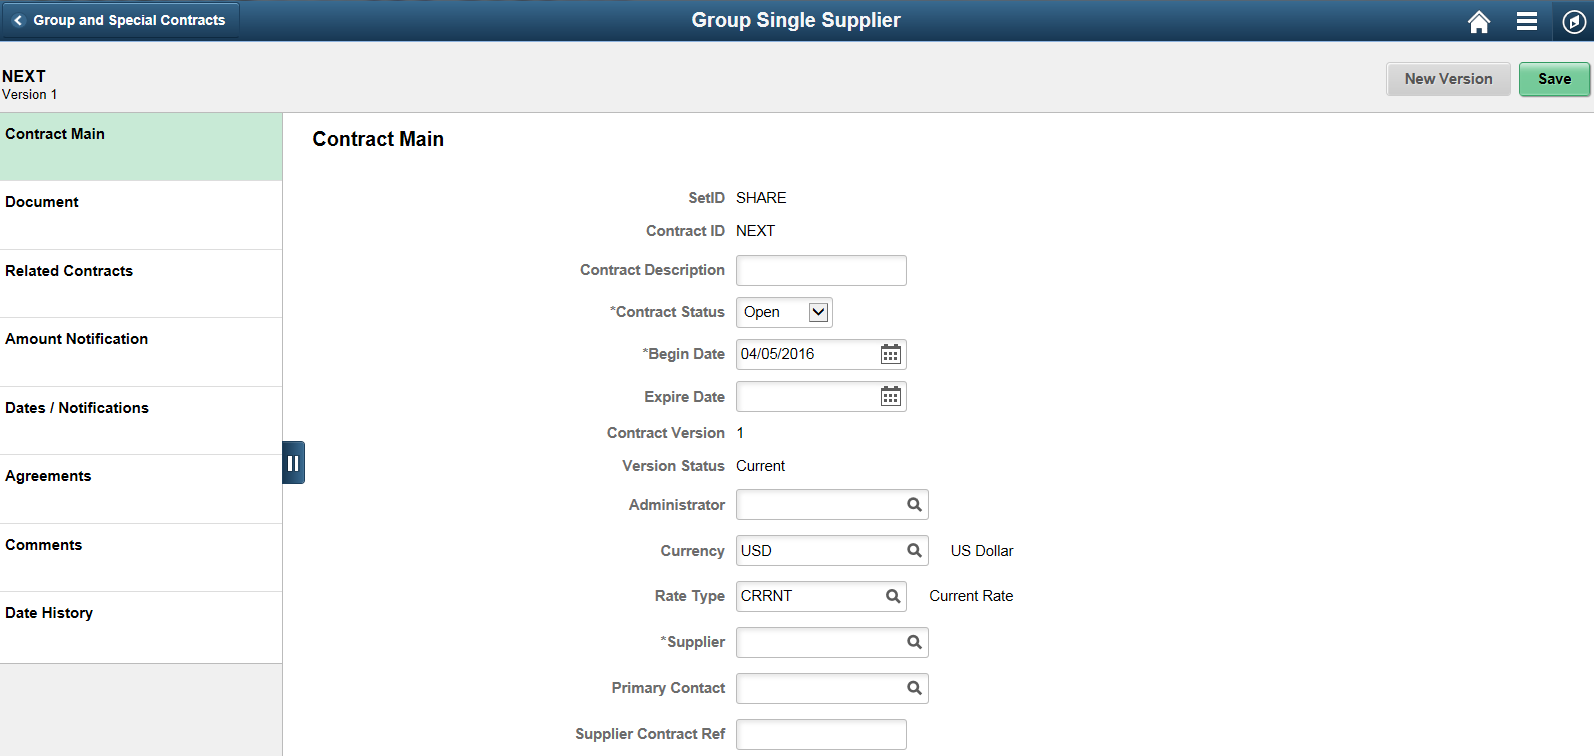
Use the Contract Main page to enter contract information.
This example illustrates the fields and controls on the Contract Main page.
This example shows the Contract Main page for the Group Single Supplier type of contract, but it can appear for Group Multi Supplier and Special Purpose contracts as well.
The Contract Main page displays the primary entry and maintenance page for procurement contracts using Contract Styles based on the Group Single Supplier, Group Multi Supplier, or Special Purpose process options. The screenshot displays an example of the Group Single Supplier. Basic information such as Administrator and Contract Status are displayed. In case of a Group Multi Supplier contract there is no supplier information. Special Purpose contracts do not have release amounts so you will not see currency related information here.
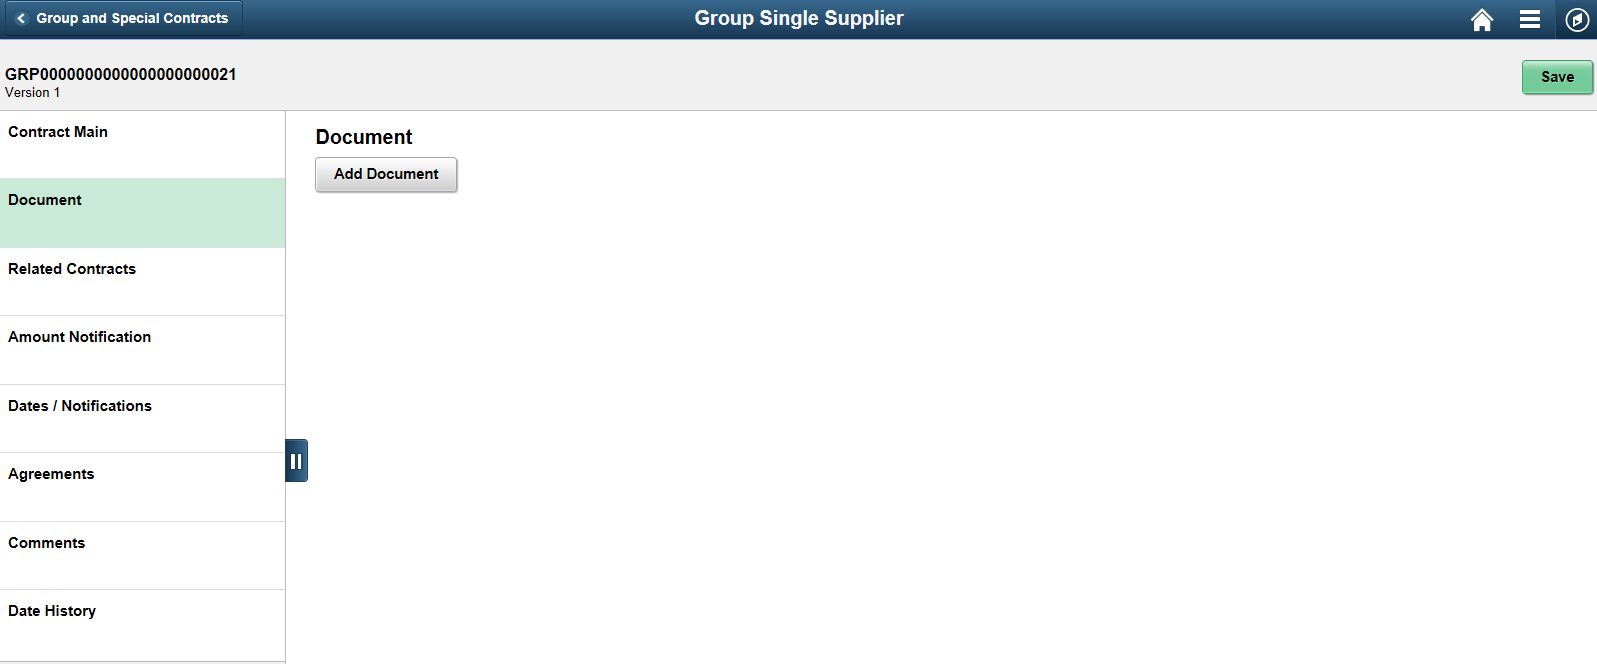
Use the Document page to add or maintain Supplier Contract documents for the contract. The Document page is the same for Group contracts and Special Purpose contracts, but is available only if Supplier Contracts is installed on your system.
Click the Document tab (left panel) to access the Document page. If there is no existing document, the system displays an Add Document button.
This example illustrates the fields and controls on the Document page.
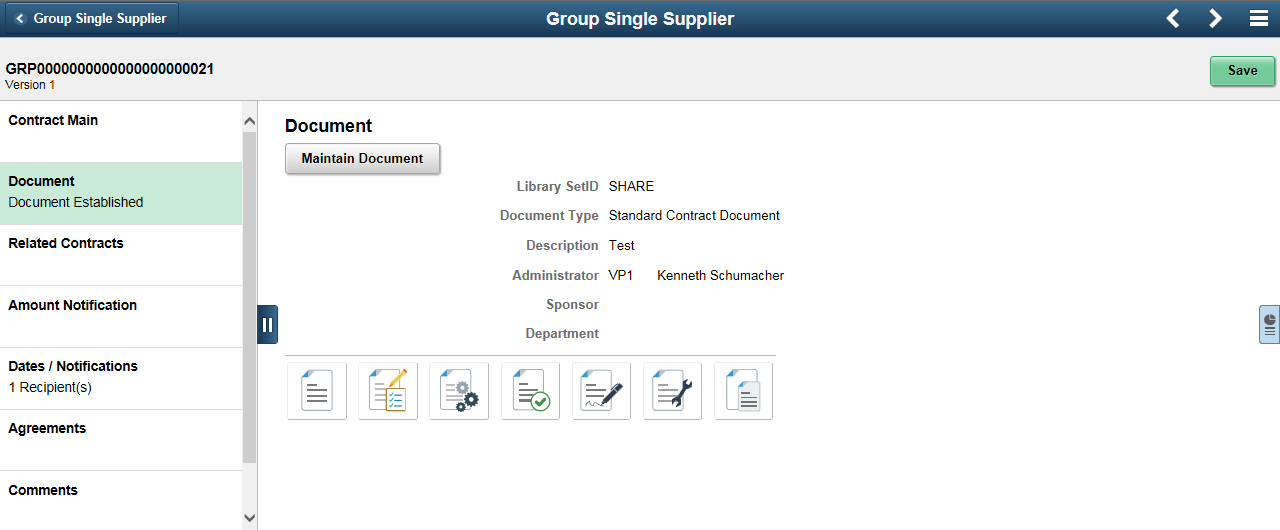
Clicking the Add document button takes you to the Supplier Contracts add page with the contract values defaulted. If you have already created a document, then Document Established is displayed in the left panel, and the Document page will show basic information for the document, as well as provide buttons to access more detailed information.
This example illustrates the fields and controls on the Document Established page. You can find definitions for the fields and controls later on this page.
Field or Control |
Description |
|---|---|
|
Click to open the created Contract Document associated with this contract. |
|
Click to open a modal page showing a history of modifications that have taken place with this document. |
|
Click to open a modal window showing collaboration history for this contract document. |
|
Click to open a modal window showing the approval history for this contract document |
|
Click to open a modal window showing any signature information that has been established for this contract document. |
|
Click to open the most recent amendment document for this contract document. |
|
Click to open a modal window showing any document attachments or related documents for this Supplier Contract document. |
 (View Document)
 (Document Modification Summary)
 (Collaboration)
 (Approve)
 (Sign Document)
 (Amendments)
 (Related documents)
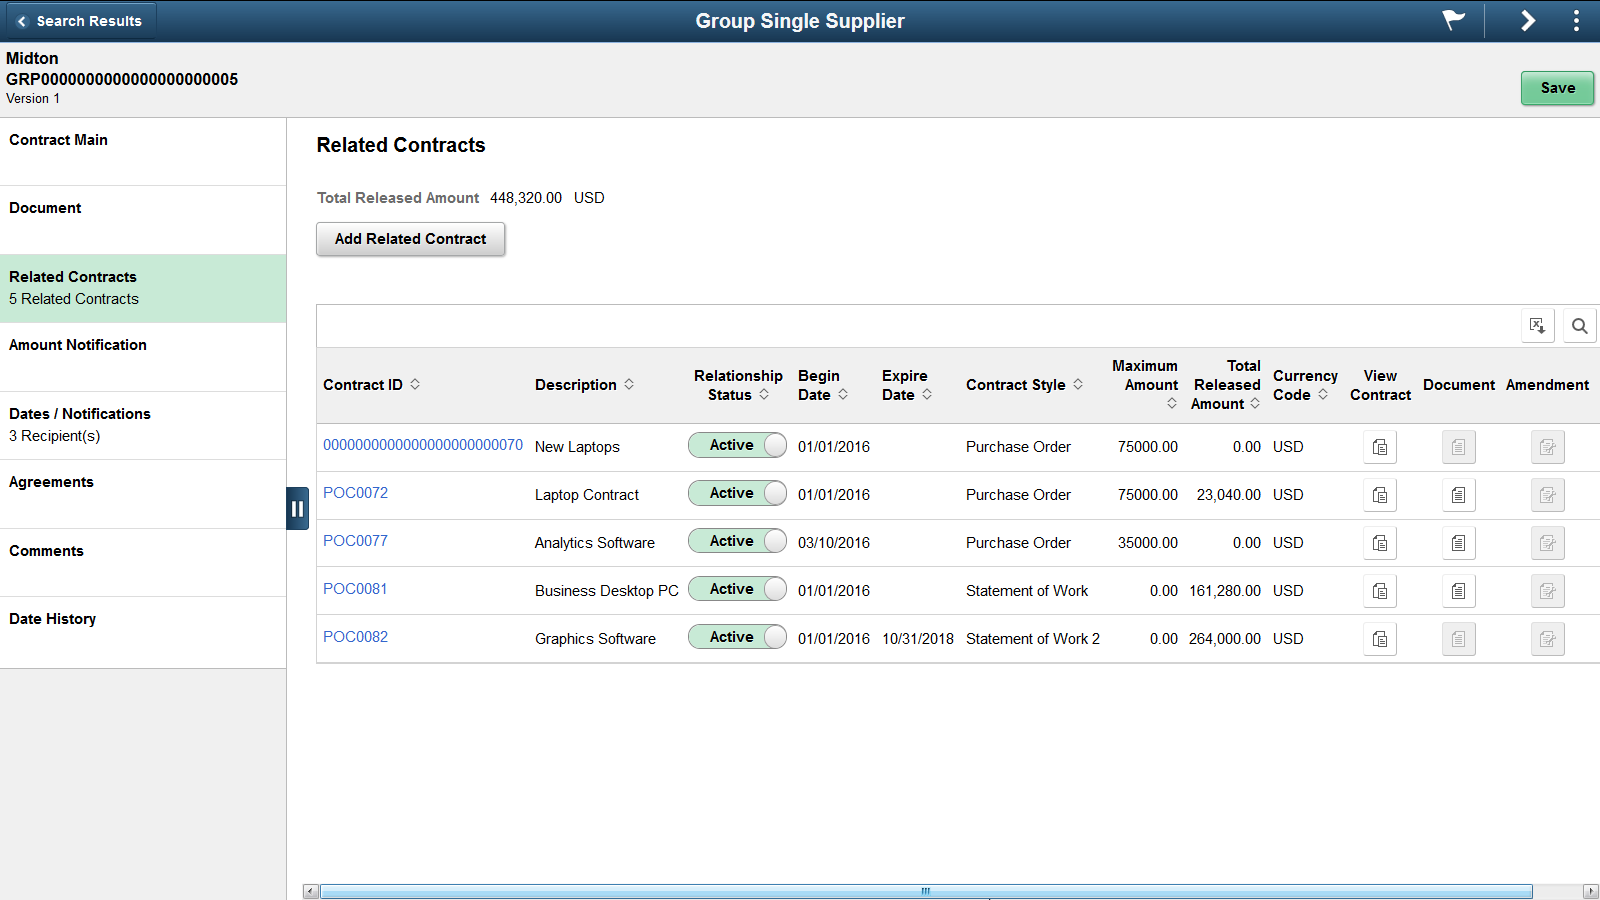
Use the Related Contracts page to add related or child contracts to the group contract. This page only appears for Group Multi and Group Single Supplier contracts. It is used to identify the child, or related contracts for these group contract types.
Click the Related Contracts tab (left panel) to access the Related Contracts page.
This example illustrates the fields and controls on the Related Contracts page.
Click the Related Contract button to add a child contract. Clicking this button will display a secondary page, where you can search for and select the related contracts.
This example illustrates the fields and controls on the Relate Contract page.

Contracts that are eligible for selection include those that meet the search criteria that are not already related, and not Group contracts. In case of Group Single Supplier contracts the supplier value is displayed and cannot be modified because with that format, all contracts must be for the same supplier.
The search displays contracts already associated to other Group Contracts only if Allow Link to Multiple Groups is selected on the Contract Set Controls options. If you have added a child contract then the main page displays that contract on the Related Contract page
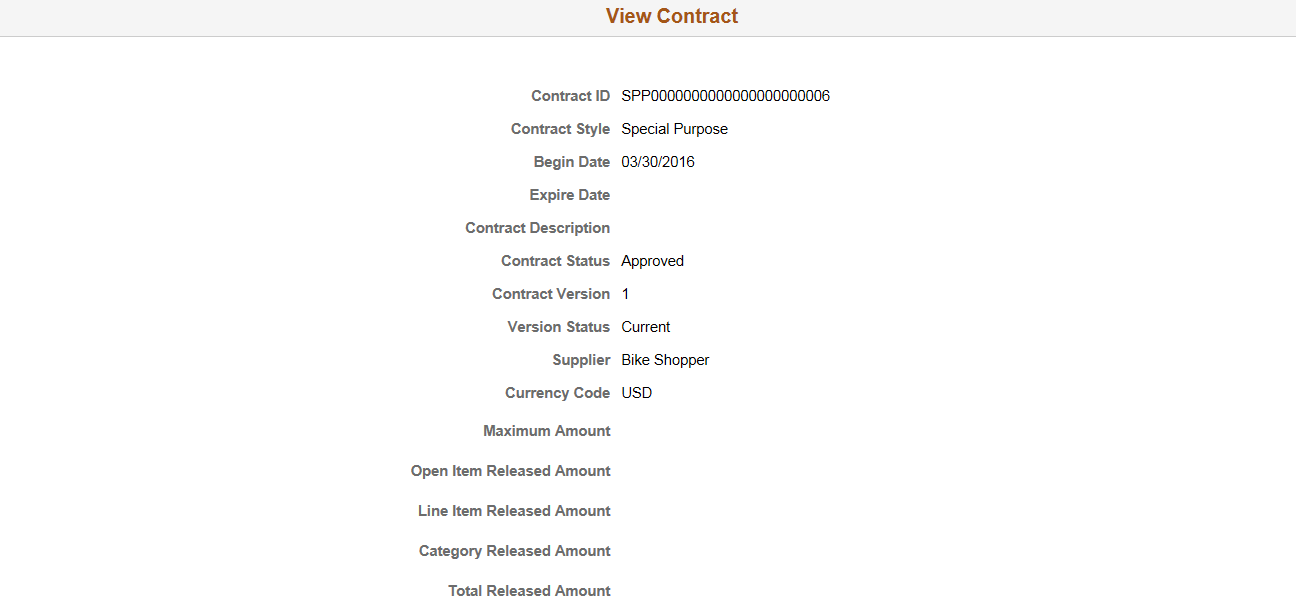
Click on the View Contract button to display a secondary page, where you can view detailed information about the contract.
This example illustrates the fields and controls on the View Contract page.
Click the check box for any contracts you wish to add, and then select the Add button.
After adding contracts from the Relate Contract page, the system takes you to the Related Contracts page. The newly selected contract(s) will appear along with summary information for the contract.
This example illustrates the fields and controls on the Example of Group Multi Supplier - Related Contracts.
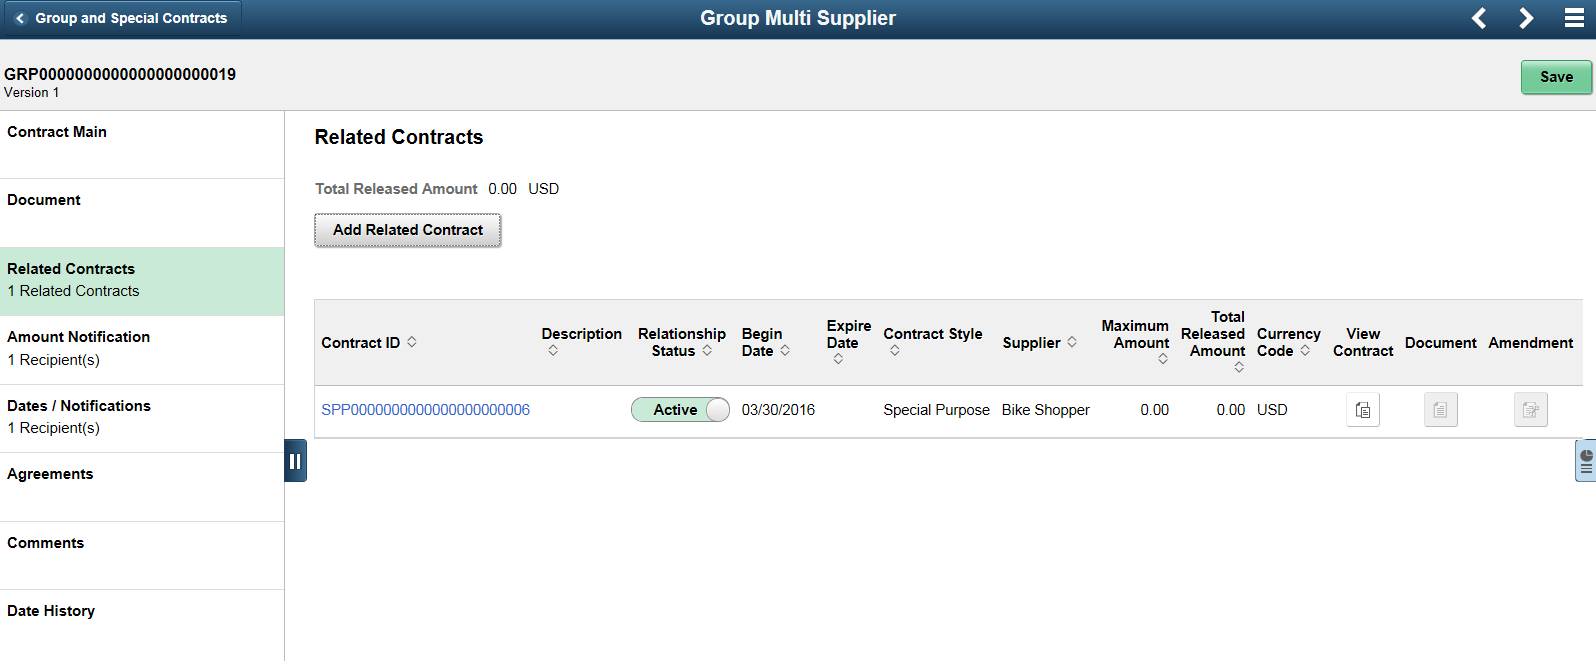
The left panel displays the number of child contracts.
The Total Released Amount appearing at the top of the right panel displays the sum for all related contracts. The Total Released Amount also displays for each related contract in the grid.
Supplier information will be displayed for Group Multi Supplier contracts, which will have related contracts for different suppliers.
Click the Contract ID link to be taken to the Contract Entry page in inquiry mode.
When a Document or Amendment exists for the related contract, the View Document or View Amendment icons will be enabled. Click the icon to download the document for viewing.
Use the Supplier Locations page to select Supplier Locations. This page only appears for Special Purpose contracts.
Click the Supplier Locations tab (left panel) to access the Supplier Locations page.
This example illustrates the fields and controls on the Supplier Locations page.
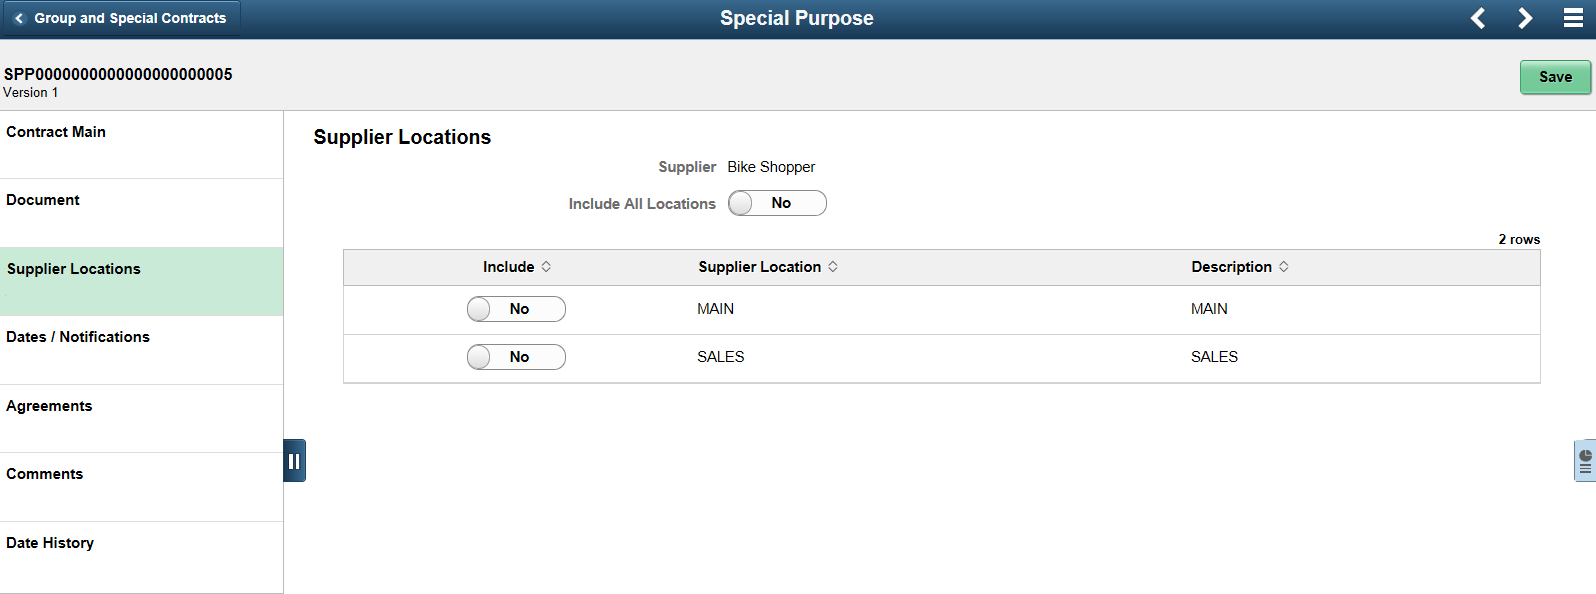
Select Yes for the Include All Locations option if you want this Special Purpose contract to apply to all supplier locations for this supplier. This will also apply to supplier locations that may be added at a future date. Select No if you wish to select the applicable supplier locations.
When you select the No option, the Supplier Locations grid appears showing all supplier locations for the supplier. The Include button can be used to specify which locations apply to this contract. At least one location must be selected when Include All Locations option is No.
Note: If you select No, and a location is added later to the supplier, and you want that new location to be used with this contract, then you will need to return to the Supplier Location page to include it.
Use the Amount Notification page to turn on Spend Threshold notification. This page only appears for Group Multi and Group Single Supplier contracts.
This example illustrates the fields and controls on the Amount Notification page.
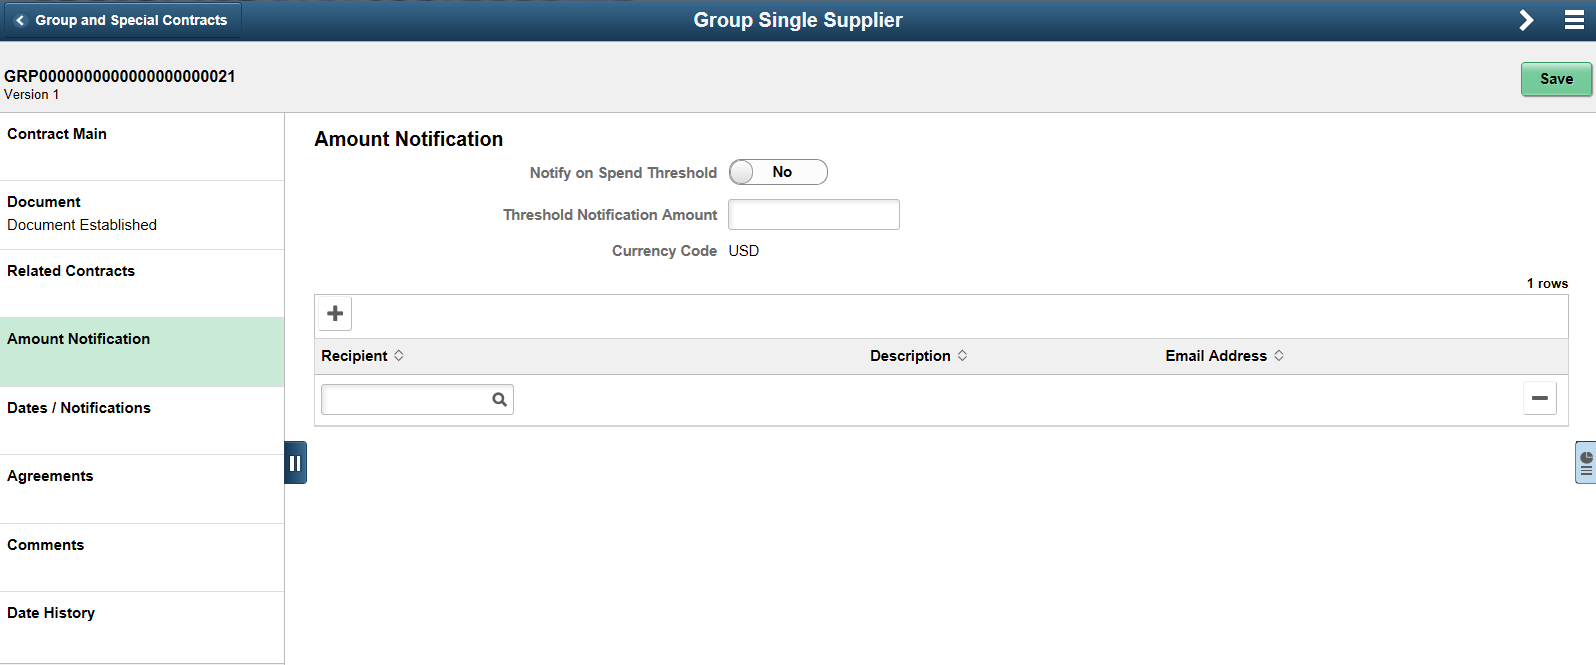
Use Amount Notifications to enable workflow notifications when a particular spend threshold is reached.
When you select Yes for Notify on Spend Threshold, you need to enter a Threshold Notification Amount, and at least 1 recipient to notify.
Later when the workflow notification program is run the system will calculate the sum of the released amounts for all the related contracts to the group contract. If this amount exceeds the threshold amount, the notification will be issued.
After the recipient is added, the left panel will indicate the number of recipients to be notified when the threshold is met.
Use the Dates/ Notifications page to enable workflow notifications when the specified date is reached. The Dates/ Notifications page is the same for Group contracts and Special Purpose contracts. Users can set the expiration date, renewal date, and Draft approval date on this page as well as when the notification should be sent prior to those dates. After you save the entries, the system calculates the actual expiry, renewal, and approval dates. You can enter the recipients to be notified for each date notification.
After the recipients are added, the left panel will indicate the total number of recipients to be notified for the selected date types.
This example illustrates the fields and controls on the Dates/ Notifications page. You can find definitions for the fields and controls later on this page.
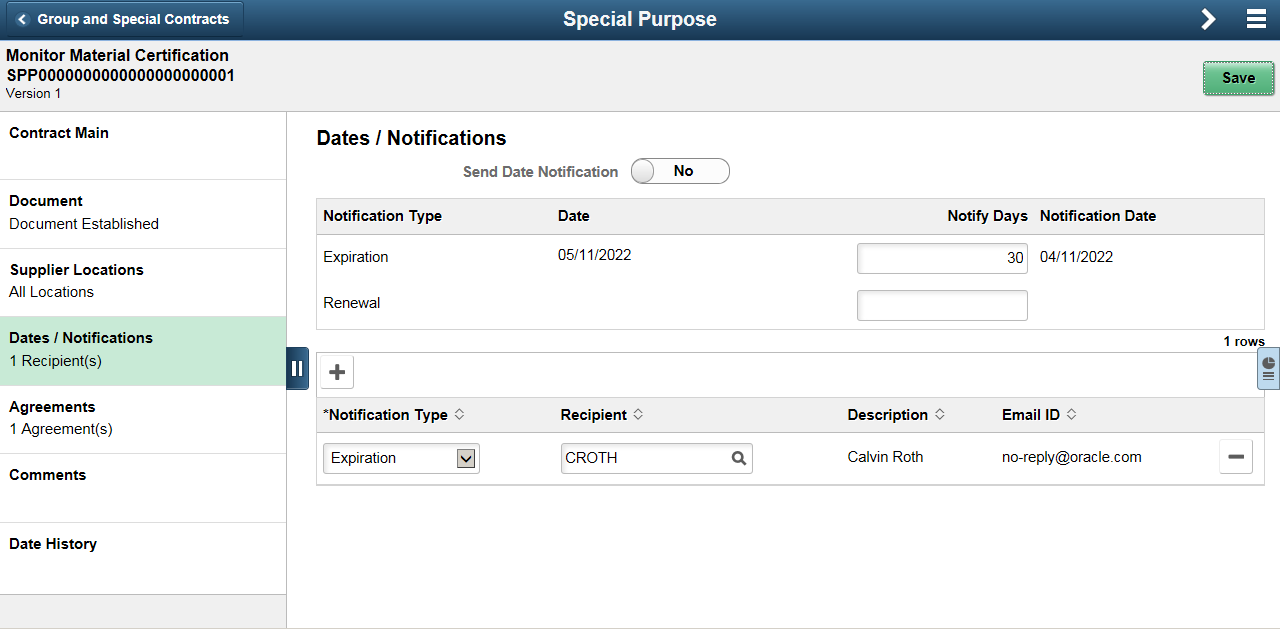
Field or Control |
Description |
|---|---|
Send Date Notification |
Select Yes to enable date notifications. |
Notification Type |
Select the notification type for which you want to notify a user.
|
Notify Days |
Enter the number of days before the corresponding date is reached, that you want the system to notify users. |
Notification Date |
Based on the date and notify days values that you define, the system determines and displays the notification date. When this date is reached, the system notifies the listed recipients through workflow or email. |
Recipient |
Select the recipient to whom you want to send notifications. The system also populates the description and email fields for the recipient. |
For more information on fields and descriptions See Contract Entry - Contract Page.
Use the Agreements tab to add agreements to a contract. This page is the same for Group contracts and Special Purpose contracts and is visible only if Supplier Contracts is installed on your system.
Click on the Add Agreement button to add a new agreement to the contract.
This example illustrates the fields and controls on the Agreements page.
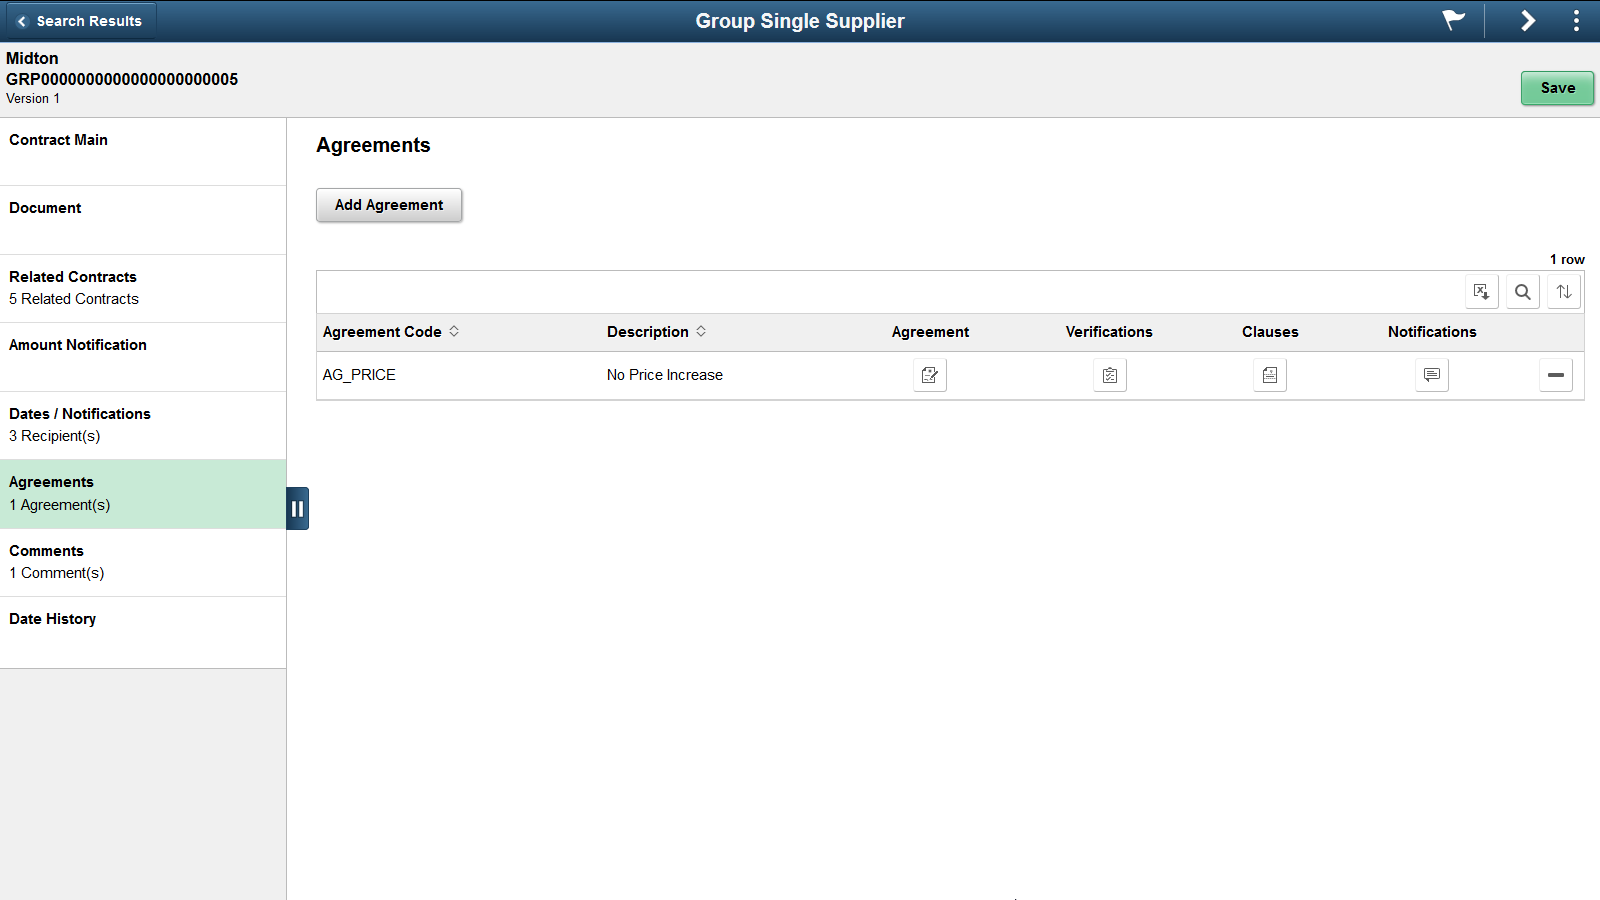
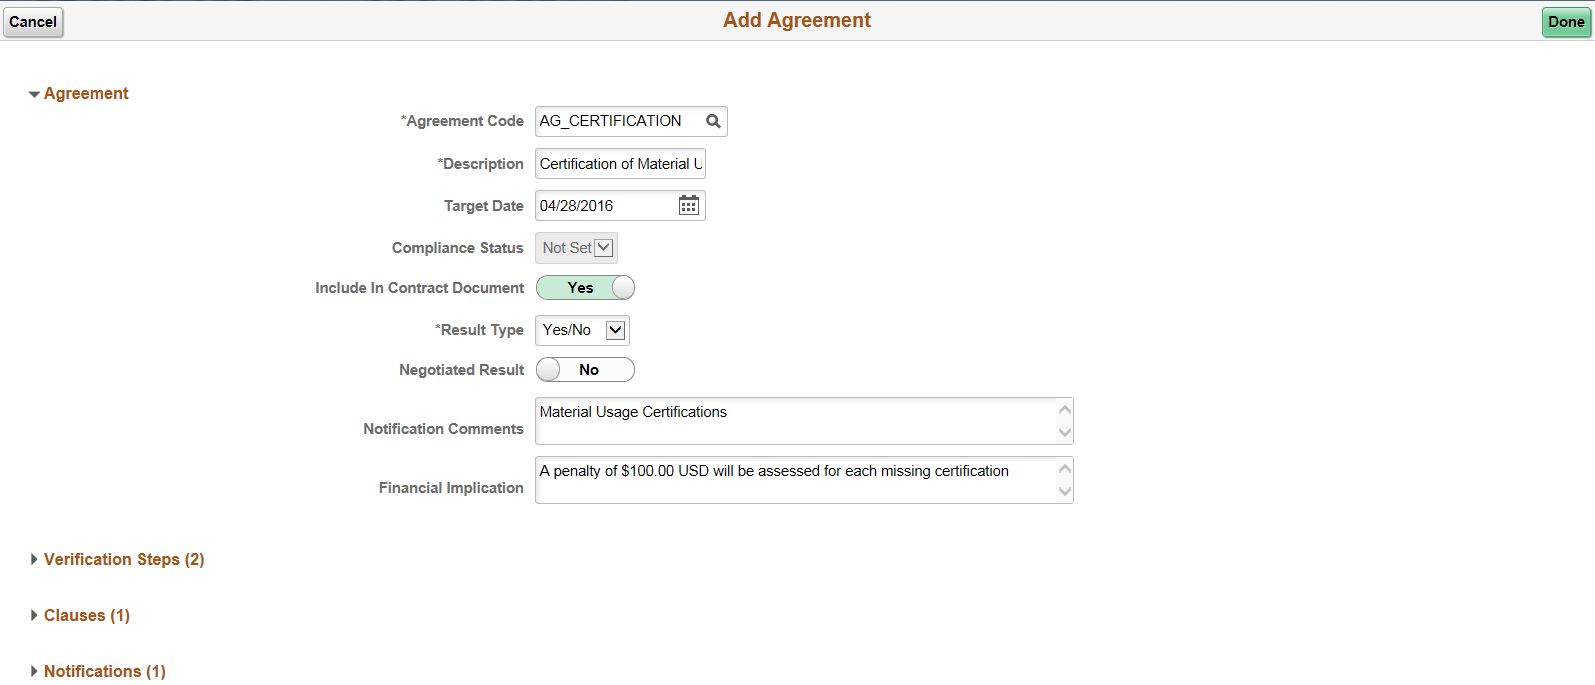
Clicking the Add Agreement button opens the Add Agreement page, where you can identify the agreement you want to add by selecting an agreement code. Once selected, agreement information will default from the agreement setup onto the page. You can choose to expand the sections to view or modify the details.
Note: Metric type agreements are not available to Group Contracts and Special Purpose Contracts Purpose contract types.
This example illustrates the fields and controls on the Add Agreement (1 of 2) page. You can find definitions for the fields and controls later on this page.
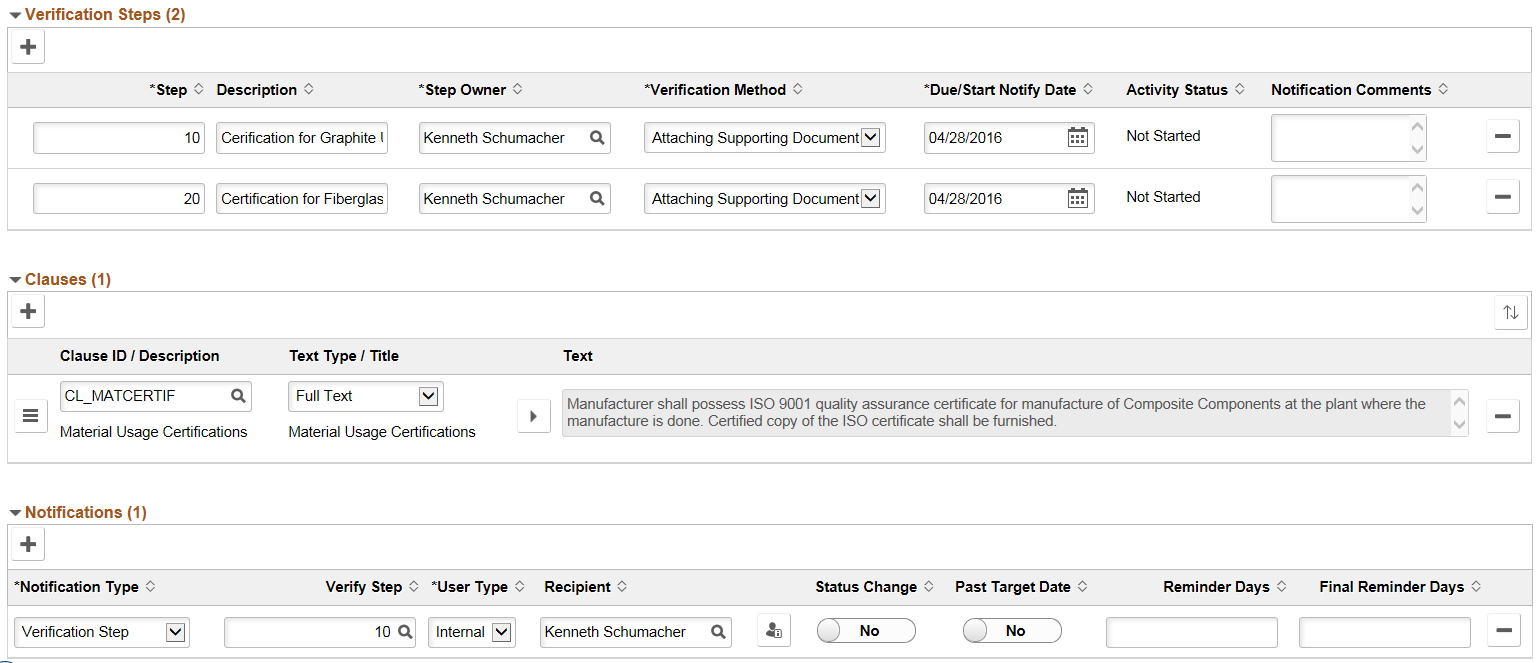
This example illustrates the fields and controls on the Add Agreement (2 of 2) page. You can find definitions for the fields and controls later on this page.
Field or Control |
Description |
|---|---|
Verification Steps |
Displays the verification steps for the agreement. |
Clauses |
Displays detail on the clauses. The text type determines whether a reference text or a full text is to be displayed. Clicking the expand/collapse button helps to expand or collapse the text area for better reading. You can choose to drag and drop in the Clauses section to reorder the clauses. |
Notifications |
The Notifications section specifies the users you wish to notify. Click on the Recipient detail icon to display a secondary page, where you can maintain recipient specific information. |
After entering the agreement information, click Done to return to the Agreement page. The Agreement page displays the agreement information on the grid. The left panel is updated with the number of agreements that exist on the contract.
This example illustrates the fields and controls on the Agreements Information page.
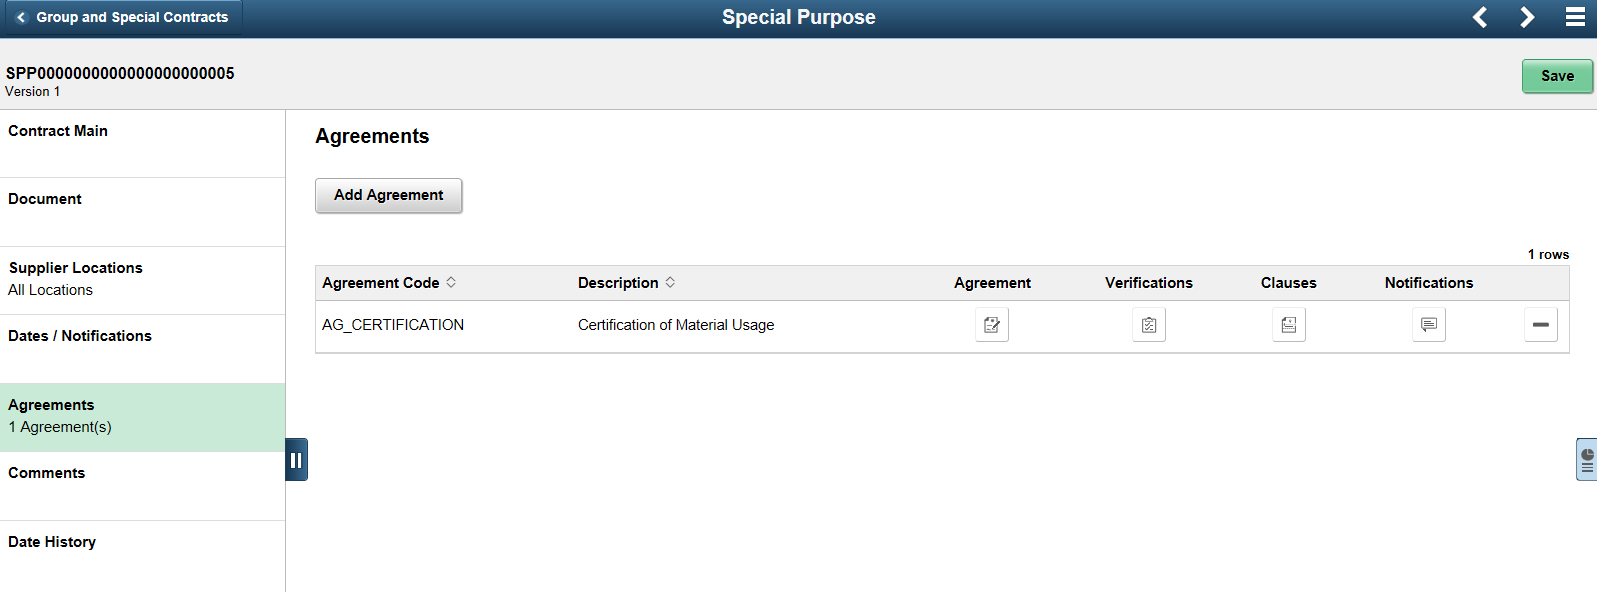
Clicking the section buttons displays the respective section in an expanded form on a secondary page.
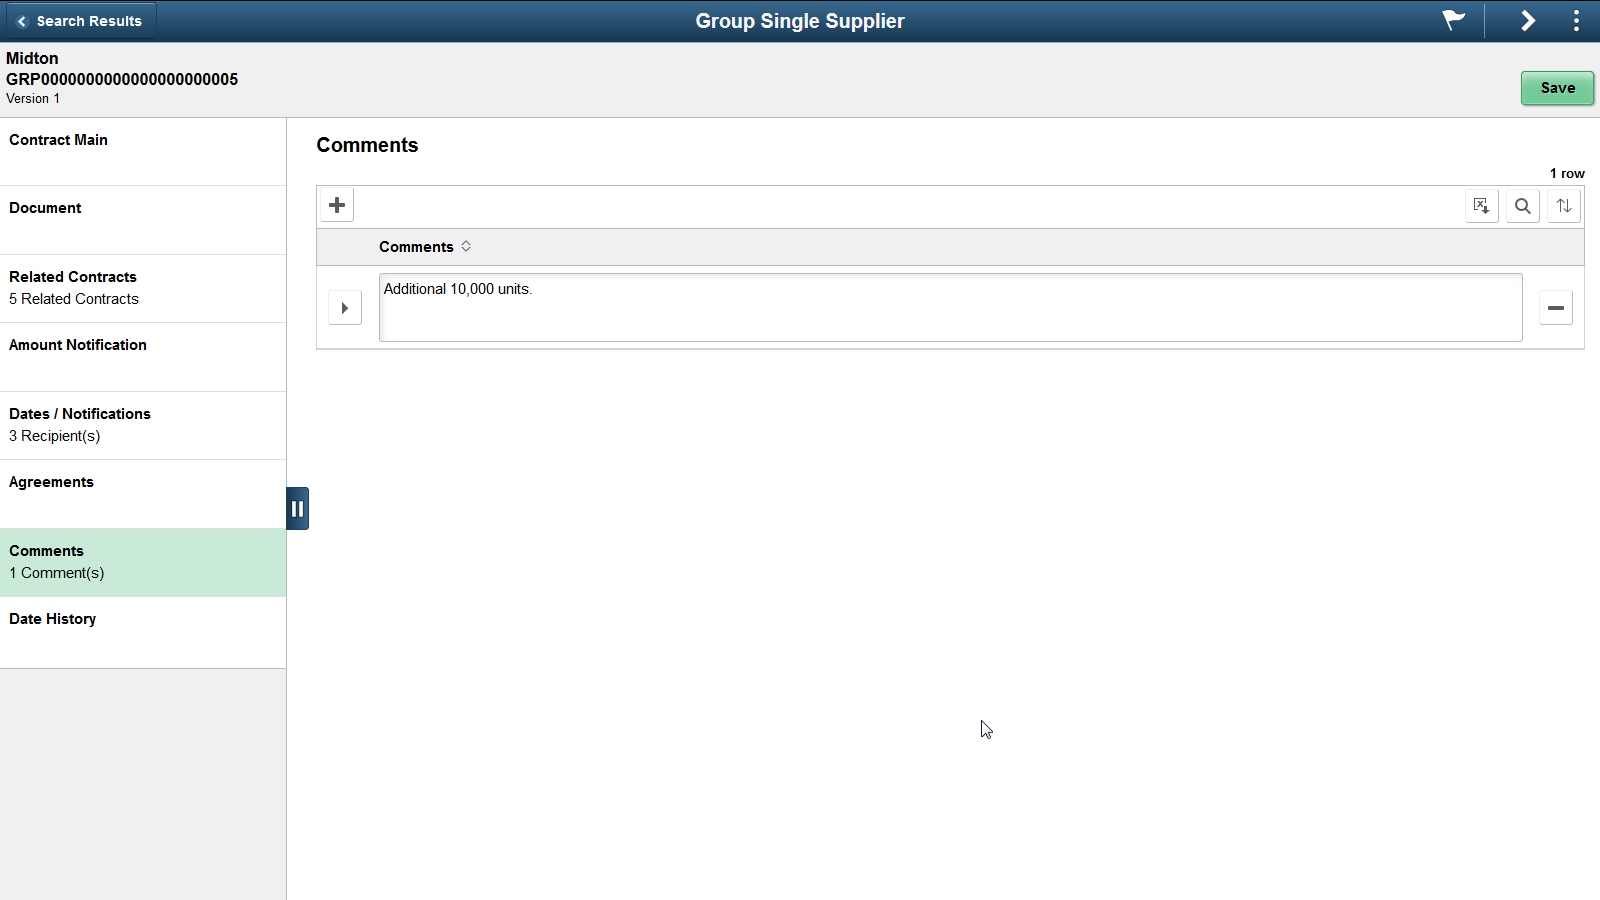
Use the Comments page to add comments to a contract. This page is the same for Group contracts and Special Purpose contracts and is available for entry regardless of the contract status.
This example illustrates the fields and controls on the Comments page. You can find definitions for the fields and controls later on this page.
Field or Control |
Description |
|---|---|
|
Click this button to expand or collapse the comments section. |
|
Click this button to add more comments. |


You can find the total number of comments displayed in the left panel, after the comments are added.
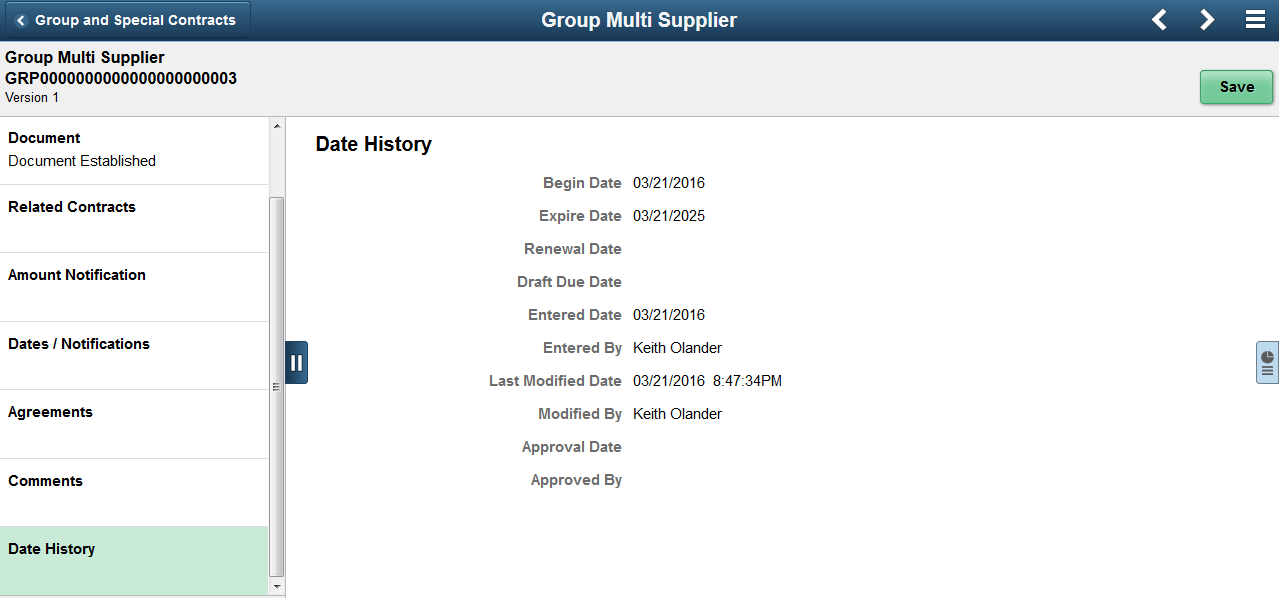
Use the Date History page to display information related to various dates on the contract.
This example illustrates the fields and controls on the Date History page.