Defining Common Journal Definitions
To define common journal definitions, use the following components:
Journal Class (JRNL_CLASS)
Journal Entry Template (GL_JRNL_TMPLT)
Journal Source (SOURCE)
Schedules (SCHEDULES)
|
Page Name |
Definition Name |
Usage |
|---|---|---|
|
PROC_PART_CF_ENTRY |
Create and modify your partition IDs. PeopleSoft General Ledger processes use partition IDs to group transaction data when you run Journal Post processes (GL_JP) concurrently. |
|
|
JRNL_CLASS |
Journal classification values that can be selected on the Header page for all types of journal entries and some reports and are used for reporting purposes added to JRNL_CLASS_TBL using this page |
|
|
GL_JRNL_TMPLT |
Use the Journal Entry Template page to control which grid columns you want to show on your Journal Entry page. |
|
|
SOURCE1 |
Use the Journal Source - Definition page to define a journal source. |
|
|
SOURCE2 |
Use the Journal Source - Options page to specify the journal error processing options for a specific source. |
|
|
SRC_JE_BS_CFS_SEC |
Specify the ChartField and the ChartField value for the suspense account. |
|
|
SRC_JE_ES_CFS_SEC |
Specify the ChartField and the ChartField value for the suspense account. |
|
|
SRC_JE_AS_CFS_SEC |
Specify the ChartField and the ChartField value for the suspense account. |
|
|
SOURCE3 |
Specify currency options for a specific source. |
|
|
SOURCE4 |
Specify journal entry approval options for standard journals and budget journals for a specific source. |
|
|
SCHEDULE |
Create schedules that automate and control the generation of standard or recurring journal entries. |
Use the Partition ChartField Entry page (PROC_PART_CF_ENTRY) to create and modify your partition IDs.
PeopleSoft General Ledger processes use partition IDs to group transaction data when you run Journal Post processes (GL_JP) concurrently.
Navigation:
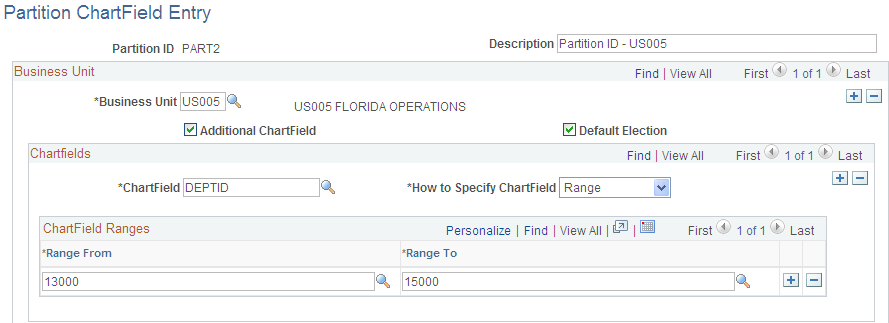
This example illustrates the fields and controls on the Partition ChartField Entry page, specifying ChartField as a range. You can find definitions for the fields and controls later on this page.
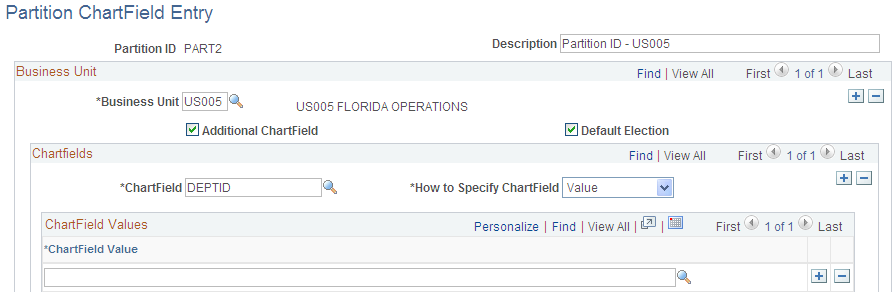
This example illustrates the fields and controls on the Partition ChartField Entry page, specifying ChartField as a value. You can find definitions for the fields and controls later on this page.
Note: Only a DBA or system administrator should have access to this table.
To add a new instance of a partition ID, select the tab to add a new value, enter its name in the Partition ID field, and click the Add button. The Process Partition page appears, enabling you to define the new instance of the partition ID.
Field or Control |
Description |
|---|---|
Partition ID |
Displays the partition ID that you entered that uniquely identifies a group of transactions that you want to process together as a single set of data. |
Description |
Enter a description for your partition ID. |
Business Unit |
First, you create a business-unit and ChartField scheme to classify transactions into mutually exclusive data sets. Then, for each partition ID (unique data set) defined in your scheme, enter the appropriate business unit here. You can have multiple business units for a partition ID. |
Additional ChartField |
Select this option to group data by ChartField in addition to business unit. If, for this business unit, you want to process transactions by business unit only, and do not want to further subdivide your transactions for processing, leave this blank. You can put more than one ChartField under a business unit. |
Default Election |
Specifies this partition ID as the default for the business unit. Transactions not included in any other process partition will be placed into this default group. There can only be one default election for a business unit. |
ChartField |
Select the ChartField by which to group your data sets. |
How to Specify ChartField |
You can define your ChartField values as either a range or a single value. |
Select Range to specify a range of ChartField values. When you select this option, edit boxes for the following two fields appear:
Field or Control |
Description |
|---|---|
Range From |
Specify the lowest value of the ChartField that you want to include in your process group. |
Range To |
Specify the highest value of the ChartField that you want to include in your process group. |
Select Value to specify a single ChartField value to define your process group. When you select this option, an edit box for the following field appears:
Field or Control |
Description |
|---|---|
ChartField Value |
Specify the single value for the ChartField that you want in your process group. |
Use SQL to delete an unwanted partition ID.
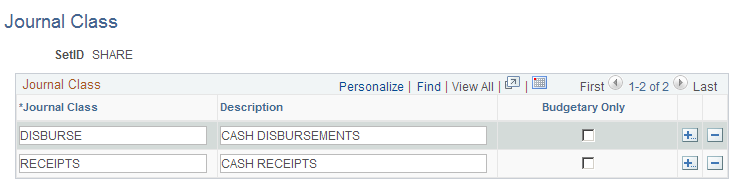
Use the Journal Class page (JRNL_CLASS) to .add and maintain journal classes.
Navigation:
This example illustrates the fields and controls on the Journal Class page. You can find definitions for the fields and controls later on this page.
Field or Control |
Description |
|---|---|
Journal Class |
Enter a short name for a journal class category. A journal class is a category set up to break journal entries down into multiple categories for reporting purposes and also for categorizing entries coming from non-PeopleSoft Financial systems. You can set up and use a valid set of these values and run journal entry reports for one or more selected journal class values. Each journal class value that you enter here updates the JRNL_CLASS_TBL record. You can only select these values (journal class field values) on the General Ledger journal entry Header page. |
Description |
The description explains exactly what the journal class short name means and appears on the Journal Class report (GLC4008). |
Budgetary Only |
The Journal Class field also appears on the Enter Budget Journals - Budget Lines − Base Currency Details page. You must select this option for any journal class categories that you define here that are specifically related to Commitment Control budget journals. |
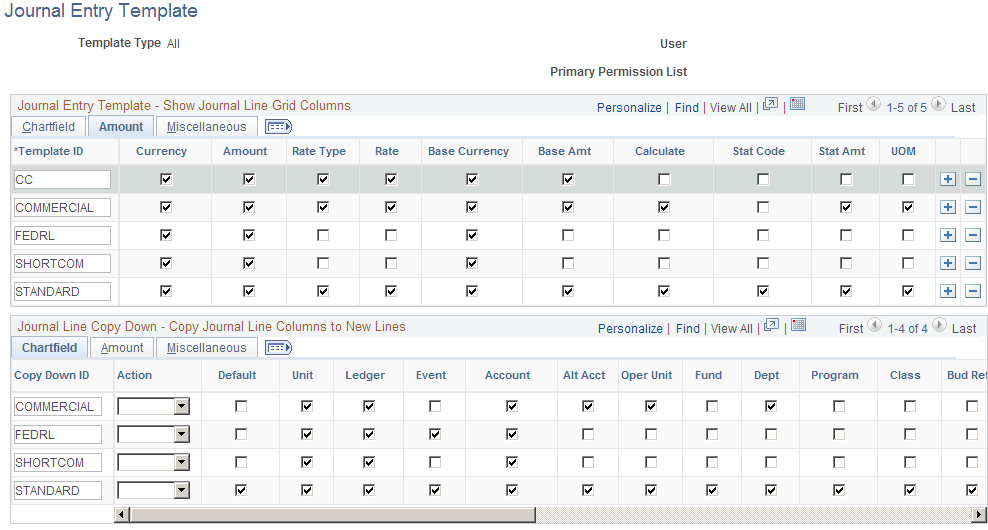
Use the Journal Entry Template page (GL_JRNL_TMPLT) to control which grid columns you want to show on your Journal Entry page.
Navigation:
This example illustrates the fields and controls on the Journal Entry Template - ChartField page. You can find definitions for the fields and controls later on this page.

PeopleSoft General Ledger is delivered with a number of fields shown on the Journal Entry page grid. When you are using fewer than the delivered number of fields, you can use this page to eliminate the unwanted columns from the grid. For example, if the journal you are entering does not use InterUnit transactions, you can eliminate InterUnit fields from that journal's entry page.
You can define journal entry templates to be used by all users, a specific user ID, or users of a specific primary permission list.
ChartField
Use the ChartField tab to control which columns of data you want included on your journal entry page for the template.
Field or Control |
Description |
|---|---|
Template ID |
The name of a journal entry template. |
Default |
Select if you want to use this template as the default when you use a journal entry page. |
Action |
Select action to check/uncheck all the check boxes except the default check box. |
Unit |
The application business unit that is the source of a transaction. |
Ledger |
Specific ledger to which an accounting entry should post. |
Speed Type |
A code that represents a combination of ChartField values. Speed types simplify the entry of ChartFields that are commonly used together. |
The names of the remaining check boxes correspond to the ChartFields that appear on the journal entry page as it is delivered with your application. Select a check box for each field that you want to appear on the journal entry page.
Note: When you select the Project ChartField check box, all the associated project ChartFields become available on the Journal Entry Page. The ChartFields associated with the Project ChartField are, Activity, Source Type, Category, Subcategory, PC Business Unit, and Analysis Type. If the Project ChartField is not selected or it is deselected, the associated ChartFields are not available.
Amount
Select the Amount tab.
This example illustrates the fields and controls on the Journal Entry Template page - Amount tab. You can find definitions for the fields and controls later on this page.
The names of the check boxes correspond to the currency and amount-related fields that appear on the journal entry page. Select a check box for each field that you want to appear on the journal entry page. Select any of the other fields that you want to display.
Miscellaneous
Select the Miscellaneous tab.
This example illustrates the fields and controls on the Journal Entry Template page: Miscellaneous tab. You can find definitions for the fields and controls later on this page.
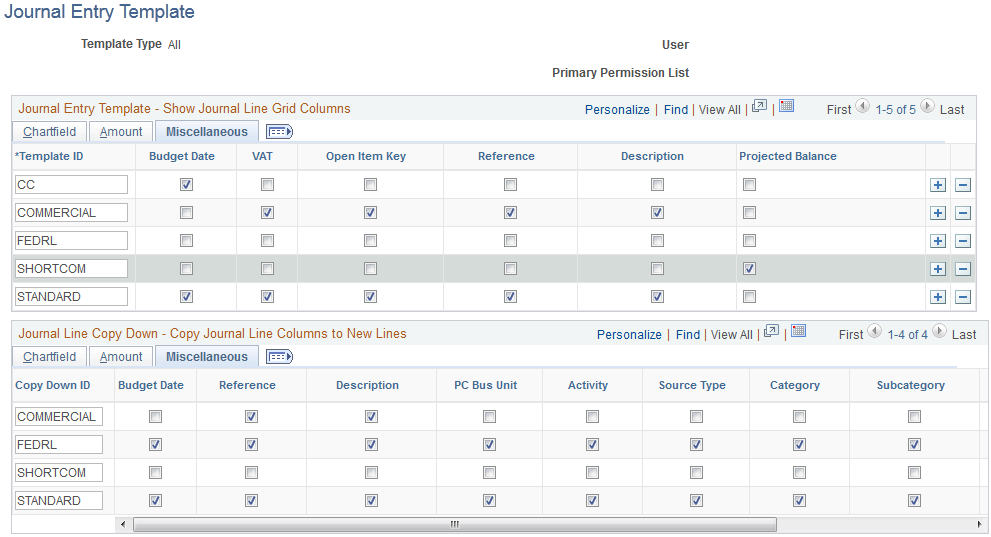
Field or Control |
Description |
|---|---|
Budget Date |
The date of the journal for the control budget. |
Reference |
A reference of the journal line. |
Description |
A description of the journal line. |
VAT and Open Item Key are also available from the Miscellaneous tab.
Field or Control |
Description |
|---|---|
|
Click the Show All Columns button to view all ChartField, Amount, and Miscellaneous columns without the tabs. |
|
Click the Show Tabs button from the all columns view to return to the tab format. |


Journal Line Copy Down
The Journal Line Copy Down settings for templates appear on the same page as the Show Journal Line Grid template. They also have the same tabs and the same toggle buttons to show all columns and to show tabs as described for the Show Journal Line Grid.
This example illustrates the fields and controls on the Journal Entry Template page - Journal Line Copy Down grid. You can find definitions for the fields and controls later on this page.
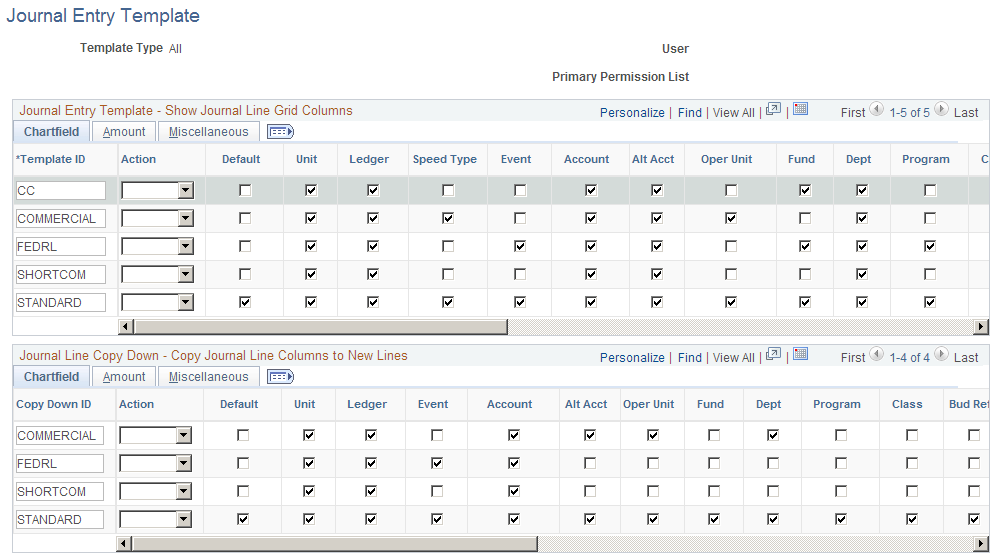
When you add a journal line on the journal Lines page the fields you selected on the journal entry template are copied down from the preceding line.
The Journal Entry Template page enables you to define various copy down templates. For example, you can define one template to copy down all fields, another to copy down all fields except the amount fields.
Select Default to designate the template as the default.
Use the Journal Source - Definition page (SOURCE1) to define a journal source.
Navigation:
This example illustrates the fields and controls on the Journal Source - Definition page. You can find definitions for the fields and controls later on this page.
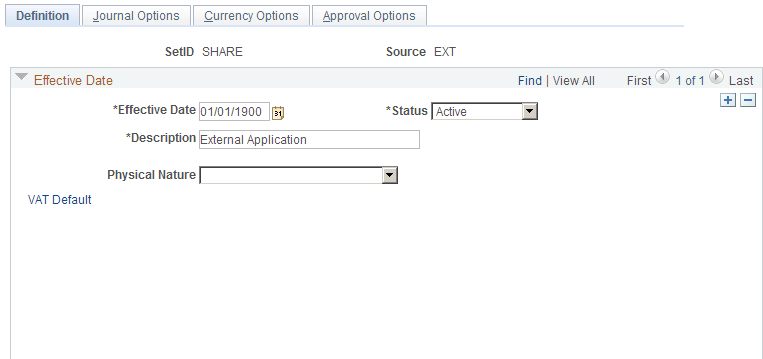
Field or Control |
Description |
|---|---|
Effective Date |
Displays the current date by default. Enter an effective date that is early enough to accommodate any historical data that you might load. |
Status |
Select either Active or Inactive. Determines whether this source is valid for processing as of the effective date. |
Description |
Enter a description to use system-wide in reports, other pages, and online inquiries. |
Physical Nature |
You can enter a value for VAT if this source is typically associated with goods or services affected by VAT. |
VAT Default |
Click this link to access the central VAT defaults page to enter additional default options for journal source. |
In addition to identifying the origin of each journal entry, PeopleSoft applications enable you to define special processing options for specific data entry sources, giving you control over when certain sources are active.
The source identifies the origin of a journal entry. It can also define any special journal entry error handling options. You can also use a source to associate journal entries with a type of transaction or a group of transactions. Sources could include individuals who enter journals, departments such as Finance or Accounting, and subsystems that generate transactions such as accounts payable or payroll entries to the general ledger.
You can use sources to facilitate inquiries and reporting. Typically, sources appear on screens and reports that reference journal entries; you can use them to identify and group journal entries from similar sources. For example, you might define sources that identify different revenue types (such as sales, services, interest, late charges) or different expense origins (such as payroll processing, payroll accruals and reversals, refunds, supplies expense).
Settings generally override from the source to the ledger and then to the business unit level. Conversely, the default is from the business unit to the ledger and then to the source level. For example, a ledger setting will override a business unit setting, but a source setting will override both a setting at the ledger and at the business unit level for the same option.
Use the Journal Source - Journal Options page (SOURCE2) to specify the journal error processing options for a specific source.
Navigation:
This example illustrates the fields and controls on the Journal Source - Journal Options page. You can find definitions for the fields and controls later on this page.

You use the Journal Balance option, Journal Edit Errors option, Journal Amount Errors option, Control Total option, and Document Type option in entry error processing.
Field or Control |
Description |
|---|---|
Default to Higher Level |
Uses the error processing options defined on the Ledgers for a Business Unit and General Ledger Definition pages. (For document type, options can be defined only at the source or on the Ledgers for a Business Unit page.) |
Recycle |
Marks journal entries that contain errors as invalid and does not allow them to be posted. Once you've made the corrections and re-edited the journal, you can post the journal successfully. |
N/A |
Available only for control total errors. Doesn't check control totals against actual totals. |
Suspend |
Posts, to a suspense account, the amount required to bring each journal into balance (if it is out of balance). For Journal Edit errors, it posts the amounts from those lines that reference invalid ChartFields. The amounts on the lines in error are zeroed out. If you select Suspend, click the Balance Suspense ChartFields, Edit Suspense ChartFields, or Amount Suspense ChartFields links to access a page where you can specify the ChartField and ChartField value for the suspense account. |
Specify |
Available only for Document Type. If you are using document sequencing, you can specify the document type. |
Change to Open From Date |
Available only for Journal Date < Open From Date. |
Change to Open To Date |
Available only for Journal Date > Open To Date. |
Note: When you define journal options at the source level, they override any error handling that you specified at the business-unit or ledger levels for journals using that source only.
You can determine how the system will process a journal entry entered with errors for that source. Remember that settings generally override from the source to the ledger and then to the business unit level. Conversely, the default is from the business unit to the ledger and then to the source level. For example, a ledger setting will override a business unit setting, but a source setting will override both a setting at the ledger and at the business unit level for the same option.
Settings for the following types of errors can be specified at the source level.
Journal Balance Errors
Use the options in the Journal Balance Error group box to define how the system should handle errors when an unbalanced journal is targeted to a balanced ledger. You can post unbalanced journals only to ledgers that have been set up as unbalanced ledgers, such as a budget ledger.
Journal Edit Errors Option
Use the options in the Journal Edit Errors group box to define how the system should handle errors when invalid ChartField values or combinations are entered on journal lines. As you enter journal lines, PeopleSoft General Ledger checks to see that all ChartField values are valid as of the journal entry date. An error occurs if the system finds an invalid ChartField value or ChartField combination. This error category also includes other line errors, such as a blank currency code or an invalid OpenItem reference value.
Journal Amount Errors Option
Use the options in the Journal Amount Errors Option group box to define how the system should handle errors when the foreign amounts and the monetary amounts are not the same sign. For example, it determines how to handle errors for a journal that has a foreign amount that is 10.00 USD and the monetary amount is −200.00 USD.
Control Total Errors
As you enter journal lines, PeopleSoft General Ledger displays a running total of the number of lines, debits, credits, and units that you've entered on the journal. Use the options in the Control Total Errors group box to define how the system should handle errors when the journal line totals do not match the control totals you entered at the journal header level. This feature is optional.
Document Type Option
This only applies if you have enabled document sequencing within the Installation Options component. This document type will be the default for journals entered through the General Ledger Journal Entry component.
Use the Journal Source - Balance Suspense ChartFields page (SRC_JE_BS_CFS_SEC) to specify the ChartField and the ChartField value for the suspense account.
Navigation:
Click the Balance Suspense ChartFields link.
Enter a ChartField and a ChartField value for the suspense account.
Use the Journal Source - Edit Suspense ChartFields page (SRC_JE_ES_CFS_SEC) to specify the ChartField and the ChartField value for the suspense account.
Navigation:
Click the Edit Suspense ChartFields link.
Enter a ChartField and a ChartField value for the suspense account.
Use the Amount Suspense ChartFields page (SRC_JE_AS_CFS_SEC) to specify the ChartField and the ChartField value for the suspense account.
Navigation:
Click the Amount Suspense ChartFields link.
Enter a ChartField and a ChartField value for the suspense account.
Use the Journal Source - Currency Options page (SOURCE3) to specify currency options for a specific source.
Navigation:
This example illustrates the fields and controls on the Journal Source - Currency Options page. You can find definitions for the fields and controls later on this page.
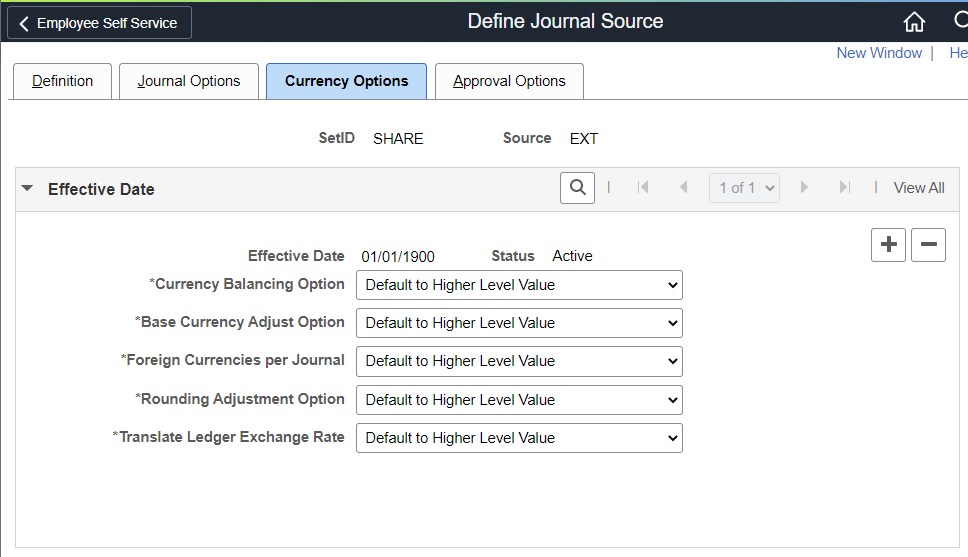
|
Currency Balancing Option |
Select a currency balancing option, which specifies how journal lines are balanced for this source:
|
|
Base Currency Adjust Option |
Select a base currency adjust option, which controls manual adjustments to the base currency in foreign currency journals:
|
|
Foreign Currencies per Journal |
Select a foreign currencies per journal option, which controls the number of foreign currencies for each journal:
Note: When you define currency options at the source level, they override any currency handling you specified at the business unit or ledger levels for journals using that source only. |
|
Rounding Adjustment Option |
Select an option that determines how the system handles an out of balance situation due to rounding.
See also: Ledgers For A Unit - Currency Options Page. |
|
Translate Ledger Exchange Rate |
Select the source of the currency exchange rate to be used for the translate ledger for a given journal source:
Note: If the translate ledger line already has the exchange rate of the primary line, then the values are retained. Therefore. if the journal is edited once with Inherit From Primary Ledger selected, and it is then re-edited with the Retain Exchange Rate (do not inherit) option, then the exchange rate that was inherited during first edit is retained. The second option is to retain the exchange rate values. |
Use the Approval Options page (SOURCE4) to specify journal entry approval options for standard journals and budget journals for a specific source.
Navigation:
This example illustrates the fields and controls on the Journal Source - Approval Options. You can find definitions for the fields and controls later on this page.
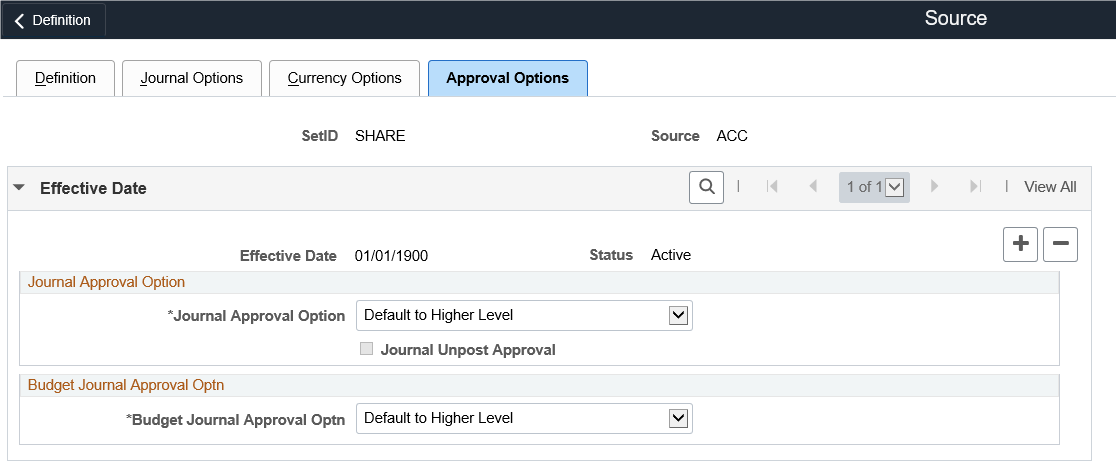
You have the option to use either the Virtual Approver method or Approval Framework method for the journal approval process. You select the approval methodology for journal approval on the Installation Options - General Ledger page. The selection choices on the Approval Options page depend upon which methodology that you select to use in Installation Options. When using the Virtual Approver method, the Business Process Name and Approval Rule Set fields appear on the page. When using the Approval Framework method, these fields are not visible, since the Approval Framework provides its own Business Process and Approval Rule Set to communicate with PeopleTools.
See Understanding Configurable Workflow.
See .Approving Journals Using the GL Journal Approval Components
Select a journal approval option and a budget journal approval option:
Field or Control |
Description |
|---|---|
Pre-Approved |
Enables journal entry without approval through workflow. |
Default to Higher Level |
Uses the approval options defined on the Ledgers For A Unit and General Ledger Definition pages. |
Require Approval |
Requires approval through workflow. If you select this option and the approval methodology on the Installation Options - GL page is Virtual Approver, you must select a Business Process Name and associated Approval Rule Set . The Business Process Name and Approval Rule Set fields are not visible when the approval methodology is Approval Framework in Installation Options. You must also select Submit Journal from the Process drop-down list box on the Journal Entry - Lines page when processing journals. |
Journal Unpost Approval |
Select check box for approving journal unposting. If Journal approval option is set to Default to Higher Level or Pre-Approved for posting, then same is applicable for unposting. Also, if approval is not required for posting then same is applicable for unposting. If approval is required for posting then approval can be enabled for unposting by selecting this check box. |
Note: When you define approval options at the source level, they override any approval handling that you specified at the business unit or ledger levels for journals using that source only.
Use the Schedules page (SCHEDULE) to create schedules that automate and control the generation of standard or recurring journal entries.
Navigation:
This example illustrates the fields and controls on the Schedules page. You can find definitions for the fields and controls later on this page.
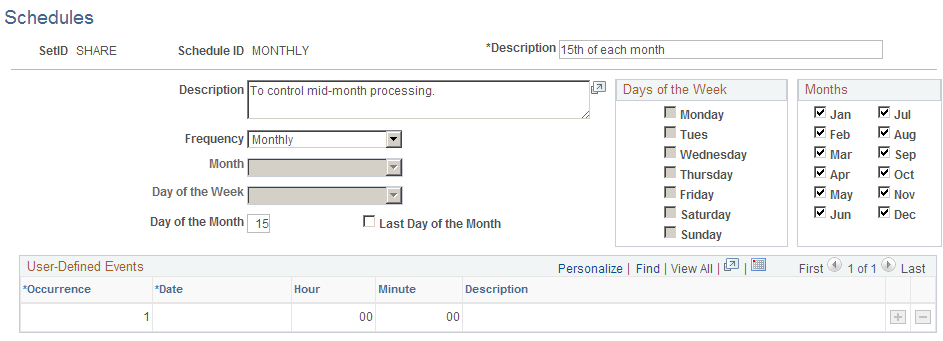
Schedules are used to automate and control the generation of recurring journal entries. You can define daily, weekly, monthly, or annual schedules for recurring transactions such as closing schedules or schedule specific user-defined events such as expense report due dates.
Schedules control the frequency of processing. For example, if you pay your rent on the 15th of each month, select a monthly schedule that specifies the day of the month as the 15th. By defining schedules that are tailored to your accounting environment, you can easily automate the creation of a Standard Journal Entry (SJEs) or a group of SJEs. You can set up daily, weekly, monthly, annual, or user-defined schedules. User-defined schedules enable you to specify specific dates and times.
Note: When you define schedules for use with standard journal entries, don't define multiple occurrences for a single day.
Field or Control |
Description |
|---|---|
Frequency |
This specifies how often the event will recur. Values are: Annually: Specifies an annual schedule. This option activates the Month and Day of the Month for you to enter the values. Daily: Specifies a daily schedule. The Daily option activates the Days of the Week check boxes for you to select or deselect specific days. Monthly: Specifies a monthly schedule. This option activates the Day of the Month and Last Day of the Month and the Months check boxes for you to select or exclude individual months. User Defn (user defined): Sets up user-defined events schedules for specific dates when an event will take place. When you use this option, you can enter an occurrence number (for multiple occurrences), the date, and a description. Do not specify hours or minutes for schedules used for SJEs. Weekly: Specifies a weekly schedule. The Weekly option activates the days of the week for you to enter a value. |
Note: When you specify a day of the month for monthly schedules, use the Day of the Month edit box to enter any day up to and including day 28. Use the Last Day of Month edit box to enter the absolute last day of the month, whether it's day 28, 29, 30, or 31.