Activating the Mouse Over Popup Feature
|
Page Name |
Definition Name |
Usage |
|---|---|---|
|
PSUSEROPTNDEFN |
Activate or deactivate the mouse over popup feature at the installation level. |
|
|
PSUSERSELFPRSNL |
Activate or deactivate the mouse over popup feature for a user. |
Use the Define Personalizations page (PSUSEROPTNDEFN) to activate or deactivate the mouse over popup feature at the installation level.
Navigation:
Select PPTL.
This example illustrates the fields and controls on the Define Personalizations page: Format tab. You can find definitions for the fields and controls later on this page.
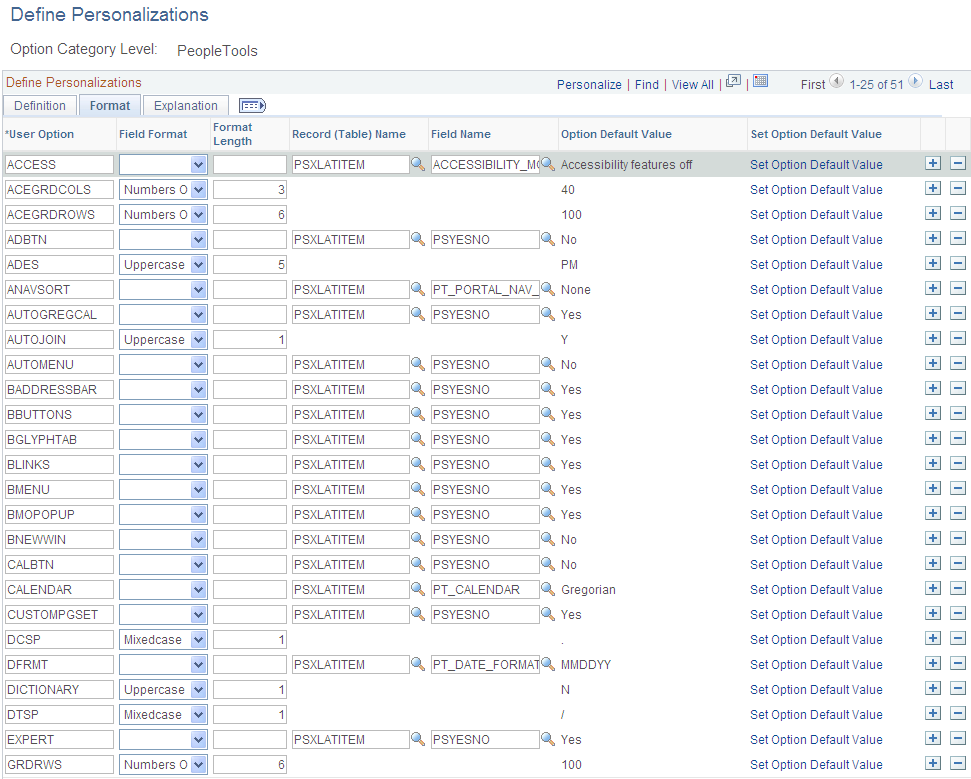
To activate or deactivate the mouse over popup feature at the installation level:
Select PeopleTools (PPTL) category.
Select the Format tab.
For user option BMOPOPUP, select the Set Option Default Value link.
Select Yes or No in the Option Default Value field.
The option is delivered as Yes.
Click the Save button.
Use the My Personalizations page (PSUSERSELFPRSNL) to activate or deactivate the mouse over popup feature for a user.
Navigation:
This example illustrates the fields and controls on the My Personalizations page: Navigation Personalizations. You can find definitions for the fields and controls later on this page.
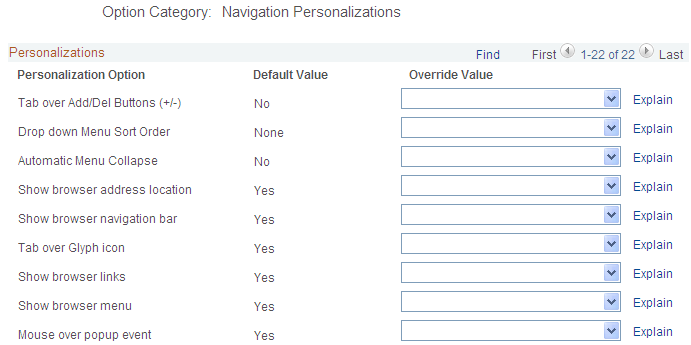
To activate or deactivate the mouse over popup feature at the user level:
From the Navigation Personalizations category, select the Personalize User Options button.
From the Mouse over pop up event option, select Yes or No in the Override Value column.
The option is delivered as Yes.
Click the OK button.
Click the Save button.
Access the Edit Box Properties - Use page in Application Designer.
This example illustrates the fields and controls on the Edit Box Properties - Use page. You can find definitions for the fields and controls later on this page.
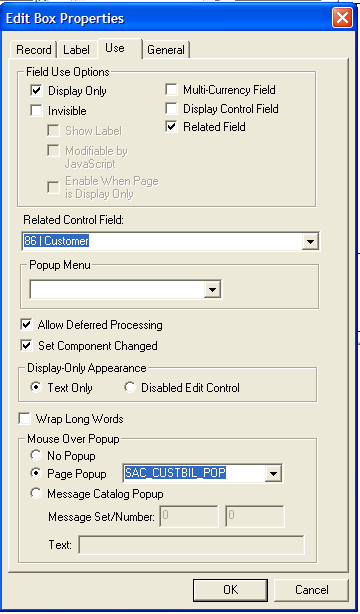
PeopleSoft FSCM does not activate the mouse over popup feature on all customer and supplier pages. Therefore, you may decide to add this feature to additional pages. To do this, determine which pages that you want to activate the mouse over popup feature. Then link a field on the page to the appropriate popup page using the Application Designer Edit Box Properties - Use page.
To link a field to a popup page:
A mouse over can be added to a page by selecting a display-only field on the page.
In other words, the Display Only option must be selected in the Field Use Options topic.
Select a popup page in the Mouse Over Popup section
See “Using Page Controls, Using Popup Pages, Associating Popup Pages with Fields”, and “Creating Page Definitions, Setting Use Properties”, in PeopleTools: Application Designer Developer's Guide
To activate a popup page, specific fields, also known as keys, must be available in the component buffer.
Bill To Customer Popup Page
Required fields in the component buffer for the bill to customer pop up page are:
SETID
BILL_TO_CUST_ID
ADDRESS_SEQ_NUM (optional – if found on main page, this address will be displayed)
Ship To Customer Popup Page
Required fields in the component buffer for the ship to customer pop up page are:
SETID
SHIP_TO_CUST_ID
ADDRESS_SEQ_SHIP (optional – if found on main page, this address will be displayed)
Sold To Customer Popup Page
Required fields in the component buffer for the sold to customer pop up page are:
SETID
SOLD_TO_CUST_ID
ADDRESS_SEQ_SOLD (optional – if found on main page, this address will be displayed)
Bill To Customer Contact Popup Page
Required fields in the component buffer for the bill to customer contact pop up page are:
SETID
BILL_TO_CUST_ID
CNTCT_SEQ_BILL
Ship To Customer Contact Popup Page
Required fields in the component buffer for the ship to customer contact pop up page are:
SETID
SHIP_TO_CUST_ID
CNTCT_SEQ_SHIP
Sold To Customer Contact Popup Page
Required fields in the component buffer for the sold to customer contact pop up page are:
SETID
SOLD_TO_CUST_ID
CNTCT_SEQ_NUM
Supplier Popup Page (Type 1)
Required fields in the component buffer for the supplier pop up (type 1) page are:
SETID
VENDOR_ID at level 0
Supplier Popup Page (Type 2)
Required fields in the component buffer for the supplier pop up (type 2) page are:
SETID
VENDOR_ID
VNDR_LOC
ADDRESS_SEQ_NUM at level 0
Supplier Popup Page (Type 3)
Required fields in the component buffer for the supplier pop up (type 3) page are:
SETID
VENDOR_ID
VNDR_LOC at level 0
Supplier Extension Popup Page (Type 1)
Required fields in the component buffer for the supplier extension pop up (type 1) page are:
SETID
VENDOR_ID
VNDR_LOC
ADDRESS_SEQ_NUM
CNTCT_SEQ_NUM at level 0
Supplier Extension Popup Page (Type 2)
Required fields in the component buffer for the supplier extension pop up (type 2) page are:
SETID
VENDOR_ID
CNTCT_SEQ_NUM at level 0
Supplier Contact Popup Page
Required fields in the component buffer for the supplier contact pop up page are:
SETID
VENDOR_ID
CNTCT_SEQ_NUM
EFFDT at level 0.