Creating Orders for Career and Temporary Placements
This topic provides an overview of career and temporary orders.
|
Page Name |
Definition Name |
Usage |
|---|---|---|
|
FO_ORDER_HDR |
Record general information about a job order for a permanent or a temporary employee. |
|
|
FO_ORDER_REQ |
Enter resource request (order line) information. |
|
|
FO_ORDER_REQ_HIST |
Change resource quantities or view a history of resource quantity changes for an order. |
|
|
FO_ASGN_REPL_DTL |
View assignment replacement information. |
|
|
FO_ORDER_TAX |
Enter sales tax information to be used as defaults when creating the order assignments. |
|
|
FO_ORDER_CAR_BILL |
Enter career placement information. This page only appears for career order types. |
|
|
FO_ORDER_TEMP_BILL |
Enter temporary placement information. This page is only applicable to temporary order types. |
|
|
FO_ORDER_MATCH |
This page captures the resource request target qualifications and the search criteria to match the skills of available candidates with the needs of your customers and fill open job orders. |
|
|
FO_SO_ATTACH |
Add and view attachments for orders. |
|
|
FO_ORDER_HISTORY |
View history items associated with the job order. |
|
|
FO_SO_HIST_SEC |
View and enter changes related to billing comments, service order priority, and service order status. |
|
|
FO_SO_TEMPLTS |
View a list of the forms associated with the order, drill down to the form details, and associate a new form with the order. |
|
|
Forms Page |
FO_SO_TMPLT_DTL |
Enter details for the order forms. |
|
FO_ORDER_JOBOPEN |
Enter information about the order for posting to job boards. |
When you add an order in PeopleSoft Staffing Front Office, you must select the user-defined order type that describes the transaction. Because user-defined order types map to one of two system-defined order types, a temporary order is really a user-defined order type that's mapped to a temporary system order type, and a career order is a user-defined order type that's mapped to a career system order type.
Career orders are requests for one or more people to perform work in a permanent capacity at a client of the staffing organization as an employee of that organization. Creating a new career order is similar to creating a temporary order, except for specific fields that pertain to the career aspects of the position, such as salary and prospective fees.
Temporary orders are requests for contingent workers for whom the client has no need for permanent positions. The customer can request one or more resources on the same order. Creating a new temporary order is similar to creating a career order, except for specific fields that pertain to the billing and payroll aspects of the position.
Career placement information applies to career and converted temp-to-hire orders, but not to temporary orders.
The same order may include several resource requests (order lines) specifying a distinct set of qualifications for the different types of resources needed by the customer.
Note: Many fields on these pages appear by default from the Staffing - Job Data page (Set Up Financials/Supply Chain, Common Definitions, User Preferences, Define User Preferences and click the Staffing - Job Data link).
Use the Order page (FO_ORDER_HDR) to record general information about a job order for a permanent or a temporary employee.
Navigation:
This example illustrates the fields and controls on the Order page (1 of 2). You can find definitions for the fields and controls later on this page.
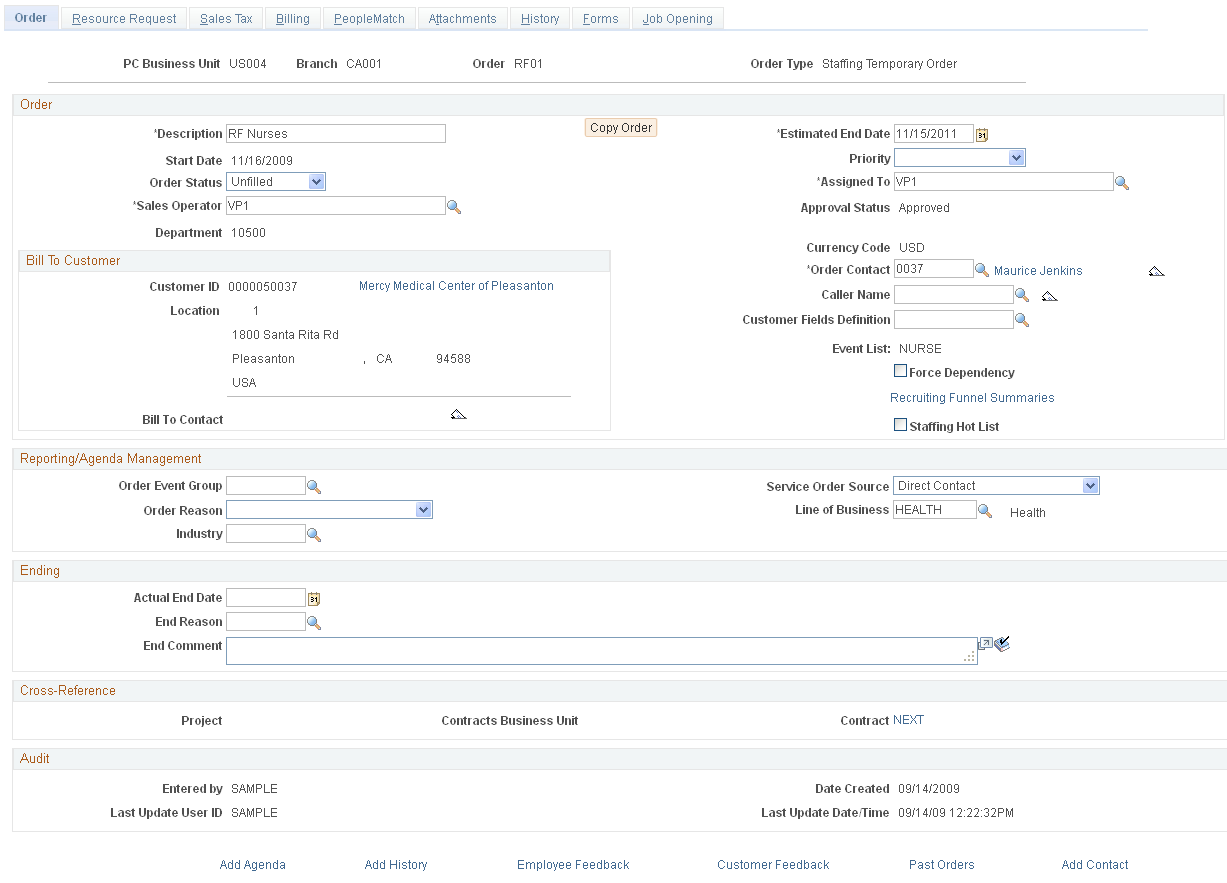
Note: When you add an order, the system provides the order status of Draft by default. Use this status while the contractual stipulations for the service have not yet been finalized with your customer. Most fields in the Order component can be changed when the order has this status. However, you cannot create assignments for draft orders. Once you confirm the contractual terms of the service with your customer, change the order status to Unfilled. If you have installed PeopleSoft Staffing Front Office with PeopleSoft Pay/Bill Management, once an order is saved with an Unfilled status, the system automatically creates a project and a contract and associates them with the order. At that point, several fields will no longer be enterable within the Order component. For example, note that you cannot change the Bill To Customer information after the status has changed to Unfilled and the order has been saved.
Field or Control |
Description |
|---|---|
PC Business Unit (PeopleSoft Project Costing business unit) |
Displays the PeopleSoft Project Costing (PC) business unit associated with the order. Every PeopleSoft Staffing Front Office order must be associated with a PC business unit even when the PC module is not used. When you add an order, you must specify which staffing branch owns the transaction. PeopleSoft Staffing Front Office uses the staffing branch configuration to automatically determine the PC business unit to which the staffing branch belongs and associates the PC business unit with the order. |
Branch |
Displays the PeopleSoft Staffing Front Office branch associated with the order. |
Order |
Displays the order ID number. |
Order Type |
Displays the user-defined order type that you selected when you initiated the order. PeopleSoft Staffing Front Office has user-defined order types and system-defined order types. When adding an order, you enter only the user-defined order type. The system associates user-defined order types with their system-defined order type. The two system-defined order types are: temporary and career. You can create as many user-defined order types as you need, each always mapping to either a temporary or a career system-defined order type. When you add an order, depending on the user-defined type you choose and its associated system-defined type, the application captures different data elements and different system behaviors and validations occur. |
Assigned To |
Enter the ID of the person, or team, that is most closely related to, and responsible for, servicing the customer's needs. |
Staffing Hot List |
Select this option to add the order to the Order Hot List pagelet. |
Order
Field or Control |
Description |
|---|---|
Description |
Enter a description to represent the services being provided through the job order. If you installed PeopleSoft Staffing Front Office with PeopleSoft Pay/Bill Management, the order description is also used as the description of the project automatically created by PeopleSoft Pay/Bill Management. The description can also default from the job opening field on the order. |
Copy Order |
Click this button to duplicate the order displayed and to create a new transaction. Update the information on the pages in the component, and then click the Save button. |
Start Date |
Select the date when you anticipate the resource contract to start or when the customer authorized it to start. |
Order Status |
Select a value that represents the state of the order:
|
Priority |
Select a priority for the order as defined through system configuration. Examples of order priorities that you may want to configure in the system include: CRITICAL, HIGH, LOW, and MEDIUM. |
Sales Operator |
Enter the ID of the person most closely related to and responsible for acquiring the customer. |
Service Operator |
Enter the ID of the person most closely related to and responsible for servicing the customer's needs. |
Department |
Enter the department within your staffing organization for which the candidate would be working. Note that this value is not the department within the customer's organization. Note: When PeopleSoft Pay/Bill Management is installed, users have the option of using the PeopleSoft Project Costing Organizations feature to generate accounting entries. The order department, as well as the PeopleSoft General Ledger business unit associated with the order's contracts business unit, are used to create the project owning organization. |
Approval Status |
Select a status for the order: Approved, Denied, or Pending. Order approval security is granted through the staffing user preferences. Orders that have not been approved can only be saved with a Draft status. |
Customer ID |
Enter the Bill To Customer ID of the customer who will be billed for the services provided in the order. |
Location |
Enter the billing location of the Bill To Customer. The available selections are customer addresses that are also designated as both bill to and sold to locations. |
Currency Code |
Captures the currency in which the customer will be billed for the services provided through the order. |
Bill To Contact |
Enter the ID of the contact in the customer organization who will be the "attention to" person in the client's invoice. |
Order Contact |
Enter the ID of the contact in the customer organization responsible for the order. Customers are connected to contacts when the contacts are set up. The system displays the IDs of these contacts when you click the Lookup button. To view details for the contact, click the contact's name. |
Caller Name |
Enter the ID of the contact who initiated the order. You can either select an ID from the list of contacts associated with the customer or enter a new name in the field. |
Customer Fields Definition |
This field is only available to customers who license PeopleSoft Pay/Bill Management. It captures the customer fields template to be used when capturing additional billing information for the job order. The system only displays those definitions that have been associated with the bill to customer in the customer setup. |
Event List |
When creating a new order for a customer with the required information set up, the default event list for a customer will pre-populate. If the customer has the Allow Recruiting Funnel List check box selected on the Default Customer Event Lists page , then the user will be able to choose a different event list from a drop down list box of available event lists. Users can not change the event list once the order has been saved by the user. |
Force Dependency |
Select this check box to force dependency so that in the Recruiting Funnel, the status icons are only clickable when the previous event is complete. Note: This value may be set at the event level, at the customer event list, or at the order level. There is a hierarchy beginning with the event level. The value will be carried over to the customer event list. The value at the customer event list level will be carried over to the order level. You can overwrite the value defaulted from the previous level in the hierarchy. |
Staffing Hot List |
Select to indicate that this order should appear on the Order Hot List pagelet. |
Reporting/Agenda Management
Field or Control |
Description |
|---|---|
Order Event Group |
Enter the type of agenda items that you want to automatically add to your agenda when assignments are made. |
Service Order Source |
Enter the method by which you received the order. |
Order Reason |
Enter the reason for originating the order. |
Line of Business |
Enter the code that represents the line of business in which the candidate would be working. |
Industry |
Enter the code that best represents the industry in which the customer operates. |
Ending
Use this group box to enter information about the date an order ended, as well as the circumstance that led to the ending of the order.
Note: This information should be entered along with changing the order status to Ended. .
Field or Control |
Description |
|---|---|
Actual End Date |
Select the date the order ended. |
End Reason |
Enter the reason the order ended. |
End Comment |
Enter any comments you have about the ending of the order. |
|
Click the spell check button to check the spelling in the End Comment field. |

Cross-Reference
These fields appear only when PeopleSoft Pay/Bill Management is installed. They display information about the project and contract automatically created by PeopleSoft Pay/Bill Management and associated with the order
Field or Control |
Description |
|---|---|
Project |
Displays the ID of the project that PeopleSoft Pay/Bill Management automatically created for the job order. |
Contracts Business Unit |
Displays the business unit of the contract that Pay/Bill Management automatically created for the job order. |
Contract |
Displays the Contract ID of the contract that PeopleSoft Pay/Bill Management automatically created for the job order. |
Audit
Field or Control |
Description |
|---|---|
Entered By, Date Created, Last Update User ID, and Last Update Date/Time |
These are display-only fields that provide the user an audit record of who added and last updated the order, and when that occurred. |
Use the Resource Request page (FO_ORDER_REQ) to enter resource request (order line) information.
Navigation:
This example illustrates the fields and controls on the Resource Request page. You can find definitions for the fields and controls later on this page.

Note: An order may have multiple resource requests. Resource requests are the equivalent of order lines. Each may have its own stipulations in terms of resource qualifications, start and end dates, and work location. Some fields on this page appear conditionally, depending on the order type and whether you have PeopleSoft Staffing Front Office installed, PeopleSoft Pay/Bill Management installed, or both.
Resource Request
Field or Control |
Description |
|---|---|
Line Number |
Displays the order line number associated with the resource request. |
Requisition Status |
Displays where the individual resource request is in the process of being fulfilled. The system automatically updates the status based on fulfillment progress. When you submit an order, the resource request status is Unfilled. This field is visible only after you submit an order. Other valid statuses are Ended and Filled. |
Date Opened |
Enter the date that the customer made the specific resource request. This information can be used in custom reports to track the time it takes to fill an order. |
Report To |
Enter the ID of the contact in the customer organization who is responsible for this resource request. |
Description |
Enter a description for the request. |
Job Code |
Enter a code to define the resource's main function. |
Job Supplement |
Select the job supplement that pertains to the order. Job supplements, which can contain information about the requirements of the job, are entered through the use of forms, and are attached to customers. |
Quantity Requested |
Enter the number of resources needed by this particular resource request. For example, an order may have two requests: the first for a single administrator and the second for three programmers. |
Assigned |
Displays the number of assignments already created for the resource request. If the active count is equal to the quantity requested, the resource request has a Filled status. If the active count is less than the quantity requested, the request has an Unfilled status. |
Pending Replacement |
Number of canceled assignments for an order that have not been replaced. |
View Replacement Detail |
Click this link to view assignment replacement details for this order. |
Change Quantity/View History |
Click this link to change the resource requested quantity or to view a history of resource quantity changes. |
Quantity Needed |
This field displays the difference between the quantity of resources requested and the number of active assignments. It corresponds to the number of assignments that still need to be created to fill the request. |
Never Filled |
Quantity requested minus the number of non-canceled assignments. |
Temp To Hire |
For temporary orders only. Select this check box if the order is a temporary position that could become a permanent position. Note: This field only appears on temporary orders. This check box must be selected for the Permanent Hire button to appear on the Assignment Header page. |
Worksite Customer
Field or Control |
Description |
|---|---|
Customer ID |
Enter the ID of the customer where the work will be performed. |
Location |
Enter the customer's location where the work will be performed. |
Customer Fields
Field or Control |
Description |
|---|---|
Definition ID |
This field appears only when your system is integrated with Pay/Bill Management. Select the customer fields definition that you want to use for this order. If a default definition was established for the customer, it automatically appears. The system displays the customer fields that you should enter for the order. Enter values according to the rules established on the definition. The customer field values entered on the resource request default to the assignment. Note: Customer field definitions integrate with PeopleSoft Billing only for temporary orders. |
Customer Field Name |
Displays the field name as defined by the customer fields template definition. |
Description |
Displays the values of each field as defined in the customer fields template definition. |
Notes |
Enter any additional notes about this request. |
Weekly Hours |
Enter the number of hours that the customer requires from this resource per week. |
Minimum Hours Waived |
Select this check box to waive any requirement for minimum weekly hours. |
Show in Self-service |
Select this check box to have this resource request appear in the self-service Open Resource Requests component. Candidates can search for open resource requests that have this check box selected. |
Partial Days Acceptable |
Select this check box to indicate that the customer will accept a resource who works partial days. |
Start Date and End Date |
Select the work dates for the request. Note: The End Date field only appears on temporary orders. |
Start Time and End Time |
Enter the start and end times for this request. |
Assignments
This group box displays all the assignments created for this resource request. If no assignments have been created, the group box is empty.
Field or Control |
Description |
|---|---|
Candidate Name |
Name of the candidate assigned to the resource request. |
Assignment ID |
The ID of the assignment associated with the resource request. |
Start Date |
The date that the assignment starts. |
Assignment Status |
The status of the assignment. |
Use the Change Quantity/View History page (FO_ORDER_REQ_HIST) to change resource quantities or view a history of resource quantity changes for an order.
Navigation:
Click the Change Quantity/View History link on the Resource Request page.
Field or Control |
Description |
|---|---|
Old Quantity |
Displays the quantity last requested. |
New Quantity |
Enter the new quantity requested. |
Request Date |
Enter the date the customer requested this change. Note: This date cannot be in the future. |
Change Reason |
Select a reason for the change from the drop-down list box. |
Comments |
Enter any additional comments. |
Quantity Change History
This section displays a history of changes for this resource request.
Use the Replacement Detail page (FO_ASGN_REPL_DTL) to view assignment replacement information.
This page displays a history of assignment replacement information for this order.
Navigation:
Click the View Replacement Detail link on the Resource Request page.
Use the Sales Tax page (FO_ORDER_TAX) to enter sales tax information to be used as defaults when creating the order assignments.
Navigation:
This example illustrates the fields and controls on the Sales Tax page. You can find definitions for the fields and controls later on this page.
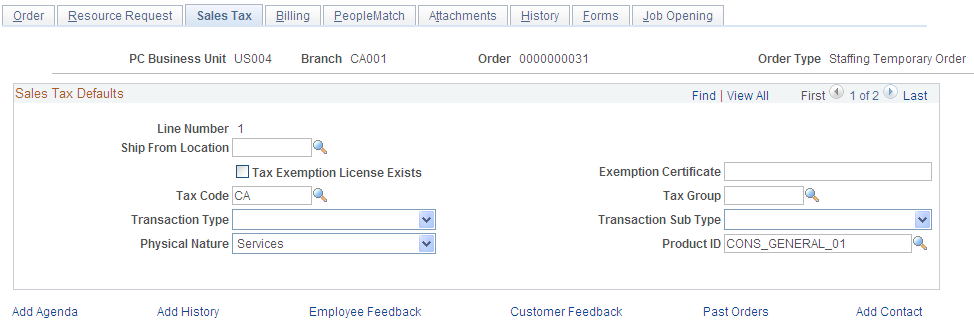
Note: This page is only available when Pay/Bill Management is installed.
Field or Control |
Description |
|---|---|
Line Number |
Displays the resource request line number. |
Ship From Location |
Enter the staffing branch location from which the request is originating. |
Tax Exemption License Exists |
Select this check box to indicate that a tax exemption certificate exists for this customer. |
Exemption Certificate |
Enter the exemption certificate number. |
Tax Code and Tax Group |
Enter a tax code and group for this request. |
Transaction Type and Transaction Sub Type |
Enter a type to describe the nature of the transaction, such as Service, and a sub type, such as Service or Misc. |
Physical Nature |
Select a value to indicate whether the request involves services or goods. |
Product ID |
Enter an ID for this request. This information will be provided by default from the contract profile. Only rate-based products can be selected for temporary orders, and only amount-based products can be selected for career orders. Note: Product kits are excluded from the look up. |
Use the Billing page (FO_ORDER_TEMP_BILL) to enter temporary placement information.
Navigation:
This example illustrates the fields and controls on the Billing Page. You can find definitions for the fields and controls later on this page.
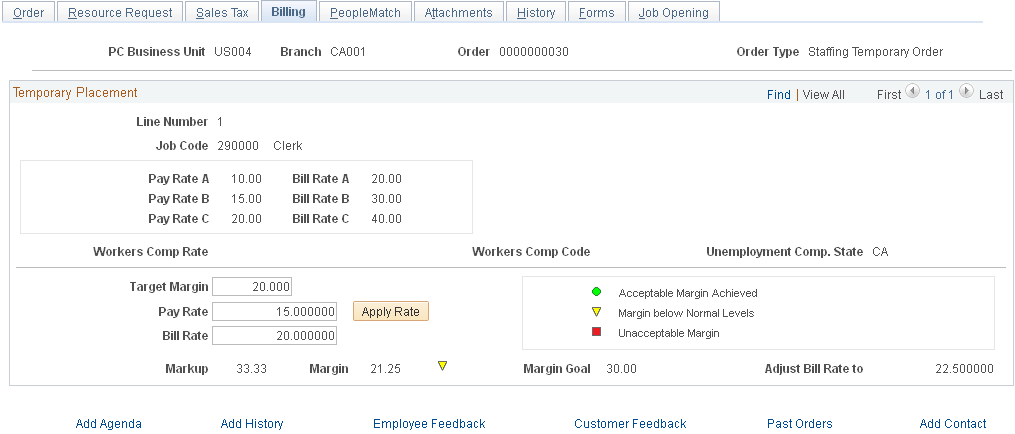
Note: This page is only available for temporary order types. For career orders, you enter billing information in the Salary and Billing page instead.
Field or Control |
Description |
|---|---|
Line Number |
This field displays the number for this temporary order. |
Job Code |
This field displays the job code that describes the work to be performed in this temporary order. |
Pay Rate A, B, C and Bill Rate A, B, C |
Defined as part of the job code, pay and bill rates are purely informative. They provide the user with guidance for the normal payroll and billing bands for the job code specified. |
Workers Comp Rate (workers' compensation rate) |
This field displays the workers' compensation rate associated with the job code in the state where the work is to be performed. This field is used by U.S. customers only. |
Workers Comp Code (workers' compensation code) |
Displays the workers' compensation code that is associated with the job code and state of the site location for the order. This field is used by U.S. customers only. |
Unemployment Comp State (unemployment compensation state) |
Displays the state in which unemployment compensation is determined. |
Target Margin |
Enter the margin percent that your organization would like to achieve with the assignments associated with this resource request. It reflects the bill rate less the pay rate and any additional costs over the bill rate. |
Pay Rate |
Enter the amount per hour you will pay employees for the work they perform at your customer's site for this request. |
Apply Rate |
Click this button to calculate the bill or pay rate, depending on information entered. If rates are adjusted, you may click this button to apply the new rates to the margin and markup calculations that follow. |
Bill Rate |
Enter or view the amount per hour you will bill your customer for the work your employees perform at your customer's site for this order. Note: The Pay Rate and Bill Rate fields are used for calculation and estimation purposes. Actual assignment rates are determined at the time of the assignment. |
Markup |
Displays, as a percentage, the difference between the pay rate and the bill rate. The calculation is: |
Margin |
Displays, as a percentage, the difference between the pay rate plus costs and the bill rate. The calculation is: Note: Two types of costs are included in additional costs. These costs are general overhead or fixed costs established in the staffing branch configuration and workers' compensation costs associated with the job code and state. |
Margin Goal |
Displays the margin goal established by your organization for the job code. |
Adjust Bill Rate to |
If you do not meet margin goals, the system recommends adjusting the bill rate to a higher level to meet the margin requirements for the position. You can adjust the pay rate downward exclusive of, or in addition to, the upward adjustment of the bill rate. |
Non-Compliance Reason |
This field displays upon save if the values for the bill rate or markup percentage exceed the defined maximum values defined on the Master Contract Rates page for this customer. A message explaining the overage will also be displayed when the order is saved. |
Use the Salary and Billing page (FO_ORDER_CAR_BILL) to enter career placement information.
Navigation:
This example illustrates the fields and controls on the Salary and Billing page. You can find definitions for the fields and controls later on this page.

Note: You enter salary and billing information for career order types on this page rather than the Billing page.
Career Placement
Field or Control |
Description |
|---|---|
Salary Range From and To |
Enter the salary range for the placement. This amount is what the customer is willing to pay for the position. This amount is not necessarily the salary range for the position in the marketplace. |
Additional Compensation |
If the pay for the position includes a base salary plus any additional monetary compensation or its equivalent, enter the value of that additional compensation. |
First Review |
Enter the date when the first candidate performance review is expected. |
Renewal % Increase |
Enter the percent of salary increase the candidate receives at review time. |
Fee Schedule |
Enter the fee schedule code to indicate how fees will be calculated based on the candidate's salary. |
Fee Schedule Sent |
Select the date the fee schedule was sent to the customer. |
Fee Schedule Sign |
Select the date the fee schedule was signed by the customer. |
Guarantee Days |
Enter the number of days that the customer is entitled to fee reimbursement in case the candidate is terminated or resigns. |
Calculate |
Click this button to calculate the minimum and maximum potential incomes and display them on the page. |
Fee Percentage |
Displays the minimum and maximum fee percentage that your organization will bill from the order. |
Total Compensation |
Displays the minimum and maximum salary range that you entered and adds to that number the amount (if any) you entered in the Additional Compensation field. |
Potential Income |
Displays the minimum and maximum potential income range associated with the resource request. The system calculates potential income as a percentage of the total compensation granted to the employee who fills the order. The system determines the percentage by the fee schedule specified on the resource request. For instance, the Salary Range might be 40,000 USD to 50,000 USD. Assuming a fee percentage of 12 percent, the low end of the potential income range is 4,800 USD and the high end is 6,000 USD. |
Send Resume to |
Enter the contact in the customer organization who should receive candidate resumes. |
1st Interview |
Enter the contact in the customer organization who will conduct the first candidate interview. Do the same for 2nd Interview and 3rd Interview if applicable. |
Other Recruiters |
Enter the name of the individual or organization also doing recruiting work. |
Reference Check By |
Select the party responsible for verifying the candidate's references: Customer, Recruiter, or Th. Party (third party). |
Extend Offer |
Select an entity that will extend the job offer to the candidate: Customer, Recruiter, or Th. Party (third party). |
CO-OP Order |
Select this check box to indicate that your organization will fill the order in cooperation with another staffing organization. |
Confidential Order |
Select this check box to indicate that the order should remain confidential. |
Company Will Relocate Employee |
Select this check box to indicate that the customer is offering a paid relocation package with this position. |
Use the PeopleMatch page (FO_ORDER_MATCH) to capture the resource request target qualifications and the search criteria to match the skills of available candidates with the needs of your customers and fill open job orders.
Navigation:
This example illustrates the fields and controls on the PeopleMatch page. You can find definitions for the fields and controls later on this page.
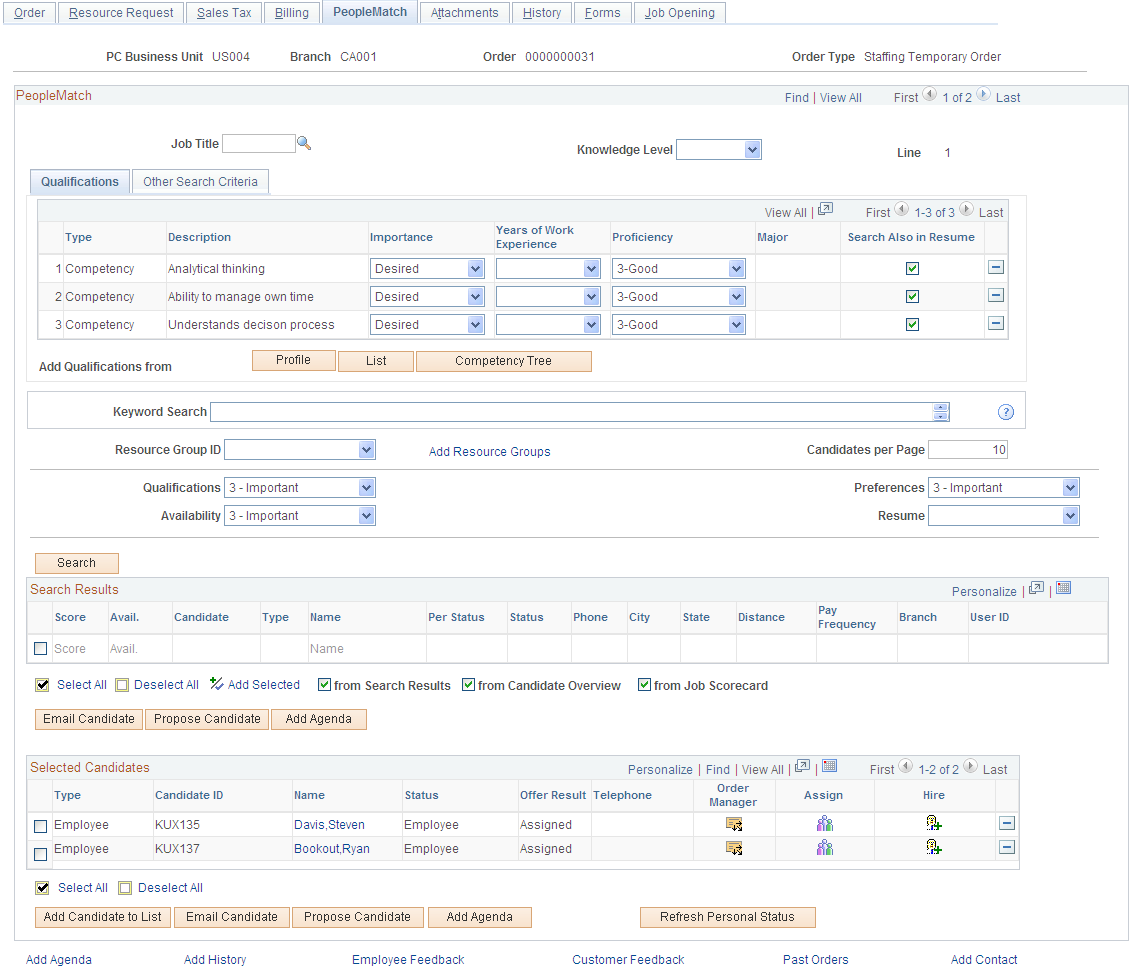
PeopleMatch searches are identical for temporary and career orders.
Note: You can search for applicants but you cannot create temporary assignments until the applicant is hired as an employee or non-employee. If you installed PeopleSoft Pay/Bill Management, the system sends a message to PeopleSoft HCM to retrieve an employee ID (EMPLID). Because a delay may occur in the time the databases receive and respond to the message, the employee record is set to pending within the PeopleMatch search results. Once you complete the hire process, the system changes the personnel status to Employee or Non-Employee. You can then complete the assignment process. Career assignments may be filled by either applicants or employees.
You must run the Index Creation process to incorporate any changes to employees and applicants that can affect matching.
PeopleMatch
Field or Control |
Description |
|---|---|
Job Title |
Enter the job title code that best describes the work to be performed by the candidate. Note: The job title entered in this field is not used by the system as search criteria. To search based on job title, include this field in the PeopleMatch search configuration and enter the job title value as search criteria on the Configurable Fields tab. |
Knowledge Level |
Select a knowledge level required for the job title: Advanced, Beginner, Intermed (intermediate), or Not Invest (not investigated). The system does not use the information entered in this field as automatic search criteria. |
The functionality of the buttons, fields, and destination pages on the Qualifications and Other Search Criteria tabs and in the Search Results group box is the same as those you use when adding customers to the system and when searching for applicants, employees, and contractors who possess particular qualifications.
See PeopleSearch Page.
Selected Candidates
This group box contains those candidates who are being considered for placement.
You can move resources to the Selected Candidates group box by:
Selecting the check box to the left of the resource's name in the Search Results grid, and then clicking the Add Selected link.
Adding an individual candidate who is not in the Search Results grid by inserting a row in the Selected Candidates group box using the Add Candidate to List button.
Using the Job Scorecard page to view scoring information, selecting the candidate, selecting the From Scorecard check box, and then clicking the Add Selected link.
Using the Candidate Overview page to view candidate information, selecting the candidate, selecting the From Candidate Overview check box, and then clicking the Add Selected link.
Field or Control |
Description |
|---|---|
Type |
Select Appl (applicant) or Empl (employee). |
Candidate ID |
Enter the candidate's applicant or employee ID. |
Name |
Displays the name of the candidate. Click a candidate name link in this column to access the Candidate Overview page. This page provides basic personal data about the candidate, as well as job-related information such as skills, references, and previous assignments. To view the candidate's resume, click View Resume. To view the candidate's employee data, click View Candidate Details. |
Status |
Indicates the resource's status if they are an applicant, or whether they are an employee or non-employee. The valid values are: Active, Hire Pending, Invalid, Pending, Employee, and Non Employee. |
Offer Result |
Displays the candidate's offer status for the resource request, such as Considering, Declined, Other, Accepted, or Assigned. |
Telephone |
Displays the candidate's main telephone number. |
|
Click the Go To Order Manager icon to make an offer, add and view agenda items, and add or view historic event information about the open order for a selected candidate. |
|
Click the Express Assignment icon to create an assignment for this candidate without using Order Manager. |
|
Click the Hire Candidate icon to hire an applicant before placing him or her on a temporary assignment. Only employees and non-employees can be placed in temporary assignments. |
Considering |
Select to consider this candidate. This field appears only if the customer has enabled RF event lists. Note: Once you select this check box, you cannot change it. In effect, you are adding the candidate to the Recruiting Funnel. |
Disqualify |
Select to disqualify this candidate from the job. This field appears only if the customer has enabled RF event lists. Note: For a candidate: If the Considering check box is deselected, then the Disqualify check box is read only and not selected. If you check the Considering check box, then the Disqualify check box is editable. If you select the Disqualify check box, then the Considering check box is read only. |
Completed |
Displays the number of completed events. Note: The assignment event is not taken into account when calculating the number of completed events. |
Email Candidate |
Click this button to send an email to selected candidates in the Search Results group box. |
Propose Candidate |
Click this button to send an email to the contact about a candidate. |
Add Agenda |
Click the Add Agenda button to add a reminder in your agenda about a candidate. |
Add Candidate to List |
Click this button to add another row in the Selected Candidates group box. |
Refresh Personal Status |
Click this button to refresh the applicant and employee status. For example, let's say a candidate is an applicant and not an employee and you want to place the person in a temporary assignment. However, only employees and non-employees can be assigned to temporary orders (applicants cannot). Thus, even though you hire the person, that person still appears as an applicant. Clicking the Refresh Personal Status button will change the person's candidate type from Applicant to Employee and the Candidate ID from Applicant ID to Employee ID. |


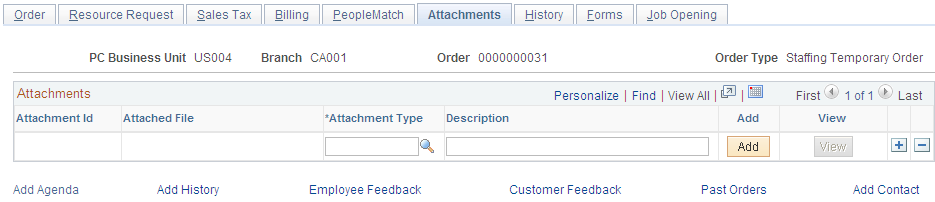
Use the Attachments page (FO_SO_ATTACH) to add and view attachments for orders.
Navigation:
This example illustrates the fields and controls on the Attachments page. You can find definitions for the fields and controls later on this page.
Field or Control |
Description |
|---|---|
Attachment ID |
Displays the ID that the system automatically derived for the file attachment. |
Attached File |
Displays the name of the file attached to the order. |
Attachment Type |
Attachment types are defined through system configuration. Attachments can include resumes, letters of reference, order-related documents, notes related to the order, signed fee schedules, and so on. Enter the type that best categorizes the file attachment. |
Description |
Enter a description indicating the contents of the file attachment. |
Add and View |
Click the respective buttons to add the Attachment to the order, or to view the attachment. If you click Add, you can then browse, open, and upload an attachment to add to the order. |
Use the History page (FO_ORDER_HISTORY) to view history items associated with the job order.
Navigation:
Note: This page displays all history items that reference this job order. If no history items were added for the order, the History Transactions group box will not have data.
Field or Control |
Description |
|---|---|
Change Tracking Details |
Click this link to view and enter change tracking details for billing, service order priority, and service order status information. |
To access the Order History Detail page and view additional detail for a particular transaction, click the View History link associated with the item.
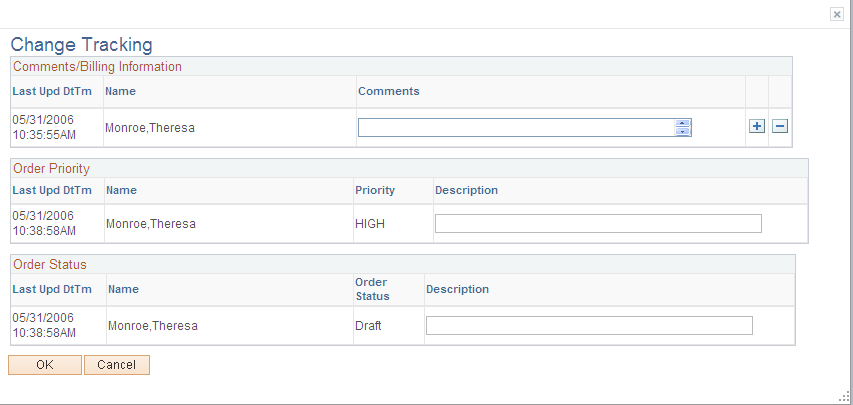
Use the Order - Change Tracking page (FO_SO_HIST_SEC ) to view and enter changes related to billing comments, service order priority, and service order status.
Navigation:
Click the Change Tracking Details link on the History page.
This example illustrates the fields and controls on the Order – Change Tracking Page. You can find definitions for the fields and controls later on this page.
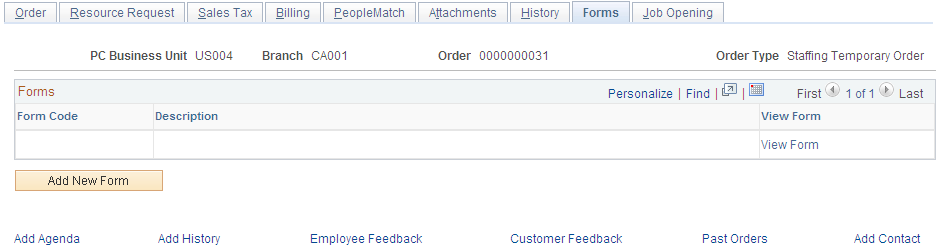
Use the Forms page (FO_SO_TEMPLTS) to view a list of the forms associated with the order, drill down to the form details, and associate a new form with the order.
Navigation:
This example illustrates the fields and controls on the Forms page. You can find definitions for the fields and controls later on this page.
Field or Control |
Description |
|---|---|
Add New Form |
Click this button to add a new form to the order. |
Form Type |
The system provides the value of ORDR (order form) by default in this field. |
Form Code |
In the Form Details group box, enter the specific template that you want to use. The system re-displays the page with a set of fields that you can then complete. Each template has a different set of questions or fields. Your organization decides what information should be contained in these forms. Note: Your implementation team sets up forms during implementation of the system. To make any changes to the list of available forms or to the content of the forms, contact your system administrator. |
Sequence |
Displays the sequence number that the system associates with each form added to the job order. |
Insert Row |
Click this button to add another form having the same form code but a different sequence number. |
Form Summary |
Click this link to view a summary of the forms added to your job order. |
View Form |
Click this link to view details of a particular form attached to the order. |
Form Details Page
Use the Forms page (FO_SO_TMPLT_DTL) to enter details for the order forms.
Navigation:
Click the Add New Form button or a View Form link on the Forms page.
Use the Job Opening page (FO_ORDER_JOBOPEN) to publish individual job postings to internal and external job boards. This page can be created from a resource request.
Navigation:
tab.
This example illustrates the fields and controls on the Job Opening page. You can find definitions for the fields and controls later on this page.
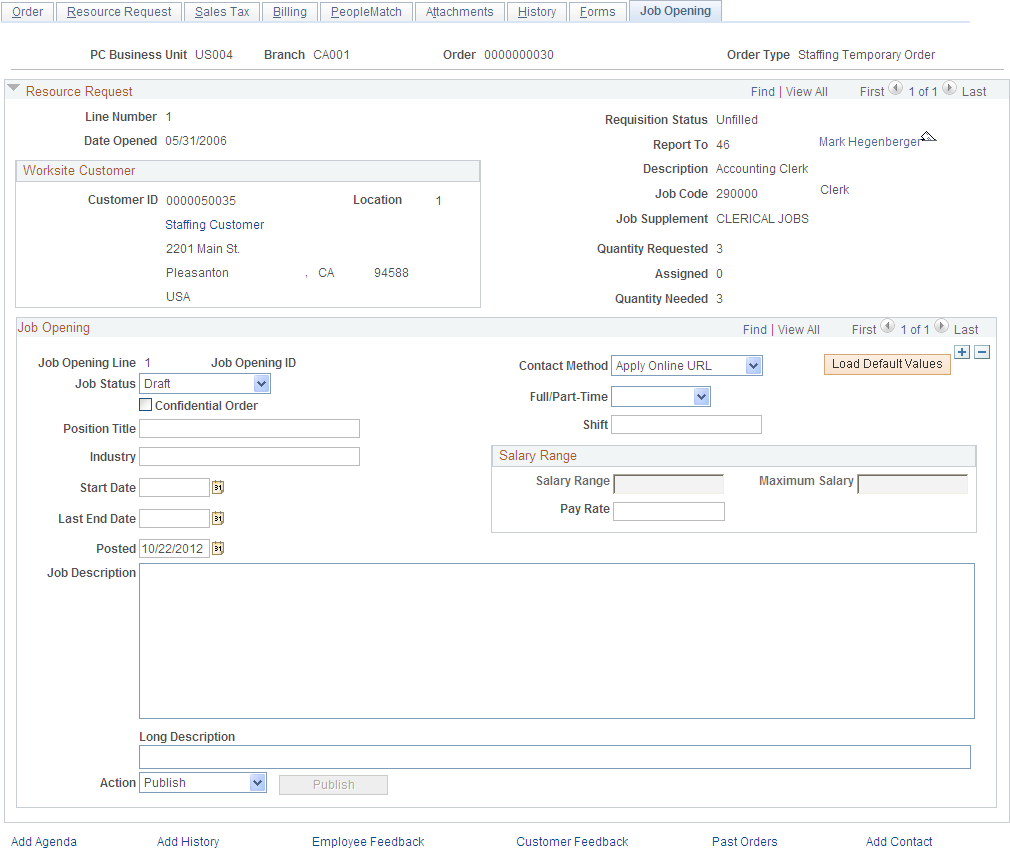
Job Opening
The fields in this section reflect the fields that may appear on a job board. Multiple job openings can be created for the order using the add a new row icon.
Field or Control |
Description |
|---|---|
Job Status |
Select an option that reflected where this job opening is in the posting process. Values include:
|
Load Default Values |
The existing Job Order structure will be used to leverage the Job Opening information. When the "Load Default Values" button is clicked, the following structure of pages will be used to extract the information needed for the Job Opening page. |
Shift |
Enter free text that defines whether the opening is for a specific shift, such as a night shift or a day shift. This information is used when publishing additional information for the job opening. |
Confidential Order |
Select to indicate to the job board distributor that the customer info should not be displayed when posting the job. |
Position Title |
This field is populated by default from the job code description entered on the Resource Request page when you click the Load Default Values button. |
Industry |
This field is populated by default from the industry value entered on the Job Order header when you click the Load Default Values button. |
Start Date |
This field is populated by default from the start date entered on the Resource Request page when you click the Load Default Values button. |
Last End Date |
This field is populated by default from the end date entered on the Resource Request page when you click the Load Default Values button. |
Posted |
This field is automatically populated when the user clicks the Publish button or selects a job status of Published and clicks the Save button. |
Contact Method |
Select the contact method candidates should use for responding to this job opening. Select Apply Online URL, Email, In-Person, In-Writing, Telephone Call, or Verbal. |
Load Default Values |
The existing Job Order structure will be used to leverage the Job Opening information. When the “Load Default Values” button is clicked, the following structure of pages will be used to extract the information needed for the Job Opening page |
Full/Part-Time |
Select a value to be used when posting to job boards. Select either Either, Full-Time, or Part-Time. |
Shift |
Enter the shift that the candidate would work. |
Job Description |
Enter a description to be used when posting to job boards. This field is automatically populated from filters for the defined in PeopleMatch when the Load Default Values button is clicked. The importance and years of experience are also brought and arranged into the description |
Long Description |
If the Job Board Distributor allows, this field can be used to publish a Job Opening to social networking sites. The short description can be used for social networking. The long description is used when publishing to job boards. |
Action |
Select one of these options: Delete – Use this option after a job posting is published. If you want to remove the posting, this option submits a deletion request to the job board distributor for all job boards. This option automatically deletes the posting on internal job boards. Publish – Use this option to publish a job posting to a job board distributor. This option automatically adds the job posting to internal job boards. Update – Use this option after a job posting is published. I you want to update a posting, this option submits an update request to the job board distributor for all job boards. This option automatically updates the posting on internal job boards. The fields that can be updated or changed on a job posting are:
|
Publish |
Click to publish this job posting to the job board distributor. The job board distributor is defined on the Installation Options – Staffing page. This button is active only when the Job Board Distributor Provider check box is selected and a Job Board Distributor is selected on the Installation Options – Staffing Installation page. |
Save |
Click this button to save the job opening and publish it to your internal job board. If the Job Board Distributor Provider check box is selected and a Job Board Distributor is selected on the Installation Options – Staffing Installation page, the system also publishes the job opening to the external distributor. |
Salary Range
Use this section to enter a salary range for career orders and enter a pay rate for temporary orders.
Field or Control |
Description |
|---|---|
Salary Range |
If the order type is Career, this field is available. If the order type is Temporary, this field is not available. |
Pay Rate |
If the order type is Career, this field is not available. If the order type is Temporary, this field is available. |
Maximum Salary |
If the order type is Career, this field is available. If the order type is Temporary, this field is not available. |
Links
Field or Control |
Description |
|---|---|
Add Agenda |
Click to access the Agenda Detail page where you can add an agenda item. |
Add History |
Click to access the Staffing FO History page where you can add a history items. |
Employee Feedback |
Click to access the Provide Employee Feedback page where you can register employee feedback. |
Customer Feedback |
Click to access the Customer Feedback page where you can register customer feedback. |
Past Orders |
Click to access the Past Orders page for the business unit, branch, and customer ID. |
Add Contact |
Click to access the Contact Information – Maintain Contacts page where you can add a new contact. |