Creating Applicant Records Online
Prospective applicants can log on to your designated staffing website and use the Online Application functionality to enter their personal information directly into the system. The system marks the record as Applicant (Pending). After a staffing representative reviews the record, he or she can change the status of the record from Applicant (Pending) to Active.
This topic discusses how to create applicant records online.
|
Page Name |
Definition Name |
Usage |
|---|---|---|
|
FO_SS_LOGIN |
Login to the Apply Online application, if your system administrator has enabled registration. |
|
|
FO_SS_USER_REG |
Create a user ID and password for logging into the Apply Online Application. |
|
|
FO_APP_SS_WELCOME |
Begin the process that enables applicants to enter their information. |
|
|
FO_APP_SS_RESUME |
Attach resumes and other files to the applicant record. Alternatively, paste the resume text in the field provided. |
|
|
FO_APP_SS_JOB_DTL |
Use the Job Opening Detail page to view internal job details. |
|
|
FO_APP_SELF_SERV |
Enter name and address information. |
|
|
FO_APP_SS_BRANCH |
Select the staffing branch to which you want to apply. |
|
|
FO_APP_SS_CONTACT |
Enter contact information, such as telephone, email, and website information. |
|
|
FO_APP_SS_AVAIL |
Enter information about availability, such as desired start date, shift preference, and full-time or part-time status. Applicants use this page to enter information about their availability. |
|
|
FO_APP_SS_EDUC |
Enter educational information. Applicants can use this page to enter their primary educational credentials. They can make multiple entries for each school they attended. |
|
|
FO_APP_SS_COMPS |
Enter information about the candidate competencies, proficiency, and interest level. |
|
|
FO_APP_SS_JTITLES |
Enter information about the candidate lines of business, job titles, and positions of interest. Lines of business are broad categories of job sectors, such as Health Care, Technology, Legal, or Clerical. They are useful for indicating the experience that applicants have in a particular field. Applicants with a work history will have job titles for positions that they have held. Customers will often request the services of employees and use a job title to refer to the work performed. |
|
|
FO_APP_SS_SUBMIT |
Submit the application. |
Use the Staffing Apply Online Login page (FO_SS_LOGIN) to login to the Apply Online application, if your system administrator has enabled registration.
Navigation:
.
This example illustrates the fields and controls on the Staffing Apply Online Login page. You can find definitions for the fields and controls later on this page.
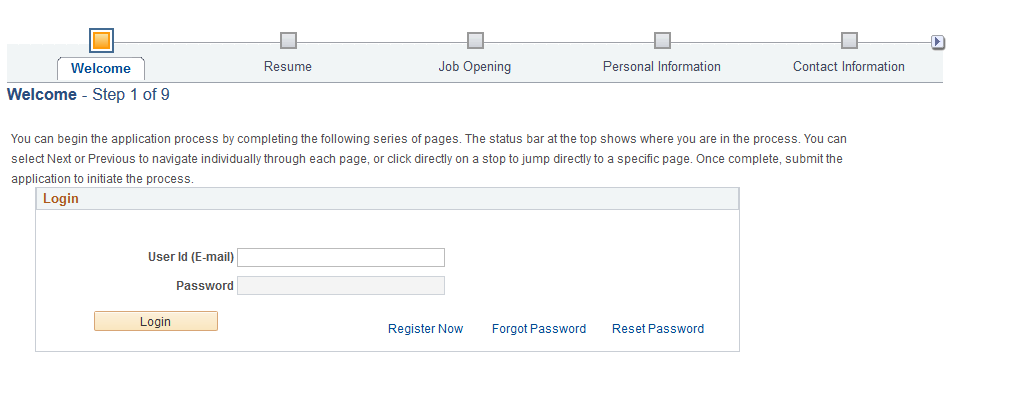
If the system has been set up to use applicant registration, the Staffing Apply Online Login page will appear and require you to enter your user ID and password or register, before you will be able to access the Apply Online component.
Note: During implementation, you can modify this page to fit your needs. Applicants must view every page in the series. However, not all pages contain required fields.
Click Next to access the Name and Address page.
Note: No search page exists for this apply online section; only new records may be created. The system automatically generates an applicant ID number.
Field or Control |
Description |
|---|---|
User Name |
Enter the user name for an existing account. |
Password |
Enter the password for the existing account. |
Login |
Select to sign in. The system validates the user name and password that the applicant entered. |
Register Now |
Select to access the Register page to create a new account. |
Forgot Password |
Select to access the Forgot Password page where an applicant can request a new system-generated password via email. Select the Reset and email Password button to reset and receive the password by email. If Secret Question for Forgot Password option is enabled on the Password Control page, the applicant must correctly select a question and answer the secret question chosen at registration before the system sends a new password. When the secret question is not enabled, the applicant receives an email containing a new password after selecting the Reset and email Password button. |
Reset Password |
Select to reset or change your password. You need your old password before you reset or change your password. |
Account Lock-out
An account is locked if an applicant has exceeded the specified number of failed logon attempts set up in the Password Control page.
On every failed logon attempt on the login page, a message displays informing the applicant as to how many attempts remain before the account is locked. An account is locked after a failed final attempt. An account can also be locked when the user is trying to reset the password on the Password Reset page and provides a wrong, old password.
When an account is locked, applicants can use the Forgot Password option to obtain a new system-generated password that will unlock the account. The Forgot Password process sends the applicant a system-generated password. After the applicant successfully logs on with the new password, the account is unlocked.
Secret Questions Lock-out
The secret question option is locked if an applicant has exceeded the specified number of incorrect answers to the secret questions setup in the Password Control page.
When secret question option is enabled in the Password Control page, then, when using the Forgot Password option, the applicant must select a question and then correctly answer the secret question to receive a system-generated password on their registered email. If the answer to the secret question is incorrect, a message displays informing the applicant as to how many attempts remain before the secret question option is locked.
When secret question option is locked due to incorrect answers to secret questions, the applicant can no longer use the Forgot Password option to reset the password. However, if the answer is correct, the system sends an email notification with a new password so that the applicant can log on with the new password.
Use the Applicant User Registration page (FO_SS_USER_REG) to create a user ID and password for logging into the Apply Online Application.
Navigation:
Select the Register Now link on the Staffing Apply Online Login page.
Use the Welcome to our Online Application page (FO_APP_SS_WELCOME) to begin the process that enables applicants to enter their information.
Navigation:
Click the Create your Applicant Record link on the Open Resource Request page.
Use the Resume page (FO_APP_SS_RESUME) to attach resumes and other files to the applicant record.
Alternatively, paste the resume text in the field provided.
Navigation:
Click Next on the Welcome to our Online Application page.
You can either copy and paste your resume text in the box provided, or click the Add Resume Attachment button to attach a copy of your resume. If you are using Resume Parsing, the system will automatically populate several fields in the applicant pages for you when you upload your resume.
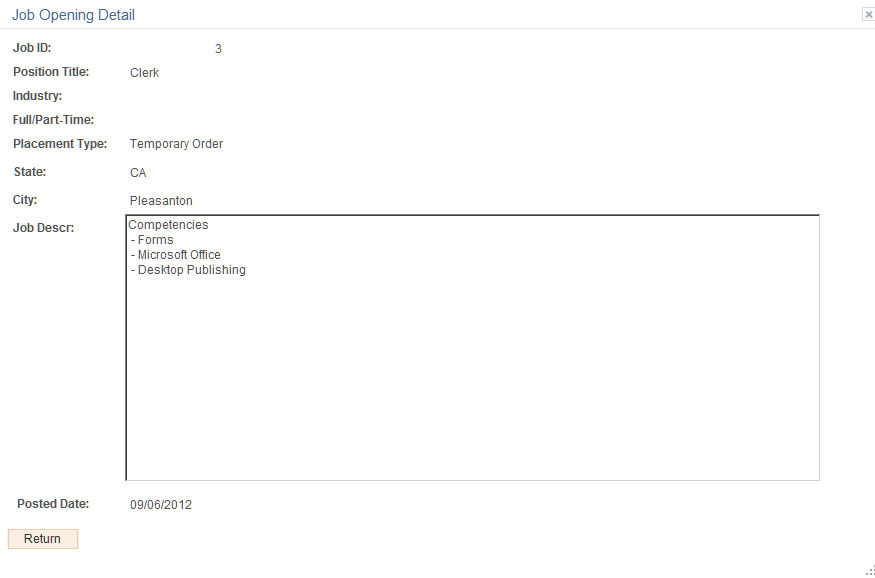
Use the Job Opening Detail page (FO_APP_SS_JOB_DTL) to view internal job details.
Navigation:
From the Apply Online component, navigate through the train stops by clicking the Next button until the system takes you to the Job Opening page. In the Search Results section, click the Detail icon.
This example illustrates the fields and controls on the Job Opening Detail Page. You can find definitions for the fields and controls later on this page.
Use the Name and Address page (FO_APP_SELF_SERV) to enter name and address information.
Navigation:
Click Next on the Resume page.
Enter your name and address information.
Field or Control |
Description |
|---|---|
Gender |
Select your gender. This field is required. |
Country |
This value appears by default from the User Preferences table and is specific to the adjacent address. The mailing address can be associated with a different country and still be valid. |
Mailing Address |
Click this link to enter address information where documents, including paychecks and other payroll correspondence, should be sent. |
National ID (Optional)
Field or Control |
Description |
|---|---|
Country |
Enter the country associated with your national ID. |
National ID Type |
Enter your ID type. |
National ID |
Enter your national identification number. |
Primary ID |
Select to identify this ID as your primary ID. |
Use the Staffing Branch page (FO_APP_SS_BRANCH) to select the staffing branch to which you want to apply.
Navigation:
Click Next on the Name and Address page.
Select the staffing Branch to which you want to apply.
Use the Contact Information page (FO_APP_SS_CONTACT) to enter contact information, such as telephone, email, and website information.
Navigation:
Click Next on the Staffing Branch page.
Phone Numbers
Field or Control |
Description |
|---|---|
Phone Type and Telephone |
Enter phone number information, including the type of phone number, such as Business, Cellular, or Home. |
Email Addresses
Field or Control |
Description |
|---|---|
Email Type and Email Address |
Enter email address information. You can add additional addresses. |
Web Addresses
Field or Control |
Description |
|---|---|
Website Type and URL (uniform resource locators) |
Enter website information. These can be examples of work, personal home pages, and so on. |
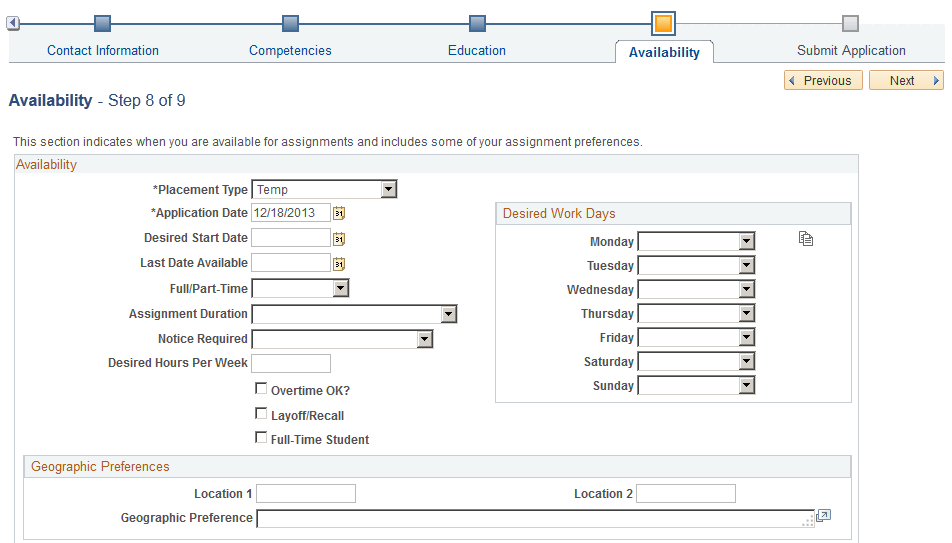
Use the Availability page (FO_APP_SS_AVAIL) to enter information about availability, such as desired start date, shift preference, and full-time or part-time status.
Navigation:
Click Next on the Contact Information page.
This example illustrates the fields and controls on the Availability page (1 of 2). You can find definitions for the fields and controls later on this page.
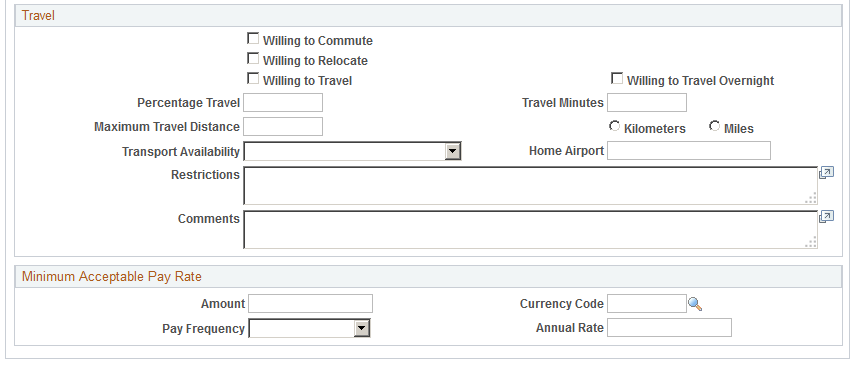
This example illustrates the fields and controls on the Availability page (2 of 2). You can find definitions for the fields and controls later on this page.
Availability
Field or Control |
Description |
|---|---|
Placement Type |
Select the placement type you prefer: Temp & Career, (temporary and career) Career, Contract, Leasing, Payrolling, or Temp (temporary). |
Application Date, Desired Start Date, and Last Date Available |
Enter the date you are applying, and enter availability dates. The availability start and end dates on this page are not affected by assignments created in the system. |
Desired Work Days |
In addition to each of the days of the week an applicant might be available to work, he or she can select any of the three standard 8-hour shifts during a 24-hour period: 1st Shift, 2nd Shift, 3rd Shift, or Any. Your system administrator can change these values to reflect your unique requirements. Note: To replicate your selection for Monday for the remainder of the work week, click the Replicate button. |
Geographic Preferences
Field or Control |
Description |
|---|---|
Location 1 and Location 2 |
Enter specific locations, and enter your more general Geographic Preference as well. |
Travel
Field or Control |
Description |
|---|---|
Willing to Commute, Willing to Relocate, Willing to Travel, and Willing to Travel Overnight |
Select any of these check boxes to indicate your commute and travel preferences. |
Restrictions |
Enter comments to track limitations on an applicant's travel. |
Also enter the Percentage Travel you are comfortable with, your maximum Travel Minutes and Maximum Travel Distance, and your Transportation Availability.
Minimum Acceptable Pay Rate
Field or Control |
Description |
|---|---|
Amount, Currency Code, and Pay Frequency |
Use these fields to indicate the candidate's minimum desired compensation. Enter the amount of pay, the currency in which the amount should be paid, and the frequency at which you want to calculate the pay rate. The system does not base payroll cycles for temporary staff on the frequency chosen here. Frequency is simply a tool that calculates pay using familiar factors. Often, customers and employees quote pay annually or hourly. |
Use the Education page (FO_APP_SS_EDUC) to enter educational information.
Applicants can use this page to enter their primary educational credentials. They can make multiple entries for each school they attended.
Navigation:
Click Next on the Availability page.
School Education
Field or Control |
Description |
|---|---|
Country, School Type, and Date Acquired |
Enter the country in which the school is located, select the type of school, such as High School, Trade School, or University, and select the date you earned the education. |
Average Grade and Completed |
Enter your average grade, and select the check box to indicate that you completed your education at the school. |
School Code |
Select a code from the list of available schools. |
School Name |
If the school is not available from the School Code field, enter it here. |
State |
Enter the location of the school. |
Area of Study and Grade |
Enter the area of concentration and the grade received. |
Professional Education
Field or Control |
Description |
|---|---|
Degree |
Select the type of degree obtained at the school. |
Date Acquired |
Select the date that the school awarded the degree. |
Average Grade and Graduated |
Enter the average grade point, and select the check box if you graduated. |
Major Code and Major |
Enter the code and major field of study at the school attended. |
School Code and School Name |
Enter the code and name of the school attended. |
Educator, Country, and State |
Enter the name of the primary instructor, and the country and state in which the instruction took place. |
Use the Competencies page (FO_APP_SS_COMPS) to enter information about the candidate competencies, proficiency, and interest level.
Navigation:
From the Apply Online component, navigate through the train stops by clicking the Next button until the system takes you to the Competencies page.
Enter information about the candidate competencies, proficiency, and interest level.
Use the Opportunities page (FO_APP_SS_JTITLES) to enter information about the candidate lines of business, job titles, and positions of interest.
Lines of business are broad categories of job sectors, such as Health Care, Technology, Legal, or Clerical. They are useful for indicating the experience that applicants have in a particular field. Applicants with a work history will have job titles for positions that they have held. Customers will often request the services of employees and use a job title to refer to the work performed.
Navigation:
From the Apply Online component, navigate through the train stops by clicking the Next button until the system takes you to the Opportunities page.
This example illustrates the fields and controls on the Opportunities Page. You can find definitions for the fields and controls later on this page.
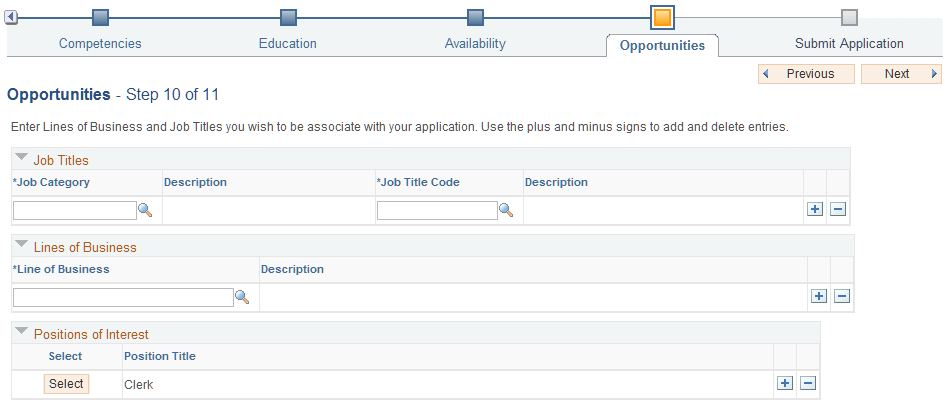
Job Titles
Applicants that have a work history will have job titles for the positions for which they have held. Customers often request the services of employees by using a job title to refer to the work performed.
Field or Control |
Description |
|---|---|
Job Category |
Select a Job Category code that you have had in the past and for which you may be qualified to hold. |
Job Title Cose |
Select a Job Title code that you have had in the past and for which you may be qualified to hold. |
Lines of Business
Field or Control |
Description |
|---|---|
Line of Business |
Select a line of business to indicate a business category with which you have experience. Lines of business are broad categories of job sectors, such as Health Care, Technology, Legal, or Clerical. They are useful for indicating the experience that applicants have in a particular field. |
Positions of Interest
Field or Control |
Description |
|---|---|
Position of Interest |
Select a position of interest for which you are interested in applying. The options available include job postings (internal and external) that have an Active status. This section can be populated from the select positions on the internal Apply Online: Job Opening Page |
Note: This PeopleSoft application delivers an index of job titles at the time the system is installed. You can delete this list from the database in all or in part, and use a job title index that more closely matches your business requirements.
Use the Submit Information page (FO_APP_SS_SUBMIT) to submit the application.
Navigation:
Click Next on the Job Titles and Lines of Business page.
Click the Submit button to submit your information and begin the application process.
The system assigns an identification number and displays the following message:
Your application has been submitted. Thank You!