Using a Cash Drawer
This section discusses how to use a cash drawer.
|
Page Name |
Definition Name |
Usage |
|---|---|---|
|
CDR_RECEIPT |
Create a receipt for payment from a customer. |
|
|
Additional Information - Check |
CDR_CHECK_DATA |
Record payment details for checks, such as the check number, name, address, drivers licence number, expiration date, secondary ID, and authorization number, and check amount. When the value in the Payment Method field is Check, the Additional Information link takes you to the Additional Information - Check page. |
|
Additional Information - Card |
CDR_CARD_DATA |
Record payment details for cards, such as card type, card number, name, address, and authorization details. When you select Credit Card or Debit Card in the Payment Method field, clicking the Additional Information link takes you to the Additional Information - Card page. |
|
Credit Card Selection |
ORDENT_HDR_CC_SEL |
Select from a list of credit cards stored for the contact of the customer identified on the Cash Drawer Receipt page. |
|
Reference Information |
CDR_REF_DATA |
Associate a payment with a particular invoice, sales order, and other such details. |
|
CDR_RECEIPT_INQ |
Correct certain fields of a cash drawer receipt. You can edit receipts using this component, however, fewer fields are available for correction on receipts that are in a Printed status. |
|
|
CDR_RECON_CASH |
Enter the actual cash counted from the drawer. This page is optional; you can bypass it to enter the actual cash count on the Reconcile tab. |
|
|
Checks Worksheet |
CDR_RECON_CHECK |
Enter the actual check numbers and amounts from the physical checks in the drawer. This page is optional; you can bypass it to enter the actual check count on the Reconcile tab. |
|
Reconcile |
CDR_RECONCILE |
Complete the cash and check worksheets, as well as the reconcile page, to reconcile the cash drawer. |
|
Total Payments |
CDR_TOTALS_SEC |
View the payment method totals. This is a drill-down page that enables you to view additional detail about the payments made for this cash drawer. |
|
RUN_CDR_LOADPMT |
Use this batch process to send cash receipt payments to the Accounts Receivable staging table. These payments will be processed by the Payment Loader process (AR_PAYLOAD). |
|
|
Reconciliations to be Processed |
CDR_RECON_LIST_SEC |
View a list of Reconciliation IDs that are selected for processing. |
|
Receipt Inquiry |
CDR_RECEIPT_INQ |
View receipts in read-only mode. You can view receipts of any status from this page; however, all fields are read-only. For security reasons, only the last four digits of the credit card number appear. |
|
Print Bank Deposit Slip |
RN_CDR_PRNTDEP |
Print a bank deposit slip from the reconciliation. This slip lists cash to be deposited, as well as a list of the checks (check number and amount) to be deposited. |
Use the Cash Drawer Receipt page (CDR_RECEIPT) to create a receipt for payment from a customer.
Navigation:
This example illustrates the fields and controls on the Cash Drawer Receipt page. You can find definitions for the fields and controls later on this page.
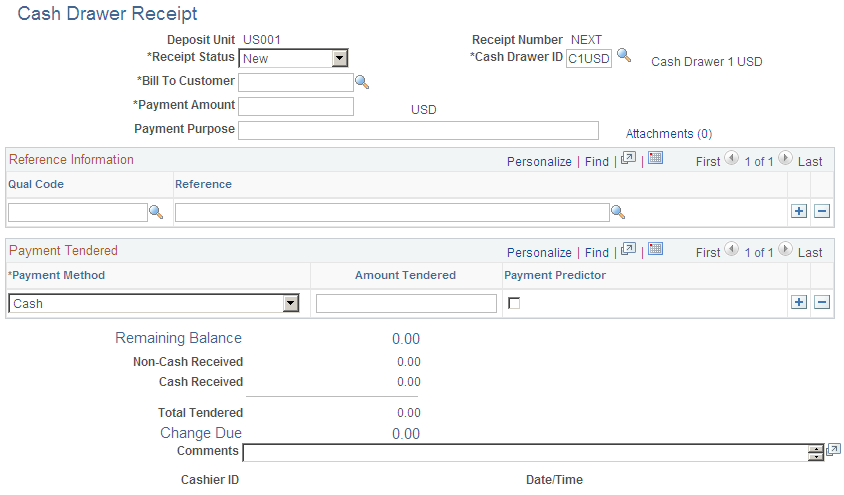
Note: You can view only those receipts that are in a status of New, Hold, or Canceled.
Field or Control |
Description |
|---|---|
Deposit Unit |
View the Accounts Receivable business unit that was entered by the cashier on the Add page. |
Receipt No (receipt number) |
View a unique value that is automatically generated at save time. This number is unique within business units. |
Receipt Status |
Select from these options: New: The default status of a receipt once it is created. When the receipt is in a New status, all fields on the receipt are editable. The cashier can update this status to Hold. Printed: The status of a printed receipt. You can edit these fields on a receipt when it is in Printed status: Payment Method, Comments, Cash Drawer, and Check Number. Reconciled: Once the cash drawer that is associated with the receipt has been reconciled, the status is automatically updated from Printed to Reconciled. At this time, you cannot update the receipt information. Canceled: If a receipt was entered by mistake, you can mark it as Cancelled. Canceled receipts are not included in the Cash Drawer reconciliation process. A cashier can update a receipt in Canceled status to a status of New or Hold. The ability to cancel a receipt is controlled by feature function security. See .Understanding Feature Function Security Hold: If you must temporarily exclude a receipt from the cash drawer reconciliation process, then save the receipt with a Hold status. You can then print the receipt if necessary. However, after printing, the status will remain in a Hold status instead of automatically getting set to Printed. The Hold status enables the cashier to handle the payment method "unknown" scenario for cash on delivery (COD) scenarios in which a receipt must be provided to the customer on delivery of goods. Cashiers can update a Hold status to a status of New, Printed, or Canceled. |
Cash Drawer BU (cash drawer business unit) |
View the business unit of the cash drawer. This value appears automatically from Order Management user preferences. |
Drawer BU Type (drawer business unit type) |
View the business unit type of the cash drawer: OM (Order Management) or AR (Accounts Receivable). |
Cash Drawer ID |
View the value selected by the cashier. The list of valid drawers is determined by the Cash Drawer by User setup and displayed from the defaults specified on the PeopleSoft Order Management User Preferences page. |
Bill To Customer |
View the ID of the customer who made the payment. |
Currency |
View the currency defined by default for the cash drawer definition. This is a read-only field. |
Payment Amount |
View the total amount that is received from the customer. This amount is entered by the cashier. It might be the total amount of a sale, including taxes. |
Payment Purpose |
Describe the purpose of the receipt or reason for collecting the payment. For example, you might describe an item or service sold as Payment in advance of an invoice. |
Payment Method |
View the method entered by the cashier: Cash, Check, Credit Card, or Debit Card. |
Amount Tendered |
View the amount of money received by the customer for each payment method, as entered by the cashier. |
Payment Predictor |
Select this check box to use Payment Predictor for this payment method. |
Non-cash Received |
View the sum of the Amount Tendered column for all noncash payments. This is a system-generated amount. |
Cash Received |
View the amount of cash received. If a row is in the grid for cash, then the value in this field is equal to the amount tendered of the row. This is a system-generated amount. |
Total Tendered |
View the sum of the noncash received + cash received (or a sum of amount tendered of all rows in the grid). This is a system-generated amount. |
Remaining Balance |
View how much more is due by the customer if multiple payment methods are entered into the grid. Once you enter all payment methods and amounts, the value in the Remaining Balance field is 0. This is a system-generated amount. |
Change Due |
View the amount of change due, which is calculated by subtracting the payment amount from the total tendered. This is a system-generated amount. |
Comments |
View the comments that the cashier entered. This is a free-form 256-character field. |
Cashier ID |
View the user ID of the cashier. |
Date/Time |
View the current date and time. |
Recording Check Information
Field or Control |
Description |
|---|---|
Payment Method |
Select Check. |
Additional Information |
Click the Additional Information link to access the Additional Information - Check page. When recording check payments, enter the appropriate check-specific information, such as check number, name, address, driver's licence number, expiration date, secondary ID and authorization number, and check amount. Note: Entering a check number is important for check matching if you choose to reconcile checks during cash drawer reconciliation. |
Recording Card Information
Field or Control |
Description |
|---|---|
Payment Method |
Select Debit Card or Credit Card. |
Additional Information |
Click the Additional Information link to access the Additional Information - Card page. Enter credit card information, such as credit card number, expiration date, and contact information. |
Process Card |
Click the Process Card button to initiate the call to the third-party credit card processor, where the card will be authorized and billed.
|
Process Card Manually |
Enable this option on the receipt if the card is processed from a separate card swiping machine. This option is used when no automated third-party integration is available. When you select this option, the Authorization Date and Authorization Code fields are available for entry, and the Authorization Status is set to Manually Approved/Settled. |
Recording Reference Information
From the Cash Drawer Receipt page, click the References link.
The reference information is passed to PeopleSoft Accounts Receivable with the payment to facilitate payment matching. Downstream processing in PeopleSoft Accounts Receivable takes care of either manual or automatic application to open invoices once they are raised.
Note: If the payment is being made to pay for future invoices, then omit the reference information. The payment will then be referenced by the bill to customer ID.
Field or Control |
Description |
|---|---|
Qual Code (qualifier code) |
Identifies the type of reference in the reference fields: Item (Invoice), Sales Order, or Purchase Order. |
Reference |
This reference is used downstream by PeopleSoft Accounts Receivable for payment matching. The prompt on this field is a No-Edit smart prompt. For example, if you selected Sales Order in the Qual Code field, then the prompt here lists valid sales orders, but you can override the default with a free-form value. |
Once you create a receipt, you can print it so that you can immediately hand it to the customer. The printable receipt information appears in a separate browser window when you click the Print Receipt link. The Print Receipt link does not appear until after you save the receipt. Once the printable receipt appears, you can use the browser print function to generate a hard copy of the receipt. After you print the receipt, you can close the browser window containing the printable receipt.
You generate the receipt using the Printable Document Framework. You can customize the format of the receipt. Cash Drawer receipt printing uses the CDR style sheet report type.
Use the Correct Cash Drawer Receipts page (CDR_RECEIPT_INQ) to correct certain fields of a cash drawer receipt.
You can edit receipts using this component, however, fewer fields are available for correction on receipts that are in a Printed status.
Navigation:
This example illustrates the fields and controls on the Correct Cash Drawer Receipts page.
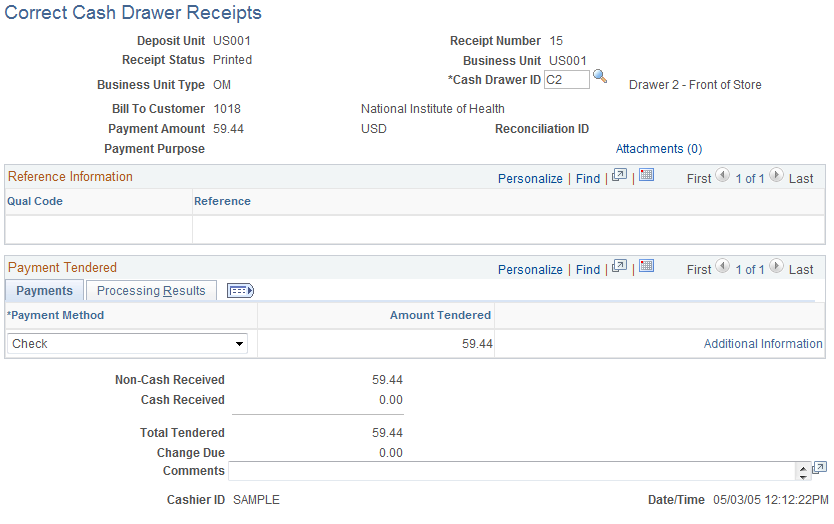
Once a receipt is printed, you can edit only these fields: Payment Method, Cash Drawer ID, Check Number, and Comments. To edit the check number, click the Additional Information link on the Payment Tendered - Payments tab.
However, the system does not allow some payment method changes. The system enforces the payment method changes that are acceptable.
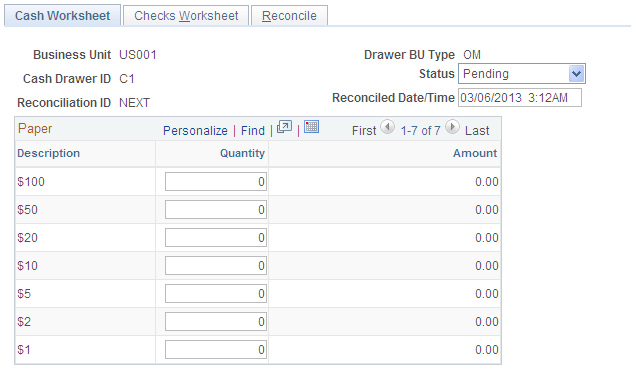
Use the Cash Worksheet page (CDR_RECON_CASH) to enter the actual cash counted from the drawer.
This page is optional; you can bypass it to enter the actual cash count on the Reconcile tab.
Navigation:
This example illustrates the fields and controls on the Cash Worksheet page (1 of 2). You can find definitions for the fields and controls later on this page.
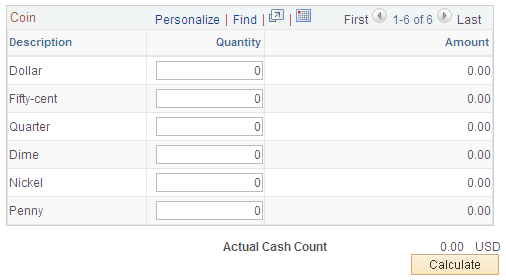
This example illustrates the fields and controls on the Cash Worksheet page (2 of 2). You can find definitions for the fields and controls later on this page.
You should reconcile cash drawers periodically to compare the system-entered receipts against the physical money in a cash drawer. The reconciliation process compares actual cash and checks for a given drawer. It does not include any card transaction for comparison to actual totals. You should reconcile card transactions as a separate business process.
Initiate a cash drawer reconciliation by creating an entry in the Reconcile Cash Drawer component. The system sets the reconciliation date and time to the current date and time. However, you can edit this default date and time. The reconciliation date and time controls which receipts are included for reconciliation. Any receipts with a timestamp after this date and time are not included in the reconciliation process. Receipts dated before are included for reconciliation. A reconciliation can have a Pending, Reconciled, or Canceled status. When a reconciliation is first created, it will have a Pending status, which indicates that the reconciliation is considered a work in progress. You can save it while the drawer is in the process of getting reconciled or while discrepancies are researched. Only one pending reconciliation can exist for a given drawer at any time. After reconciliation, the status of the drawer is set to Reconciled.
Note: The Cash Worksheet page is built dynamically based on the currency defined for the drawer and based on the denominations defined for the currency. The Reconciliation Date/Time field controls which receipts are reconciled.
Cash Worksheet
The cashier can complete the Cash Worksheet to help calculate currency totals by denomination and actual cash count. Alternatively, the cashier can skip the Cash Worksheet page and enter the actual cash count on the Reconcile page.
Field or Control |
Description |
|---|---|
Quantity |
Enter a count for each of the paper bills and coins identified in the grid. |
Actual Cash Count |
Click the Calculate button to view the summed amount of the monies identified in the grid. The actual cash count computed on the Cash Worksheet is automatically carried over to the Actual Cash Count field on the Reconcile page. |
Checks Worksheet
Use the Checks Worksheet page (CDR_RECON_CHECK) to enter the actual check numbers and amounts from the physical checks in the drawer.
This page is optional; you can bypass it to enter the actual check count on the Reconcile tab.
Navigation:
The Checks Worksheet page is also optional. On this page, you can enter the physical checks in the drawer and total them for comparison against the system receipts. If a discrepancy exists in the check amount, check receipts and Check Worksheet entries are matched by check number and amount. If the system cannot find a match for each check receipt and each Check Worksheet entry, the cashier is prompted to identify which check receipt matches with a particular check worksheet entry. You cannot save the reconciliation as reconciled until all worksheet entries and all check receipts are matched.
Alternatively, the cashier can skip the Checks Worksheet and enter the actual check count on the Reconcile page. When doing this though, if the actual check count does not match the system-generated check expected amount, then the cashier must list the actual checks on the Worksheet page so that the check discrepancy can be processed.
Field or Control |
Description |
|---|---|
Check Number |
Enter the check number specified on the physical check. |
Amount |
Enter the check amount specified on the physical check. |
Actual Check Count |
Click the Calculate button to view the summed amount of the checks identified in the grid. |
Reconcile
A summarization of the cash drawer activity to assist in reconciling the actual cash and checks in the drawer appears under the Reconcile tab. The opening balance (float) of the cash drawer, plus the total receipts for the day, minus any noncash or check receipts, plus any noncash paid out will generate the cash/check expected amount. The cashier can compare the cash/check expected amount with the actual physical cash/check count.
Field or Control |
Description |
|---|---|
Beginning Cash Amount |
Enter a beginning cash amount. This amount becomes the float amount defined for the cash drawer. Users who have appropriate security can change the float amount. If you change the amount, use the Comment field to explain why. |
Total Payments |
View the sum of all positive amount receipts for the cash drawer. All payment methods are included in this total. |
Total Paid Out |
View the sum of all negative amounts receipts for the cash drawer. All payment methods are included in this total. |
Total Receipts |
View the amount arrived at by the system when subtracting the total paid out amount from total payments. |
Non-cash/check Payments |
View the sum of all positive amount payments received into the cash drawer that were not cash or check for the given day. This total is subtracted from the total receipts to help arrive at the cash/check expected amount. |
Non-cash Paid Out |
View the amount of all negative receipts that were not cash for the given day. This total is added to the total receipts to help arrive at the cash/check expected amount. |
Cash/Check Expected |
View the amount of the cash and checks that should be in the cash drawer (cash/check expected = opening balance + total receipts – non-cash/check payments + noncash paid out). This amount is compared to the actual totals to determine whether the cash drawer is balanced. Note: Negative checks are not included in this total because no physical negative check is expected in the drawer. |
Cash Expected |
View the amount of the total cash that is expected to be in the cash drawer. |
Check Expected |
View the total check amount that is expected to be in the cash drawer. Note: Negative checks are not included in this total because no physical negative checks are expected in the drawer. |
Actual Cash Count |
View the amount of physical cash counted from the cash drawer. This value is carried forward from the Cash Worksheet page or entered by the cashier if the Worksheet page is bypassed. |
Actual Check Count |
View the physical check amounts totalled from the cash drawer. This value is carried forward from the Checks Worksheet page or entered by the cashier if the Worksheet page is bypassed. |
Actual Total |
View the total value of the actual cash count plus the actual check count from the cash drawer. |
Shortage/Overage |
View the amount of cash drawer shortage or overage of both cash and checks combined. The calculation is Shortage/Overage = Actual Count – Expected. |
Cash Shortage/Overage |
View the amount that the cash drawer is over or short in cash. |
Check Shortage/Overage |
View the amount that the cash drawer is over or short in checks. |
Save as Reconciled |
Once a cash drawer is reconciled:
Note: If the cash drawer does not reconcile, you can research the discrepancy using the drill-down capabilities. Alternatively, if the discrepancy amount is within the defined tolerance, you can choose to flag the drawer as Reconciled by clicking the Save as Reconciled button. Any discrepancy amount is logged to the discrepancy staging table (CDR_DISCREP_STG). If the discrepancy is outside of the defined tolerance amount, then a user with security can choose to override and mark the drawer as reconciled. The Comment field is available for the user to enter a justification for the discrepancy. Drill-down capabilities are built into the Reconcile page to assist you in the reconciliation process. For example, when you click the Total Receipts Amount link, a secondary page appears with a breakdown of the amounts by payment method. Note: You cannot edit the Receipt Amount field during reconciliation, but you can update payment methods of receipts. After correcting a receipt using the drill-down features, click the Calculate button on the Reconcile tab to refresh the latest receipt changes. Feature Security controls reconciliation. |
Reconciled Date/Time |
Edit this field for pending reconciliation processes. This enables you to include any receipts added to the drawer after the reconciliation process was last saved. To include these receipts in the totals, you must save the updated reconciled date/time. After you edit the Reconciled Date/Time field, click the Calculate button. When asked if you want to save the data, select yes and the totals on the page are refreshed. Select no, and nothing occurs. |
Use the Process Cash Drawer Receipts page (RUN_CDR_LOADPMT) to use this batch process to send cash receipt payments to the Accounts Receivable staging table.
These payments will be processed by the Payment Loader process (AR_PAYLOAD).
Navigation:
After you have reconciled a cash drawer, you can pass the payments associated with the reconciliation over to the PeopleSoft Receivables payment staging tables. Processing the cash drawer receipts using CDR_LOADPMT populates the staging tables with the details of each payment transaction, such as reference information, bill to customer, payment method, and payment amount. Once the staging tables have been populated, you can run the Payment Loader process (AR_PAYLOAD) to create payments from the cash drawer receipts.
CDR_LOADPMT is an Application Engine process. All receipts that meet the run control parameters and have a status of Reconciled are selected for processing. Receipt payments are grouped into Receivable Deposit Control entries in the following way:
Receipt payments are grouped by bank account and currency.
Cash and check payments are recorded in separate deposits.
Procurement cards, debit cards, and credit cards are grouped as a single deposit with a payment method of EFT.
After the receipt payments are successfully processed, the Receivables Deposit control ID and payment sequence numbers that were assigned are saved back to the receipt payment. You can view them from the Receipt Inquiry component. A single deposit batch ID is assigned to each of the reconciliations that were picked up to be processed, as well. You can view the deposit batch ID that was assigned from the Reconciliation component. This deposit batch ID is needed for printing the associated deposit slip.
Note: Gift voucher payment types are passed to PeopleSoft Billing and processed as a line on the invoice as opposed to being sent to Receivables as a payment.
See Receiving Cash Drawer Payments.
Field or Control |
Description |
|---|---|
Accounting Date |
Enter the accounting date to associate with the payments. If you leave this field blank, the current date appears by default. |
Cash Drawer Business Unit |
Specify the business unit to which the cash drawer belongs. |
Cash Drawer BU Type (cash drawer business unit type) |
Specify the cash drawer business unit type. The available options are OM and AR. |
Range Selection |
Select the processing option that applies: Cash Drawer: Select to identify a range of cash drawers that need to be processed. Recon Date (reconciliation date): Select to identify a range of reconciliation dates and a range of cash drawers. Recon ID (reconciliation ID): Select to identify a range of reconciliation IDs for a given cash drawer ID. |
After the CDR_LOADPMT process has processed cash drawer receipts, you can generate and print a bank deposit slip. This slip lists the cash, as well as the checks (check number and amount) to be deposited to the bank. A batch deposit ID is assigned to the reconciliations that are picked up for processing by the CDR_LOADPMT process. You can specify this batch deposit ID on the run control page of the bank deposit slip, and the system will print on the deposit slip all cash and check receipt payments that were included in that batch. You can think of the batch deposit ID as a rubber band around all of the cash drawer reconciliations that were processed and passed to Receivables. The batch deposit ID that was assigned to the reconciliation is viewable from the Reconciliation component.