Managing Returned Material for Sales Orders
PeopleSoft Order Management provides a quick entry format to process RMAs for sales orders.
Note: Use the RMA pages in the Inventory menu to process returns for material stock requests in PeopleSoft Inventory.
This section discusses how to work with and process RMA sales orders.
|
Page Name |
Definition Name |
Usage |
|---|---|---|
|
RMA_FORM2 |
Capture return information from a customer and assign an RMA ID to the order. |
|
|
Close RMA Page |
RUN_OM_CLOSE_RMA |
RMAs that have been fully received and/or fully canceled for the selected OM business unit can be automatically closed. |
|
RMA_CUST_SHIP_HIST |
Review shipment and invoice history, and select order lines to populate the RMA lines. |
|
|
RMA_SHPHS_SERIALOM |
Select the serial number that is returned. |
|
|
RMA_SHPHS_LOTOM |
Select the lot and serial IDs that are returned. |
|
|
CONVER_DATA1_SS |
Add or view conversations for the customer. |
|
|
RMA Line Page |
RMA_LINE |
Enter or change RMA line details. See RMA Form Page |
|
RMA Header Projects (returned material authorization header projects) Page |
RMA_HDR_PROJ |
View or enter information for PeopleSoft Project Costing at the header level. |
|
Configuration Code Entry Page |
RMA_LINE_CONFIG |
Display the configuration code for a product. |
|
RMA_SERIAL_LOT |
View, delete, or change serial and lot IDs for a line. |
|
|
RMA Line Projects (returned material authorization line projects) Page |
RMA_LINE_PROJ |
Enter information for PeopleSoft Project Costing at the line level. |
|
Replace Sales Orders Page |
RMA_LINE4 |
View the replacement sales orders that are generated from the RMA when the RMA is either entered or received. |
|
RMA_LINE3 |
Select revenue accounts for the RMA. |
|
|
Price Detail Page |
RMA_LN_PRCAUDIT |
Displays the pricing details for an RMA line. |
|
Price Adjustment Detail Page |
RMA_LN_PRCDTL_SEC |
Displays the conditions that cause the price rule to be applied. |
|
RMA_PAY_GROUP |
Displays the refund payment groups for the RMA or the RMA line. |
|
|
RMA_LINE_PROMO |
Review and update promotion details for the RMA line. |
|
|
OM Shipment History (Header) Page |
ORD_SHIP_HDR_VW |
View shipment history at the header level. |
|
OM Shipment History (Line) Page |
ORD_SHIP_LINE_VW |
View shipment history at the line level. |
|
Shipments by Schedule Page |
ORD_SHIP_SCHED_VW |
View shipment history at the schedule level. |
|
Return Material Authorization Page |
RUN_OMS3000 |
Specify parameters for the Return Material Authorization report. You have the option to include canceled order lines in the report run. |
|
RMA Register Page |
RUN_OMS7100 |
Specify parameters for the RMA Register report. |
|
Overdue RMAs Page |
RUN_OMS7110 |
Specify parameters for the Overdue RMAs report. |
Use the RMA Form page (RMA_FORM2) to capture return information from a customer and assign an RMA ID to the order.
Navigation:
Note: All navigation links will be available for input even if the RMA form is in display-only or inquiry mode.
This example illustrates the fields and controls on the RMA Form page. You can find definitions for the fields and controls later on this page.
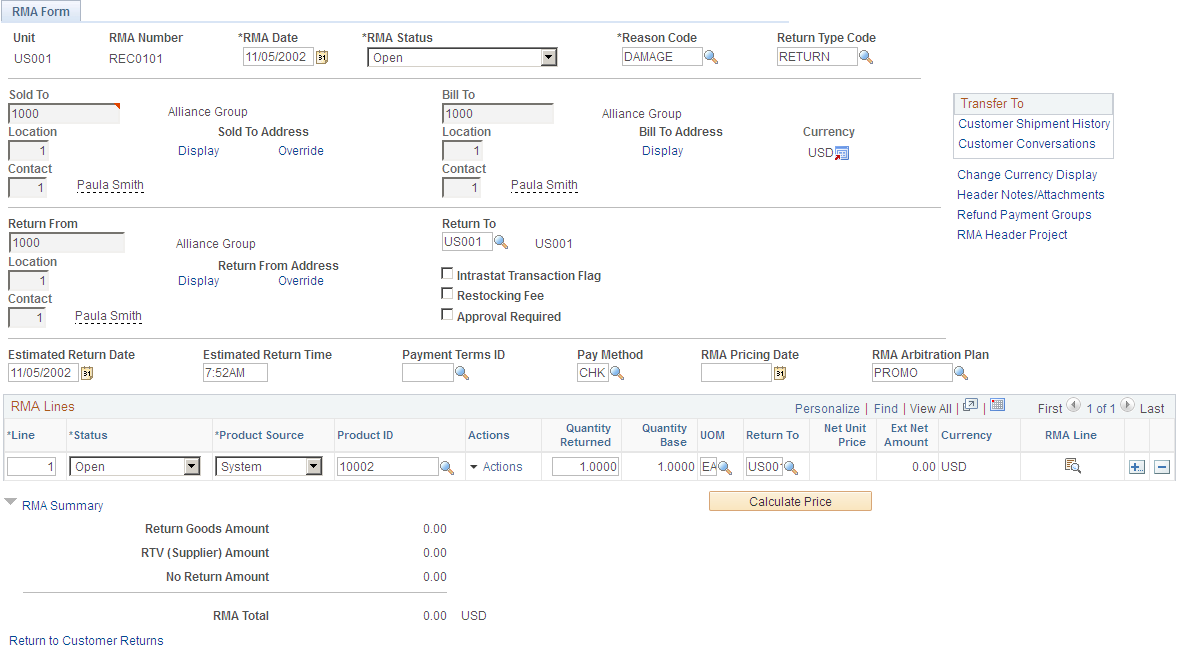
Note: You can assign an RMA number in Add mode. For example, you can assign an RMA Number that uses the same number as the original sales order. Alternatively, you can have the system automatically assign a number.
Field or Control |
Description |
|---|---|
RMA Date |
View the current date, but you can change this value. |
RMA Status |
Select a value: Pending: RMA is not complete. The system cannot receive goods that are referenced on RMAs with a status of Pending or create replacement sales orders and credit memos until the status is changed to Open. This is the default value. Open: RMA is complete and ready for processing. This means that the system can receive returned goods, create replacement sales orders, and request credits. Status remains Open until the last line of the RMA is received. Canceled: RMA is no longer valid. No receipts are expected for it, no credit memo is issued, and no replacement orders are generated. You cannot change the RMA status in the header to Canceled if there are receipts against any of the RMA lines, and you cannot change an RMA line status to Canceled if there are any receipts against the line. Closed: All RMA lines are received. Note: You can change the status to Closed: for non-inventory items. |
Reason Code and Return Type Code |
Enter values that are the defaults for all the RMA lines. You can change them as needed. Note: Reason codes with a reason type of RMA Cancel must exist in the system. |
Sold To |
Enter a customer ID. |
Contact |
Enter the primary contact who is associated with the sold to customer defaults. |
Display |
Click to view the customer sold to, bill to, or return from address. |
Override |
Click to override the address for the sold to or return from customer. Note: If you click Override, the next time you click Display you will access the new address for the override. |
Location, Sold To, Bill To, Return From, and Currency |
You can define any number of location addresses for customers. The location that you identified as primary for each customer role appears by default, but you can select another location from the available options. The currency code that is associated with the sold to customer is the default currency value. |
Intrastat Transaction Flag |
Select if the items that are returned are eligible for intrastat reporting. The system passes this flag to PeopleSoft Billing for products that are returned for credit only as well as for credit and replacement. |
Bill To, Contact, Return From, Pay Method, and Return To |
The Bill To ID, Contact, and Return From ID (the Priority 1 Ship To customer ID) fields appear by default from the sold to customer, but you can change them as needed. If you specified a distribution network code on the General Information - Ship To Options page for the Return From customer, the priority 1 ship from business unit defaults to the Return To field. Select the payment method. If you have not set up a distribution network code for the customer, the PeopleSoft Inventory Business Unit (if one exists) that you define on the Shipping and Returns page defaults to the Return To field on the RMA Form page. You can select a different PeopleSoft Inventory Business Unit. |
Estimated Return Date and Estimated Return Time |
(Optional) Enter a date and time. If the Return To business unit requires closure calendar validation and processing for receiving activities as defined on the Closure Calendar page, the Estimated Return Date is validated against the calendar. If the system encounters an exception date, you will receive a warning message. You can either click No to accept the exception date or click Yes to reschedule. If you click Yes, the system returns the first future valid date for receiving operations. |
Payment Terms ID |
Specifies the Payment Terms ID. The Payment Term defaults from the OM/RMA business unit. |
Pay Method (payment method) |
Specifies the payment method for the RMA line. |
RMA Pricing Date |
Enter a date. This date will be used as the effective date instead of the RMA Date when the pricer is called. The default value is null, and if no value is entered, the RMA Date will be used as the effective date when the pricer is called. |
RMA Arbitration Plan |
Specifies the arbitration plan used during RMA pricing calculation. |
Restocking Fee |
Selected by default if you indicated on the General Information - Sold To Options page that the sold to customer is normally charged restocking fees. You can deselect this check box. |
Approval Required |
You can create a workflow that uses this option in conjunction with the Virtual Approver in PeopleSoft Workflow to route the RMA to the appropriate person for approval. Select this check box to keep the status of the RMA at Pending. |
Header Notes/Attachments |
Click the Header Notes/Attachments link to access the RMA Header Notes/Attachments page. |
Refund Payment Groups |
Click the Refund Payment Groups link to access the Refund Payment Groups page where you can edit the credit card information and refund method. |
RMA Header Project |
Click the RMA Header Project link to access the RMA Header Projects page. |
Change Currency Display |
Click to toggle between the base currency and the transaction currency. |
Customer Shipment History |
Click the Customer Shipment History link to transfer to the Customer Shipment History page. |
Customer Conversations |
Click the Customer Conversations link to transfer to the Conversations page. |
Calculate Price |
Click the Calculate Price button to trigger the price calculation manually. |
View Product Add |
Click the View Product Add link to open the Product Add page. This link is available only if there are Product Adds. However, if the pricing calculation results in Product Adds, the Product Add page will be automatically displayed after the price calculation. |
RMA Lines
Field or Control |
Description |
|---|---|
Line |
View the starting sequence number for RMA line numbering that you establish in the line numbering parameters on the Order Management Definition - Order Management Setup page and increments by those parameters. |
Product Source |
View a default value from the General Information - Sold To Options page and indicates if you are choosing to enter RMA line information by customer part number or system number (product ID). |
Product ID |
Enter a product ID or use the default from the shipping history line that you selected. |
Related Links |
Click the button to view Search for products or View Projects information. |
Quantity Returned |
View an amount from the Customer Shipment History page. If you enter RMA lines manually, you must enter the quantity returned, and it is not validated against customer shipment history. |
Quantity Base |
View the quantity in the standard UOM for the returned item. For example, suppose that the standard UOM is EA and the customer returns one box that contains 12 items. If the UOM returned is BOX, and the quantity is 1, the quantity base is 12. |
UOM and Net Unit Price |
View the product default UOM (established on the Product Attributes by UOM page) when you enter the product ID. The product list price appears in the Net Unit Price field. If you are populating lines automatically from shipping history, the system takes the UOM and net unit price from the shipment history or invoice history line. You can change the net unit price for the product ID that is returned from the shipment history line. If the quantity that is returned from the customer is in a different UOM than the one for the original order, it is validated against inventory UOMs instead of sales UOMs, but the system cannot automatically create a replacement sales order in the returned UOM. For example, suppose that a customer returns a product in eaches that is sold only in cases but is stocked in eaches and cases. The return is validated against the inventory UOMs that include eaches. The system cannot automatically create a replacement sales order for the return in eaches because it is not a valid sales UOM. Thus the RMA is saved, but you must manually enter a replacement sales order for the return using a valid sales UOM. |
Return To |
View the PeopleSoft Inventory Business Unit that you defined at the business unit level on the Shipping and Returns page. You can change this value for each line. If you have not defined a business unit level Inventory business unit, the Return To IBU defaults to the ship from on the original order when you populate the line from shipment history. If you populate RMA lines manually and have not defined a Return To IBU, the Inventory business unit that you selected at the header defaults. Warning! You can return product to an inventory location that does not carry stock, for example you may want the product returned to a repair center instead of the warehouse. If this is a case, you will receive a warning message and a red error box next to each line which has a invalid item/return to business unit combination. You must either change the product ID or the return to business unit to a valid combination. If you leave the invalid combination, this causes problems in receiving. When entering RMAs from the Inventory menu, you cannot enter an invalid combination. If you do so, you will not able to save the RMA. |
Ext Net Amount (extended net amount) |
Displays the extended net price for the RMA line. |
Currency |
Displays the currency for extended net amount. |
RMA Line |
Click to access a specific RMA line. |
Use the Customer Shipment History page (RMA_CUST_SHIP_HIST) to review shipment and invoice history, and select order lines to populate the RMA lines.
Navigation:
Click the Customer Shipment History link on the RMA Form page.
This example illustrates the fields and controls on the Customer Shipment History page. You can find definitions for the fields and controls later on this page.
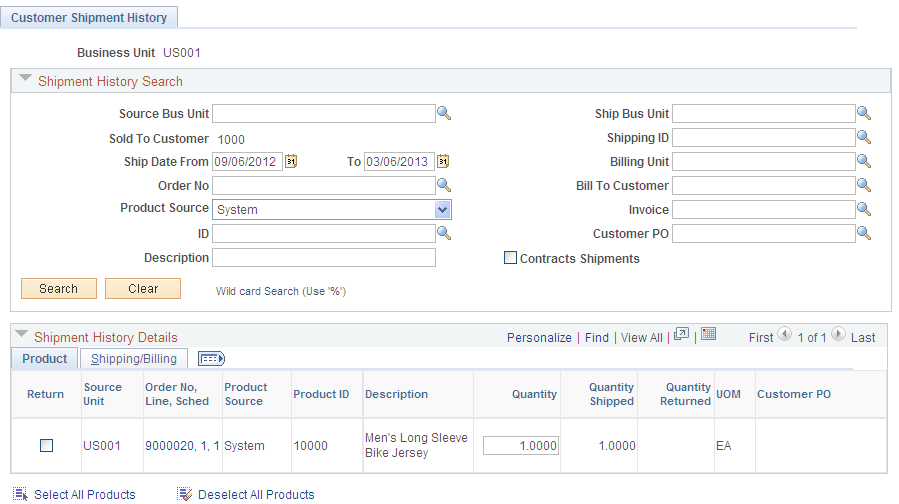
An easy way to populate RMA lines is to review customer shipment and invoice history and select the order lines that reflect the returned merchandise.
If Customer Shipment History is used to populate the RMA lines, the system will retrieve the net price from the originating schedules or invoices.
Note: You can view the Customer Shipment History page from Review RMA Information; however, you must access the page from the RMA Form page to automatically populate RMA lines.
Note: Use the inquiries in the Control Inventory menu to view internal and external issues.
Field or Control |
Description |
|---|---|
Source Bus Unit |
Enter the Source Business Unit. |
Ship Bus Unit |
Enter the Ship Business Unit. |
Product Source |
Select the Product Source. The available options are: Customer, System, UPC and Universal. |
ID |
Select the Product ID. |
Source Unit, Order No., Line, Sched (order number, line, schedule), Product Source, Product ID, Description, Quantity Shipped, Quantity Returned, UOM and Customer PO (customer purchase order) |
The order number, customer PO (purchase order) number, product ID, quantity shipped, quantity returned and UOM from the lines that you select are copied to the RMA lines, and you are returned to the RMA Form page. You can select lines to copy only if you accessed the page from the link on the RMA Form page. Note: Even though the unit price does not appear on the Customer Shipment History page, it is available for the system to copy to the RMA line. |
Ship Unit, Shipping ID, Ship Date, Billing Unit, Invoice, Line and Billing Status |
These fields from the lines that you select are copied to the RMA lines, and you are returned to the RMA Form page. You can select lines to copy only if you accessed the page from the link on the RMA Form page. |
Select All Products and Deselect All Products |
Click to select or deselect all of the lines on this page. This link is available only if you access the page from the RMA Form page. |
Return to RMA |
Click to return to the RMA Form page. This link is available only if you access the page from the RMA Form page. |
Use the Serial/Lot Selection page (RMA_SHPHS_SERIALOM) to select the serial number that is returned.
Navigation:
Click the Serial Number Selection button next to the order number on the Customer Shipment History page.
Field or Control |
Description |
|---|---|
Quantity Shipped |
View the original amount that was shipped. |
Select/Deselect All IDs |
Click to select or deselect all of the serial IDs. You can also select them individually. |
Use the Serial/Lot Selection page (RMA_SHPHS_LOTOM) to select the lot and serial IDs that are returned.
Navigation:
Click the Serial/Lot Selection link on the Customer Shipment History page.
Field or Control |
Description |
|---|---|
Quantity Shipped |
View the original amount that was shipped. If the item was a configured item, the configuration code also appears. |
Select/Deselect All IDs |
Click to select or deselect all of the serial IDs. You can also select them individually in the Serial/Lot group box. |
Use the RMA Line page (RMA_LINE) to enter or change RMA line details.
Navigation:
Click the RMA Line link on the RMA Form page.
This example illustrates the fields and controls on the RMA Line page. You can find definitions for the fields and controls later on this page.
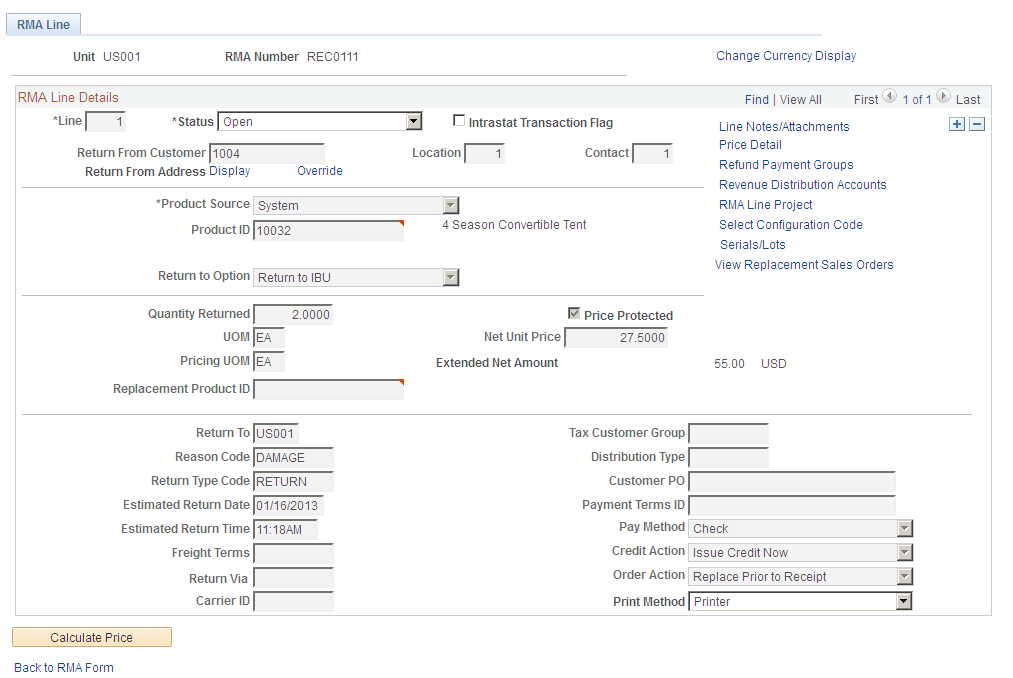
The system populates many field values on this page from the RMA Form page. All of the fields are available for editing except Unit, RMA Number, and Currency.
Field or Control |
Description |
|---|---|
Change Currency Display |
Click to toggle between the base currency and the transaction currency. |
Location and Return From Customer |
View the default location that is associated with the return from customer (from the RMA Form page). You can select an alternate location if required. |
Product ID |
Enter a product ID or use default from the shipping history line that you selected. |
Replacement Product ID |
Allows a different product ID to be ordered in case the returned product is inactive or not desired as a replacement. Only if the Order Action field option is Replace Prior to Receipt or Replace After Receipt would the Replacement Product ID be visible. |
Return to Option |
Select an option to specify whether the product should be returned to the warehouse, to the supplier, or return is not required. The available options are Return IBU: Return the product to the inventory business unit. This is the default value. Return Vdr: Return the product to the supplier directly. If this option is selected you must also enter a Supplier ID and Supplier Location and the address of the supplier will be printed on the RMA report. No Return: No need to return the product. This option is automatically selected if the product entered on the RMA line is not an inventory item. |
Kit Product ID |
Displays the parent/kit product ID if the product returned is from a kit. |
Price Protected |
Select this option to determine whether the price of the RMA line should be protected, either manually or automatically by the system. Selecting this option will cause the pricer to bypass the calculation of the RMA line. If this option is selected, the pricing input fields, such as price and pricing UOM, will be grayed out and not available for editing. |
Pricing UOM |
Displays the default value from the sales order and allows the pricer to use an UOM other than the Return UOM. |
Extended Net Amount |
Displays the extended net amount for the RMA line. |
Pay Method (payment method) |
Specifies the payment method for the RMA line. |
Carrier ID |
View default from the Return Type Codes page. |
Tax Customer Group |
View default from the General Information - Customer Group Info page. |
Return Via, Freight Terms, Order Action, and Credit Action |
View the return type code that is associated with the RMA Line. You can modify these values. |
Distribution Type |
View the business unit distribution options. Distribution types define different departments or cost centers. While the transaction determines the debit and credit accounts for most transactions, distribution types are used when the account distribution depends on which department or cost center issued the product. |
PO Number (purchase order number) |
View and modify the PO number that is associated with the shipment that is referenced on the line. |
Payment Terms ID |
Specifies the Payment Terms ID. Payment Terms at the line level default from the header |
Print Method |
Select a print method. Values are: Printer: Print a hard copy of the RMA form. Fax: Fax the form to the customer.x File: Send the form to a file. Note: PeopleSoft does not deliver the facility for printing, faxing, or creating a file for RMA acknowledgments. You must configure the system to do that. Note: You can also drill back from the replacement sales order to determine the RMA line that is associated with the order and to view all receipts for the RMA. |
Calculate Price |
Click the Calculate Price button to trigger the price calculation manually. |
View Product Add |
Click the View Product Add link to open the Product Add page. This link is available only if there are Product Adds. However, if the pricing calculation results in Product Adds, the Product Add page will be automatically displayed after the price calculation. |
Line Notes/Attachments |
Click the Line Notes/Attachments link to access the RMA Line Notes/Attachments page. |
Price Detail |
Click the Line Price Detail link to access the RMA Price Detail page. |
Refund Payment Groups |
Click the Refund Payment Groups link to access the Refund Payment Groups page where you can edit the credit card information and refund method. The Refund Payment Groups page is used to display the refund payment groups in the RMA. The page also displays the RMA lines belonging to the group and the total amounts for the group. If payment method is credit card, the credit card section of the page will be available to the user for editing. |
Shipping Details |
The Shipping Details link is displayed if the RMA line is created from Customer Shipment History. Click on the link to open the existing Shipments by Schedule page that display the schedule details. Links are present in Shipments by Schedule page to allow the user to drill to the original sales order for the schedule and to display the invoice details. |
Invoice Details |
The Invoice Details link is displayed if the RMA line is created from Customer Shipment History, and it has been billed. Click on the link to open invoice inquiry page to review the invoice details. |
Serials/Lots |
Click the Serials/Lots link to access the RMA Serial/Lot IDs page. |
Select Configuration Code |
Click the Select Configuration Code link to access the Configuration Code Entry page. |
RMA Line Project |
Click the RMA Line Project link to access the RMA Line Projects page. |
View Replacement Sales Orders |
Click the View Replacement Sales Orders link to access the Replace Sales Orders page. |
Revenue Distribution Accounts |
Click the Revenue Distributions Accounts link to access the Revenue Distribution Accounts page. |
Use the RMA Serial/Lot IDs (returned material authorization serial and lot IDs) page (RMA_SERIAL_LOT) to view, delete, or change serial and lot IDs for a line.
Navigation:
Click the Serials/Lots link on the RMA Line page.
Field or Control |
Description |
|---|---|
Unit, RMA Number, RMA Line, Product ID, Quantity Returned and UOM |
View values from entries at the RMA line level. |
Serial ID and Lot ID |
View, delete, or change these fields manually. |
Expiration Date |
For lot-controlled items, the lot expiration date is assigned at the source business unit for the originally shipped lot. This field is read-only. |
Quantity |
View the quantity for the ship serial-, serial- or lot-controlled item. |
Note: You can add multiple serial IDs manually by inserting new rows in the Serial/Lot group box. The serial ID, lot ID, and quantity shipped will appear for the ship serial-, serial-, or lot-controlled items that are returned.
Use the Revenue Distribution Accounts page (RMA_LINE3) to select revenue accounts for the RMA.
Navigation:
Click the Revenue Distribution Accounts link on the RMA Line page.
Field or Control |
Description |
|---|---|
Revenue Code |
Select a code. You can have multiple revenue codes. |
Percentage |
Must total 100 percent. |
Use the Promotion Details page (RMA_LINE_PROMO) to review and update promotion details for the RMA line.
Navigation:
Click the Promotion Details link on the RMA Line page.
If the RMA was populated from Customer Shipment History, the promotion details will default from the original order. Otherwise you can update the options for the promotion.
Field or Control |
Description |
|---|---|
Promo Detail |
Click the icon to access the Promotion Inquiry page. |
Refresh Promotion Details |
Click this button after making any changes to the promotion. |
Use the Refund Payment Groups page (RMA_PAY_GROUP) to displays the refund payment groups for the RMA or the RMA line.
Navigation:
Click the Refund Payment Groups link on the RMA Form page.
Click the Refund Payment Groups link on the RMA Line page.
RMA captures credit card information and passes to Billing for refund. To support multiple credit cards from multiple orders or invoices, grouping of RMA lines based on originating order or invoice will be used as a unit to specify the refund payment method and credit card information. This will also allow refunding to the same credit card that customer used to pay for the goods.
Field or Control |
Description |
|---|---|
Payment Method |
Select the payment method from the drop down list. The available options are: Cash, Check, Credit Crd, DD, Draft, EFT, and Giro-EFT |
Payment Terms ID |
Specify the Payment Terms ID. Payment Terms default from the line level to form unique payment groups based on the payment method, payment terms or credit card data if present. |
Product Source, Product ID, Quantity Returned, Quantity Base, UOM, and Currency |
Displays the Product Source, Product ID, Quantity Returned, Quantity Base, UOM (unit of measure) and Currency. |
Clear Credit Card Info |
Click this button to clear all the credit card information. |
Select Primary Card |
Click this button to select the primary card for the customer and use it for credit. |
Select Credit Card |
Click this link to open the Credit Card Selection page to allow the user to select an existing credit card. |
Copy from Bill To |
Click this button to copy the bill-to address of the RMA. |
Copy from Return From |
Click this button to copy the return from address of the RMA. |
Select Bill To Address |
Click this link to select a Bill To address for the customer. |