Creating Risks and Action Plans
|
Page Name |
Definition Name |
Usage |
|---|---|---|
|
PGM_PROJECT_RISK |
Enter project risk details and triggers. |
|
|
PGM_ACTION_PLAN |
Establish actions plans in response to risks. |
|
|
PGM_RISK_NOTES |
View and edit comments or file attachments that are relevant to a risk. |
Use the Project Risk page (PGM_PROJECT_RISK) to enter project risk details and triggers.
Navigation:
This example illustrates the fields and controls on the Project Risk page. You can find definitions for the fields and controls later on this page.
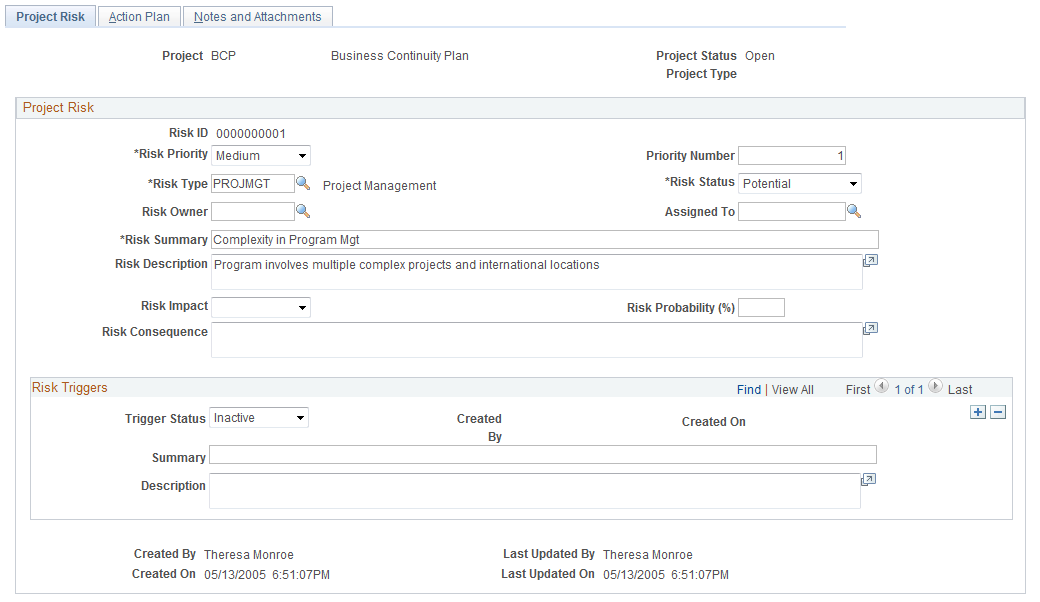
The project, project status, release, and project type fields all come from the program or project for which you are entering the risk.
Field or Control |
Description |
|---|---|
Risk ID |
Displays the automatically generated number unique to each project ID. The system displays Next until you save the project risk. |
Activity |
Enter the activity to associate with the risk. Leave this field blank if this is a project risk. This field does not appear if this is a program risk. |
Risk Priority |
Select the priority of the risk from these options: High, Medium, or Low. Risks in the Top 5 Risks group box on the Manager Workbench page and the Top 5 Risks pagelet are sorted in conjunction with the Priority Number. Risks are sorted first by risk priority, then by priority number. |
Priority Number |
Enter the ranking, between 1 and 999, of the risk. The priority number is relative to other risks that have the same risk priority. Enter the same priority number for two risks to indicate that the risks have equal priority. |
Risk Type |
Enter the type of risk to categorize this risk into a group. You define risk types on the Risk Type page. |
Risk Status |
Select the current status of this risk from these options: Active, Inactive, or Potential. The system displays risks with Active and Potential statuses on the Top 5 Risks group box on the Manager Workbench page and the Top 5 Risks pagelet. |
Risk Owner |
Enter the employee ID of the risk owner. This is for informational purposes only. The system does not use risk owner for any processing. |
Assigned To |
Enter the employee ID for the individual responsible for monitoring this risk. You can search all risks assigned to an individual on the Review Risks page. |
Risk Summary |
Enter a short summary of the risk. The Risk Summary appears as a link that allows you to access more information about the risk in the Top 5 Risks group box on the Manager Workbench page and the Top 5 Risks pagelet. |
Risk Impact |
Select the effect that this risk might have on the program, project, or activity. Options are: High, Medium, or Low. |
Risk Probability |
Enter the probability, between 0 and 100 , that this risk will occur. The system treats the value as a percentage (for example 50 means 50 percent). |
Risk Consequence |
Enter the description of the consequence if this risk were to occur. |
Additional Fields |
Click to transfer to a secondary page with ten additional user fields. The system does not use these fields for any processing or reporting, but you can enter any additional information for this risk. |
Risk Triggers
Field or Control |
Description |
|---|---|
Trigger Status |
Select the trigger status from these options: Active, Ignore, and Inactive. This field is used for informational purposes only. |
Created By |
Displays the originator's name. The system populates this field when you save the risk. |
Created On |
Displays the date and time. The system populates these values when you save the risk. |
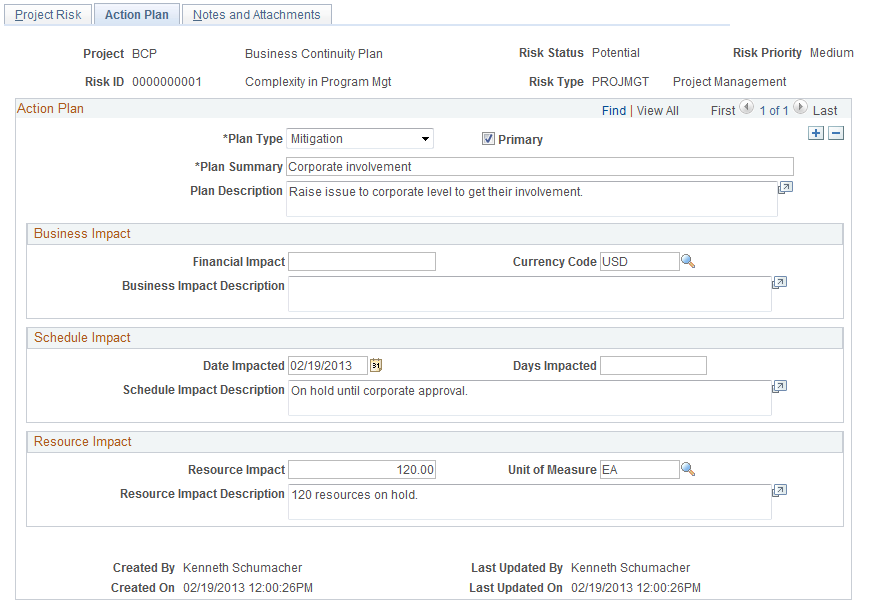
Use the Action Plan page (PGM_ACTION_PLAN) to establish actions plans in response to risks.
Navigation:
This example illustrates the fields and controls on the Action Plan page. You can find definitions for the fields and controls later on this page.
Field or Control |
Description |
|---|---|
Plan Type |
Select the type of action plan from these options: Acceptance: Select to indicate that you are not changing the project plan to deal with the risk, or that no suitable response strategy exists. Avoidance: Select to indicate that you are changing the project plan to eliminate the risk or condition, protecting the project objectives from the risk's impact, or modifying the project objective to accommodate the risk. Mitigation: Select to indicate that you are reducing the probability or consequences of a risk to an acceptable level. Transference: Select to indicate that you are shifting the consequences of the risk, and ownership of the response, to a third party. Transferring the risk does not eliminate the risk, but rather makes another party responsible for its management. |
Primary |
Select to indicate that this action plan is the primary action plan. For a new project risk, the system assigns the first action plan as the primary action plan. You can select only one primary action plan for each risk. The system issues an error message when you save if you select the Primary check box for more than one action plan. |
Business Impact
Use this section to identify the effect to a program or project's budget, cost, or revenue.
Field or Control |
Description |
|---|---|
Financial Impact and Currency Code |
Enter the monetary amount and corresponding currency code for the business effect of this action plan. |
Schedule Impact
Use this section to record the effect to the project schedule, either a specific date or number of days that would be impacted if this risk occurs.
Resource Impact
Use this section to indicate the effect to resources if this risk occurs.
Field or Control |
Description |
|---|---|
Resource Impact and Unit of Measure |
Enter a number and the associated unit of measure, such as MDY (Person Day) or MHR (Work Hour), to indicate the effect to the resources. |
Use the Notes and Attachments page (PGM_RISK_NOTES) to view and edit comments or file attachments that are relevant to a risk.
Navigation:
This example illustrates the fields and controls on the Notes and Attachments page. You can find definitions for the fields and controls later on this page.
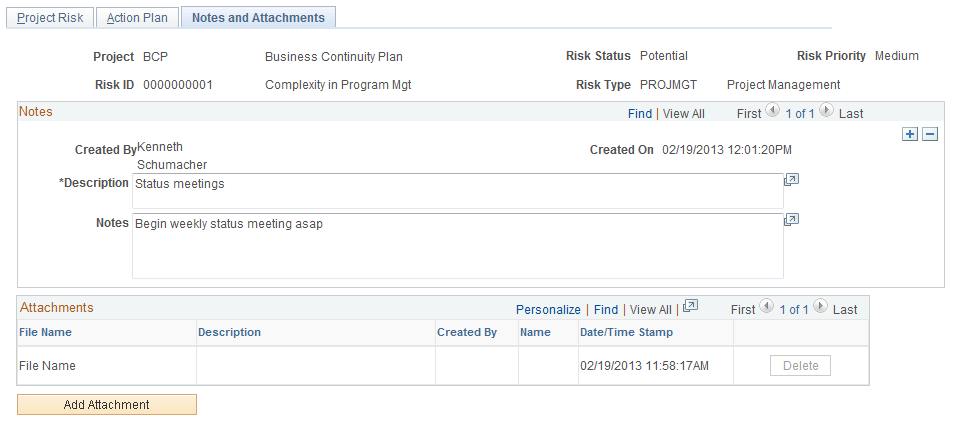
Notes
Enter the description and notes that pertain to this risk.
Attachments
Attach any type of file to this risk.
Field or Control |
Description |
|---|---|
Add Attachment |
Click to add an attachment. Note: You must have the File Attachment option set on the Installation Options - Project Costing page for attachments to work. See PeopleSoft Asset Lifecycle Management, Enterprise Service Automation, Financial Management, Staffing Front Office, and Supply Chain Management Product-Specific Installation Instructions located on Oracle's PeopleSoft My Oracle Support website. |
File Name |
Displays the name of the file that you upload as a link. Click on the filename to view the attachment. |
Added By, Name, and Date/Time Stamp |
Displays information about the user who adds the attachment, and the date and time that the upload occurred. |