Managing Banners
You can add or delete banners at any time, and the system records the information. Each time a user clicks a banner, the system records the selection information as well. Click stream tracking information is a combination of the user and the banner that the user clicks. The system records users' banner clicks by inserting a row into the Banner Usage table (PS_BANNER_CLICK).
To manage banners, use the Maintain Banners component (EM_BANNER_ADMIN).
This section discusses how to manage banners and review banner activity.
|
Page Name |
Definition Name |
Usage |
|---|---|---|
|
EM_BANNER_ADMIN |
Add or update banners. |
|
|
EM_BANNER_CLICK |
View the click count of a particular banner. |
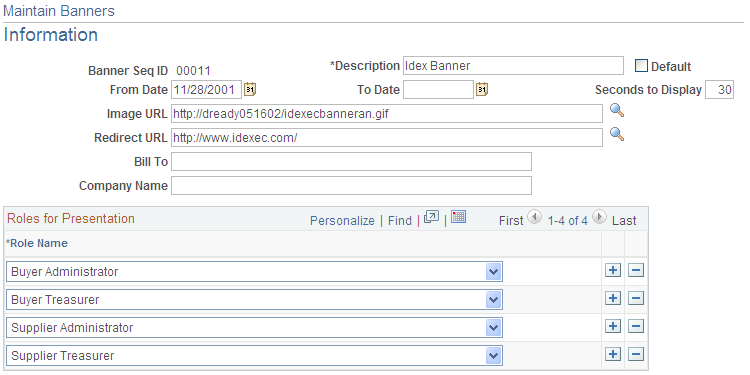
Use the Maintain Banners - Information page (EM_BANNER_ADMIN) to add or update banners.
Navigation:
This example illustrates the fields and controls on the Maintain Banners - Information page. You can find definitions for the fields and controls later on this page.
Field or Control |
Description |
|---|---|
Banner Seq ID (banner sequence ID) |
Displays the banner ID, numbered automatically if you do not make a selection when accessing the page. |
Description |
Enter the banner description. |
Default |
Select for the displayed banner to be the default banner. This is the default banner when the user is not in any other banners' target audience. The system automatically manages the sole default banner, and you must set up one default banner. To change the default, enter another banner ID and select its Default check box. |
From Date |
Enter the date that the banner first becomes available to display. |
To Date |
Enter the last day that the banner is available. If you don't enter a date, the banner doesn't expire. |
Seconds to Display |
Enter the amount of time elapsing before the displayed banner is replaced by the next. Banners appear according to the banner sequence ID, and the system administrator can modify the display order. |
Image URL (uniform resource locator) |
Enter the storage location for the banner URL. |
Redirect URL |
Enter the represented organization's web address as specified by the host administrator. |
Bill To |
Enter the organization represented by a given banner and thus billed for its management. |
Company Name |
Enter the organization represented by the banner. |
Roles for Presentation
Add and select each role name to which banners are presented.
Use the Review Banner Usage - Click Stream Tracking page (EM_BANNER_CLICK) to view the click count of a particular banner.
Navigation:
Review the banner view history, including the specific date/time click.
For each banner, this page displays the user, the date, and the time that the user clicked a particular banner.