Setting Up and Creating the Cash Flow Worksheet
To set up and create the cash flow worksheet use the Ledger Set (LEDGER_SET_FR), ChartField Value Sets (CF_VALUE_SET), Data Source (FR_DATA_SOURCE), Elements (FR_ELEMENT), and Worksheet (FR_WORKSHEET) components.
|
Page Name |
Definition Name |
Usage |
|---|---|---|
|
LEDGER_SET |
Select the combination of business units and ledgers to include in the cash flow statement configuration. You can select multiple ledgers for a business unit and group specific ledgers for a set of business units to be used for the defining of the cash flow statement data sources. |
|
|
ChartField Value Set Page |
CF_VALUE_SET |
Set up ChartField value sets to scope ChartField values for use in the cash flow statement process. |
|
FR_DATA_SOURCE |
Use to define the source of cash flow data and to filter the data for use by the cash flow statement elements to produce the line item amounts. |
|
|
FR_ELEMENT |
Select predefined calculation formats. |
|
|
FR_WORKSHEET |
Set up new cash flow worksheets and copy cash flows worksheets. |
|
|
FR_WORKSHT_DS_SEC |
View dependencies and different levels. |
|
|
FR_WORKSHT_PR_SEC |
Set the business unit scope, time spans, and currency rates for beginning balances, closing and variations. |
|
|
Process Cash Flow Page |
FR_WORKSHT_PR_SEC |
Visible only when the Status of the worksheet is Active, click this link to access the Process Cash Flow page to submit the cash flow process. |
|
FR_WORKSHT_DFN_SEC |
View and print the element names, balance types, and derived line detail for each worksheet line rather than amounts. |
|
|
FR_WORKSHT_CPY_SEC |
Copy an existing worksheet and create multiple worksheet versions. |
|
|
FR_WORKSHT_LN_SEC |
Add and define new lines or change lines on the worksheet. |
|
|
FR_WORKSHT_LIS_SEC |
Use to add line items to a derived element. |
Use the Ledger Set page (LEDGER_SET) to select the combination of business units and ledgers to include in the cash flow statement configuration.
You can select multiple ledgers for a business unit and group specific ledgers for a set of business units to be used for the defining of the cash flow statement data sources.
Navigation:
This example illustrates the fields and controls on the Ledger Set page. You can find definitions for the fields and controls later on this page.
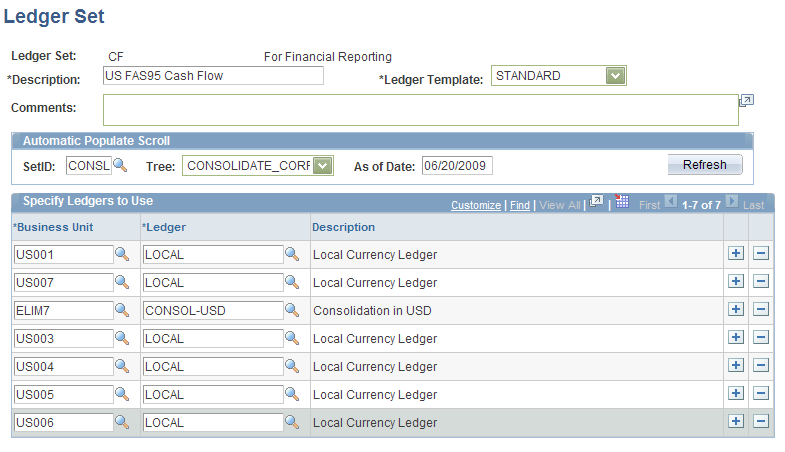
Ledger sets for cash flow statements are applicable to information that is to be derived from the ledger table for both balance sheet and profit and loss accounts. They differ from those prepared for consolidated balance sheet and income statements in that multiple ledgers can be associated with a business unit.
Field or Control |
Description |
|---|---|
SetID |
Enter the SetID for the tree that includes the group of business units that are to be used in the cash flow statement. |
Tree |
Select the tree that includes the business units that are to be used in the cash flow statement. The system populates the valid business unit values found in the selected tree for the specified ledger template. All applicable business units appear in the scroll, but you can add or delete business units from the scroll. |
As of Date |
Enter the date applicable to the tree that you select to retrieve the appropriate version of the tree. |
Refresh |
Click this button after changing the SetID or tree selection to repopulate the scroll with the associated business units. You manually enter the ledgers applicable to the business units. |
Business Unit |
In association with the ledger template, the SetID and tree determine the business units that are populated by the system in the scroll. You can add or delete business units in the scroll. Business units that you add do not have to be part of the tree that you specified. |
Ledger |
Specify the ledger source for the data. The ledgers can have different base currencies. |
See Ledger Set Page.
Use the ChartField Value Set page (CF_VALUE_SET ) to set up ChartField value sets to scope ChartField values to use in the cash flow statement process.
Navigation:
This example illustrates the fields and controls on the ChartField Value Set page. You can find definitions for the fields and controls later on this page.
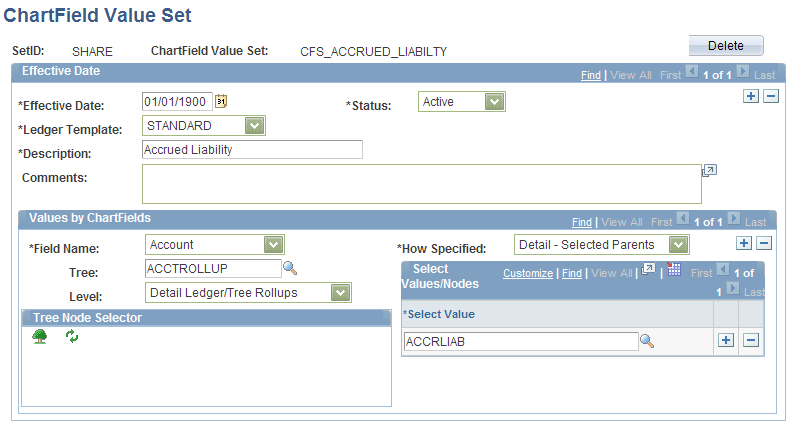
You can define ChartField value sets to provide the scope of accounts to be included in the calculation of an element.
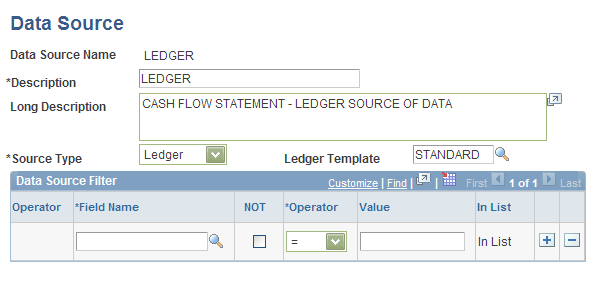
Use the Data Source page (FR_DATA_SOURCE) to define the source of cash flow data and to filter the data for use by the cash flow statement elements to produce the line item amounts.
Navigation:
This example illustrates the fields and controls on the Data Source page - (Ledger source). You can find definitions for the fields and controls later on this page.
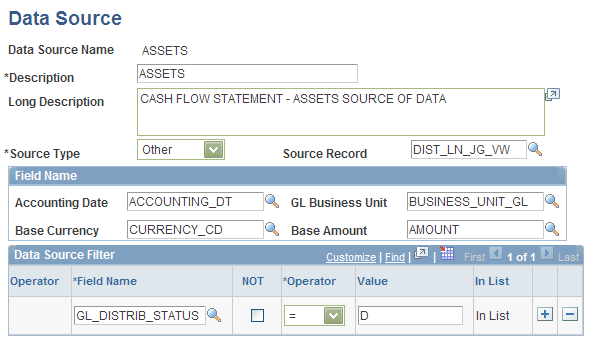
This example illustrates the fields and controls on the Data Source page (Assets source). You can find definitions for the fields and controls later on this page.
The ledger table, and the transaction tables from the Asset Management and Treasury applications are recommended sources. The latter two transaction tables only because consolidated amounts are carried in the ledger tables and details of the acquisition and disposition of assets are need for the cash flow statement. These necessary details are carried in the transaction tables only.
Other transaction tables are not recommended because they might grow extremely large during a year and might not be necessary on a detail level in the preparation of the cash flow statement.
Field or Control |
Description |
|---|---|
Source Type |
Ledger: Select when the source types is ledger table and select the appropriate Ledger Template. Other: Select when the source type is other than ledger. |
Ledger Template |
This field is available when Ledger is selected as the source type. Select the template that is appropriate to the ledgers for the business units being reported and the element calculations. |
Source Record |
This field is available when Other is selected as the source type. Select the source record that carries the amounts appropriate to the business units being reported and the element calculations. |
Field Name
If Ledger is specified as the source type, the ledger template defines the fields where necessary data is to be found and the field name group box is not available. However, if Other is specified as the source type, provide the field names where the necessary data is stored.
Field or Control |
Description |
|---|---|
Accounting Date |
Select the field that contains the dates appropriate to the cash flow statement and the period being reported. |
Base Currency |
Select the field to distinguish the rows that contain the base currency for the cash flow statement calculations. |
GL Business Unit |
Select the field name to distinguish the general ledger business unit included in the cash flow statement. |
Base Amount |
Select the name of the field that contains the amounts in the base currency. |
Data Source Filter
The Data Source Filter enables you to filter data derived from the source tables based on various operators applied to the specified field and its values.
Field or Control |
Description |
|---|---|
Field Name |
Enter the name of the field on which the data in the source record is to be filtered for use in the cash flow statement. |
Not |
Select to do the opposite of the operator value. |
Operator |
Select an operator, or action that is to be applied to rows that contain values for the Field Name selected. For example, include only rows from the treasury accounting line table (TRA_ACCT_LINE) in the cash flow calculations data source that have a value in the general ledger (GL_DISTRIBUTION) field. |
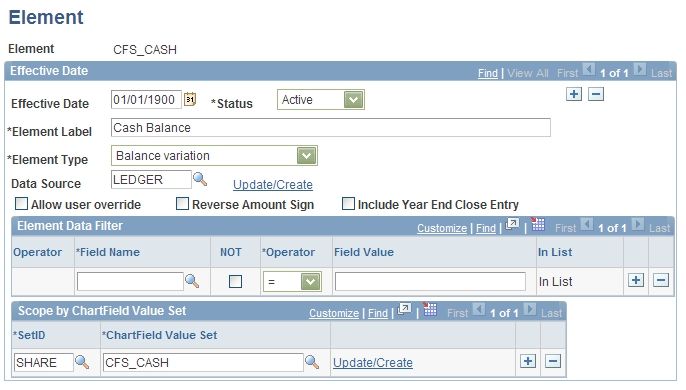
Use the Element page (FR_ELEMENT) to select predefined calculation formats.
Navigation:
This example illustrates the fields and controls on the Element page. You can find definitions for the fields and controls later on this page.
Field or Control |
Description |
|---|---|
Effective Date |
Enter an effective date for the element status. This date works in conjunction with the effective dating of the worksheet to provide the appropriate element for the cash flow statement. |
Status |
Set the status with effective dating. |
Element Type |
Enter an element type to specify one of the delivered types of calculation formats required for determining the underlying cash flows:
|
Data Source |
Enter the name of the appropriate data source definition. |
Update/Create |
Click to access the Data Source page and create or modify a data source as needed. |
Allow user override |
Select to enable the user to override the amount calculated by the process. Override amounts are calculated and tied to a user ID. You can override the calculated amount on the cash flow worksheet. By default the override amount is the same as the calculated amount until you override it. |
Reverse Amount Sign |
Select to reverse the sign resulting from the calculation. You must know the sign carried by transaction amounts in the various tables to understand when this check box must be selected. For example, the element type for sales is an ending balance element because it is an income statement line item and only the activity for the period is relevant to cash flow. An increase to cash flow derived by the sales element is defined with the Reverse Amount Sign check box selected when the amount is coming from the ledger table because it is held in that table as a negative amount. However, the Reverse Amount Sign check box is not selected if the sales element derives the sales amounts from the billing transaction tables because sales amounts are maintained as positive amounts in the billing tables. If another element determining cash flow is a variation in accounts receivable that is calculated as the ending balance minus the beginning balance for the period, then a reduction in accounts receivable is a negative amount. Because accounts receivables is normally recorded in the system tables as a positive and because this element is defined to calculate a decrease in the accounts receivable balance as a negative number, to properly reflected the decrease in accounts receivable as an increase to cash flow, it is necessary to reverse the sign of the variance. You must know from which source tables the data is coming and take into consideration the normal sign in which those amounts are maintained within the source tables, the calculation method within the element, and the impact of the amount on cash flow to know when to select the Reverse Amount Sign check box. |
Include Year End Close Entry |
Select and the calculations determined by the element includes the period 999 entries for year end closing. |
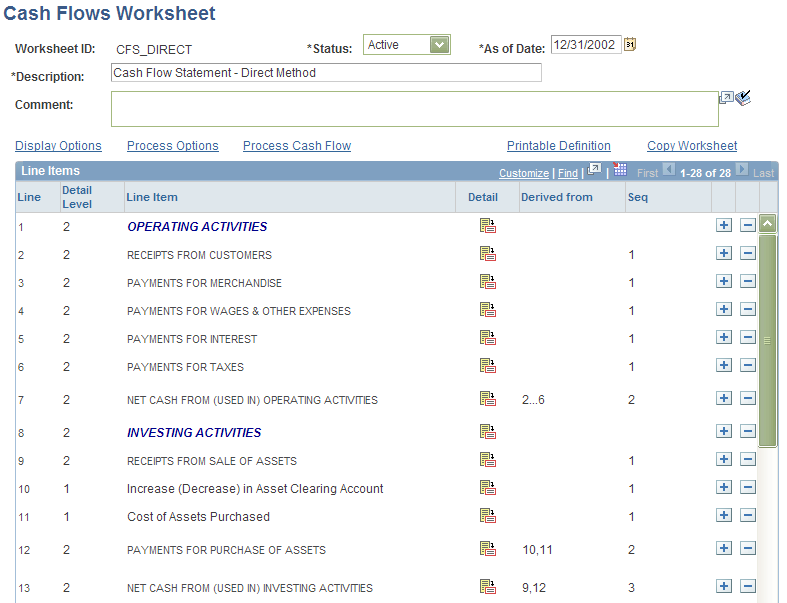
Use the Cash Flows Worksheet page (FR_WORKSHEET) to set up new cash flow worksheets and copy cash flows worksheets.
Navigation:
This example illustrates the fields and controls on the Cash Flows Worksheet page - direct method (1 of 2). You can find definitions for the fields and controls later on this page.
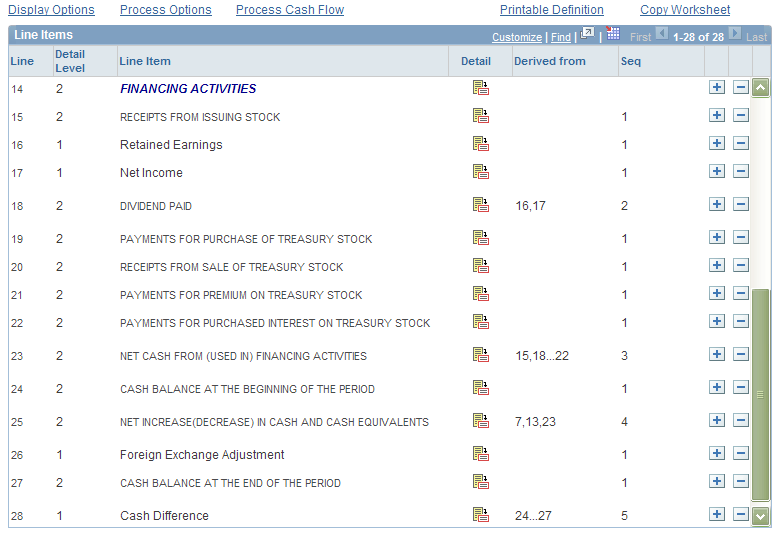
This example illustrates the fields and controls on the Cash Flows Worksheet page - direct method (2 of 2). You can find definitions for the fields and controls later on this page.
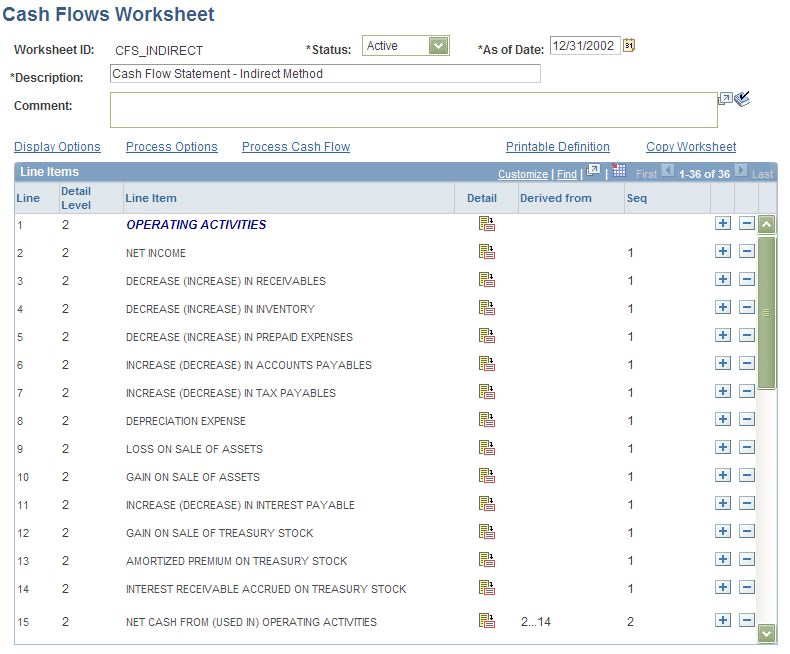
PeopleSoft delivers a direct method cash flow worksheet as well as an indirect method cash flow worksheet to use as a guideline for each calculation method. You can modify these to fit your organization's particular requirements. The cash flow worksheet previously pictured depicts the direct method, whereas the following presents the indirect cash flow method.
This example illustrates the fields and controls on the Cash Flows Worksheet page - indirect method (1 of 2). You can find definitions for the fields and controls later on this page.
This example illustrates the fields and controls on the Cash Flows Worksheet page - indirect method (2 of 2). You can find definitions for the fields and controls later on this page.
Field or Control |
Description |
|---|---|
Worksheet ID |
Click the Copy Worksheet link to create and name a new worksheet. |
Status |
Use to activate or inactivate a worksheet. An inactive worksheet cannot be processed and the Process Cash Flow link is not available. |
As of Date |
Enter a date to be used for prompting effective dated tables such as the Elements and to be used by the calculation process to pull the data for the worksheet. |
Display Options |
Click this link to open the Display Options page and alter the display of the worksheet. See Display Options Page. |
Process Options |
Click this link to set the processing options on the Process Options page. |
Process Cash Flow |
Click this link to calculate line amounts and update the report entity using the cash flow process. |
Printable Definition |
Click this link to access, view, and print the worksheet showing the element names, balance types, and derivation of line items rather than amounts. |
Copy Worksheet |
Click this link to copy the worksheet giving it a new Worksheet ID and to create different versions of a worksheet. |
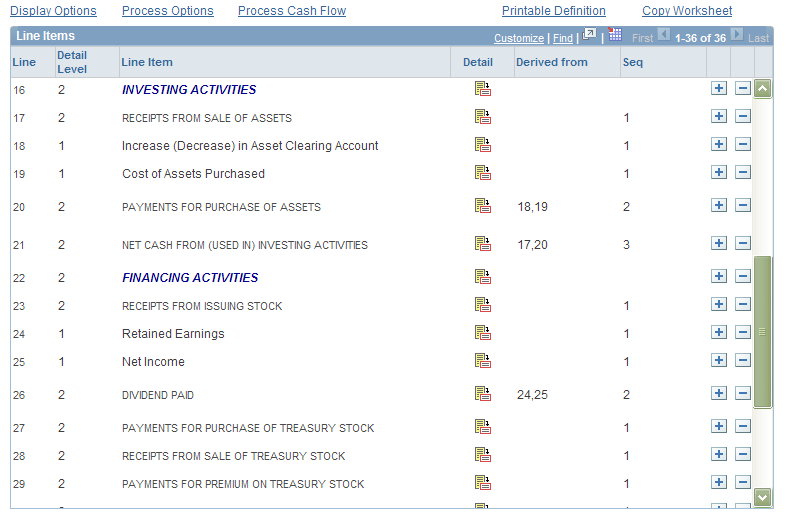
Line |
Lines are maintained by the system as you add or delete lines on the worksheet. Use the line numbers as reference in creating derived elements. See Selected Line Items to be Added to the Derived Element Page. |
Detail Level |
Determines the lines display format on the worksheet. There are multiple levels available to be used in organizing the format of the worksheet. You determine the level when you add a line. |
Derived From |
This is a display option of the elements making up a line that is set using the Display Options link. |
Seq (sequence) |
This is a display option of the calculation sequence maintained by the system for a line. |
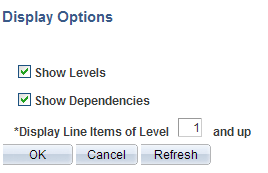
Use the Display Options page (FR_WORKSHT_DS_SEC) to view dependencies and different levels.
Navigation:
Click the Display Options link on the Cash Flows Worksheet page.
This example illustrates the fields and controls on the Display Options page. You can find definitions for the fields and controls later on this page.
Field or Control |
Description |
|---|---|
Show Levels |
Select to display the levels you have set for each line item on the worksheet. |
Show Dependencies |
Select to display on the worksheet the lines that you determined to be used in calculating a particular line. |
Display Line Items of Level xx and up |
Select the line levels to be displayed on the worksheet. There are multiple levels that you can set for a line when you add or change the line. Levels control display only. |
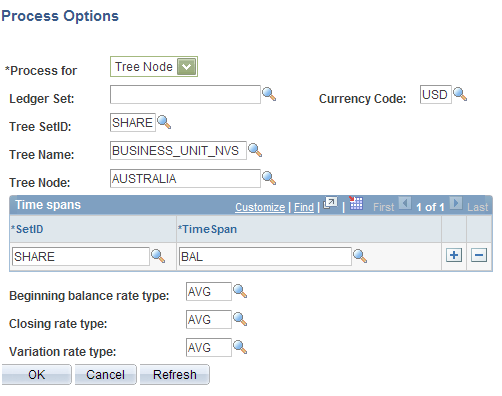
Use the Process Options page (FR_WORKSHT_PR_SEC) to set the business unit scope, time spans, and currency rates for beginning balances, closing and variations.
Navigation:
Click the Process Options link on the Cash Flows Worksheet page.
This example illustrates the fields and controls on the Process Options page - one business unit. You can find definitions for the fields and controls later on this page.

This example illustrates the fields and controls on the Process Options page - multiple business units. You can find definitions for the fields and controls later on this page.
Field or Control |
Description |
|---|---|
Process for |
Specify the business unit and ledger or the business unit tree for multiple business unit and ledger set to be used for the cash flows worksheet. |
Tree SetID, Tree Name, and Tree Node |
Enter the applicable tree information or the business units included in the worksheet. |
TimeSpans
Field or Control |
Description |
|---|---|
SetID |
Enter the SetID for the time span used. |
TimeSpan |
Enter a TimeSpan defined to include adjustment period data. |
Currency Rate Types
Field or Control |
Description |
|---|---|
Beginning balance rate type, Closing rate type, and Variation rate type |
Select the rate type to be applied to element calculations for beginning balances, ending balances, and the variations between the beginning and ending balances. These rates are applicable when presenting the cash variation due to currency rate changes in the conversion of base currency amounts to the reporting currency of the cash flow statement. |
Use the Cash Flows Worksheet (printable definition) page (FR_WORKSHT_DFN_SEC) to view and print the element names, balance types, and derived line detail for each worksheet line rather than amounts.
Navigation:
Click the Printable Definition link on the Cash Flows Worksheet page.
This example illustrates the fields and controls on the Cash Flows Worksheet printable definition page. You can find definitions for the fields and controls later on this page.
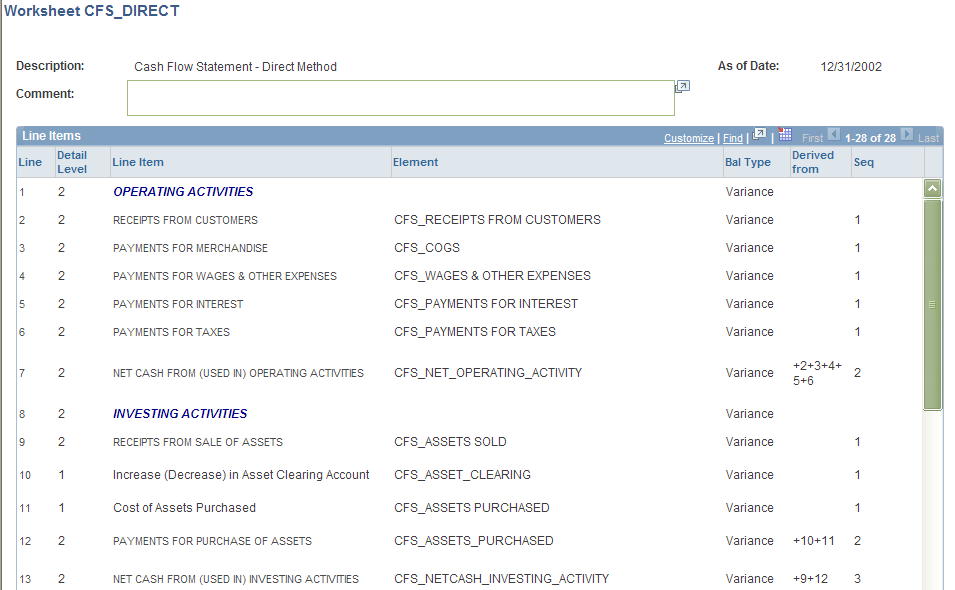
This page provides a view of the elements with the balance types and line dependencies for derived line elements.
Use the Copy Worksheet page (FR_WORKSHT_CPY_SEC) to copy an existing worksheet and create multiple worksheet versions.
Navigation:
Click the Copy Worksheet link on the Cash Flows Worksheet page.
Field or Control |
Description |
|---|---|
New Worksheet ID |
Enter a new worksheet ID to make a copy of an existing worksheet and click OK. This will create a copy that you can access from the search page. |
Use the Line Item Detail for Line page (FR_WORKSHT_LN_SEC) to add and define new lines or change lines on the worksheet.
Navigation:
Click the Detail icon or the Add a New Row button to access the page.
This example illustrates the fields and controls on the Line Item Detail for Line nn page. You can find definitions for the fields and controls later on this page.
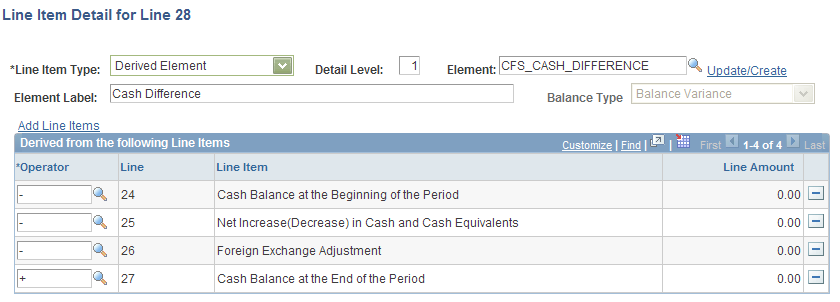
Field or Control |
Description |
|---|---|
Line Item Type |
Define the line as one of three types depending on its purpose and if it is dependent on other values:
|
Detail Level |
Enter 1, 2, or 3, and so on as the level. The level determines the format, or font for the line. |
Element |
Select the elements you previously defined to determine the calculation or output for the line. You can click the Update/Create link to update or create an element for the line. |
Balance Type |
Select one of the following to describe the line balance, or the output of the line:
|
Add Line Items |
Select to access a secondary page and add lines to the derived element for the line. See Selected Line Items to be Added to the Derived Element Page. |
Operator |
The possible operators are to add or subtract the value of a particular line from the line's other derived elements. |
Use the Selected Line Items to be Added to the Derived Element page (FR_WORKSHT_LIS_SEC) to add line items to a derived element.
Navigation:
Visible only for a derived element, click the Add Line Items link on the Line Item Detail for Line nn page.
This example illustrates the fields and controls on the Selected Line Items to be added to the Derived Element page. You can find definitions for the fields and controls later on this page.
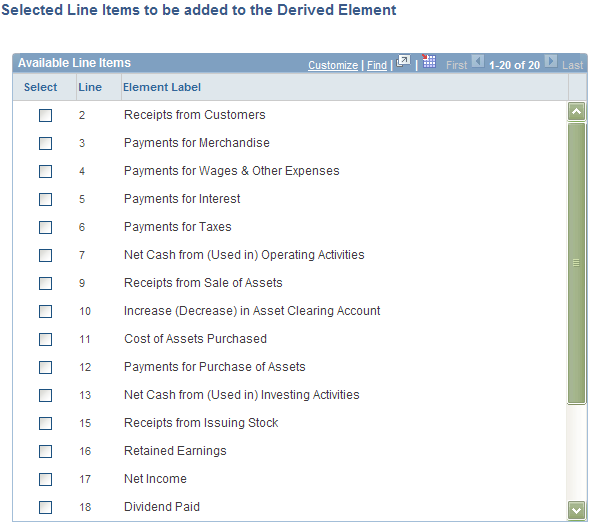
Field or Control |
Description |
|---|---|
Select |
Select from the available lines the line or lines to add to the derived element and click OK. |