Transferring Items to Another Customer or Business Unit
|
Page Name |
Definition Name |
Usage |
|---|---|---|
|
TRN_IDENTIFY |
Build a customer business unit or transfer worksheet. |
|
|
Filter Items Page |
WS_ITEMSRCH_SEC |
Enter advanced selection criteria for items to include in the worksheet. See the Transfer Selection Page for more information. |
|
TRN_WORKSHEET1 |
Indicate the to customer or business unit that receives the items. |
|
|
Currency Conversion Page |
EU_CUR_CNV_WS_SEC |
Select the currency code, rate, and date of conversion for the display currency on the worksheet. See the Transfer Worksheet - Worksheet1 Page. |
|
Control Distribution ID Page |
AR_TRN_DST_CTL_SEC |
Override the control distribution code that defines the control accounts receivable (AR) account. See the Transfer Worksheet - Worksheet1 Page. |
|
TRN_WORKSHEET2 |
Review or modify information about the items that you are transferring. |
|
|
Additional Item Information Page |
TRN_WRKSHT_EXT |
Display additional information for an item. See the Transfer Worksheet - Worksheet2 Page. |
|
Item Activity Detail Page |
ITEM_ACTIVTY_DRILL |
View item activities. See the Transfer Worksheet - Worksheet2 Page. |
|
Items in Other Groups Page |
ITEM_MGROUP_SEC |
View other worksheet groups that have the selected item or any pending item groups that are not posted that have the item. |
|
Conversations Page |
CONVER_DATA1_SS |
Update or add conversation entries for the item. See the Transfer Worksheet - Worksheet1 Page or the Transfer Worksheet - Worksheet2 Page. |
|
Additional Customer Information Page |
CUST_INFO_SEC |
Display customer information for an item. See the Transfer Worksheet - Worksheet1 Page or the Transfer Worksheet - Worksheet2 Page. |
|
TRN_ACTION |
Select a posting action for a worksheet. Also use this page to delete a worksheet, create accounting entries online for the worksheets, or delete accounting entries. |
This documentation discusses how to:
Build a customer or business unit transfer worksheet.
Select the to customer, business unit, and items.
Modify item information.
Select a transfer worksheet action.
Use the transfer worksheet to transfer items to another customer or business unit. The customers can be in the same business unit or different business units, or they can be assigned to different subcustomer levels within a single customer.
When you transfer an item from one business unit to another, the GL account and ChartFields assigned to the Transfer Control Distribution code must exist in both the business unit from which you are transferring the item and the business unit to which you are transferring the item.
You can transfer items with value-added tax (VAT) as long as all the From customers' and To customers' receivables business units point to the same VAT entity. You can transfer payments that are put on account between two PeopleSoft Receivables business units.
Note: You cannot transfer multiple items that have the same item and item line number to another customer. For example, suppose that you have three customers that have items with the same item and item line numbers. In this case, you can combine the three items into one item on the maintenance worksheet using the target customer's number.
After you complete the transfer worksheet and select a posting action, you must run the Receivables Update process (AR_UPDATE) to transfer the items, create accounting entries, and post the results.
Use the Transfer Selection page (TRN_IDENTIFY) to build a customer business unit or transfer worksheet.
Navigation:
This example illustrates the fields and controls on the Transfer Selection page. You can find definitions for the fields and controls later on this page.
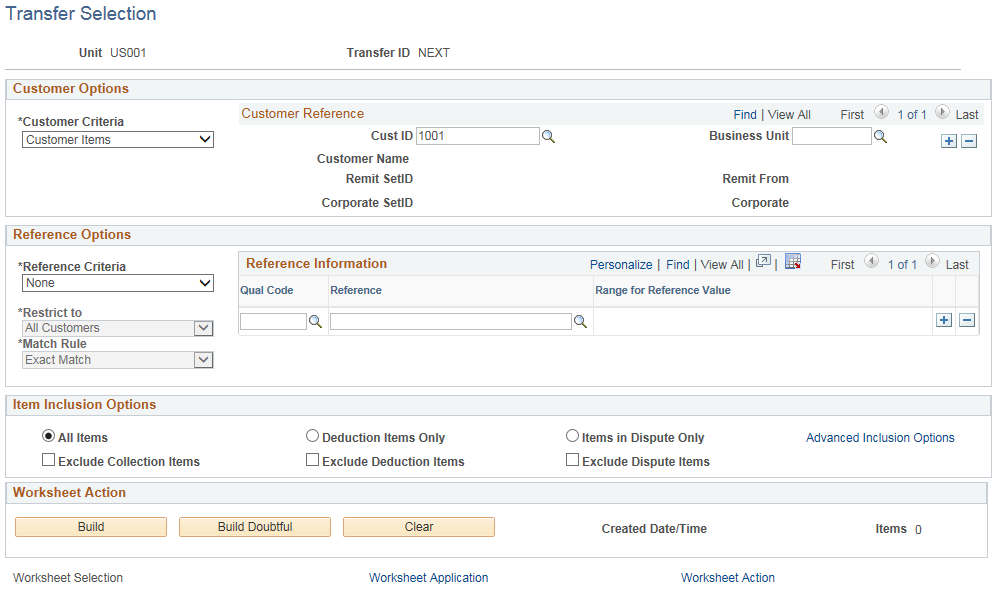
Customer Options
Field or Control |
Description |
|---|---|
Customer Criteria |
Select the type of customer items that you want to display on the worksheet. Values are: Corporate Items: Displays corporate items only. Customer Items: Displays all customer items only. Remit From Items: Displays remit from items only. None: The system creates a blank worksheet. |
Cust ID (customer ID), Business Unit, SubCustomer 1, and SubCustomer 2 |
Enter the customer's ID and the business unit to construct a worksheet for a specific customer. If the customer has subcustomers that were set up on the SubCustomer Qualifier 1 and SubCustomer Qualifier 2 pages, enter the qualifiers to narrow the worksheet display even further. Note: Remember that the GL account and ChartFields assigned to the Transfer Control Distribution code must exist in this from business unit. |
Reference Options
Field or Control |
Description |
|---|---|
Reference Criteria |
Select an option to restrict reference criteria to search for only a Range of References, Specific Values, or no values (None). If you decide to enter only reference options, the worksheet contains items matching the references. |
Restrict to |
Select All Customers, Corporate Cust Only, Customer Only, or Remit Cust Only. |
Match Rule |
If you selected Specific Value or Range of References in the Reference Criteria field, specify the match type for the item information. Values are Exact Match and Like Match. A like match enables you to use a specific reference and range for reference values to identify the reference, as long as you provide the beginning letters or numbers, not characters from the middle. For example, if you enter a purchase order (PO) number of 24%, and select Like Match, the worksheet contains all items with PO numbers beginning with 24, but does not catch a PO number of x24x. |
Reference and Range for Reference Value |
If you selected Specific Value in the Reference Criteria field, enter the reference value in the Reference field. If you selected Range of References in the Reference Criteria field, enter from and to values, with the to value always greater than the from value. The values that you enter are case-sensitive. |
Qual Code (qualifier code) |
Select from the reference criteria that were set up on the Reference Qualifier page. Items can be identified by any reference such as PO, item ID, or document number. |
Item Inclusion Options
Field or Control |
Description |
|---|---|
All Items, Deduction Items Only, or Items in Dispute Only |
Select one of these options to indicate the type of items to include in the worksheet. |
Exclude Collection Items, Exclude Deduction Items, and Exclude Dispute Items |
If you select All Items, you can also select one or more of the check boxes to exclude collection, deduction, and dispute items. |
Advanced Inclusion Options |
Click this link to access the Filter Items secondary page (WS_ITEMSRCH_SEC), where you can create, edit, and save selection criteria for items to include in the worksheet. You can filter items using values in the following categories:
|
Worksheet Action
Field or Control |
Description |
|---|---|
Build |
Click to build a worksheet that transfers items to another customer or business unit. |
Clear |
Click to clear all items from the existing worksheet. |
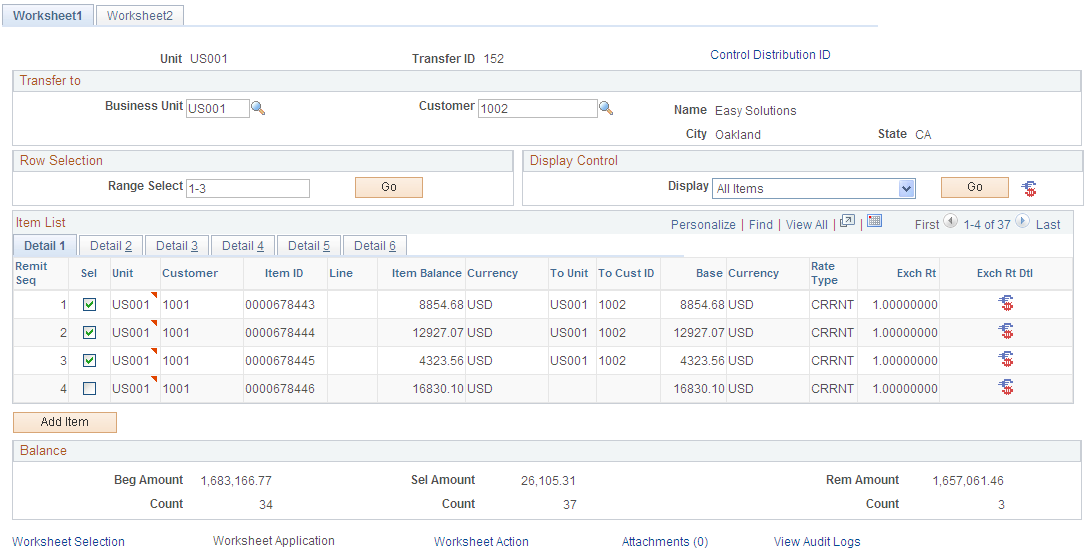
Use the Transfer Worksheet - Worksheet1 page (TRN_WORKSHEET1) to indicate the to customer or business unit that receives the items.
Navigation:
Click the Build button on the Transfer Selection page.
This example illustrates the fields and controls on the Transfer Worksheet - Worksheet1 page. You can find definitions for the fields and controls later on this page.
Field or Control |
Description |
|---|---|
Control Distribution ID |
Click to access the Control Distribution ID page. Use the Control Distribution ID page (AR_TRN_DST_CTL_SEC) to override the control distribution code that defines the control AR account the Receivables Definition - Accounting Options 2 page. The distribution code determines the offsetting AR accounting entries. |
Selecting a Transfer To Customer
Field or Control |
Description |
|---|---|
Business Unit and Customer |
Enter the business unit and customer ID of the transfer to customer. If the customer has subcustomers, the system displays information about subcustomer 1 and subcustomer 2 in the remaining two fields. If you selected the Subcustomer Qualifier option for the system and have set them up for the customer, you can perform intracustomer transfers by changing the subcustomer 1 and subcustomer 2 qualifiers. Note: Remember that the GL account and ChartFields assigned to the Transfer Control Distribution code must exist in this transfer from business unit. |
Selecting Rows and Controlling the Display
Field or Control |
Description |
|---|---|
Range Select |
Enter a range of items, such as items 4 to 7, to select multiple rows, and click Go. Note: If you select an item that is in use, you may receive an error message. A field on the Installation Options - Receivables page, No Mult Pending Item Selection, determines whether the system checks groups to verify that an unposted pending item exists for the item that you selected or that the item has been selected in another group. To verify where the item is in use, select Items in Other Groups using the Related Actions icon for the item. |
Display |
Select a value to limit the display of items in the list, such as All Items, Selected, or Unselected, and click Go. |
|
Click the Currency Conversion Panel icon to access the Currency Conversion page, where you select a display currency for the Conversion Amount - Currency column and specify whether to use today's date, the accounting date for the item, or a date that you specify to determine which exchange rate to use. |
Sort All |
Select an option to sort all the items in the worksheet, not just the items that appear in the scroll area. Sort items by due date or item ID. The page displays the selected rows that currently appear in the list. Click the arrows to view different chunks of data. For better performance, you can limit the number of rows that appear in the scroll area on the Installation Options - Receivables page. You should use a maximum chunk size of 100 rows, although larger chunks might perform satisfactorily. These fields and buttons are not available if the number of rows does not exceed the maximum chunk size. |

Note: Click the Customize link to sort by column, reorder columns, hide columns, and freeze columns. This enables you to place the key fields that you want to review on the Detail 1 tab and sort your data.
Selecting Items
Field or Control |
Description |
|---|---|
Remit Seq (remit sequence) |
This number relates to the order in which the items were entered on the Worksheet Selection page. Initially, the items appear in this order. If you sort the worksheet based on the value in another column, the number stays with the item, but the grid order changes. Use this column to sort the worksheet in the original order. |
Sel (select) |
Select the items to transfer. |
Add Item |
Click to add a new item to the worksheet and specify the business unit, customer ID, and item ID. Note: To add all of another customers' open items to the scroll, as opposed to a single item, click the Worksheet Selection link to add a customer ID to the customer reference and rebuild the worksheet. |
Beg Amount (beginning amount), Beg Count (beginning count), Rem Amount (remaining amount), Rem Count (remaining count), Sel Amount (selected amount), and Sel Count (selected count) |
Displays balance information, which is updated whenever you select an item and save or refresh the worksheet. |
Use the Transfer Worksheet - Worksheet2 page (TRN_WORKSHEET2) to review or modify information about the items that you are transferring.
Navigation:
Click the Build button on the Transfer Selection page.
This example illustrates the fields and controls on the Transfer Worksheet - Worksheet2 page. You can find definitions for the fields and controls later on this page.
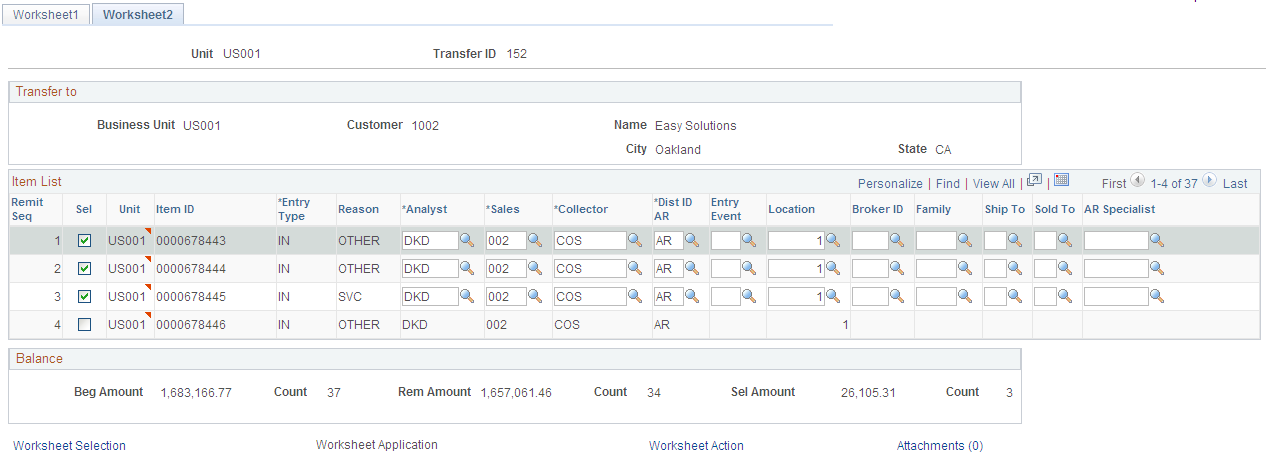
If you access this page to view details about a selected item, none of the fields appear highlighted. You can change the value of any of these fields for selected items if the transfer item requires different values.
If the system automatically opens this page, the worksheet has errors. The system automatically highlights the fields that you need to change. You must change the value of any highlighted field to a value for the To customer.
Field or Control |
Description |
|---|---|
Analyst, Sales, Collector, and AR Specialist |
If the To customer has different support personnel assigned, enter the code for the credit analyst, sales person, collector, or AR specialist. |
Dist ID AR (distribution ID receivables) |
Displays the receivables distribution ID. For non-doubtful transfers only, the AR distribution code is defaulted on the To Item as follows:
You can override the value if necessary. |
Family |
If the To customer is assigned to a different family of inventory items, enter the new family. |
Broker ID, Ship To, Sold To, or Location |
If the bill to customer for the from customer is associated with a different broker, ship to customer, location, or sold to customer from the to customer, enter the correct values for the to customer. |
Use the Finalize Transfer Worksheet page (TRN_ACTION) to select a posting action for a worksheet.
Also use this page to delete a worksheet, create accounting entries online for the worksheets, or delete accounting entries.
Navigation:
Field or Control |
Description |
|---|---|
Delete Worksheet |
Click to delete the entire worksheet, plus any accounting entries that were created for the worksheet. |
Delete Transfer Group |
Click to delete the accounting entries that you created, but leave the worksheet intact. |
Action |
Select a posting action for the group, and click OK to perform the action. Values are: Do Not Post: Saves the changes to the group, but no posting takes place. Use this option to change the posting option for a group set to Batch Priority or Batch Standard if the group has not been processed yet. Note: When you select Do Not Post, the Business Unit and the Customer fields become available for entry on the Post Now: Runs the Receivables Update process immediately. If the user enabled the notification feature, the system displays a message when the process finishes. Post Now to GL: Runs the Receivables Update process immediately and runs processes to create and post journals to the general ledger. If the user enabled the notification feature, the system displays a message when the process finishes. Batch Priority: Runs the Receivables Update process the next time a priority scheduled job runs or the next time a standard scheduled job runs if that occurs first. This option is not intended for large jobs. Batch Standard: Runs the next time a standard scheduled batch job runs. This may occur once a day depending on how often the organization schedules standard jobs. Note: The posting options that are available depend on the options that you select for the user on the Define User Preferences - Process Group page. Use the Post Now and Post Now to GL options only for small groups or when you have an immediate need to post the transaction. The system issues a message if another user or scheduled process is posting transactions for the same business unit and customer combination at the same time. Important! When you select the Post Now, Post Now to GL, Batch Priority, and Batch Standard values in the Action field, the Business Unit and Customer fields on the page are no longer available for entry. When you select the Do Not Post value, the Business Unit and Customer fields become available for entry on the Worksheet 1 page. |
OK |
Click if you selected Post Now or Post Now to GL to run the batch processes. |
Create/Review Entries |
Click to create or review accounting entries. Use this option only if you need to review the accounting entries before posting. |