Entering Regular Deposits
|
Page Name |
Definition Name |
Usage |
|---|---|---|
|
PAYMENT_DATA1 |
Enter regular deposit totals, including information and control totals for a new deposit. You can also delete a deposit. The Totals page is unavailable if the deposit has been reconciled with a bank statement. |
|
|
PAYMENT_DATA2 |
Enter details about each payment in a regular deposit. |
|
|
PAYMENT_REF_DETAIL |
Enter the items to which you are applying the payment. Also, create deductions, pay or write off all or part of an item, and create on-account payments or prepayments. |
|
|
PAYMENT_DATA3 |
Select an action to save the deposit or delete the deposit. |
|
|
DEPOSIT_STATUS |
View details about one specific deposit ID (including control totals and status) or scan all deposits, one at a time. |
|
|
DEPOSIT_INCOMPLETE |
View posted and unposted deposits that are not yet completely processed. You can see the payment amount for the deposit that is still in process, summarize out-of-balance deposits (only), or view the list of incomplete deposits by user. |
Use a regular deposit when you have customer information but lack item IDs. After you create the deposit, you must apply the payments using the payment worksheet or the Payment Predictor process.
You can change deposit information until one of these events occurs:
A payment in the deposit is applied or has a saved worksheet.
Accounting entries for directly journaled payments have been completed.
The Journal Generator Application Engine process (FS_JGEN) has processed cash control accounting entries.
Keyword Search
Keyword search allows you to execute a deeper, more free-form search, to access application data from the Payment Entry component.
See the product documentation for PeopleTools: Search Technology, Working with Search Pages, Working with Keyword Search modes.
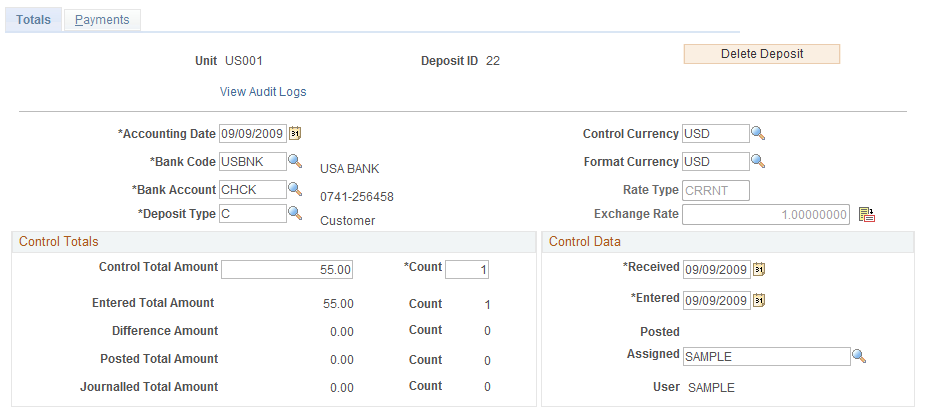
Use the Regular Deposit - Totals page (PAYMENT_DATA1) to enter regular deposit totals, including information and control totals for a new deposit.
You can also delete a deposit. The Totals page is unavailable if the deposit has been reconciled with a bank statement.
Navigation:
This example illustrates the fields and controls on the Regular Deposit - Totals page. You can find definitions for the fields and controls later on this page.
Field or Control |
Description |
|---|---|
Accounting Date |
Enter the accounting date for each payment and for all pending items created from the payment. You can override the date on the Regular Deposit - Payments page. The system validates the accounting date to make sure it falls within the open period for the business unit and transaction type as defined on the Open Period page for the business unit. |
IBAN |
Displays the international bank account number (IBAN) in addition to the local, domestic bank account number when the country has been set up to display the IBAN on the IBAN Formats Page. |
Deposit Type |
Displays the default deposit type for the bank account that you defined on the External Accounts - Account Information page. Override the value if needed. |
Control Currency |
Enter a currency code if the same currency is used for all of the payments. Note: Specifying a control currency at the deposit level is optional. If you enter currency at this level, all payments in the deposit must then have this same currency. To take advantage of multicurrency processing, leave control currency blank and specify currency at the payment level. The next page in this component, Payments, enables you to enter a different currency for each payment in the deposit. |
Format Currency |
Select the display currency. |
Rate Type and Exchange Rate |
If you enter a control currency, you can adjust these fields as needed. The market rate is used when items are selected for the payment; use of this rate may result in a remaining amount on the payment that must be addressed to balance the payment. The user-defined rate is used only when a cash line is created, and a realized gain and loss line can be created during posting. Realized gain and loss calculations are not affected by changing the rate type or exchange rate on the deposit or payment pages. The appropriate way to change the exchange rate for the realized gain and loss calculations is to change the market rate. The exception to this is when the base currencies of the item and payment are the same and when the entry currencies of the item and payment are the same. |
|
Click the Exchange Rate Detail icon to access a page where you can view or modify the exchange rate. |
Control Total Amount |
Enter the control totals for the amount and count of the payments in this deposit. You can have a zero-total deposit if the payment amounts offset each other. |
Entered Total Amount and Difference Amount |
These fields display the amount and count of the payments that you have entered and the difference between the payments entered and the control totals. If the control and entered totals and count are not the same, you cannot apply any of the payments. Balancing these control totals is a necessary first step in payment application. |
Posted Total Amount and Journalled Total Amount |
These fields display the amount and count of payments that are applied and posted, or directly journaled. |
Received and Entered |
Enter the date when either the bank or your company received the payment. Because of normal processing delays, this date may be different from the entered date. |
User |
Displays the user ID of the individual assigned to the deposit. If you received an electronic deposit, the Payment Loader process (AR_PAYLOAD) assigns the user ID of the individual who created the run control ID for the process. If another user modifies the deposit in the Regular Deposit component (PAYMENT_ENTRY), the system automatically changes the user ID to that person's user ID. |

Use the Regular Deposit - Payments page (PAYMENT_DATA2) to enter details about each payment in a regular deposit.
Navigation:
This example illustrates the fields and controls on the Regular Deposit - Payments page. You can find definitions for the fields and controls later on this page.
The more information that you can provide on this page, the easier it will be to work with the payment worksheet.
Field or Control |
Description |
|---|---|
Balance |
Displays the status for the deposit. When the amount total and number of entered payments equals the control amount and count from the Regular Deposit - Totals page, the status changes from Not Balanced to Balanced. The total amount of all the payments in the deposit must match the control totals on the Regular Deposit - Totals page before you can create a payment worksheet. |
Payment Information
You cannot update payment information for a deposit that has been reconciled with a bank statement.
Field or Control |
Description |
|---|---|
Seq (sequence) |
Displays the sequence number for each payment. When you enter a payment ID, the system assigns the next number to the payment so that you can track the order in which payments are entered. |
Payment ID |
Enter the check number or other identifying number. |
Accounting Date |
Displays the payment date, using the accounting date on the Totals page as the default. The system validates the payment date to make sure that the date falls within the open period for the business unit and transaction type as defined on the Open Periods page for the business unit. The payment date may be different from the deposit date if you use the postmark date from checks. The payment date affects earned discounts, so it needs to be accurate. |
Amount |
Enter the amount for this payment. |
Payment Predictor |
Select to use the Payment Predictor process to apply this payment. The bank account governs the default setting for this check box. If a worksheet already exists for this payment, this check box is unavailable. Note: If you receive payments for vendor rebate claims or claimback items from PeopleSoft Purchasing or PeopleSoft Order Management, you do not select this option. You must manually apply the payments on the payment worksheet to indicate the base and value-added tax (VAT) amounts for each item. |
Journal Directly |
Select if a payment should be handled as miscellaneous cash received rather than applied to items. Payments to be directly journaled cannot be processed in payment worksheets and do not go through the Receivables Update process. |
Range of References |
Select to identify an item by a range of numbers. Enter reference values in the Reference Information group box. |
Payment Method |
Select Check, Electronic Funds Transfer, or Giro - EFT. Use Giro - EFT in the Netherlands if you print invoices, statements, or dunning letters with the acceptgiro attachment and the payment is for one of these bills. The system populates this field in the following way:
If the payment method is Cash, the deposit was entered as a cash drawer receipt for a counter sale. In this case, all payments in the deposit are cash payments, and you cannot change the payment method. Also, you cannot add any payments to the deposit. The only information you can change for cash payments is the reference information. Note: If you enter deposits online, the cash payment method is not available. |
|
Attachments |
Click to view/ add attachments. See Installation Options - Multiple Attachments Page to define the maximum attachment upload limit for various products. |
Apply Payment |
Click to create a payment worksheet or apply a direct journal payment, depending on the type of payment. The payment must be ready to apply after the deposit is balanced for the link to be available on the page. If the deposit is unbalanced or Payment Predictor is selected, or after the payment has been applied, the Apply Payment link is not available. |
Receipts |
Click this link to open the Receipts page (PAY_RECEIPT_AR) where you can enter receipt information for the payment and print a miscellaneous cash receipt. The link is available only when the Deposit Type is M (Miscellaneous Receipts) on the Totals page for the deposit. |
Customer Information
Customer information is optional. However, the more information that you can provide, the easier using the payment worksheet is.
Field or Control |
Description |
|---|---|
Customer ID and MICR ID (magnetic ink character recognition ID) |
Enter a customer ID or a MICR ID to identify a customer. The system then automatically displays other information about the customer. Note: If you selected the Track Direct Journal Customer check box on the Installation Options - Receivables page, the Cust ID field is available for direct journal payments so that you can associate a customer with the payment. The payment does not update the customer balance. This enables you to use the Direct Journal inquiry page to review all direct journal payments for a customer. The field is available for all normal payments. |
SubCustomer 1 and SubCustomer 2 |
Displays the default subcustomer qualifiers for the customer that you entered on the Miscellaneous General Info page. Override the values if needed. You use the subcustomer qualifiers as filter criteria for payments on some inquiry pages. If subcustomer qualifiers are not enabled for the customer, these fields are not available. |
Link MICR (link magnetic ink character recognition) |
Click to access a page where you can link the MICR ID to the remit from customer. If you enter a MICR ID that has not been associated with a customer, no customer information appears. |
Attachments |
Click this link to view file attachments. See also Defining File Attachments. |
View Audit Logs |
Click link to search for audit logs for this payment and deposit. |
Reference Information
Enter information that ties this payment to specific items. You can use part of the name plus a wildcard of % as long as you provide the beginning letters or numbers. For example, enter a purchase order (PO) number of 24% here and later use the Like Match option on the Worksheet Selection page. The worksheet will contain all items having PO numbers beginning with 24, but will not include a PO number of x24x.
Field or Control |
Description |
|---|---|
Qual Code (qualifier code) |
Select the type of reference information to use to identify the items, such as document, purchase order, or bills of lading. Note: When the qualifier code is PV for Public Voucher Number, the system first identifies the items by finding the invoices in the Billing header table (BI_HRD) that match the specified Public Voucher Number. Next, the system matches the items in the ITEM table with invoices that have the same invoice number. |
Reference (reference value) and To Reference (to reference value) |
Enter a reference number to identify an item, or enter a range of reference numbers. To enter a range, select the Range of References check box in the Payment Information scroll area. The value in the To Reference Value field must always be greater than the value in the Reference field. Note: The references (#REFS) Payment Predictor algorithm group does not support a range of references. To use a range of references for a particular payment and have the Payment Predictor process apply that payment, create algorithms specifically for your environment or database platform. |
Detail References |
Click to open the Detail Reference Information page, where you create deductions, pay or write off all or part of an item, and create on-account payments or prepayments. This page functions like a worksheet; it enables you to list the items to which you are applying the payment and enter the appropriate entry type for each item. |
Add Conversation |
Click this link to access the Conversations page, where you can add a new conversation. The SetID, Business Unit, and Customer ID fields are populated based on the selected customer. You can add new conversation entries by clicking the Add Conversation Entry button on the Conversation page. The Add Conversation link appears on the Regular Deposits - Payments page for a single active customer or multiple customers in a payment irrespective of status (active or inactive), whether conversations exist or do not exist. The Add Conversation link does notappear on this page for a single inactive customer. It also does not appear when the payment is defined as a direct journaled payment. |
View/Update Conversations |
Click this link to access the Conversations page, where you can view and update existing conversations for the customer. If there are multiple conversations for the customer, you can select the conversation you want to view or update on the View/Update Conversations search page. You can also add, delete, or edit existing conversation entries on the Conversations page. The View/Update Conversations link appears on this page for a single active customer with existing conversations, and for multiple customers in a payment, irrespective of status (active or inactive) and whether conversations exist or do not exist. The View/Update Conversations link does not appear on this page for a single active customer with no conversations or for a single inactive customer in a payment. It also does not appear when the payment is defined as a direct journaled payment. |
Use the Detail Reference Information page (PAYMENT_REF_DETAIL) to enter the items to which you are applying the payment.
Also, create deductions, pay or write off all or part of an item, and create on-account payments or prepayments.
Navigation:
Click the Detail References link on the Regular Deposit - Payments page.
The Detail Reference Information page for a regular deposit is similar to the Detail Reference Information page for the payment worksheet.
A deposit is out of balance when the number of entered payments does not match the control number, or the total amount of entered payments does not equal the deposit control amount. You can see that a deposit is out of balance because the Not Balanced message appears on the regular deposit entry pages. Another indication of an out-of-balance deposit is that the Worksheet Selection page is unavailable when you try to build a worksheet for a payment in the deposit.
To correct errors on regular deposits:
Adjust regular deposit totals.
Adjust payment information.
Delete a deposit.
The pages that you use to correct regular deposit balancing errors are identical to those that you use to enter regular deposits. However, the navigation is different. You use the Regular Deposit Balancing component (BALANCING) to correct balancing errors.
The pages work the same as when you enter deposits and payments, but only out-of-balance deposits are available for you to select. When you use pages for balancing errors, you can change any of the information associated with a deposit or payment.
Use the Regular Deposit Balancing - Action page (PAYMENT_DATA3) to select an action to save the deposit or delete the deposit.
Navigation:
Click the Delete Depositbutton to delete a deposit.
Use the All Deposits page (DEPOSIT_STATUS) to view details about one specific deposit ID (including control totals and status) or scan all deposits, one at a time.
Navigation:
Field or Control |
Description |
|---|---|
IBAN |
Displays the international bank account number (IBAN) in addition to the local, domestic bank account number when the country has been set up to display the IBAN on the IBAN Formats Page. |
Use the Incomplete Deposits page (DEPOSIT_INCOMPLETE) to view posted and unposted deposits that are not yet completely processed.
You can see the payment amount for the deposit that is still in process, summarize out-of-balance deposits (only), or view the list of incomplete deposits by user.
Navigation: