Creating Credit Card Payments Using the Credit Card Worksheet
|
Page Name |
Definition Name |
Usage |
|---|---|---|
|
PAYMENT_IDENT_IC |
Create a new worksheet, modify an existing one, and select items to include in the worksheet. |
|
|
Change Deposit Unit Page |
AR_CHANGEBU_SEC |
Change the deposit unit for the credit card worksheet. See the Credit Card Worksheet Selection Page. |
|
Credit Card Details Page |
AR_CRCARD_DETAILS |
View or modify the customer's credit card details and settle a credit card transaction. See the Credit Card Worksheet Selection Page. |
|
Exchange Rate Detail Page |
AR_EXCH_RT_DTL |
View or modify the exchange rate. See the Credit Card Worksheet Selection Page. |
|
Document Sequence Page |
AR_DOC_SEQ_SEC |
Enter a document sequence number if the document type is set up for manual numbering. Also, change the document type for document sequencing. See the Credit Card Worksheet Selection Page. |
|
Detail Reference Information Page |
PAYMENT_REF_DET2 |
Create deductions, pay or write off all or part of an item, and create on-account or prepayments without first building the worksheet. See the Credit Card Worksheet Selection Page. |
|
Items NOT open on ITEM table Page |
PAYMENT_REF_DET3 |
Display items that are not open in the Item table (PS_ITEM). List items that are selected on the Detail Reference page but were already paid or do not exist in the Item table to determine whether to delete items on the Detail Reference Information page. See the Credit Card Worksheet Selection Page. |
|
Filter Items Page |
WS_ITEMSRCH_SEC |
Enter advanced selection criteria for items to include in the worksheet. See the Credit Card Worksheet Selection Page. |
|
PAYMENT_WS_IC |
Select items for payment by credit card. |
|
|
Currency Conversion Page |
EU_CUR_CNV_WS_SEC |
Select the currency code, rate, and date of conversion for the display currency on the worksheet. The values you enter determine the currency and amount for the Conversion Amount - Currency field. |
|
PAYMENT_WS_IC_DTL |
View or update details about a selected item on a worksheet or copy, write off, or edit items. |
|
|
Currency Exchange Aid Page |
CURR_EXCHG_AID_SEC |
Use as an aid in converting the payment amount to the currency of a selected item making a partial payment. |
|
VAT Header Page |
PAYM_ITEM_VAT_HDR |
View VAT header defaults, and manually override values, if applicable. |
|
VAT Detail Page |
PAYM_ITEM_VAT_LN |
View VAT line defaults, including VAT amounts. Manually override values if applicable. If the VAT declaration is at the accounting date, then the user cannot modify it. |
|
Item Activity Detail Page |
ITEM_ACTIVITY_DRILL |
View all activities for an item. |
|
Item in Other Groups Page |
ITEM_PGROUP_SEC |
View other worksheet groups that have the selected item or any pending item groups that are not posted that have the item. |
|
Additional Customer Information Page |
CUST_INFO_SEC |
View additional customer information. |
|
PAYMENT_ACTION_IC |
Select posting options for the payment applied on the credit card worksheet, including entry events. |
Credit card worksheets enable you to select existing PeopleSoft Receivables items and pay them by credit card. Credit card worksheets are created during credit card batch processing, when items are paid by credit card from inquiries and when they are built directly through the credit card worksheet pages.
Credit card worksheets populate the same tables as payment worksheets.
The credit card worksheet components behave differently depending on whether or not the credit card payment has been authorized and settled. Before settlement, use the credit card worksheet to select items that make up the amount to be authorized and settled. After the credit card payment has been settled, unposting the payment enables you to use the credit card worksheet to apply the payment to items in the same way you would use a payment worksheet.
Working with a credit card worksheet consists of these high-level steps:
Use the Credit Card Worksheet Selection page to select the items that you want to work with and build the worksheet.
If you add items to an existing worksheet, the system adds the new items that you selected and does not delete any selected items that are already on the worksheet.
Use the Credit Card Worksheet Application page to select items to pay by credit card.
Use the Credit Card Worksheet Action page to select a posting action for the worksheet or to create accounting entries online.
You can also delete the worksheet, that is, remove the items from the worksheet, or you can save your work and complete the worksheet later.
Enabled Write-Off Functionality on the Credit Card Worksheet
If you enable Write Off (WO) in the system and the credit card worksheet contains line amounts with a Payment Type of PY (payment) and one with WO (write off) and the write off requires approval, then this enables the Submit to Workflow link on the Action page and disables the Pay by Credit Card link. Once the write off is approved, this enables the Pay by Credit Card link on the Action page and disables the Posting Action field. After the credit card is settled, this enables the Posting Action field.
If you enable Write Off (WO) in the system and the credit card worksheet contains a line amount with the Payment Type of PY and no write off amount, this enables the Pay by Credit Card Link field on the Action page and disables the Posting Action field. Once the credit card is settled, this enables the Posting Action field.
This documentation discusses how to:
Build a credit card worksheet.
Use the credit card worksheet to select items to pay by credit card.
View and update item details.
Select a credit card worksheet action.
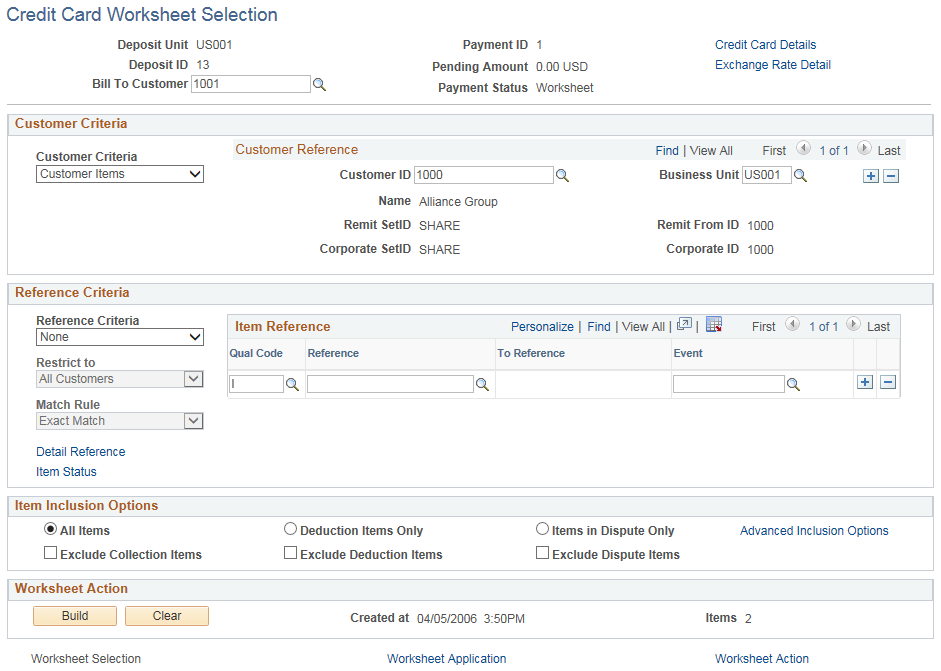
Use the Credit Card Worksheet Selection page (PAYMENT_IDENT_IC) to create a new worksheet, modify an existing one, and select items to include in the worksheet.
Navigation:
This example illustrates the fields and controls on the Credit Card Worksheet Selection page. You can find definitions for the fields and controls later on this page.
Field or Control |
Description |
|---|---|
Change Unit |
Click to change the deposit unit. This button is only visible if no payment items exist. |
Credit Card Details |
Click to access the Credit Card Details page. |
Exchange Rate Detail |
Click to access the Exchange Rate Detail page. You can change this information if no payment items exist and the currencies are different. |
Customer Criteria and Reference Criteria
The information that you enter about customers and items determines the information that appears on the worksheet. The more information you provide, the more focused your worksheet will be. For example:
If you enter only customer information, the worksheet will list all open items for the customer.
If you enter only item information, the worksheet will list all open items that match your item criteria for all customers.
If you enter both customer and item information, the worksheet will list all the open items that match the customer and item criteria that you select.
Note: If you enter no customer or item information, the system will create a blank worksheet.
Customer Criteria
Field or Control |
Description |
|---|---|
Customer Criteria |
Select the type of customer that you want to include in the worksheet from these values: Corporate Items, Customer Items, or Remit From Items. If you select None, the system creates a worksheet based on other selection criteria, and it does not limit items to specific customers. You can also select None and enter a customer ID and business unit. In this case, the system uses the customer reference criteria in conjunction with the item reference criteria to select only items that match both criteria. |
Customer ID and Business Unit |
Enter the customer ID and business unit. Note: If you select Corporate Items or Remit From Items in the Customer Criteria field, you must enter a business unit. The system needs a business unit to determine the SetID of corporate customers and remit-from customers. The resulting worksheet displays all open items with the specified corporate or remit-from customer across all business units, not just the business unit that you select. |
Reference Criteria
Field or Control |
Description |
|---|---|
Reference Criteria |
Specify whether you will use a Specific Value, None, or a Range of References. If you select either Range of References or Specific Value, you enter information in the Item Reference fields. If you click the Detail Reference link to enter reference information, the Reference Criteria field displays Detailed References. |
Restrict to |
Select to qualify items by customer. Values are All Customers, Corporate Cust Only, Customer Only, and Remit Cust Only. |
Match Rule |
If you select Specific Value in the Reference Criteria field, specify whether the item information is an Exact Match or a Like Match. A Like Match enables you to use a percent (%) wildcard to identify the reference, as long as you provide the beginning letters or numbers. For example, if you enter a purchase order number of 24% and select Like Match, the worksheet will contain all items with purchase order numbers beginning with 24xx, but it will not include a purchase order number of x24x. Note: Like Match is not available for reference qualifiers that equate to numeric fields, such as statement IDs, and accept giro numbers. |
Reference and To Reference |
Enter one of the following:
|
Qual Code (qualifier code) |
Enter the type of reference, such as documents, items, purchase orders, or any other criteria that you set up on the Reference Qualifier page. |
Detail Reference |
Click to access the Detail Reference Information page, where you enter a list of items to which you are applying the credit card payment. This page works like a worksheet, enabling you to enter items quickly and specify the payment amount and enter some of the available entry types for processing the items. |
Item Inclusion Options
Field or Control |
Description |
|---|---|
All Items , Deduction Items Only, or Items in Dispute Only |
Select one of these options to indicate the type of items to include in the worksheet. |
Exclude Deduction Items, Exclude Collection Items , and Exclude Dispute Items |
If you select All Items, you can also select one or more of the check boxes to exclude collection, deduction, and dispute items. |
Advanced Inclusion Options |
Click this link to access the Filter Items secondary page (WS_ITEMSRCH_SEC), where you can create, edit, and save selection criteria for items to include in the worksheet. You can filter items using values in the following categories:
|
Worksheet Action
Field or Control |
Description |
|---|---|
Build |
Click to create a new worksheet or to add items meeting your selection criteria to an existing worksheet. |
Clear |
Click to remove all items from an existing worksheet. |
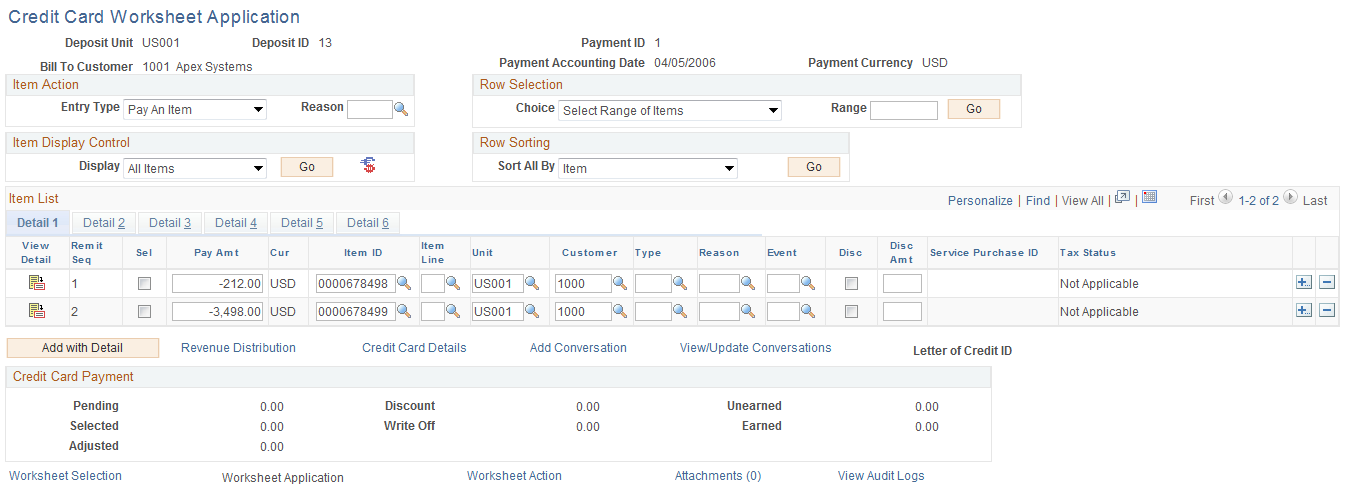
Use the Credit Card Worksheet Application page (PAYMENT_WS_IC) to select items for payment by credit card.
Navigation:
This example illustrates the fields and controls on the Credit Card Worksheet Application page. You can find definitions for the fields and controls later on this page.
To use the credit card worksheet, follow these high-level steps:
Use the item display or sort controls to adjust the view.
Select the items to pay.
Manage underpayments and discounts.
Overpayments are not allowed on credit card worksheets that have not been authorized and settled.
Check the information in the Credit Card Paymentgroup box to verify the amount of the credit card payment based on the selected items.
Field or Control |
Description |
|---|---|
Payment Accounting Date |
Displays the accounting date for the payment activity. |
Item Action
The Item Action group box enables you to select a specific entry type and entry reason to apply to the items that appear in the Item List grid.
Field or Control |
Description |
|---|---|
Entry Type and Reason |
Select the entry type for the activity that you want to perform for the selected items. You must enter a valid entry reason in the Reason field if you specified that entry reasons are required when you set up the entry type that you entered in the Entry Type field. Note: If you select an item that is in use, you get an error message. To see where the item is used, select Items in Other Groups on the Worksheet Application Detail View page for the item. |
Row Selection
Use the Row Selection group box fields to determine whether the Sel (select) check box is selected or not selected in the Item Display grid based on a selected Choice.
Field or Control |
Description |
|---|---|
Choice |
Select one of these values to select or deselect the Sel (select) check box for the rows that appear in the Item List grid.
|
Go |
Click this button to apply your selection to the Item List grid and to update worksheet balances. |
Item Display Control
Use the fields in the Item Display Control group box to adjust the view and contents of the Item List grid.
Field or Control |
Description |
|---|---|
Display |
Select one of these values to display all of the items in the Item List grid or to modify the appearance of items in the Item List grid:
|
Go |
Click to refresh the list of items in the grid. |
|
Click the Display Currency Conversion Worksheet icon to access the Currency Conversion page, where you select a display currency for the Conversion Amount - Currency column and specify whether to use today's date, the accounting date for the item, or a date that you specify to determine the exchange rate to use. |

Row Sorting
Use the Row Sorting group box to sort the rows that appear in the Item List grid based on the value that you specify. This feature sorts all items in the worksheet, not just the items that appear in the scroll area.
Click the arrows to view different chunks of data. For better performance, you can limit the number of rows that appear in the scroll area on the Installation Options - Receivables page. Oracle recommends a maximum chunk size of 100 rows, although larger chunks may perform satisfactorily.
Field or Control |
Description |
|---|---|
Sort All By |
Click the drop-down arrow to select one of these sort values:
|
Item Summary Information
Use the Customize link to sort by column and to reorder, hide, and freeze columns. This functionality enables you to put the key fields that you want to review on the Detail 1 tab and sort your data.
The Item List summary information detail tabs are identical to the Item List grid summary information detail tabs described in the topics about applying payments.
See Reviewing Item List Detail 1 Summary Information.
Field or Control |
Description |
|---|---|
|
Click the View Detail icon to view or update details for a selected item on a worksheet and to copy or write off the item. |
Add with Detail |
Click to add an item to handle underpayments and write-offs. If a new item was created in error, clear the item by clearing the Sel (select) column or delete the item. |
Revenue Distribution |
Click to manually distribute amounts for control budgets across multiple revenue lines if you are making a partial payment. This link is available only if you have enabled commitment control processing and you have enabled input of multiple revenue lines for the business unit. |
Credit Card Details |
Click this link to access the Credit Card Details page. |
Add Conversation |
Click this link to access and add a new conversation or update a conversation to associate with this payment. |
View/Update Conversations |
Click this link to view or update an existing conversation. |

Reviewing Credit Card Payment or Balance Information
As you select open items, you need to check the information in the Credit Card Payment group box. The system updates the amounts whenever you click the Refresh button.
The Credit Card Payment group box is renamed to Balance after you authorize and settle the credit card transaction. The region then behaves in the same manner as the Balance region of the Payment worksheet.
Handling Exact Payments
Select items that you want to pay for by credit card. If a customer has no items in the worksheet, you can still put a payment on account or treat it as a prepayment.
Handling Underpayments
To create an underpayment, do one of the following:
Treat the entire amount as a partial payment against an item, and then change the amount for the item to the amount of the credit card payment.
Pay off the item and create an adjustment or a deduction item for the difference between the item amount and the payment amount by creating a new item and entering a positive amount for the difference.
For deductions, enter the item ID of the paid item as the document ID for the new deduction on the Worksheet Application Detail View page. This action ties the purchase order number, bill of lading, and document information for the referenced item to the new deduction. Regular deductions create new items in the system. The Deduction Due Date field on the Receivables Options - Payment Options page, enables you to determine whether the due date of the new item is the payment accounting date or the due date of an existing item. If you specify that the due date is from an existing item, you must enter the item ID of the existing item as the document ID on the Worksheet Application Detail View page. After the Receivables Update process runs, the new deduction appears in the system.
Place the entire amount on account (without referencing any items) by creating a new item and entering a negative amount for the amount of the payment.
Do not use the same item ID for the on account item as an existing item. If you want the on account item to be associated with an existing item, either add a prefix or suffix to the ID, or use the same item ID with a different line number.
Partially pay for an item and write off the remaining item balance by selecting the split item and changing the entry type to WO.
Important! If the item is a rebate claim that originated in PeopleSoft Purchasing or a claimback that originated in PeopleSoft Order Management, do not write off the remaining balance. Use the Claims Management Workbench in PeopleSoft Purchasing or PeopleSoft Order Management to handle write-offs so that the system can determine whether the write-offs meet the write-off tolerances for claim processing.
Use the Worksheet Application Detail View page (PAYMENT_WS_IC_DTL) to view or update details about a selected item on a worksheet or copy, write off, or edit items.
Navigation:
Click the View Detail button on the Credit Card Worksheet Application page.
This example illustrates the fields and controls on the Worksheet Application Detail View page. You can find definitions for the fields and controls later on this page.
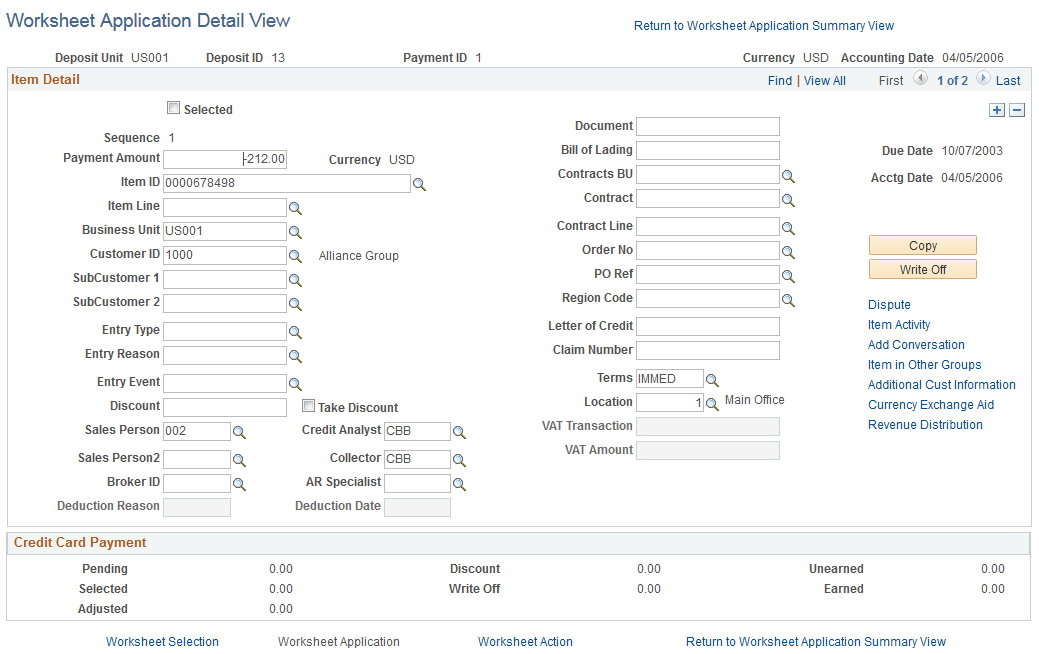
View item details to identify an item or change the details.
Field or Control |
Description |
|---|---|
Deduction Reason |
If you are creating a new deduction, enter the reason why the customer took the deduction. You define reason codes on the Deduction Reason page. |
AR Specialist (accounts receivable specialist) |
The system populates the AR Specialist field for deduction items based on the default specialist that you assigned to the business unit. If you overrode the default specialist for the deduction reason or customer, the system uses that value. |
Document |
If you enter a value that matches an existing item ID, the system automatically populates the Bill of Lading, Order No (order number), PO Ref (purchase order reference), Contract # (contract number), Letter of Credit ID, and Due Date fields with the value for the existing item when you save or refresh the page. If you receive different information for these fields with the payment, override those values. If you are creating a payment for a vendor rebate claim item or claimback item that you interfaced from PeopleSoft Purchasing or PeopleSoft Order Management, you must enter a reference ID. When you run the Rebate Notification process, it sends the reference ID to PeopleSoft Purchasing and PeopleSoft Order Management for use in reconciling the claims on the claims management workbench. This field is available for entering existing items only if you enter entry reasons on the AR Integration page. |
Location |
Enter the address sequence number for new items. You must enter a value in this field to include the item in correspondence if you selected the Item Address option for the correspondence customer on the Correspondence Options page. |
Copy |
Click to copy the item and add a new row to the worksheet. You must add the amount and entry type to the new row. |
Write Off |
For a new item, click to write off an underpayment amount. |
Dispute |
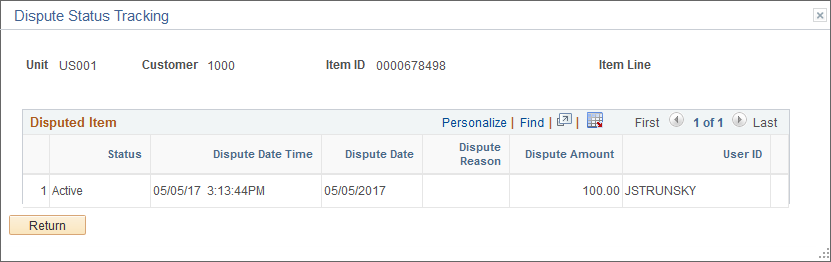
Click to access the Dispute Status Tracking page and view dispute status information for an item. This link appears only when dispute tracking data exists for the item. |
Note: To save your changes on this page, return to the Worksheet Application page.
Dispute Status Tracking Page
Use the Dispute Status Tracking page (ITEM_DISP_T) to view dispute status information for an item.
This example illustrates the fields and controls on the Dispute Status Tracking page.
Use the Credit Card Worksheet Action page (PAYMENT_ACTION_IC) to select posting options for the payment applied on the credit card worksheet, including entry events.
Navigation:
Click the Worksheet Action link on the Credit Card Worksheet Selection page or the Worksheet Application page.
Field or Control |
Description |
|---|---|
Delete Worksheet |
Click to delete the entire worksheet, plus any accounting entries created for the worksheet. If the associated credit card transaction has not been settled, the entire payment is deleted, releasing any items selected on the worksheet. If the associated credit card transaction has been settled, the payment is not deleted, but items selected on the worksheet are released. The settled payment must be unposted before the Delete Worksheet button becomes available. |
Delete Payment Group |
Click to delete the accounting entries that you create but leave the worksheet intact. |
Pay by Credit Card |
Click to access the Credit Card Details page to begin credit card processing. |
Action |
Select a posting action for the group and click OK to execute the action. Note: The posting options that are available depend on the options that you select for the user on the Define User Preferences - Process Group page. Use the Post Now and Post Now to GL options only for small groups or when the transaction must be posted immediately. The system issues a message if another user or scheduled process is posting transactions for the same business unit and customer combination at the same time. |
Create/Review Entries |
Click to create or review accounting entries. Use this option only if you need to review or modify the accounting entries. Otherwise, use one of the posting actions to create the accounting entries. |
Note: If the worksheet does not have a zero balance but you need to stop working with the worksheet, save your work and select Do Not Post for the posting action.