Adjusting Cost and Transferring Assets
This topic provides an overview of cost adjustments and asset transfers.
|
Page Name |
Definition Name |
Usage |
|---|---|---|
|
ASSET_COST_01 |
Identify the cost/adjust/transfer transaction that you want to perform. |
|
|
ASSET_COST_01A |
Enter or adjust cost information that is required by the transaction that you initiated from the Main Transaction page. |
|
|
Asset Location Transfer Page |
ASSET_COST_02_S2 |
Change the location for an asset. |
|
Asset Cost IU Transfer Page |
ASSET_COST_02 |
Select the asset information that you want transferred with the asset. The link appears on the page only after you select Fixed Price MarkUp as the action on the Main Transaction page. |
|
ASSET_COST_02_S1 |
Specify how cost information for the transfer will be passed between business books. This link appears when you have selected InterUnit Transfer as the action on the Main Transaction page and when you have entered the business unit to transfer to. |
|
|
N/A |
Apply a markup or markdown to the asset that you are transferring. |
|
|
CHILD_ASSETS |
Select child assets to include in the transfer or recategorization that you have initiated against the parent assets. |
|
|
AM_PARCHD_TRF_RCT |
Specify transaction overrides for a specific child asset. You can specify specific convention, quantity, cost, transaction percentage, transaction date and accounting date for the child asset on this page. |
|
|
FULL_PART_SEC |
Specify transaction overrides for all child assets at once. |
|
|
ASSET_PROFILE_SEC |
Enter a new asset reporting profile ID when you recategorize an asset. |
To adjust cost and transfer assets:
Select the type of transaction, enter accounting and transaction dates, and specify the transaction data that is required to update the general ledger.
Make the actual adjustments or cost entries.
Select some, none, or all child assets to include in the transaction that you are performing. The Child Assets page appears only when the asset you are transacting against is a parent asset and the transaction type is a transfer. A separate Application Engine process is provided for transferring parent-child assets between business units.
Note: Adjustments to parents do not automatically filter down to the child assets; therefore, the Child Asset page does not appear for adjustments. Instead, add another child asset. A reminder message will appear stating that child assets are associated with the parent asset that you are adjusting.
Use the Pending Transaction page for workflow processing.
If you have changed information in a book that posts to your general ledger, PeopleSoft Asset Management generates the appropriate accounting entries when you run Create Accounting Entries (AM_AMAEDIST) or Depreciation Close (AM_DPCLOSE). The asset account is updated when you generate and post the journal entries.
Note: Financial transactions cannot be performed on the Lease Administration Lease Assets through Asset Management.
When transferring an asset from one federal fund to another, Treasury rules require that you generate the appropriate federal funds transfer accounting entries as documented in the United States Standard General Ledger (USSGL) transactions E510 and E606.
Public Law 101-5101 requires that upon cancellation of a Treasury Appropriation Fund Symbol (TAFS), any collectible account receivable is re-established in a miscellaneous receipt account. Upon collection, the funds are deposited to Treasury miscellaneous receipt account ‘3200’ – Collections of Receivables from Canceled Accounts. The cancelled fund should no longer be transacted against or posted to the General Ledger per Federal regulations. However, assets can be transferred from the purchasing fund into a non-cancelling fund that is available for the same general purpose but still in the unexpired phase. Thus, when you transfer assets to/from a Federal fund, you must generate accounting entries for USSGL E510 and E606 in Asset Management as follows:
|
Federal Funds Transfer Out |
Federal Funds Transfer In |
||
|---|---|---|---|
|
DR |
5730 |
DR |
Asset Account |
|
CR |
Asset Account |
CR |
5720 |
The following table indicates when a Federal funds transfer account should be used:
|
From Fund |
To Fund |
Federal Funds Transfer Out Account Used |
Federal Funds Transfer In Account Used |
|---|---|---|---|
|
Federal |
Federal |
Yes |
Yes |
|
Federal |
Non-Federal |
Yes |
No |
|
Non-Federal |
Federal |
No |
Yes |
|
Non-Federal |
Non-Federal |
No |
No |
To set up and process Federal funds transfers:
Use the Installation Options - Asset Management page to create a Federal fund attribute, which will be used to set up chartfield attributes on the ChartField Attribute page and specify whether a fund is Federal.
Use the ChartField Attribute page to set up Federal fund indicators.
Use the ChartField Values - ChartField Attributes page to attach the Federal fund attribute to a fund.
On the Accounting Entry Template IDs page, select the Federal Fund check box to enable Federal funds transfer distribution types on the Accounting Entry Templates page.
Use the Accounting Entry Templates page to associate accounts with the Federal Fund Transfer accounting entry.
Use the Main Transaction page to transfer the asset.
Use the Create Accounting Entries run control page to generate accounting entries from the Federal Fund Transfer accounting entries.
The following is an example of generated Federal fund transfer accounting entries as viewed from the Review Financial Entries page:
Example of generated Federal fund transfer accounting entries
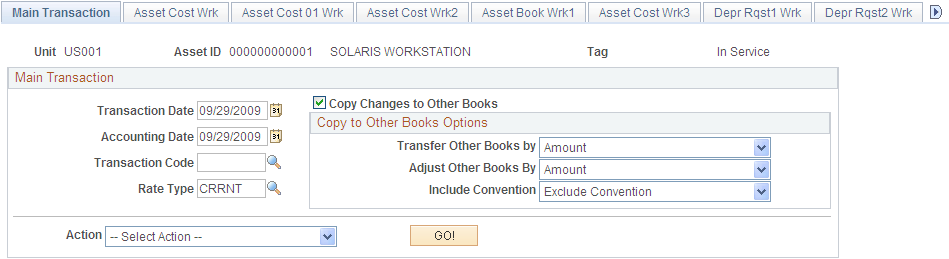
Use the Main Transaction page (ASSET_COST_01) to identify the cost/adjust/transfer transaction that you want to perform.
Navigation:
This example illustrates the fields and controls on the Main Transaction page. You can find definitions for the fields and controls later on this page.
Field or Control |
Description |
|---|---|
Transaction Date and Accounting Date |
Displays the current date or the dates that are specified as operator defaults. As a rule, transactions are entered in PeopleSoft Asset Management some time after they have occurred. Any difference between accounting and transaction dates will affect depreciation as well as posting. |
Transaction Code |
(Optional) Select a code to help identify which accounting entry template to use for this transaction. |
Rate Type |
Enter the currency exchange rate type to use for this transaction. |
Copy Changes to Other Books |
Select to copy the changes that you make to other books. |
Transfer Other Books by |
Select to transfer the changes that you make to other books by Amount or Percent. |
Adjust Other Books by |
Select to adjust the other books by Amount or Percent. Select Percent to transfer a percentage of the amount from subsequent books. For example, suppose you have an asset with two books, Corporate and Federal. The cost amount for Corporate is 5000.00 USD and is 4000.00 USD for Federal. If you transfer 2500.00 USD from the Corporate book, select Copy Changes to Other Books, and then specify the Percent option. 2500.00 USD will be transferred from the Corporate book and 2000.00 USD will be transferred from the Federal book. If you select Amount, a transfer of 2500.00 USD from both books will occur. If you have a multicurrency business unit, the Amount option will be overridden by Percent when you transfer or recategorize an asset. Note: If you do not select the Copy Changes to Other Books option, when the book that you are changing is associated with a ledger group that contains multiple ledgers, and the Keep Ledgers In Synccheck box is selected for the ledger group, changes will be copied to other books that associated with the same ledger. |
Include Convention |
The options are to Exclude or Include a depreciation convention. The depreciation convention automatically displays AM (actual month) for all transactions (except for Adjustments, which invokes the convention specifically defined for adjustments.) If you choose to have the convention included, the convention will be copied to all books. If you choose to have the convention excluded, the convention will not be copied to all books. You can override each book separately at the transaction level also. |
Action |
Select the financial transaction to be performed. Select an action and click the GO! button:
|
Use the Cost Information page (ASSET_COST_01A) to enter or adjust cost information that is required by the transaction that you initiated from the Main Transaction page.
Navigation:
Click the GO! button on the Main Transaction page.
This example illustrates the fields and controls on the Cost Information page. You can find definitions for the fields and controls later on this page.
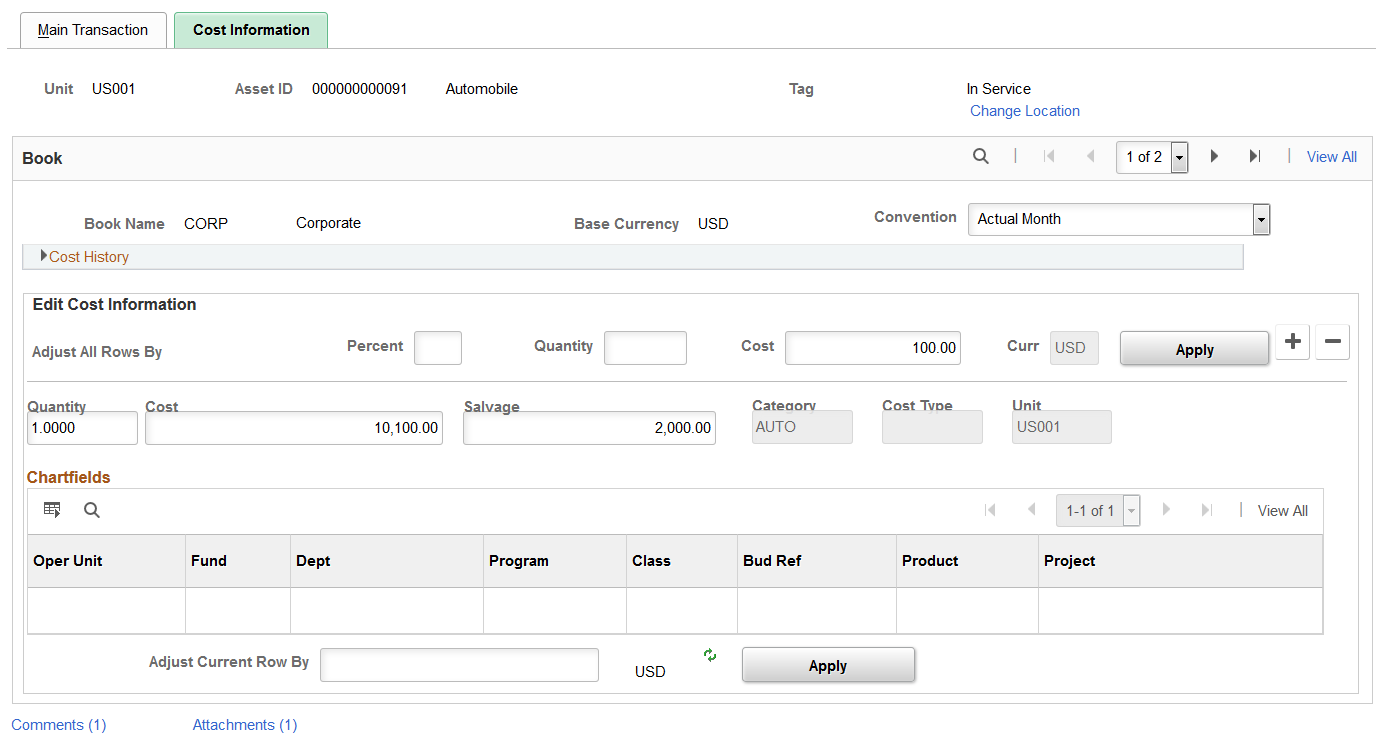
The Cost Information page displays different fields and value options depending upon the action that you select before clicking the GO! button: addition, adjustment, recategorization, revaluation, or transfer activities.
Note: If you want to perform multiple transactions, complete one transaction, and then save and reenter the page to begin the next transaction. Doing so preserves the audit trail for each transaction.
Note: Transaction currency appears by default from the asset book base currency. Each line can reflect a different transaction currency, depending on the transaction. Balances are displayed in the base currency after the transaction currency is converted to the base currency.
Field or Control |
Description |
|---|---|
|
Update Asset Profile |
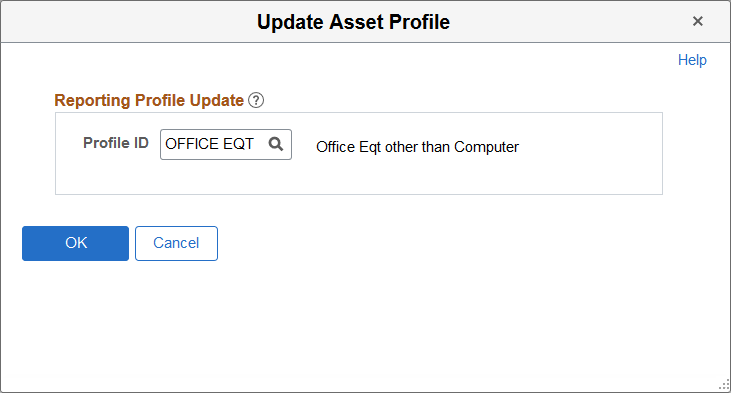
Click to access the Update Asset Profile Page and synchronize the reporting asset profile with the new asset category when you recategorize an asset. An update to the reporting asset profile ID alone does not change the asset book information or category. Profile updates after asset addition are for reporting purposes only. This field is only visible when you select Recategorize from the Action field on the Main Transaction page. See Updating Asset Reporting Profile After Asset Recategorization |
Change Location |
Click to change the asset's location. |
Convention |
Convention appears by default as Actual Month for all transactions, with the exception of Adjustments, which has its own convention. If you selected the Copy Changes to Other Books check box on the Main Transaction page and selected Exclude in the Include Convention check box, the convention will not be copied to all books. You need to override each book separately. |
Cost History |
Shows cost balance for the selected asset. You cannot update information here, but you can review cost rows and their associated ChartFields for an asset. |
This documentation discusses the remaining fields on the Cost Information Page in the context of the transaction being performed. Some fields are available only for certain transactions.
Note: If the asset transactions that you want to adjust are still pending (depreciation has not yet been run), you may, depending on the transaction type, be able to delete or change them.
Cost History
Expand this group box to view cost history information.
The information displayed includes ChartField information, Salvage Value, Category and Cost Type.
Edit Cost Information
Add new cost rows in the Edit Cost Informationgroup box.
Field or Control |
Description |
|---|---|
Cost, Percent, and Quantity |
Enter as necessary, and enter additions and adjustments for any appropriate ChartFields. |
Adjusting Total Cost or Quantity
You can adjust the total cost of an asset by either a percentage of its original cost or by a specific cost amount.
Field or Control |
Description |
|---|---|
Adjust All Rows By |
Enter the appropriate percentage or amount in the appropriate fields: Percent, Quantity, and Cost. The default is a positive adjustment. To make a negative adjustment, enter a negative percentage or amount. In a transaction, you can adjust the cost either by percent or cost, but not both. You can adjust the total quantity of an asset by entering the Quantity adjustment. The default is a positive adjustment. If you want to make a negative adjustment, you must enter a negative quantity. |
Apply |
Click to prorate the adjustment and add it to each cost row in cases of multi-ChartField asset. If the asset has one ChartField combination, the cost is added to the total cost. The system automatically calculates and displays the adjusted total cost. If the cost that is entered is in a different currency than the base currency of your book, the cost is converted to the base currency before the cost rows are adjusted. Note: Changes are applied only to the current book unless you select the Copy Changes to All Books check box on the Main Transaction page. If you select this option, your changes will be visible after you save the page and then restart it. Note: Currency for Adjust by Percent is the same as the base currency of the book. However, Currency for Adjust by Cost can be any valid value. |
Adjusting Cost or Quantity by Cost Row
Field or Control |
Description |
|---|---|
Cost and Quantity |
To adjust the cost or quantity for a particular cost row, enter the new field values directly into the cost row. You can adjust an asset's cost for individual cost rows by entering the new cost into the Cost field for each cost row that you'd like to change. To adjust the quantity for individual cost rows, enter the new quantity into the cost rows, not the number of units by which quantity will increase or decrease. For example, if the quantity should be adjusted from 1 to 2, enter 2. This changes only the quantity, not the cost. Note: To establish an audit trail, you should change cost information one field at a time. For example, if you need to change the department and adjust the cost, enter the new department and save your change, and then go back and adjust the cost. |
Apply |
Click to apply the adjustment to each cost row. The system automatically calculates and displays the adjusted total quantity. |
Adding and Viewing Comments
Click the Comments link to access the Cost Information - Comments page (AM_COMMENTS_SEC) and view or add relevant supporting comments to an asset transaction.
This example illustrates the fields and controls on the Cost Information - Comments page.
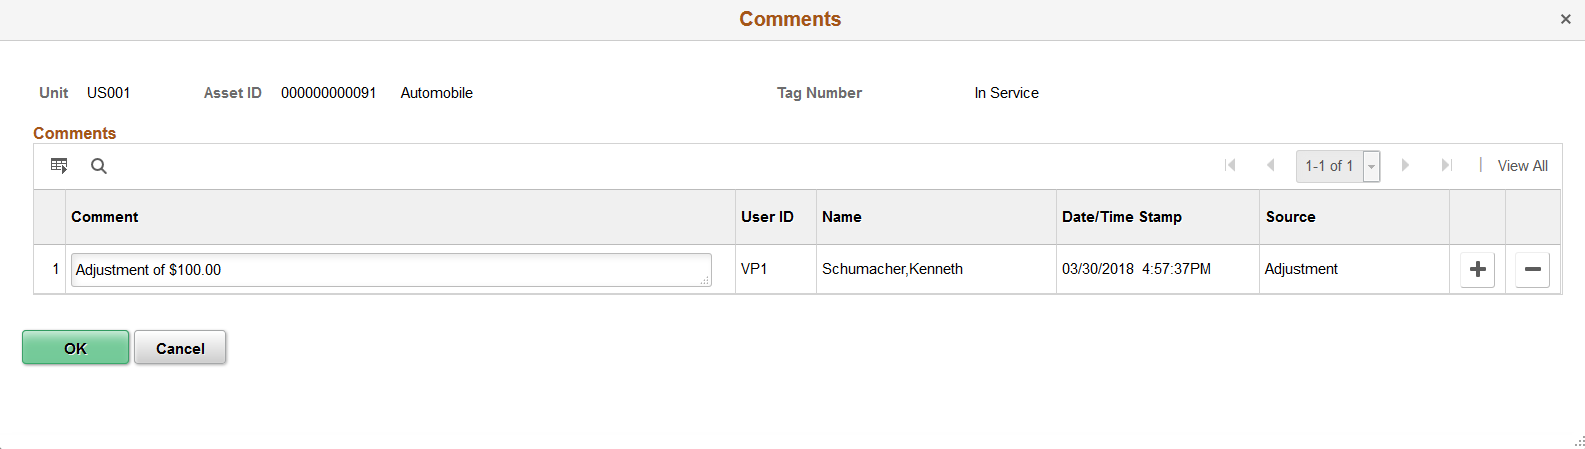
Field or Control |
Description |
|---|---|
Comment |
Enter comments for an asset. |
User ID, Name and Date/Time Stamp |
Displays the user ID, name, and date/time stamp related to the user who added the comment. |
Source |
Displays the transaction source for the asset, such as adjustment, transfer, and so forth. |
Adding and Viewing Attachments
Click the Attachments link to access the Cost Information - Attachments page (AM_ADD_ATTACH_SEC) and view or add relevant supporting documents to an asset transaction.
This example illustrates the fields and controls on the Cost Information - Attachments page.
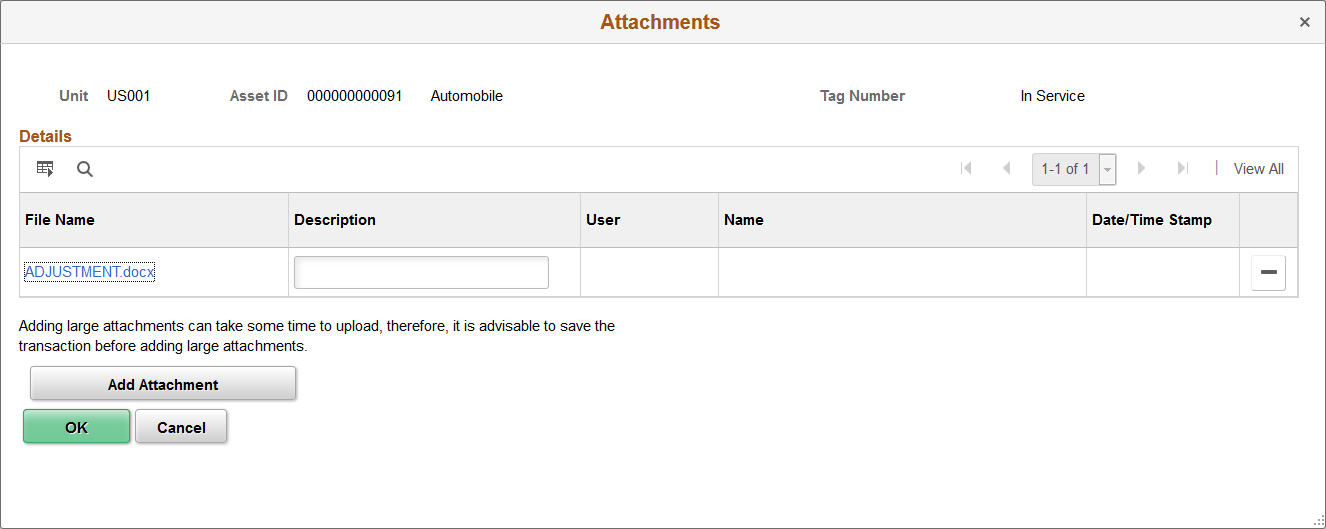
Field or Control |
Description |
|---|---|
Add Attachment |
Click this button to attach files as supporting documentation for an asset. Supply a description of the file or files that you attach. |
File Name |
Displays the attached file. Click the file-link to access the file. |
Description |
Displays a description of the file attachment when one was provided by the user. |
User, Name, and Date/Time Stamp |
Displays the user ID, name, and date/time stamp related to the user who added the attachment. |
Transferring Assets Within a Business Unit
Periodically, you need to transfer assets from one department, product, or project to another. In addition to physically relocating the assets, you may need to change some of the ChartField elements to correctly allocate asset cost and depreciation expense. You can perform full, partial, or retroactive transfers.
Note: This transaction describes transferring assets within a business unit.
See Transferring Parent-Child Assets to Other Business Units (Interunit Transfers) In Mass.
Full Transfers – Edit Cost Information
A full transfer requires you to transfer all units or the total cost of the asset.
Field or Control |
Description |
|---|---|
Oper Unit (operating unit), Dept (department), Program, Product, and Project (and any other delivered or customized Chartfield) |
Enter the new values into the appropriate fields. |
Partial Transfers – Edit Cost Information
Partial transfers are useful when you want to assign an asset's cost and depreciation to two or more sets of ChartFields. To partially transfer an asset, you need to perform a separate transfer for each set of ChartFields.
Field or Control |
Description |
|---|---|
Oper Unit (operating unit), Dept (department), Project, or Product (and any other delivered or customized Chartfield) |
For each transfer, select the appropriate ChartFields, and enter quantity and amount in the Edit Cost Information group box. For example, suppose department 43000 has two automobiles, worth a total of 60,000 JPY. You plan to transfer one car from department 43000 to 12000, and the other from department 43000 to 14000. Because the cost of the assets will eventually be allocated to two separate sets of ChartFields, you'll need to perform two separate transfers. Each transfer will move 30,000 JPY out of department 43000 and into departments 12000 and 14000. |
Retroactive Transfers
You may want to transfer assets retroactively if they were transferred during a prior accounting period, but are not yet entered in PeopleSoft Asset Management. To do this, enter the transaction and accounting dates on the Main Transaction page and enter the appropriate cost information in the Edit Cost Information group box. The system will create correcting entries that back out depreciation from the original department for the period between the transaction date and the accounting date. Prior period depreciation for that same period will be posted for the new department.
Recategorizing Assets – Edit Cost Information
You may want to recategorize assets either because you entered the incorrect category or cost type, or because you have created a new category or cost type and want to transfer existing assets to the new reclassification.
Field or Control |
Description |
|---|---|
Category and Cost Type |
Change the values as needed. Recategorizing an asset affects depreciation. |
Revaluing Assets
Revaluation as defined here is based upon the original cost of the asset without consideration of any prior impairment nor taking into account the fair value or net book value of the asset at the time of revaluation. For revaluation that includes these considerations, use the Revaluation Worksheet or the Revaluation en Masse process.
See:
Revaluing Assets Using the Revaluation Worksheet.Revaluing Assets En Masse.
Field or Control |
Description |
|---|---|
Cost Type |
To revalue assets, select an action of revaluation, which will change the cost type to R, and enter the appropriate percentage in the Adjust All Rows By Percent field. Click Apply. The system will create an adjustment cost line with cost type of R. Note: This action is only available if the revaluation process is enabled at the Installation Options and Business Unit/Book levels. The cost type that is used here depends upon the cost type for revaluation that is established at the Business Unit/Book level. The cost type, R, is the default value. |
Note: Entering changes to cost information and transacting transfers, recategorizations and revaluations affect prior calculated depreciation and accounting entries. You must run both depreciation and accounting entry processing when you make these changes.
Transferring Assets to Other Business Units (Interunit Transfers)
PeopleSoft Asset Management gives you full flexibility in performing Interunit transfers. You can fully or partially transfer assets from one business unit to another, or from one business unit to many others. You can do full or partial transfers by cost, quantity, or percentage.
Note: You can perform interunit transfers from group assets to other group assets, group assets to regular assets and from regular assets to group assets.
Note: You cannot perform interunit transfers on joint venture business units.
When you perform an interunit transfer of an ARO-enabled asset, you receive a warning that an ARO may have been recognized for this asset.
Interunit processing is performed through the PeopleSoft Centralized Inter/IntraUnit Processor. It provides consistent setup and centralized processing to manage Inter/Intraunit transactions.
The procedures for performing interunit transfers that are discussed in this section do not apply to parent-child assets. You do Interunit transfers for parent-child assets using the Parent-Child IU Transfer page ( AM_PARCHD_IU application engine program).
Note: To transfer parent and child assets among business units in this application engine, you must set up the appropriate InterUnit Transfer Definitions.
In the New Unit field, select the business unit to which you are transferring the asset. The New Asset ID field is populated by default as NEXT. You can change this value if necessary. Do not enter an existing asset ID unless you want to transfer costs between the two assets.
Select a profile ID that is valid for the new business unit to set up book reporting. Trans Code (transaction code) identifies which accounting entry template to use for this transaction. Only valid combinations for accounting entry templates that exist are accepted.
Click the InterUnit Transfer Options link to access the InterUnit Transfer Options page, where you can select the asset information that you want transferred with the asset.
Click Transfer From/To Books link to access the Transfer From/To Books page where you specify the way in which cost information is passed between business unit books. This link displays after supplying the value in the New Unit field.
Select the Remaining Life check box to depreciate the transferred (ADD) asset through its remaining life. This check box is deselected by default, which allows the transferred (ADD) asset to calculate depreciation over its full useful life. The full useful life depends upon the selection of the Use Profile check box. If deselected, the useful life is derived from the source asset. If the Use Profile check box is selected, the useful life is derived from the target unit profile.
Use the fields in the Edit Cost Information group box to specify the cost and quantity to be transferred.
Select the Use Profile option to get profile attributes when New Profile ID has been enabled. If it is not enabled, the profile attributes are derived from the "from" or original asset profile. When using the capitalization threshold feature, the Use Profile option establishes which threshold is used for the new asset. If this check box is deselected, the system uses the anchor profile threshold. If the check box is selected, the system uses the threshold defined in the target profile.
Note: You can run the capitalization threshold validation in the new business unit if you want to validate the status again.
See Capitalization Thresholds Page.
Click Proceeds to open the InterUnit Proceeds page, where you can specify a markup value to be applied to the transferred assets in the receiving business unit. This feature is often used in European countries.
You can perform full interunit transfers from one business unit to another, or from one business unit to many others. You can also perform a partial interunit transfer in which the original business unit retains a portion of the asset but transfers part of it to another business unit.
Note: When performing a partial interunit transfer when multiple ChartField combinations within the same book are involved, you must delete the entry or entries in the page for the ChartField combination that you do not want to transfer. Additionally, it is recommended that if you want to do a partial transfer to more than one business unit, you should do them separately.
Full Interunit Transfers from One Business Unit to Another
Full interunit transfers from one business unit to another are the simplest transfers to perform. After you have completed the information in the Enter New Unit group box and its pages and saved the Cost Information page, all cost rows are transferred to the new business unit.
Full Interunit Transfers from One to Many Business Units
You can transfer to as many business units as existing cost rows. To do this, enter one of the receiving business units in the New Unit field in the Enter New Unit group box. Complete the rest of the Interunit transfer information. Review each cost row in the Edit Cost Information group box. All cost rows will show the new business unit that you entered in the New Unit field. Change the business unit for each cost row as appropriate. In this way, you can transfer all cost rows for an asset to multiple business units.
Note: Transaction currency is supplied by default from the base currency of the book. Each line can reflect a different transaction currency depending on the transaction. Balances are displayed in the base currency after the transaction currency is converted to the base currency. The system allows interunit transfers across business units with different base currencies when using the TRANSFER action.
Partial Interunit Transfers
You can transfer part of an asset to a different business unit and enable the original business unit to retain a portion of it. To do this, enter the receiving business unit in the New Unit field in the Enter New Unit group box. Complete the rest of the Interunit transfer information. Review each cost row in the Edit Cost Information group box. All cost rows will show the new business unit that you entered in the New Unit field. To retain partial ownership of the asset with the original business unit, delete the entry or entries with the ChartField combination for which you do not want to transfer.
Accumulated Depreciation Adjustment for Group Assets
PeopleSoft estimates the NBV for Group Members when they are being transferred to a new business unit or being recategorized. This estimation of the accumulated depreciation amount is calculated in the Group Asset Depreciation Calculation process. You can, however, override the estimated calculation by clicking the Accum Depr button and supply your own accumulated depreciation value. When you select a member asset for Fixed Price MarkUp, InterUnit Transfer, Recategorize, or Transfer, the Accum Depr button appears on the Cost/Information page. When you click the button, you are prompted to enter the accumulated depreciation value.
Use the Asset Cost IU Book Transfer page (ASSET_COST_02_S1) to specify how cost information for the transfer will be passed between business books.
This link appears when you have selected InterUnit Transfer as the action on the Main Transaction page and when you have entered the business unit to transfer to.
Navigation:
Click the Transfer To/From Books link on the Cost Information page.
The transactions that are generated to pass book information for Interunit transfers differ depending on how many To books a From book is passing information to, and whether it is passing the information using a Transfer Book action or an Add Book action.
Note: Assets that you transfer to new business units using the Add Book action will have a cost row of zero on the new business unit until you run the Depreciation Calculation application engine program (AM_DEPR_CALC). Running this program updates the asset's cost row with its net book value from the From book.
Using a From Book Once
When you use a From book once only, an Add Book action generates a retirement for the From book and an add to the To book. A Transfer Book action generates a Transfer Out for the From book and a Transfer In for the To book.
The asset that is retired receives an asset status of Disposed on the From book.
These tables show that assets that you transfer between books using the action Transfer Book receive a status of Transferred.
|
From Book |
From Trans |
To Book |
To Trans |
Action |
|---|---|---|---|---|
|
CORPORATE |
Transfer Out |
CORPORATE |
Transfer In |
Transfer Book |
|
FEDERAL |
Transfer Out |
FEDERAL |
Transfer In |
Transfer Book |
|
From Book |
From Trans |
To Book |
To Trans |
Action |
|---|---|---|---|---|
|
CORPORATE |
Transfer Out |
CORPORATE |
Transfer In |
Transfer Book |
|
FEDERAL |
Retire |
FEDERAL |
Add |
Add Book |
|
From Book |
From Trans |
To Book |
To Trans |
Action |
|---|---|---|---|---|
|
CORPORATE |
Retire |
CORPORATE |
Add |
Add Book |
|
FEDERAL |
Retire |
FEDERAL |
Add |
Add Book |
Using a From Book for Two or More Transfers
When you use a From book for two or more Transfer Book actions, only one Transfer Out transaction is generated. Because this takes care of the cost on the From book, no additional Transfer Out transactions are generated for that book.
This table shows that assets that you transfer between books using the Transfer Book action receive a status of Transferred.
|
From Book |
From Trans |
To Book |
To Trans |
Action |
|---|---|---|---|---|
|
CORPORATE |
Transfer Out |
CORPORATE |
Transfer In |
Transfer Book |
|
CORPORATE |
LOCAL |
Transfer In |
Transfer Book |
Using a From Book for Both Transfer and Add
When you use a From book for both a Transfer Book and an Add Book, a Transfer Out transaction is generated for the Transfer Book. Because this takes care of the cost on the From book, the Add Book does not generate a retirement for that book.
This tables shows that assets that you transfer between books using the Transfer Book action receive a status of Transferred.
|
From Book |
From Trans |
To Book |
To Trans |
Action |
|---|---|---|---|---|
|
CORPORATE |
Transfer Out |
CORPORATE |
Transfer In |
Transfer Book |
|
CORPORATE |
LOCAL |
Add |
Add Book |
Using a From Book for Two or More Adds
When a From book is used for two or more Add Book actions, a retirement is generated for the first Add Book action. Because this takes care of the cost on the From book, no further retirements are generated for it.
This table shows that the asset that was retired receives a status of Disposed on the From book.
|
From Book |
From Trans |
To Book |
To Trans |
Action |
|---|---|---|---|---|
|
CORPORATE |
Retire |
CORPORATE |
Add |
Add Book |
|
CORPORATE |
LOCAL |
Add |
Add Book |
Retiring a Book
When an asset is transferred from a business unit with two books to a business unit with more than two books, the asset pulls the additional book's mapping from the Interunit Business Unit/Book Definition page and profile.
For example, if you do a transfer from CAN01 (two books - ASSET-CAD/ASSET-USD) to US001, the mapping might be like this:
ASSETS-CAD ------> CORP
ASSETS-USD ------> FEDERAL
ASSETS-USD ------> ACE
ASSETS-USD -------> AMT
Some of the information such as life for the new business unit and book comes from the profile. The transfer amounts and so on are calculated from the FROM business unit or book, as previously outlined.
Note: When you transfer from a business unit with three books to a business unit with two books, the cost information on the extra From Book is automatically retired. You do not need to enter an action.
This table shows that assets that are retired receive a status of Disposed.
|
From Book |
From Trans |
To Book |
To Trans |
Action |
|---|---|---|---|---|
|
CORPORATE |
Transfer Out |
CORPORATE |
Transfer In |
Transfer Book |
|
LOCAL |
Transfer Out |
LOCAL |
Transfer In |
Transfer Book |
|
FEDERAL |
Retire |
|
|
|
Use the InterUnit Proceeds page (N/A) to apply a markup or markdown to the asset that you are transferring.
Navigation:
Click the Proceeds button on the Cost Information Page. This button appears on the page only when you select Fixed Price Mark Up as the action on the Main Transaction page.
You can transfer an asset from one business unit to another and have the receiving business unit receive the assets at a marked up cost by specifying either a fixed markup cost or a fixed markup percentage. To do so, enter the net markup price in Interunit Proceeds or the net markup percentage in Mark Up/Down Percent. The default is a positive adjustment. If you want to decrease the price or percentage, you must enter a negative amount. Enter the number of assets in Transfer Quantity.
Note: If you were to enter both an Interunit proceeds (Price) and a Mark Up/Down percent, the percent overrides the price.
You can complete a partial transfer and a fixed price markup or markdown by using a two-step method. For example, you may want to do a partial transfer of four computers out of a total quantity of ten computers and mark up the price as well. The first step is to perform an Interunit transfer for six computers. Complete this transaction, and then do a fixed price markup on the remaining four computers, and transfer them to the new business unit.
PeopleSoft Asset Management processes markups in the following ways:
The markup percentage of the asset is specified on the cost of the asset.
The cost of the asset is marked up or down for all the ChartFields in proportion to the original cost distribution of the asset.
You can have the markup affect one or all of the asset's books during the transfer.
The Keep All Books in Sync option for the acquiring business unit controls whether the markup is done on one book or all the asset's books.
The book information for the asset in the acquiring business unit comes from the asset profile that is specified at the time of the sale (on the Cost Information page).
This includes the depreciation method and convention, asset life, and so on.
The selling business unit manages the markup price as proceeds.
Accumulated depreciation is not passed on to the new business unit.
Use the Child Assets page (CHILD_ASSETS) to select child assets to include in the transfer or recategorization that you have initiated against the parent assets.
Navigation:
The Child Assets page appears for child assets when you select the Transfer or the Recategorize actions on the Main Transaction page.
This example illustrates the fields and controls on the Child Assets page. You can find definitions for the fields and controls later on this page.

Note: Parent assets that are created on the Parent Asset page (parent-only assets) do not have cost or basic information. They cannot be viewed in the Parent-Child Basic Information component, nor can they be viewed or transacted against in the Asset Cost/Adjust Transfers component; the Asset Retirements component; or the Parent-Child NBV component. If you want to use a parent asset as a reporting umbrella only and access these pages to manipulate child assets in mass, you should create a zero cost parent asset instead of a parent only asset. Also, to transact against parent and child assets at once, parent and child must share the same asset profile.
Field or Control |
Description |
|---|---|
Select All |
Click Select All to include all child assets with the parent in the transaction that you have initiated. To include some child assets, select the Selected check box on the specific rows. |
Include Parent Asset |
Select to include the parent asset in this transaction. |
Advanced Txn Details (advanced transaction details) |
Click this link to access the Parent Asset Adv Txn options page. Specify transaction overrides for all child assets at once. For example, you would use this page to specify that only 50 percent of the cost of all child assets be transferred between departments, while the parent asset is fully transferred. Select to apply as full transaction, actual percentage, or transaction amount. |
Note: Only child assets available for transfer based on the specified accounting date can be selected. The system compares the last accounting dates for the child assets as specified on the Book table with the accounting date of the current transaction to make this determination.
Use the Child Asset TRF/RCT Overrides page (AM_PARCHD_TRF_RCT) to specify transaction overrides for a specific child asset.
You can specify specific convention, quantity, cost, transaction percentage, transaction date and accounting date for the child asset on this page.
Navigation:
Click Child Details on the Asset Cost/Adjust Transfer Child Assets page.
This example illustrates the fields and controls on the Child Asset TRF/RCT Overrides page. You can find definitions for the fields and controls later on this page.
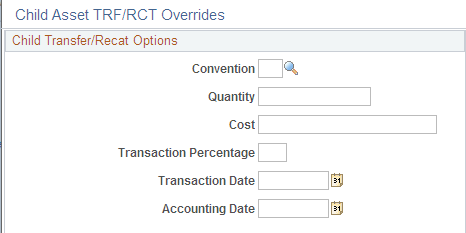
Field or Control |
Description |
|---|---|
Convention |
Select a depreciation convention. |
Quantity or Cost |
Enter the quantity or cost to use in this transaction for the child asset. For example, if you were transferring all costs for the parent from one department to another, but wanted to transfer only 500 USD for the child asset, you would enter 500 in Cost. |
Transaction Percentage |
You can specify a percentage of the child asset's cost to include by entering it in the Transaction Percentage field. |
Transaction Date and Accounting Date |
Enter a transaction date or an accounting date if you want it to differ from the dates that you entered for the parent's transaction. |
Use the Parent Asset Adv Txn options page (FULL_PART_SEC ) to specify transaction overrides for all child assets at once.
Navigation:
Click the Advanced Txn Details link on the Asset Cost/Adjust Transfer Child Assets page.
Select one of these options:
Field or Control |
Description |
|---|---|
Full Transaction |
Applies the full transaction to all child assets. Select this check box when you are partially transferring the parent asset, for example, but want to fully transfer all associated child assets. |
Actual Percentage |
Enter the percentage of the costs of the child assets to apply to this transaction. For example, if you enter 50 percent, then 50 percent of the costs of all child assets will be included in the transaction even though a different percentage has been specified for the parent asset. |
Transaction Amount |
Enter a specific amount of the costs of the child assets to apply to this transaction. For example, if you enter 250, USD 250 of the costs of each child asset will be included in the transaction. |
Use the Update Asset Profile page (ASSET_PROFILE_SEC) to enter a new asset reporting profile ID when you recategorize an asset.
Update Asset Profile page