 Understanding Time in PeopleSoft Services Procurement
This chapter lists prerequisites and discusses how to:
Create timesheets.
Manage timesheets.
Approve timesheets.
Manage timesheet worklists.
Understanding Time in PeopleSoft Services Procurement
The service provider uses the timesheet to record and submit time to an approver for immediate, online approval. The service provider can also track daily activities and report issues. The timesheet approver can provide feedback to the service provider, including performance-rating information through the approval process.
When the service provider logs time against a work order, the time template determines the time reporting codes for that work order. There could be different rules for applicable pay types. For instance, you may pay the pay rate, fixed cost and markups for the first eight hours but only pay the pay rate and fixed costs after eight hours. When creating invoices against tav_pathimesheets, the invoicing process considers the rates defined on the work order and the pay types and multipliers associated with the time reporting code to determine the rate for the supplier.
The timesheet provides the following capabilities:
Records the number of hours worked on a project as hours per day or as start and stop times, and submits it to the time approver for approval.
Records specific activities and tracks progress on a project.
Records and reports project-related problems or issues to the time approver.
Summarizes all the information entered to create a comprehensive time report.
Records performance information regarding a service provider's performance on a project.
You use the Manage Timesheets page as the focal point for all time activity in PeopleSoft Services Procurement. Use this page to:
Create, edit, submit, or view timesheets. (supplier service provider).
View, adjust, or approve timesheets. (timesheet approver).
Filter reports by selecting the criteria in the timesheet status, service provider, or date fields.
Access pages used to modify time details.
The timesheet approval process begins when the service provider submits his or her time, along with any project issues, to the designated timesheet approver for review and approval. Any rejected timesheets are returned to the service provider for correction. Submitted timesheets are eligible for adjustment prior to approval. Approved timesheets are eligible for adjustment upon invoicing.
The following diagram illustrates the timesheet approval process:
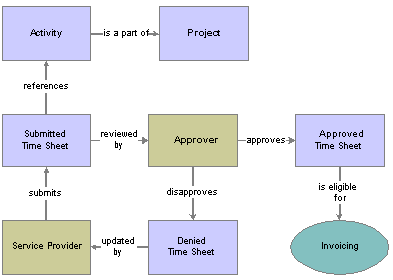
Timesheet Approval Process
There are three ways to approve a timesheet:
Mass approval of multiple timesheets.
Mass line approval for multiple lines.
Line-by-line approval.
 Prerequisites
These attributes must be set up before entering time and expense information:
Services project business units.
Services project types.
Services templates.
Expense business purposes.
Expense distance rates.
Email messaging.
Preferred merchants.
Expense types.
Payment types.
Expense locations.
Time reporting codes.
A work order must also be defined before time or expense transactions can be logged against it. The work order must be resource-based services (versus deliverables-based for progress logs), and it must be in a released status.
See Also
Creating TimesheetsThis section discusses how to:
Enter time worked by week.
Enter time worked by calendar and 24–hour clock.
Submitting timesheets for approval.
Pages Used to Create Timesheets|
Page Name |
Object Name |
Navigation |
Usage |
|
SPA_MANAGE_TE |
Services Procurement, Maintain Timesheets (external) |
View, search, and sort the list of expense sheets. Access the timesheet that you want to modify. To add a new timesheet, select a reporting period end date, business unit, and work order. Click the Add button. |
|
|
Enter Time |
SPA_TIME_ENTRY |
Click a linked time report to view an existing timesheet. Click the Create button to enter time on the timesheet. |
Enter time worked. |
|
Timesheet Details |
SPA_TIME_DETAILS |
Click the Timesheet Details button on the Enter Time page. |
View timesheet details. |
|
Review Timesheet |
SPA_TIME_SUBMIT |
Click the View Summary button on the Enter Time page. |
review the timesheet summary. |
|
SPA_TIME_ATTACH |
Click the Add Attachment link on the Enter Time page. |
Add, delete, or view an attachment for the timesheet. Note. You can add more than one attachment for each timesheet. Click the plus sign to include more attachments for the timesheet. |
See Also
Entering Time Worked by WeekAccess the Enter Time page.
The format of the time entry page is determined by the time template specified on the work order. In this example, the time template makes it possible to enter time on a weekly basis.
|
Work Order ID |
Select the work order to which the time is being charged. The list of work orders available include those that belong to the business unit entered in the Add Dialog and that use the same template as the work order that was entered in the Add Dialog. |
|
Hours |
Displays the total number of hours worked for that week. |
|
Save Timesheet |
Select to save the timesheet. When you save the timesheet, the timesheet appears in the Active Timesheet group box on the Manage Timesheets page. |
|
Review and Submit |
Select to review and submit the timesheet to the timesheet approver. |
See Also
Entering Time Worked by Calendar and 24–Hour Clock
Access the Enter Time page.
The format of the time entry page is determined by the time template specified on the work order. In this example, the time template enables you to enter time using a 24–hour clock. This method of reporting time enables users to record time on a day-by-day basis, with both start and end times. For example, a user can enter time for a day with a start time of 8:00 a.m., a lunch break from 12:00 noon until 1:00 p.m., and an end time of 5:00 p.m.
Submitting Timesheets for ApprovalTo submit timesheets for approval:
Access the Enter Time page.
Click Submit for Approval.
Click OK on the Submit Confirmation page.
Warning! After you submit the timesheet for approval, you cannot go back and add time for the same time period, project, and activity combination using the same work order.
Managing TimesheetsThis section discusses how to manage timesheets.
Pages Used to Manage Timesheets|
Page Name |
Object Name |
Navigation |
Usage |
|
SPA_MANAGE_TE |
Services Procurement, Maintain Timesheets (external) |
View, search, and sort the list of expense sheets. Access the timesheet that you want to modify. To add a new timesheet, select a reporting period end date, business unit, and work order. Click the Add button. |
|
|
Enter Time |
SPA_TIME_ENTRY |
Click a linked time report to view an existing timesheet. Click the Create button to enter time on the timesheet. |
Enter time worked. |
|
Timesheet Details |
SPA_TIME_DETAILS |
Click the Timesheet Details button on the Enter Time page. |
View timesheet details. |
|
Review Timesheet |
SPA_TIME_SUBMIT |
Click the View Summary button on the Enter Time page. |
review the timesheet summary. |
|
SPA_TIME_ATTACH |
Click the Add Attachment link on the Enter Time page. |
Add, delete, or view an attachment for the timesheet. Note. You can add more than one attachment for each timesheet. Click the plus sign to include more attachments for the timesheet. |
Managing Time and Expense SheetsAccess the Manage Timesheets page.
Create New Timesheet
The Create New Timesheet grid groups together a unique combination of work orders for a given work order time template.
|
Date Range |
Date specified for timesheet entry. Note. This value always defaults to the next available timesheet. However, if there is no timesheet specified, the date defaults to the first day of the week. |
Active Timesheet
This section is used to display timesheets that are in an active status. Theses timesheets can include timesheets that were created but never submitted, or timesheets that were denied and require re-submission.
To modify a timesheet, click the link that corresponds with the active timesheet,
Timesheet History
This section is used to search and view past timesheets.
Approving TimesheetsThis section discusses how to:
Approve or deny timesheets.
Establish proxy time entry.
Note. Before you can approve timesheets, you must have a role action of SP_TIME_APPROVER.
See Also
Setting Up Roles for Role Actions
Pages Used to Manage Timesheets|
Page Name |
Object Name |
Navigation |
Usage |
|
Worklist |
WORKLIST |
Worklist, Worklist |
View timesheets that require your approval. |
|
Approve Timesheet |
SPA_TIME_APPROVE |
Select timesheets that require your approval form the Worklist page. |
Approve timesheets. |
|
Enter Time |
SPA_TIME_ENTRY |
Click the View/Adjust Timesheet button on the approve Timesheet page. |
View a list of adjustments entered for the timesheet. |
|
Timesheet Details |
SPA_TIME_DETAILS |
Click the Timesheet Details button on the Enter Time page. |
View the details for the timesheet. |
|
Review Timesheet |
SPA_TIME_SUBMIT |
Click the View Summary button on the Enter Time page. |
View summary information for adjusted sheets. |
Approving and Denying Timesheets
Access the Approve Timesheets page.
Amount Details
Use this section to view a graphical presentation of timesheet amounts, including logged, available, timesheet, and remaining amounts.
Time Line Approvals
Use this section to approve or deny timesheet lines.
|
Action |
Select an option to approve or deny the timesheet. Values include: Approve: Changes status to Approved. The timesheet is now available for invoicing. Deny: Changes status to Denied by Approver. If you deny the timeline, enter a comment to indicate a reason. The timeline returns to the service provider for modifications and re-submission. |
|
|
Click to access the Timesheets Details page, where you can view the details of the timesheet and select the rating for the work that the service provider performed for this time line. |
|
Mark All |
Select to mass approve or deny timesheets. |
|
View/Adjust Timesheet |
Click to access the Enter Time page, where you can make adjustments to the timesheet. |
Establishing Proxy Time Entry
Service Provider Contacts can create time sheets for service providers within the supplier office location.
If an approver denies a time sheet, the service provider and provider contacts in the supplier office location receive a worklist notification indicating that the timesheet is denied. If the time sheet is approved, the service provider and the provider contacts in the supplier office location receive an email notification indicating that the time sheet is approved.
When a service provider contact resubmits the time sheet, the denied worklist entry is removed from all other provider contacts within the same supplier office location.
Manage Timesheet WorklistsThis section discusses how to trigger worklist and email notifications.
Triggering Worklist and Email NotificationsThe following status changes trigger a worklist entry and an email notification:
The service provider receives a worklist entry and an email notification if the timesheet status changes to Approve or Deny.
The approver receives a worklist entry and an email notification when a timesheet is submitted.
The user can either access the timesheet using the email link shown below or by navigating using the worklist.
The email notification contains values from the Enter Time page and a URL that the recipient should use to access the timesheet.